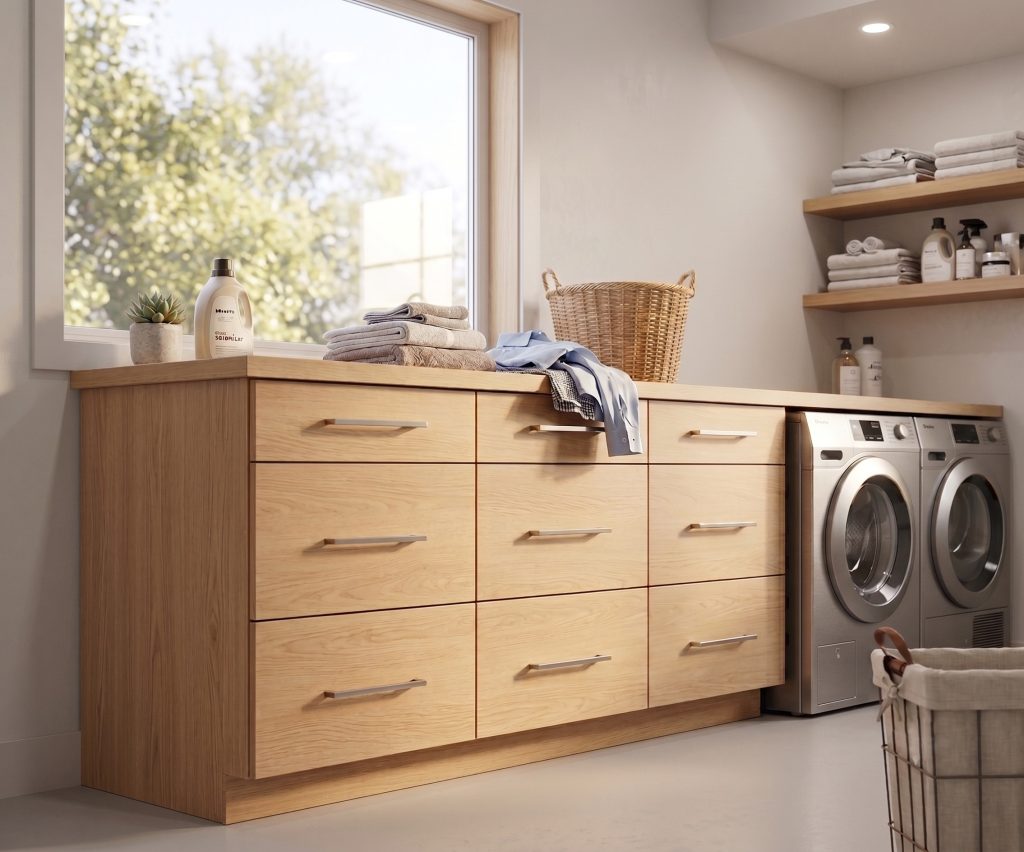
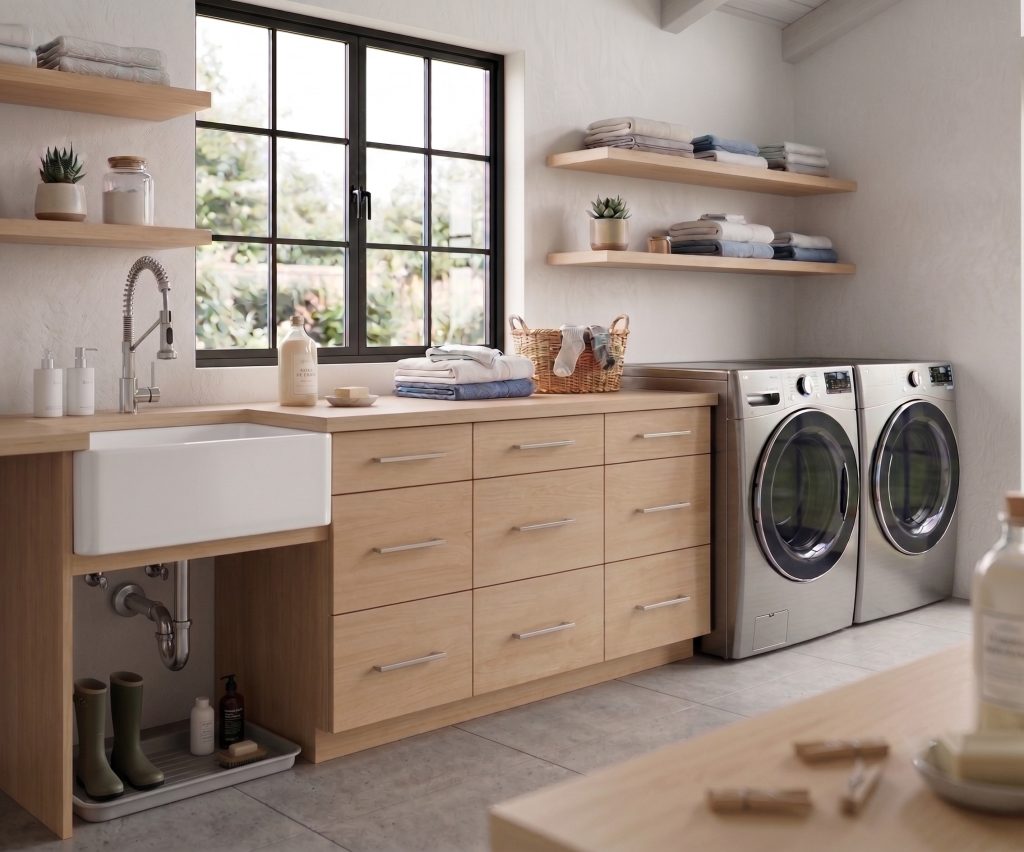
Building your own cabinets is one of the best ways to save money, maximize storage space, and create a custom solution that fits your home perfectly. Whether you’re remodeling a kitchen, upgrading a workshop, or building cabinets for a laundry room, learning how to build a cabinet from scratch gives you complete control over the design, materials, and final appearance.
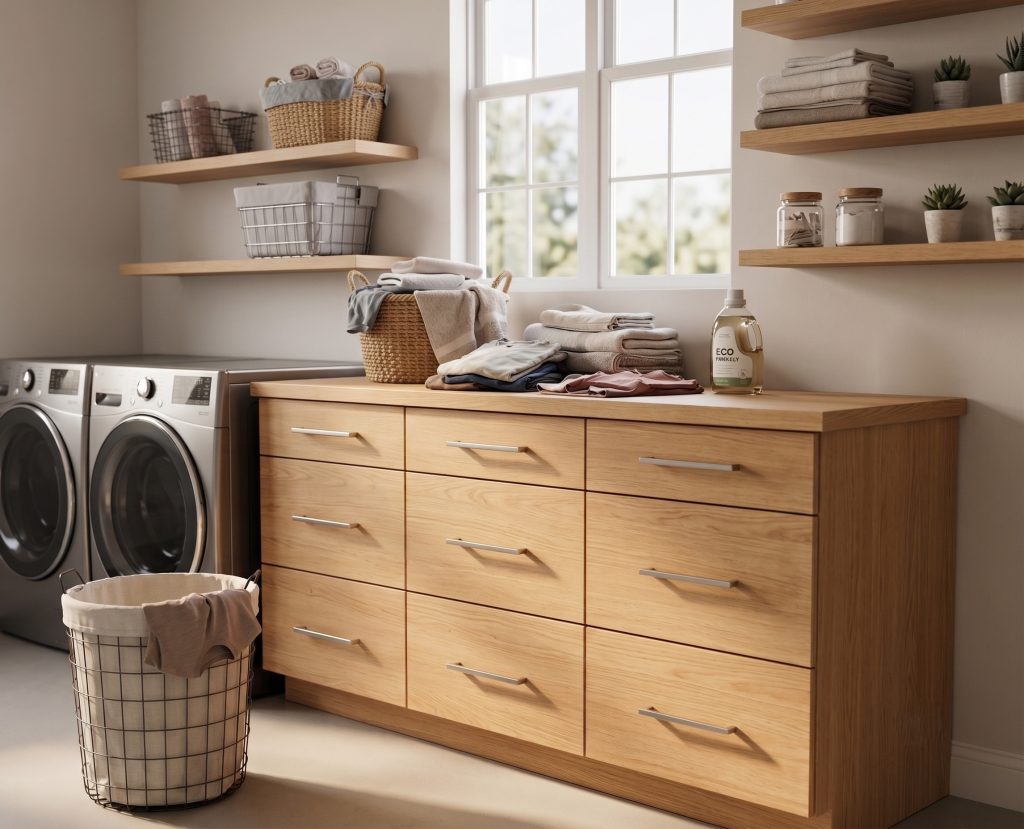
In this DIY woodworking project, I’ll show you how to build a durable frameless base cabinet using 3/4-inch plywood and simple pocket-hole joinery. This cabinet features three spacious drawers, a clean modern design, and a sturdy construction method that can be adapted to fit a wide range of cabinet sizes and applications. The project is designed to be straightforward enough for beginners while still providing professional results that experienced woodworkers will appreciate.
Download the Printable PDF Plans
Before getting started, be sure to download the printable PDF woodworking plans. The plans include detailed dimensions, a complete cut list, material requirements, and step-by-step illustrations that make the cabinet construction process much easier to follow. Having the plans available in your workshop can save time, reduce mistakes, and help keep the project organized from start to finish.

What You’ll Learn in This Cabinet Building Tutorial
Throughout this cabinet building tutorial, you’ll learn how to:
- Cut and prepare cabinet-grade plywood components
- Build a strong frameless cabinet box
- Assemble and install drawer boxes
- Install drawer slides for smooth operation
- Fit and align drawer fronts correctly
- Apply a professional-quality painted finish
- Complete the cabinet with hardware and a finished countertop
If you’re looking for DIY cabinet plans, woodworking project plans, or a step-by-step guide to cabinet construction, this tutorial will walk you through the entire process with clear instructions and detailed illustrations.
Let’s get started and build a custom base cabinet that is strong, functional, and built to last.
Related Cabinet Plans
If you’re building a full set of cabinets, these other plans may help:
- Frameless Garage Base Cabinet with Drawers and Double Doors, Slab Style
- Frameless Kitchen Base Cabinet with Drawers and Double Doors, Shaker Style
| Time to Complete | Total Cost | Skill Level |
| 8 hours | $160 | Beginner to Intermediate |
Download Printable Plans in PDF


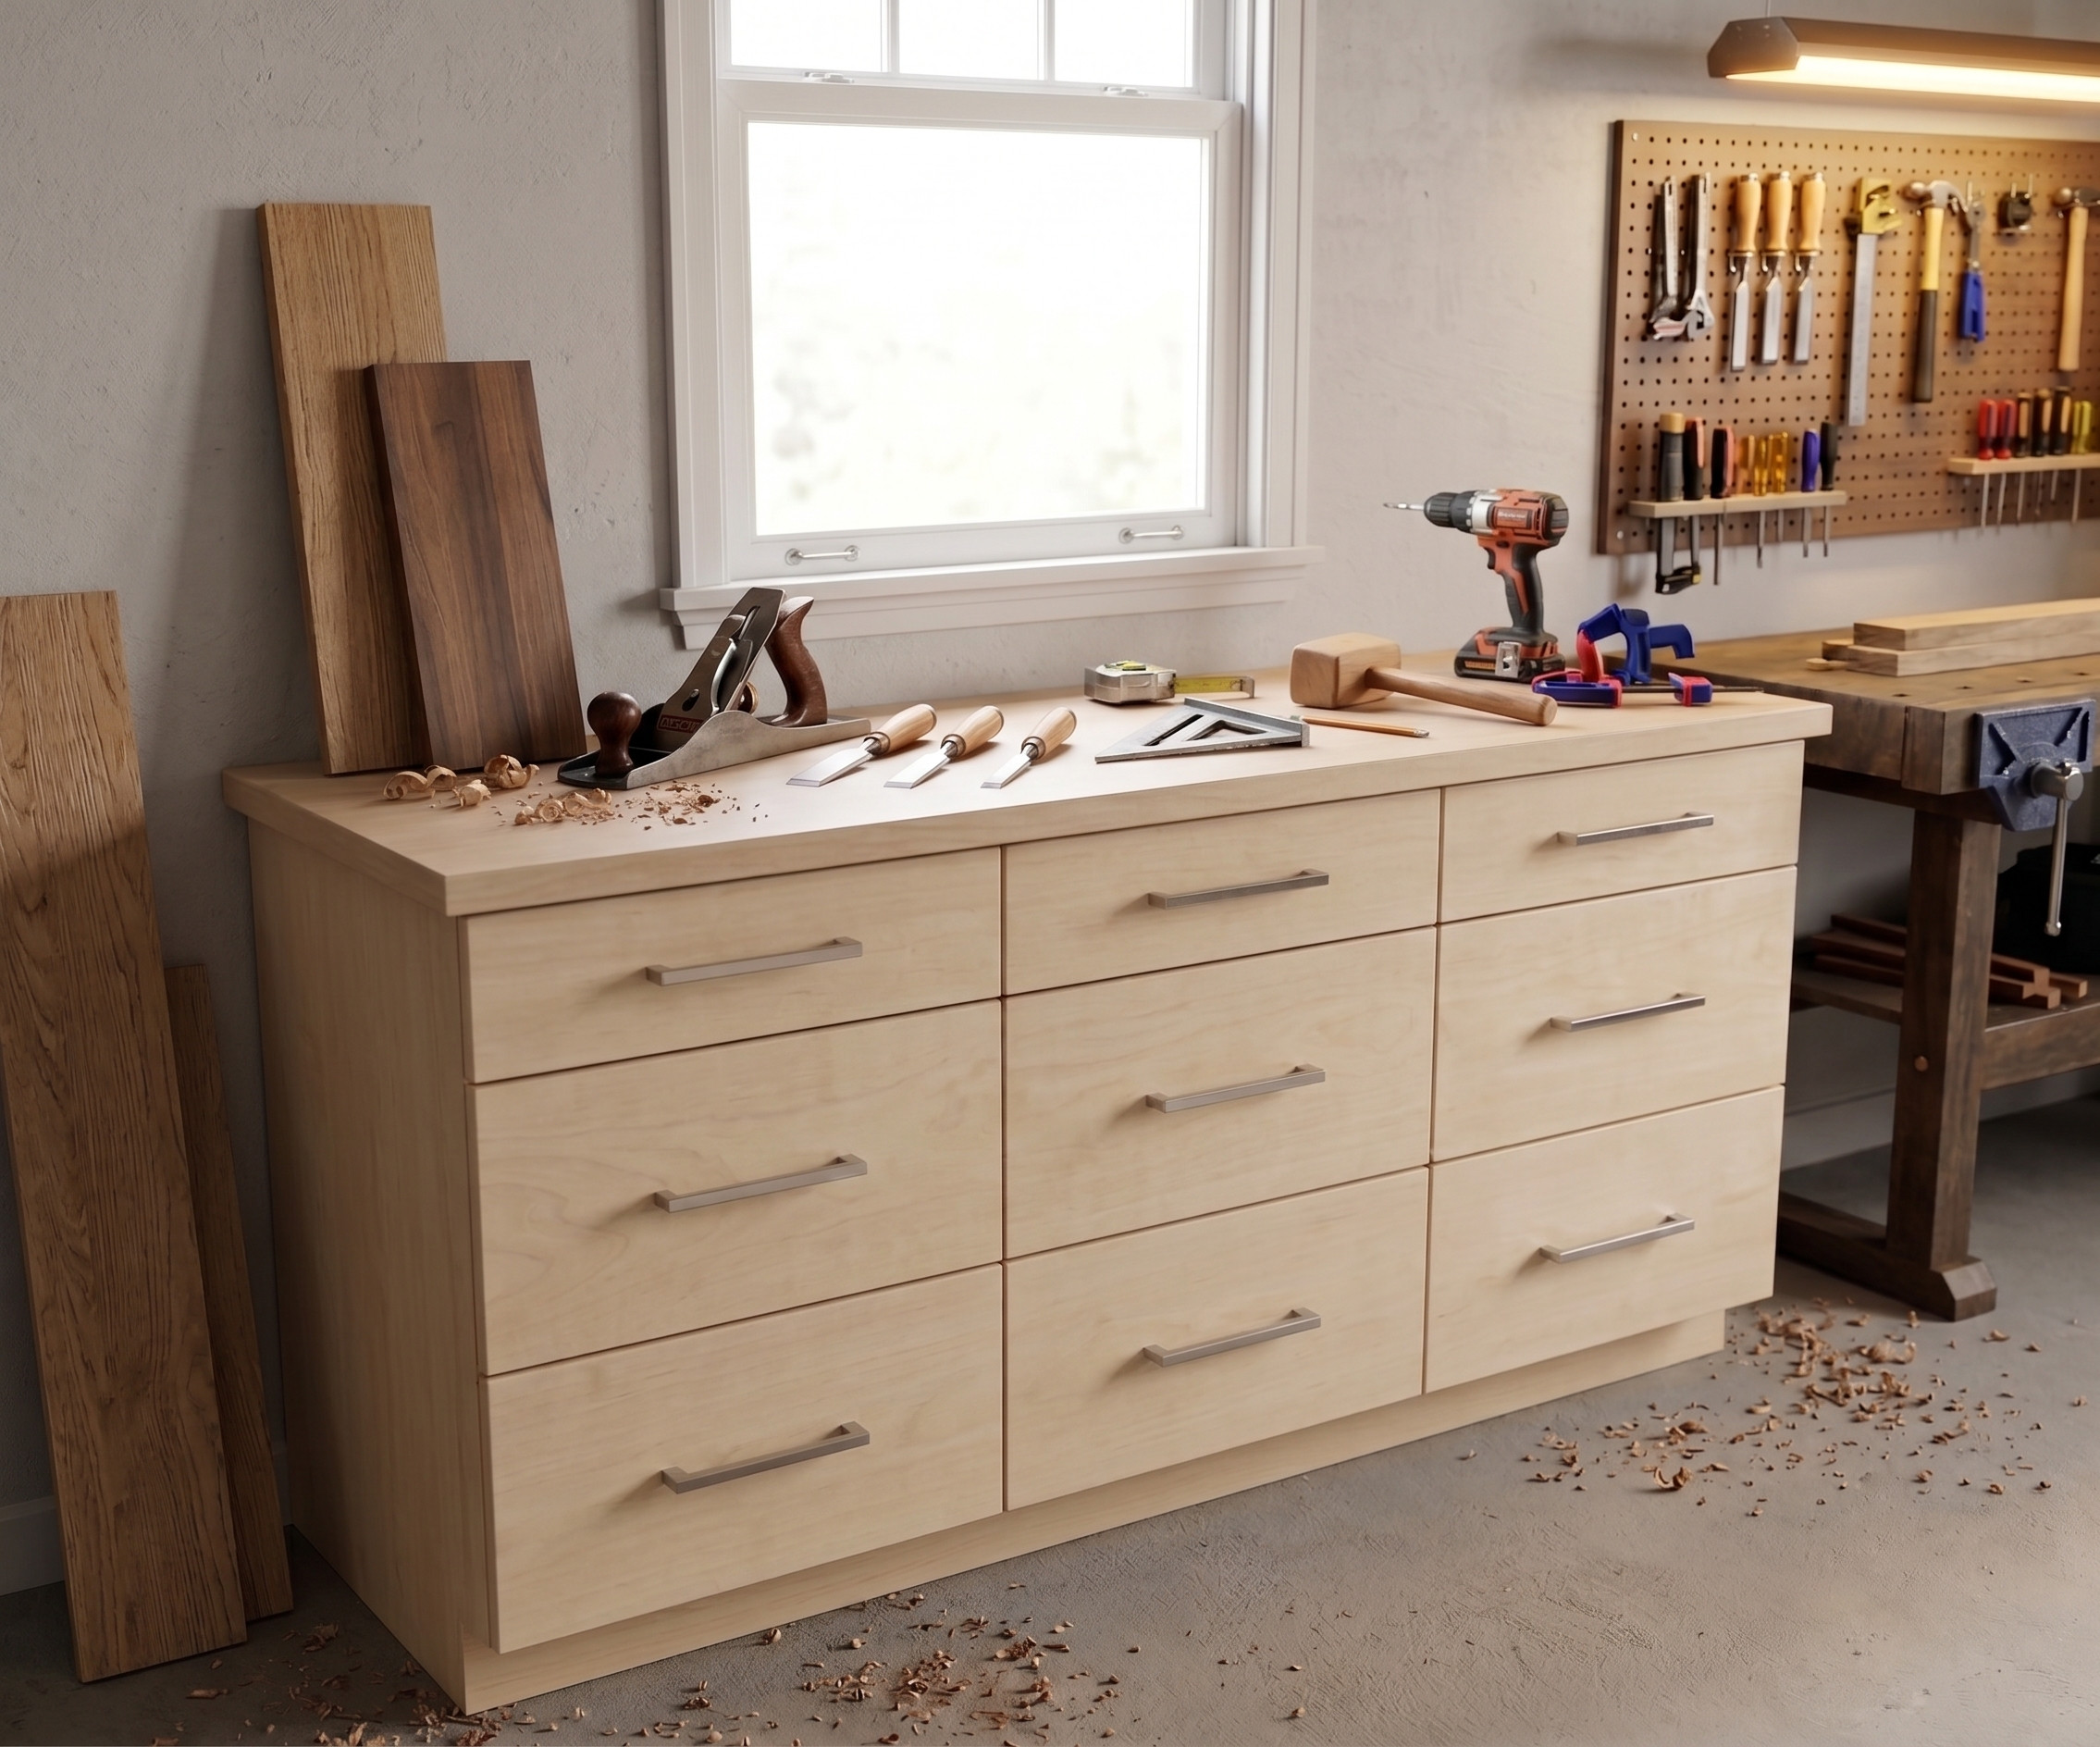
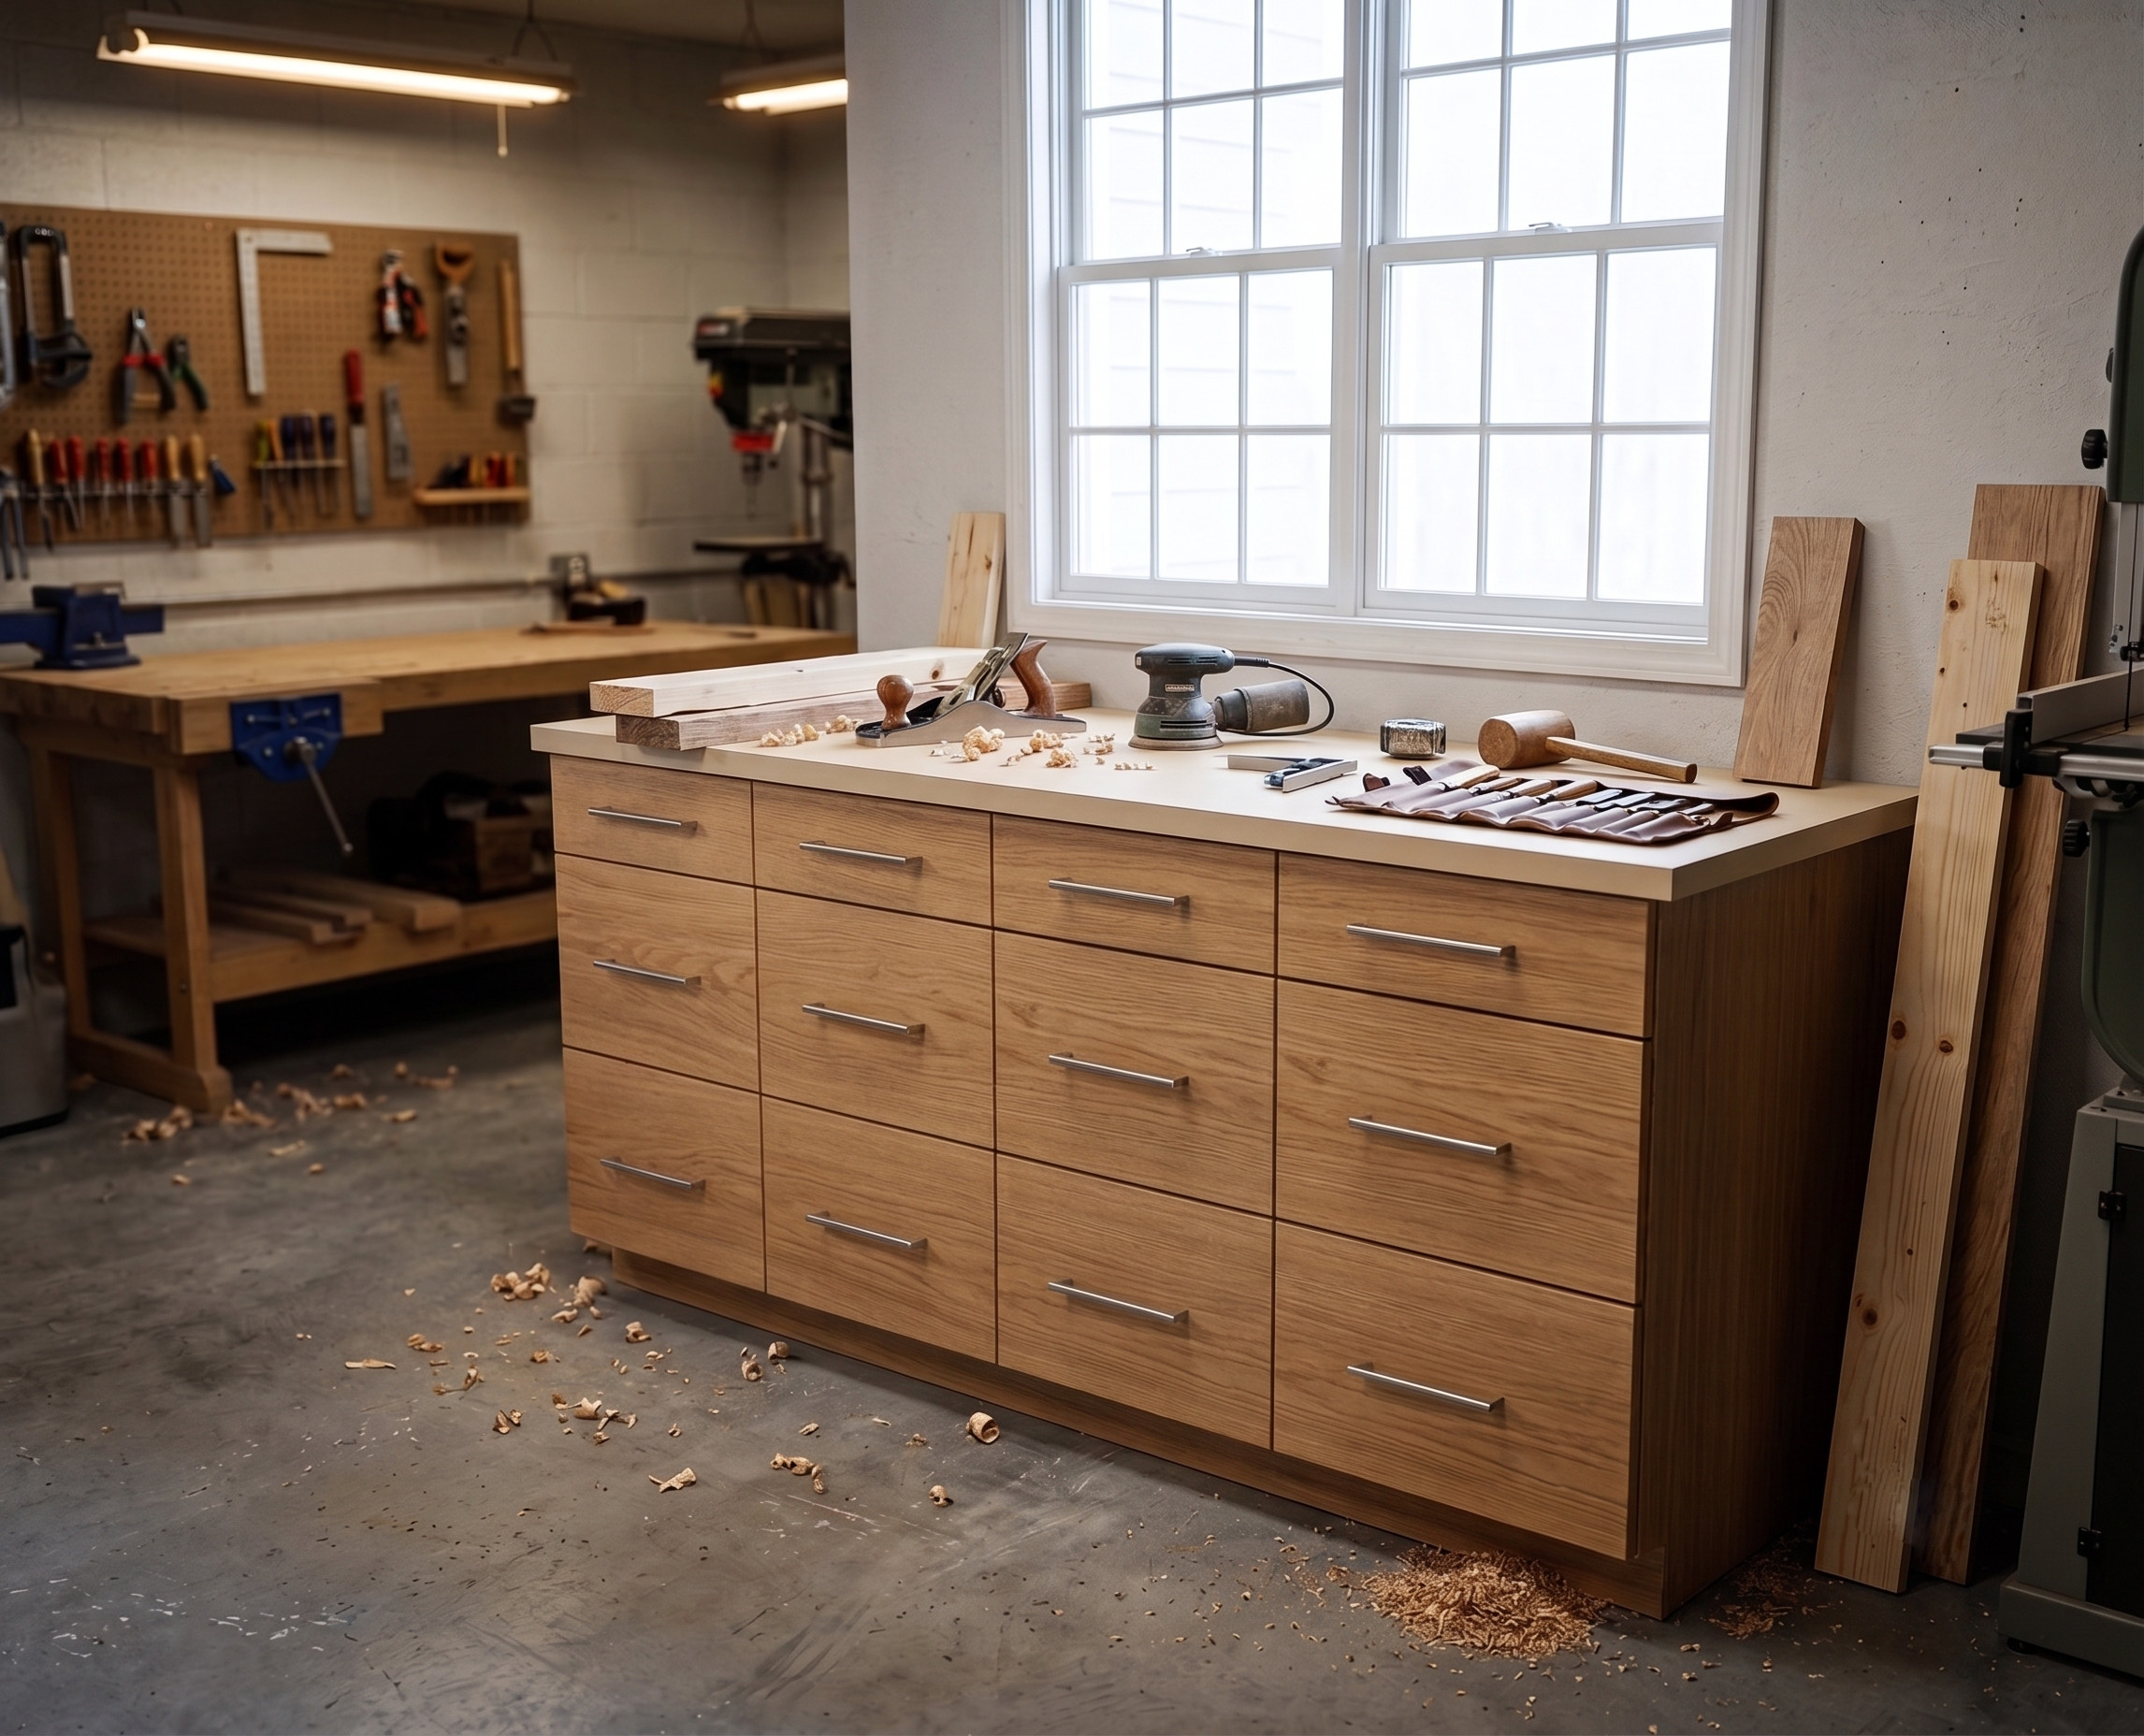
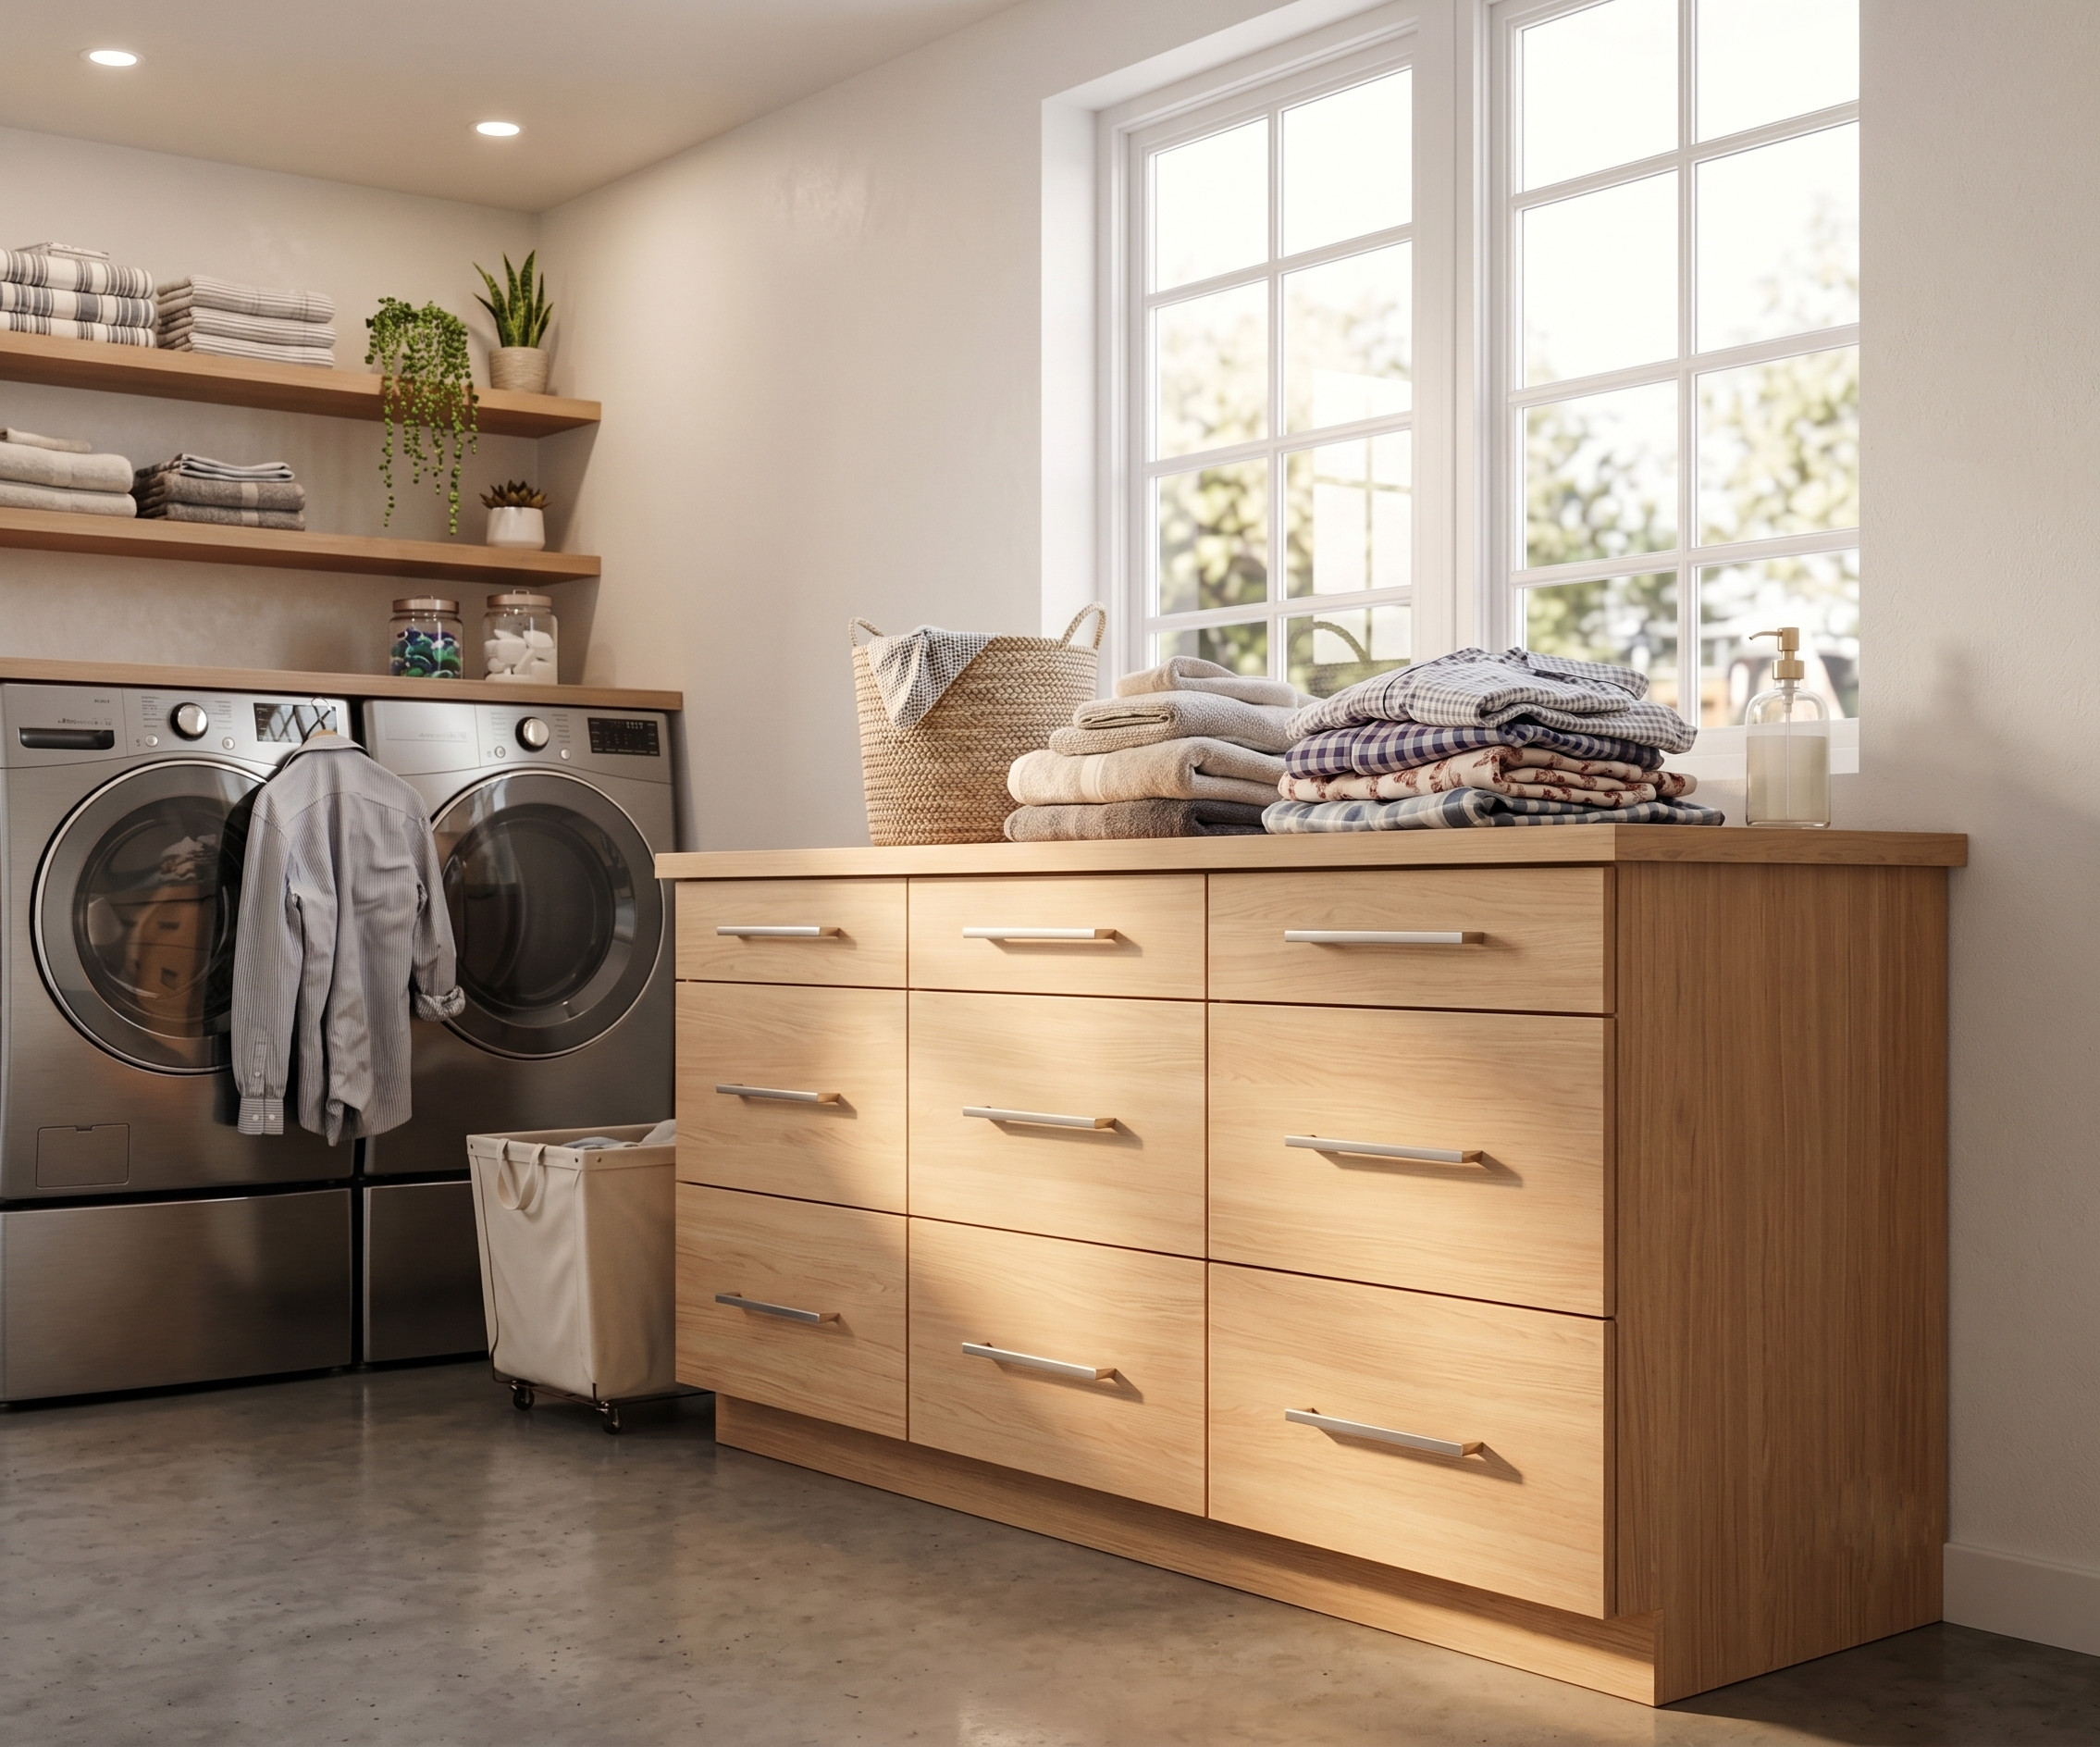
DIY Frameless Base Cabinet 21″ Wide with Three Drawers Slab Style
$12.97
Digital PDF download – DIY woodworking plans for a frameless base cabinet with 3 drawers, slab-style design. Includes step-by-step instructions, full cut list with measurements, material list, tools list, and assembly diagrams. Instant download. No physical product shipped. Perfect for kitchen, laundry room, garage, or workshop cabinet builds using 3/4″ plywood and pocket-hole joinery.
Description
Build a Custom Frameless Base Cabinet — The Right Way
Building your own base cabinet is one of the smartest ways to save money, maximize storage, and create a custom solution that fits your space perfectly. Whether you’re renovating a kitchen, outfitting a laundry room, or upgrading a garage or workshop, these woodworking plans give you everything you need to build a strong, functional, professional-looking cabinet from scratch.
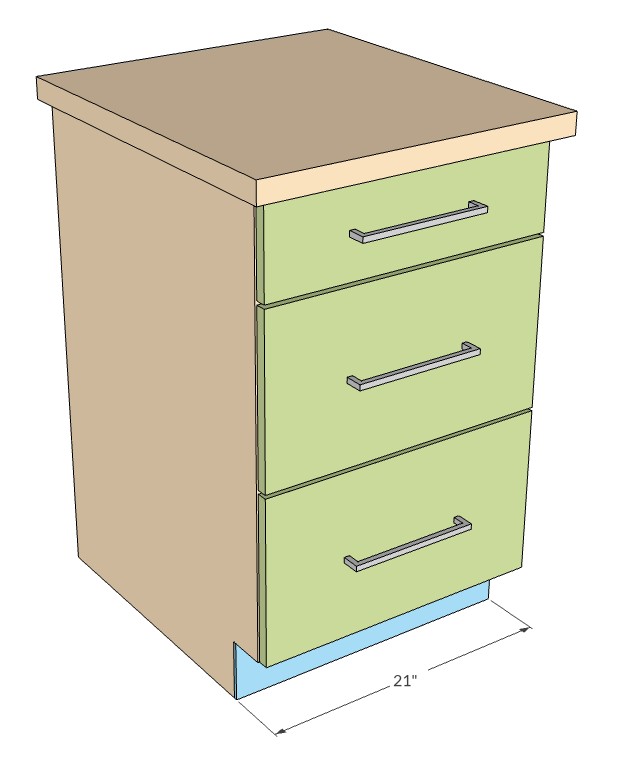
This plan covers a 21-inch wide frameless base cabinet with three spacious drawers and a clean, modern slab-style design. The cabinet is built using 3/4-inch cabinet-grade plywood and assembled with pocket-hole joinery — a beginner-friendly method that produces rock-solid, professional results without complicated joinery techniques.
These aren’t just rough sketches. The PDF plans include detailed measurements, a complete cut list, illustrated assembly steps, and all the guidance you need to go from raw sheet goods to a finished cabinet with confidence.
Who These Plans Are For
These plans are designed for:
- Beginner to intermediate woodworkers who want a clear, structured guide to cabinet building
- DIY homeowners remodeling a kitchen, laundry room, bathroom, or mudroom
- Garage and workshop builders looking for sturdy, functional storage cabinets
- Furniture makers who want accurate plans without starting from scratch
- Anyone who has attempted a cabinet build before and wants a better, more organized approach
If you can make straight cuts and drive a screw, you can build this cabinet.
What’s Included in the PDF Plans
This is a complete woodworking plan PDF, not a basic tutorial. Everything you need to build this cabinet is included in one printable document:
- Step-by-step building instructions — 18 detailed steps from first cut to finished cabinet
- Full cut list with exact measurements — every panel, drawer box component, and trim piece listed with dimensions
- Complete material list — know exactly what to buy before you set foot in the lumber yard
- Tools required list — a clear list of every tool needed for the project
- Assembly diagrams and illustrations — visual references for each stage of the build
- Drawer slide installation guide — precise reference measurements for correct slide placement
- Drawer front alignment instructions — achieve consistent 1/4-inch spacing for a clean, professional look
- Finishing and painting guidance — tips for priming MDF, applying paint, and achieving a smooth finish
- Countertop and toe-kick installation steps — complete the cabinet from bottom to top
- Printable PDF format — print at home or at any copy shop
- Instant digital download — access your plans immediately after purchase
- Works on desktop, tablet, and mobile — view in your workshop from any device
Project Details
| Detail | Specification |
|---|---|
| Cabinet Width | 21 inches |
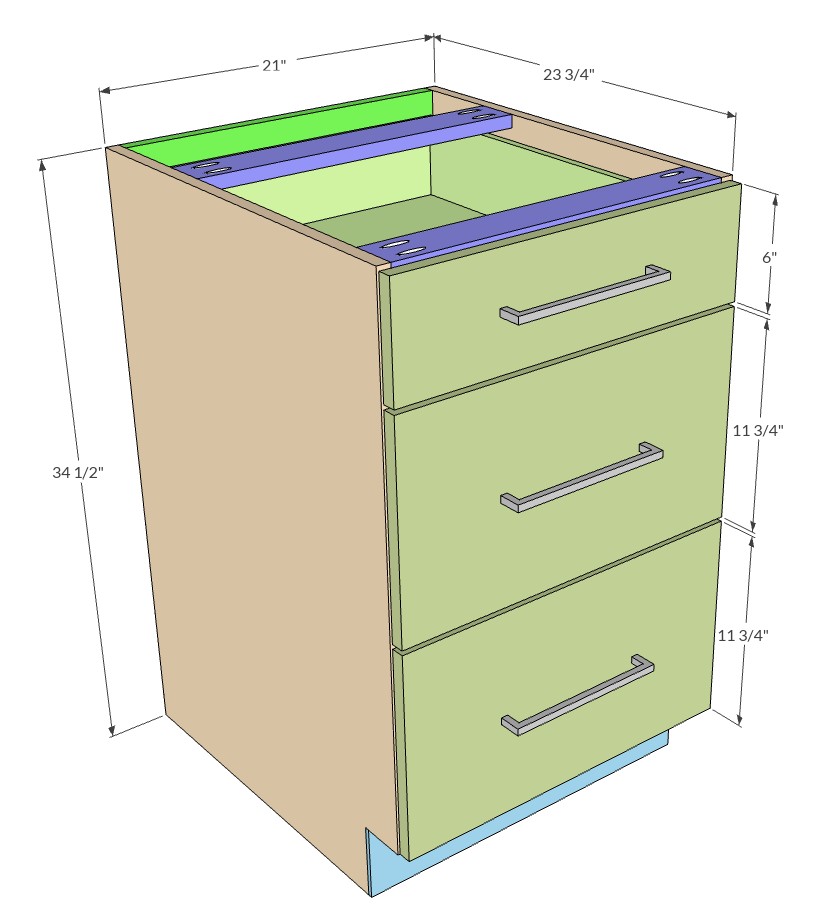
| Cabinet Height | 34 1/2 inches (standard base cabinet height) |
| Cabinet Depth | 23 3/4 inches |
| Number of Drawers | 3 (one top drawer, two identical larger drawers) |
| Cabinet Style | Frameless / Slab-style drawer fronts |
| Primary Material | 3/4-inch cabinet-grade plywood |
| Drawer Box Material | 1/2-inch plywood |
| Drawer Front Material | MDF (ideal for painted finish) |
| Joinery Method | Pocket-hole joinery (Kreg Jig compatible) |
| Estimated Build Time | 8 hours |
| Estimated Project Cost | Approximately $160 |
| Skill Level | Beginner to Intermediate |
Tools Needed for This Build
- Tape measure
- Drill
- Miter saw
- Table saw (or circular saw with straight-edge guide)
- Nail gun (with 1-inch brad nails)
- Kreg Pocket-Hole Jig
- Random orbital sander
- Clamps
- Dovetail saw (for toe-kick notch corners)
- Speed square or carpenter’s square
- Screwdriver
- Pencil
Why Use Woodworking Plans Instead of Winging It?
Free tutorials and YouTube videos can get you started, but they rarely give you the full picture. You’re left pausing, rewinding, and guessing at dimensions — and one wrong cut can waste an entire sheet of plywood.
These plans are built to solve that problem. With a complete cut list, accurate measurements, and illustrated step-by-step instructions, you can:
- Cut smarter — lay out all components before making a single cut to maximize plywood yield and reduce waste
- Build faster — no stopping to figure out what comes next; each step is clearly outlined
- Avoid costly mistakes — accurate measurements and diagrams mean fewer do-overs
- Work with confidence — even if this is your first cabinet build, you’ll know exactly what you’re doing at every stage
- Achieve professional results — consistent drawer gaps, flush faces, and smooth-operating drawers every time
Digital Download Information
This is a digital product only. No physical materials, lumber, or hardware are included.
After completing your purchase:
- You will receive an instant download link for your PDF plans
- The file can be opened immediately on any computer, tablet, or smartphone
- Print the plans at home or at any print shop for easy workshop use
- No shipping, no waiting — your plans are ready the moment your order is confirmed
Please note: due to the digital nature of this product, all sales are final. See our refund policy for details.
Build the Cabinet Your Space Deserves
A well-built base cabinet adds real value to any room — and building it yourself means you get exactly the size, finish, and configuration you need. These plans take the guesswork out of the process so you can focus on the build, not the planning.
Download your PDF plans today and start building.
Other Woodworking Projects


Tools for this project
Material List
- Available with the purchase of PDF plans.
Note: Lumber dimensions are listed as nominal size. See lumber sizes for actual dimensions vs nominal.
Disclosure: Some of the links on this page as well as links in “tools for this project” and “material list” sections are affiliate links.
Dimensions
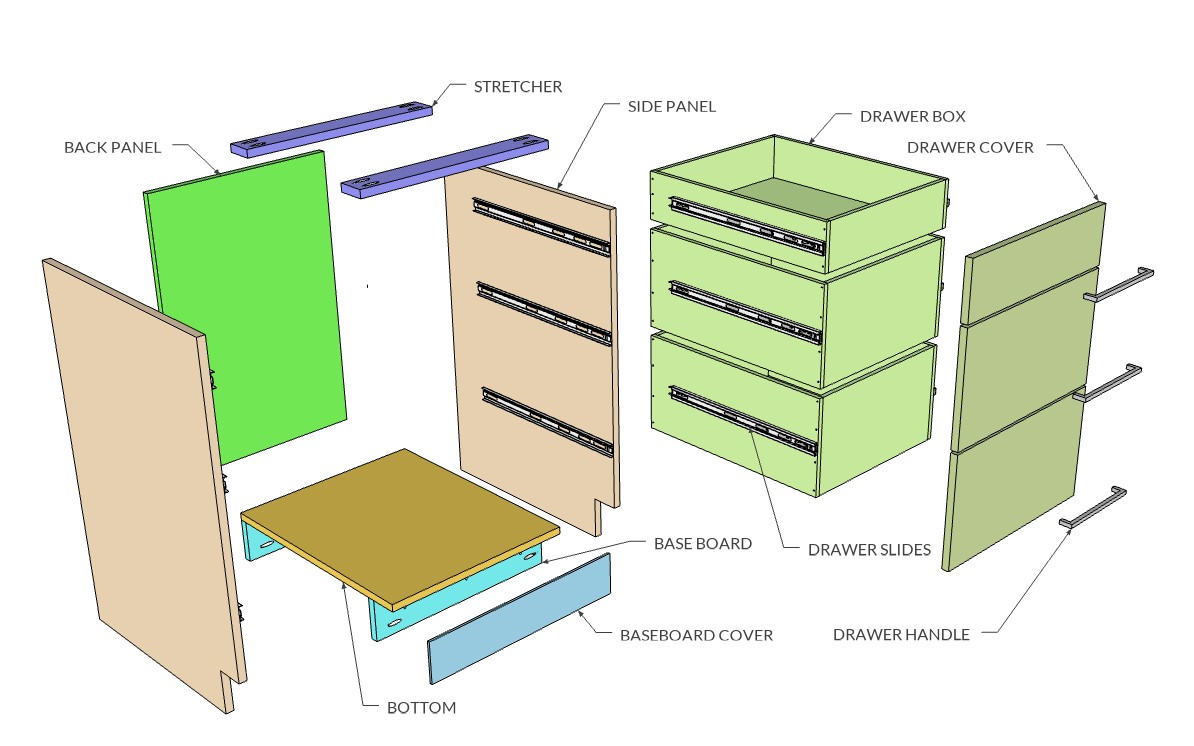
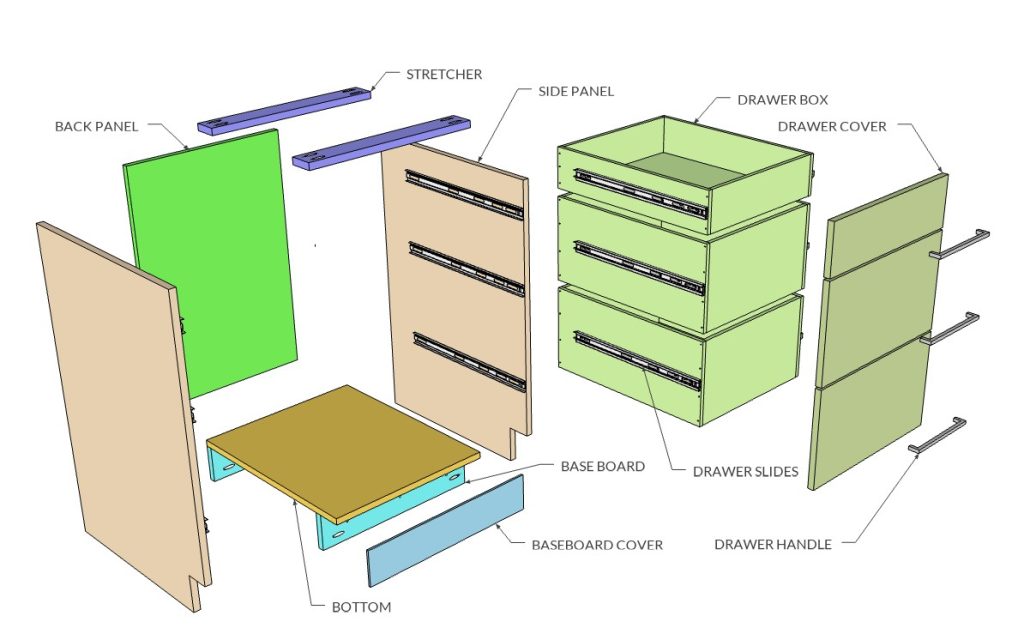
Frameless Base Cabinet with Drawers Diagram
Choosing the Right Plywood for Cabinet Construction
When building frameless base cabinets, accuracy is critical. Take the time to measure carefully and make precise cuts for every component. Using quality woodworking tools and proper cutting techniques will help ensure the cabinet parts fit together correctly and produce professional-looking results.
One of the most important decisions when building cabinets is selecting the right plywood. Cabinet-grade plywood with an A-grade face veneer is typically more durable, visually appealing, and consistent than lower-grade alternatives. It is also recommended to use rotary-cut plywood, which generally offers more uniform strength and contains fewer knots and imperfections.
For most DIY cabinet projects, 3/4-inch cabinet-grade plywood is the preferred material. Thinner plywood can be more prone to flexing or warping over time, while thicker plywood adds extra weight and cost without providing significant advantages for standard cabinet construction.
For the best appearance and long-term durability, consider using birch plywood with a veneer face on both sides. Birch plywood provides excellent structural stability and creates a smooth surface that is ideal for painted or clear-finished cabinets.
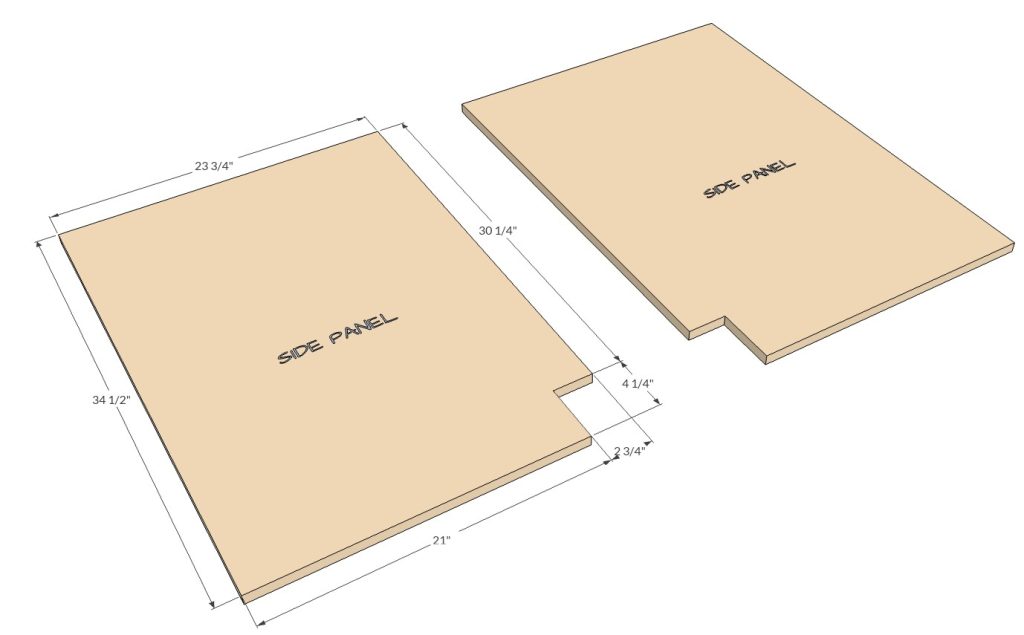
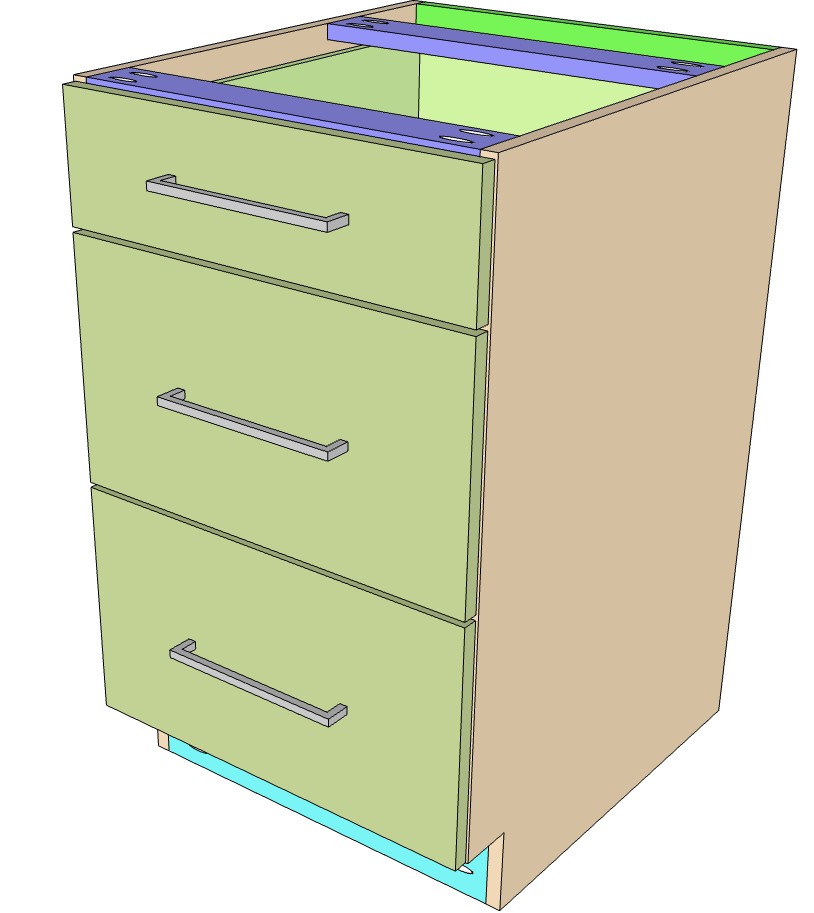
Step 1: Cut the Cabinet Side Panels and Toe-Kick Notches
Begin by cutting the largest cabinet components from the plywood sheet according to the cut list layout. Following the recommended layout and grain direction helps reduce material waste and maximize yield from each sheet of plywood.
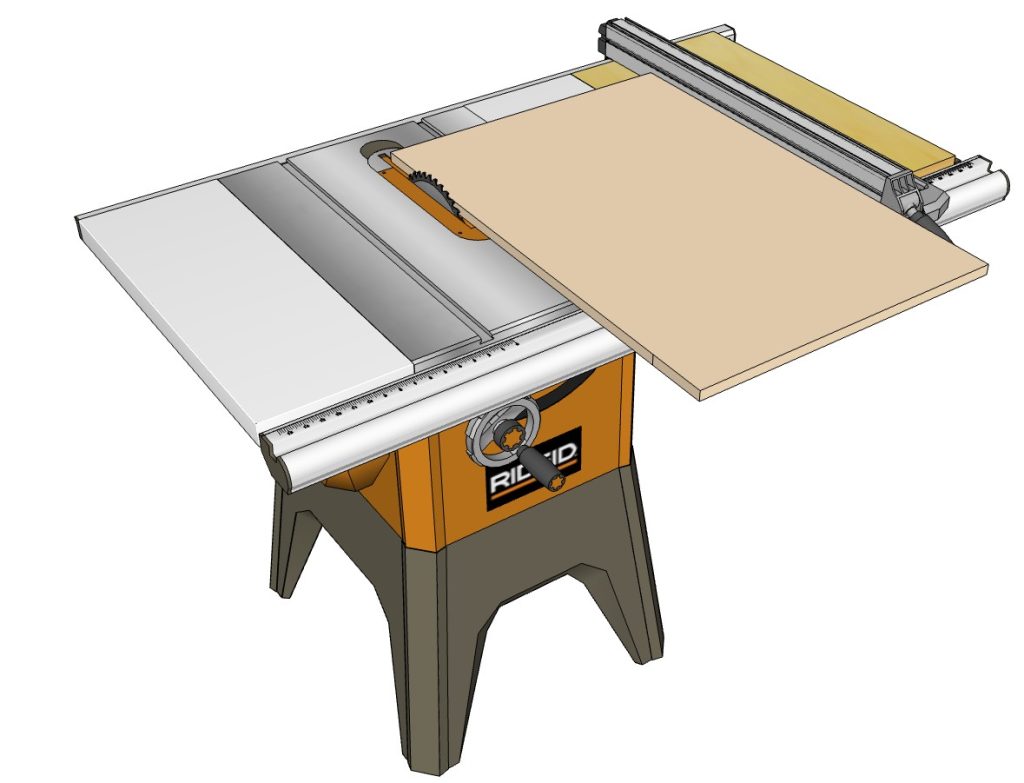
Using 3/4-inch cabinet-grade plywood, cut two side panels measuring 23 3/4″ x 34 1/2″. These cuts can be made with a table saw or a circular saw equipped with a Kreg Accu-Cut guide system for accurate, straight cuts.
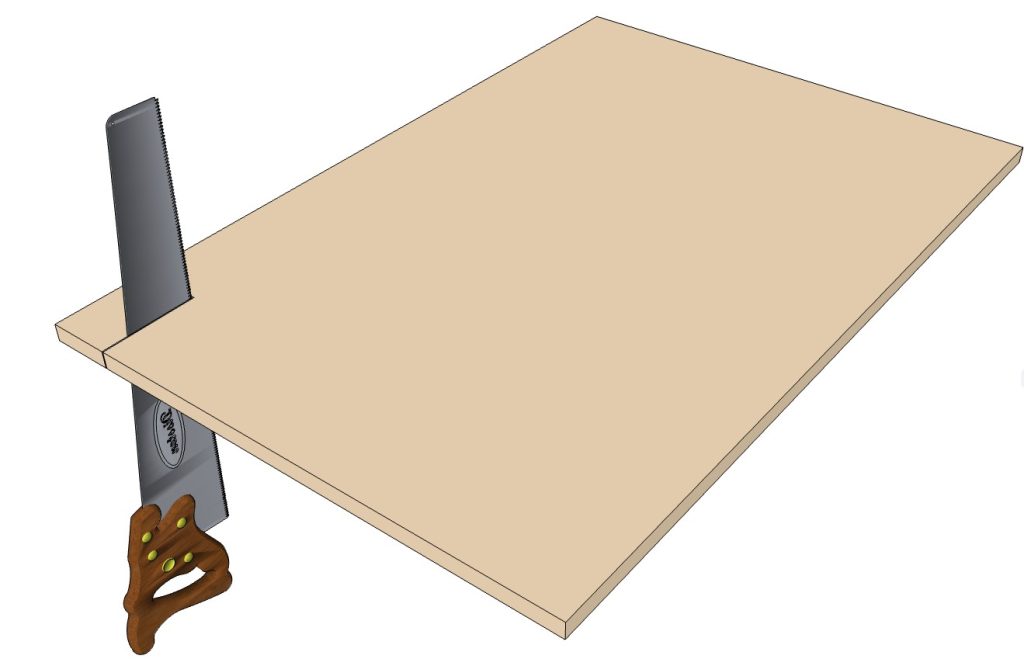
Next, mark and cut a 4 1/4″ x 2 3/4″ toe-kick notch from the bottom front corner of each side panel, as shown in the illustration. Depending on the cutting method you use, the inside corner of the notch may need to be finished by hand with a dovetail saw or another fine-tooth hand saw to achieve a clean, accurate cut.
The toe-kick notch creates recessed foot space at the bottom of the cabinet, making it more comfortable to stand close to the countertop once the cabinet is installed.
If you plan to build multiple DIY kitchen base cabinets, consider making a simple toe-kick template. A template allows you to quickly mark identical cutouts on every side panel, improving consistency and saving time throughout the project.
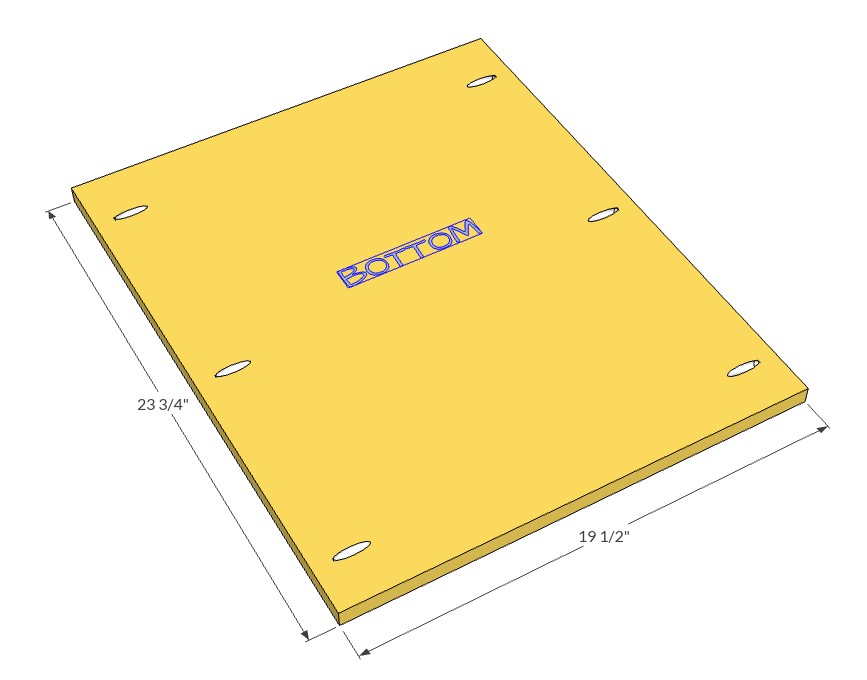
Step 2: Cut the Bottom Panel and Drill Pocket Holes
Using the same 3/4-inch cabinet-grade plywood, cut the following cabinet component:
- One bottom panel: 23 3/4″ x 19 1/2″
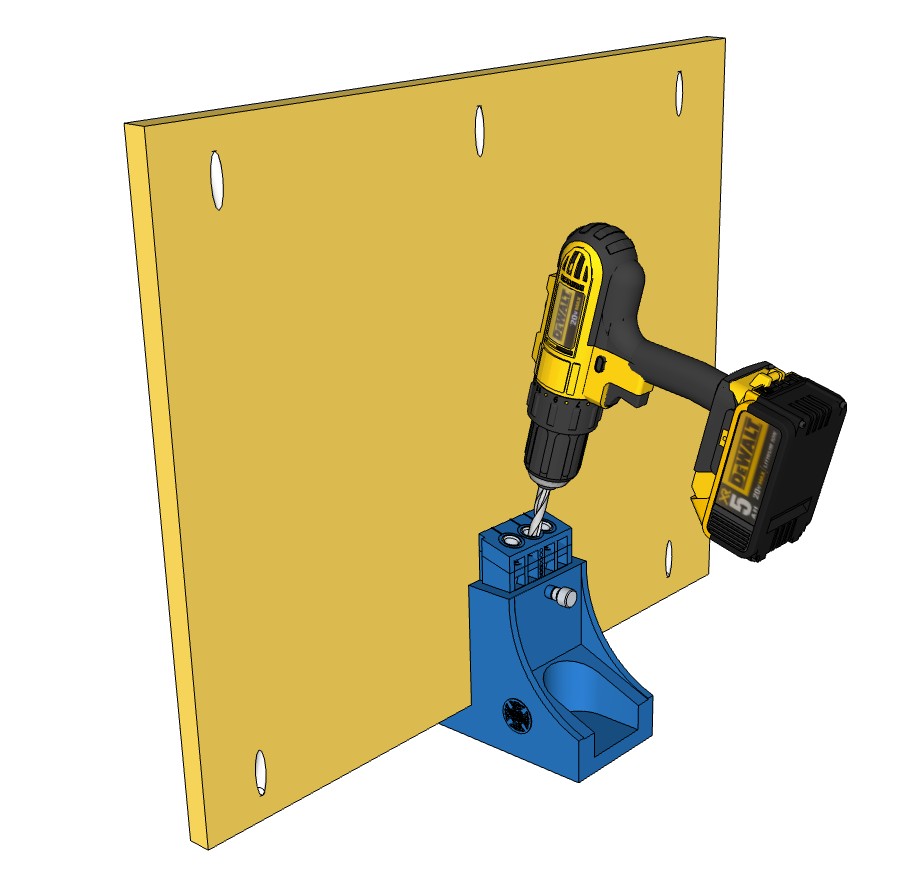
After cutting the panel to size, set your Kreg Pocket-Hole Jig for 3/4-inch material thickness. Drill six pocket holes in the locations shown in the illustration.
Proper pocket-hole spacing is important for creating strong joints. Placing the holes too far apart can weaken the connection, while drilling more holes than necessary adds extra work without significantly increasing strength. Space the pocket holes evenly to provide solid support while keeping the cabinet assembly process efficient and clean.
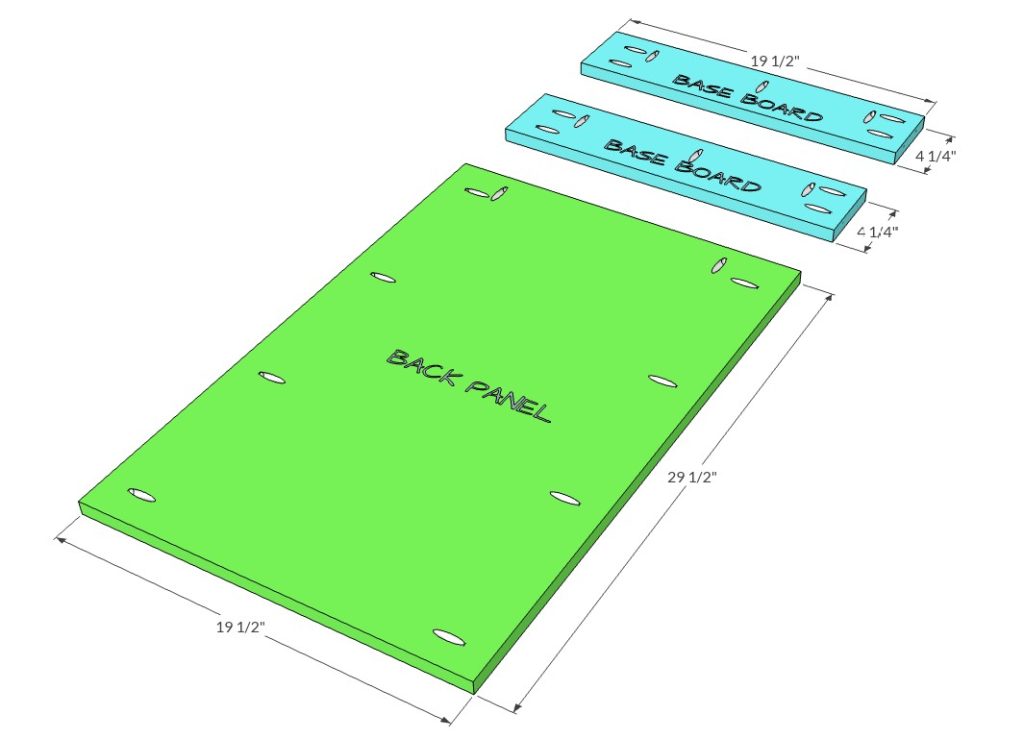
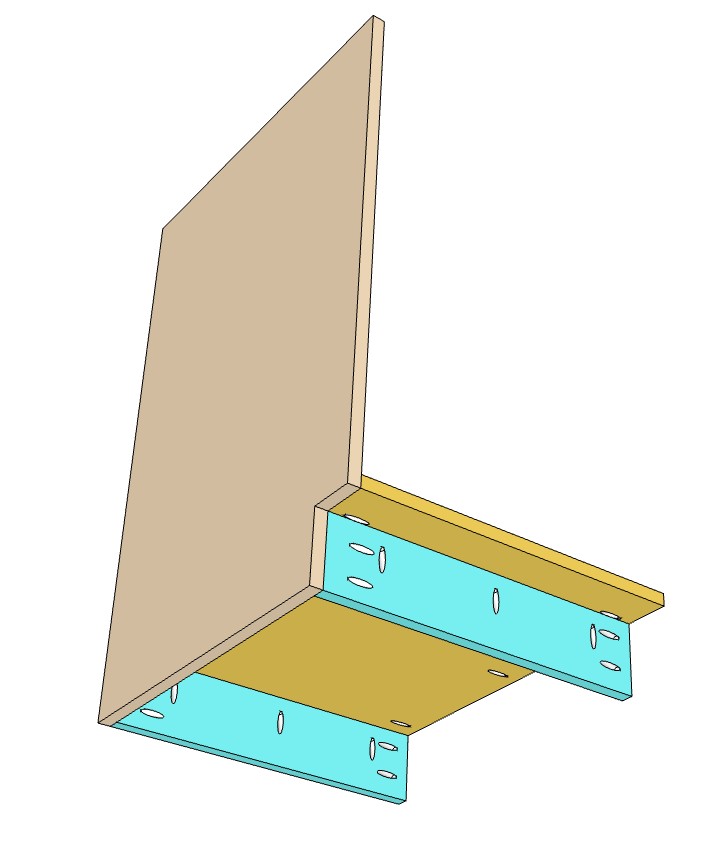
Step 3: Cut the Back Panel and Base Supports
Using 3/4-inch cabinet-grade plywood, cut the remaining cabinet components:
- One back panel: 19 1/2″ x 29 1/2″
- Two base support pieces: 19 1/2″ x 4 1/4″
Once the pieces have been cut to size, drill the pocket holes in the locations shown in the illustration.
The back panel helps keep the cabinet square during assembly, while the base support pieces strengthen the cabinet structure and provide additional support for the bottom section. Properly installing these components will improve the overall rigidity and durability of the finished frameless base cabinet.
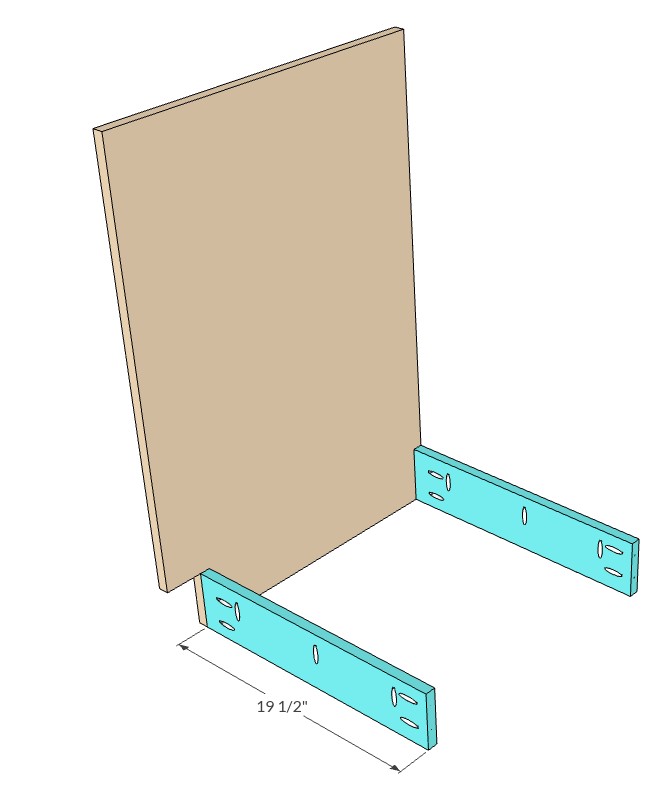
Step 4: Assemble the Cabinet Base Frame
Pocket-hole joinery can be assembled using pocket-hole screws alone or in combination with wood glue. Adding glue creates a stronger permanent bond and helps prevent joints from loosening over time. However, once the glue cures, the parts cannot be disassembled without damaging the cabinet components.
For a frameless base cabinet, wood glue is generally not necessary for the main cabinet box since the cabinet will be secured to the wall and subjected to very little movement. Glue is often more beneficial when assembling cabinet doors and drawers, where additional durability is desirable.
To begin assembly, lay the left side panel flat on a work surface. Position the front base support piece and back base support piece as shown in the illustration, then secure them to the side panel using 1 1/4-inch pocket hole screws.
Before driving the screws, clamp each piece securely in place. Proper clamping prevents the plywood components from shifting during assembly and helps maintain flush, accurate joints. Taking the time to align the parts correctly at this stage will improve the overall fit and appearance of the finished cabinet.
Step 5: Install the Cabinet Bottom Panel
Position the bottom panel between the cabinet side panel and the back base support piece as shown in the illustration. Make sure all edges are aligned correctly, then secure the bottom panel using 1 1/4-inch pocket hole screws.
Before fully tightening the screws, verify that the panel sits flush with the adjoining parts and that the assembly remains square. Maintaining proper alignment during this step is important for accurate cabinet construction and will help ensure the remaining components fit together smoothly.
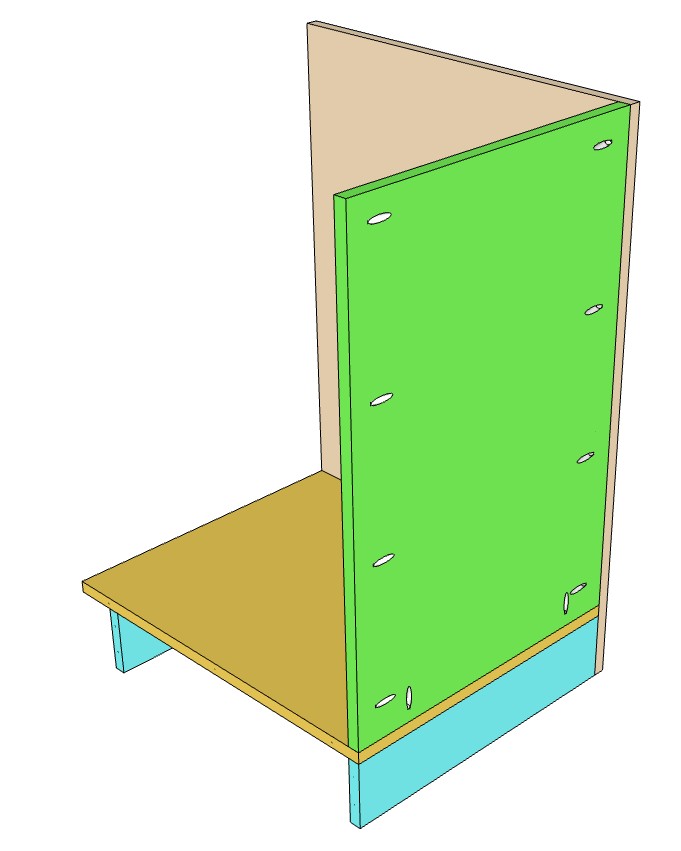
Step 6: Attach the Cabinet Back Panel
Position the back panel against the cabinet frame and secure it using the pre-drilled pocket holes and 1 1/4-inch pocket hole screws.
When installing the panel, make sure the pocket holes face toward the back of the cabinet so they remain concealed after installation.
As you fasten the back panel, periodically check that the cabinet remains square by confirming that all corners stay properly aligned. A square cabinet box is essential for proper door and drawer operation and will help ensure a professional-looking finished cabinet.
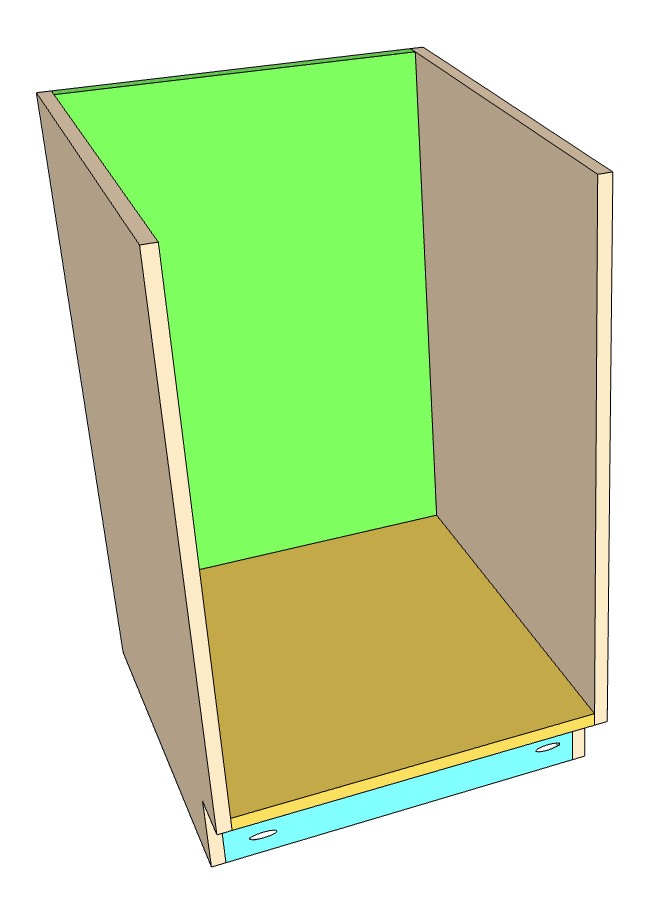
Step 7: Install the Right Side Panel
Position the right side panel onto the cabinet frame, aligning it with the bottom panel, back panel, and base support pieces. Secure the panel using 1 1/4-inch pocket hole screws through the pre-drilled pocket holes.
Before fully tightening the screws, check that all edges are flush and properly aligned. It is also important to verify that the cabinet box remains square as you fasten the panel. Making any necessary adjustments now will help ensure the cabinet doors and other components fit correctly during the later stages of assembly.
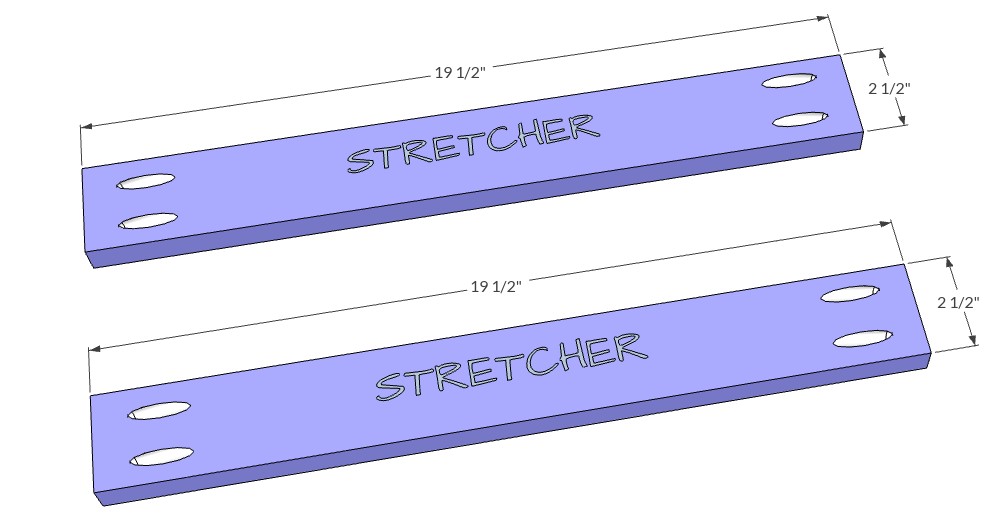
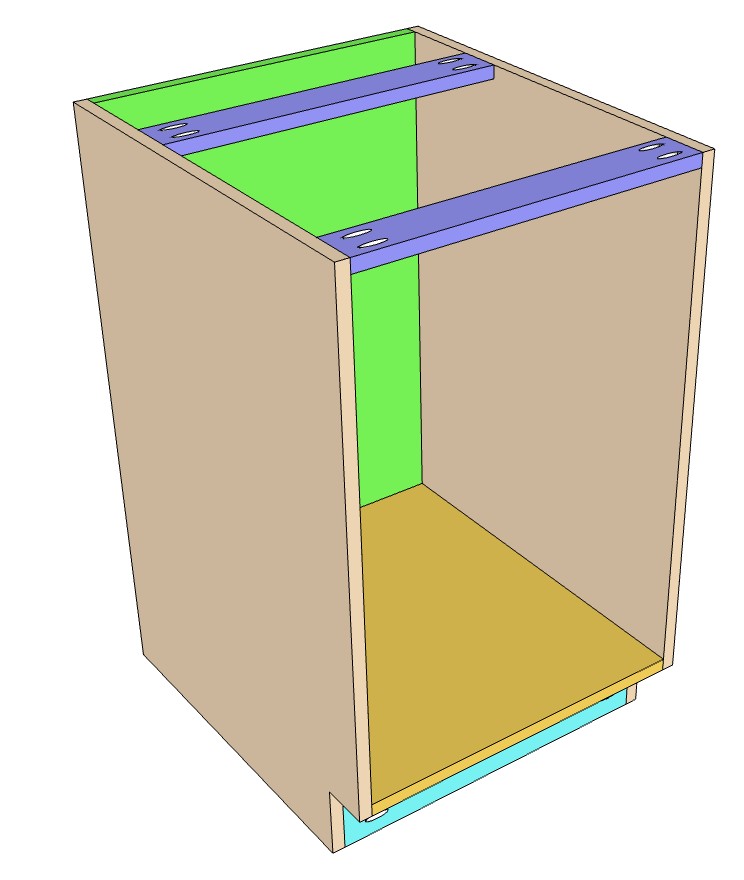
Step 8: Cut the Stretcher Boards
Using 3/4-inch cabinet-grade plywood, cut the following pieces:
- Two stretcher boards: 19 1/2″ x 2 1/2″
After cutting the stretcher boards to size, drill pocket holes at both ends of each board as shown in the illustration.
Accurate pocket-hole placement will help create strong connections and make the final cabinet assembly easier. Before drilling, ensure both boards are cut to identical dimensions so they fit properly across the top of the cabinet.
Step 9: Install the Stretcher Boards
Position the front stretcher board and back stretcher board at the top of the cabinet box as shown in the illustration. Secure both pieces using 1 1/4-inch pocket hole screws.
These stretcher boards help reinforce the upper portion of the cabinet and maintain the correct cabinet width. As you install them, make sure they are seated flush with the cabinet sides and that the cabinet remains square.
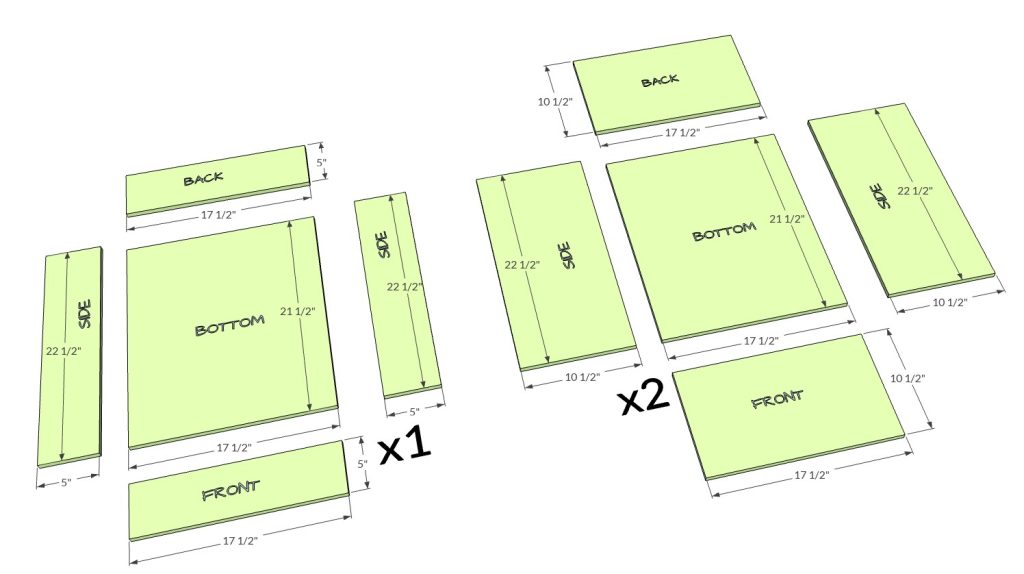
Step 10: Cut the Drawer Box Components
Now it’s time to build the drawer boxes for the cabinet.
The drawer boxes can be made from either 1/2-inch plywood or 1/2-inch MDF. For this project, 1/2-inch plywood is used because it provides greater strength and durability.
This cabinet includes three drawer boxes. The middle and bottom drawer boxes are identical in size.
Top Drawer Box
Cut the following pieces:
- One bottom panel: 17 1/2″ x 21 1/2″
- Two side panels: 22 1/2″ x 5″
- One front panel: 17 1/2″ x 5″
- One back panel: 17 1/2″ x 5″
Middle and Bottom Drawer Boxes
Cut the following pieces:
- Two bottom panels: 17 1/2″ x 21 1/2″
- Four side panels: 22 1/2″ x 10 1/2″
- Two front panels: 17 1/2″ x 10 1/2″
- Two back panels: 17 1/2″ x 10 1/2″
Before assembling the drawer boxes, verify that all parts are cut accurately and that the corners are square. Precise cuts will help ensure smooth drawer operation and proper alignment within the cabinet.
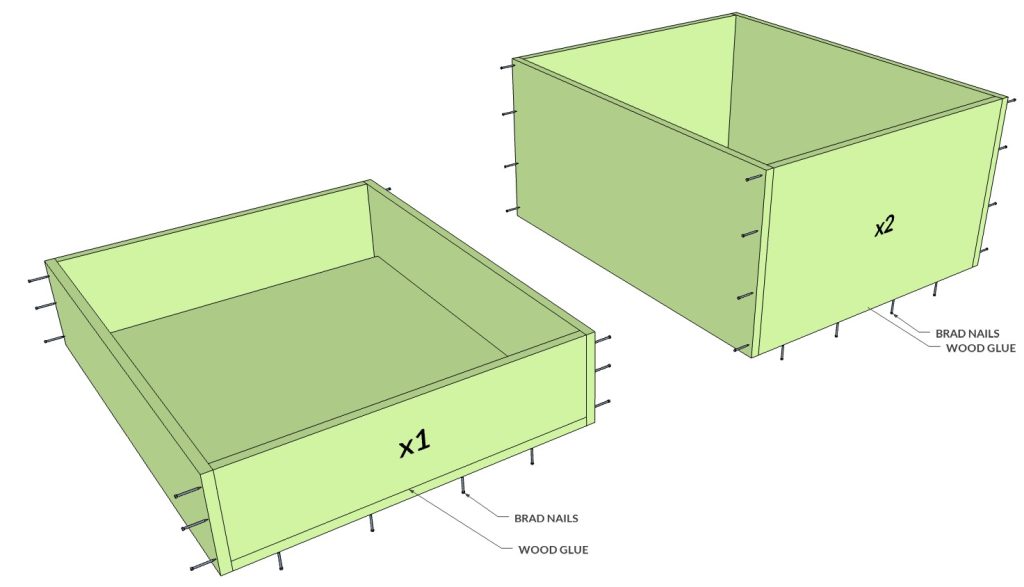
Step 11: Assemble the Drawer Boxes
To assemble the drawer boxes, you will need wood glue and a nail gun with 1-inch brad nails.
Begin by placing a drawer bottom panel on a flat work surface. Apply a bead of wood glue along the edge of the bottom panel, then position the front and back drawer pieces. Secure them with 1-inch brad nails.
Next, apply wood glue to the remaining exposed edges of the bottom panel and install the side panels. Fasten the side panels with 1-inch brad nails to complete the drawer box assembly.
As you assemble each drawer box, check that all corners remain flush and square before driving the nails. Taking the time to keep the drawer boxes square will help prevent problems when installing the drawer slides.
Repeat this process for the remaining drawer boxes. Once finished, you should have three fully assembled drawer boxes ready for drawer slide installation.
Step 12: Install the Drawer Slides on the Drawer Boxes
Accurate drawer slide placement is essential for smooth operation. If one slide is mounted higher or lower than the other, the drawer can bind, tilt, or become difficult to open and close. Both slides must be installed level and parallel to each other.
For the top drawer box, measure 2 1/2″ up from the bottom edge of the drawer box and draw a horizontal reference line on both sides.
For the middle and bottom drawer boxes, measure 5 1/4″ up from the bottom edge of each drawer box and draw a horizontal reference line on both sides.
Next, fully extend each drawer slide and press the release clip to separate the slide into two sections. The inner slide section will be attached directly to the drawer box.
Position the inner slide so that the mounting holes align with the center of the reference line. Secure the slide with screws, making sure the front edge of the slide is flush with the front edge of the drawer box.
Repeat the process on the opposite side of the drawer box and then on the remaining drawer boxes. Double-check that all slides are installed straight, level, and evenly aligned to ensure smooth drawer movement after installation.


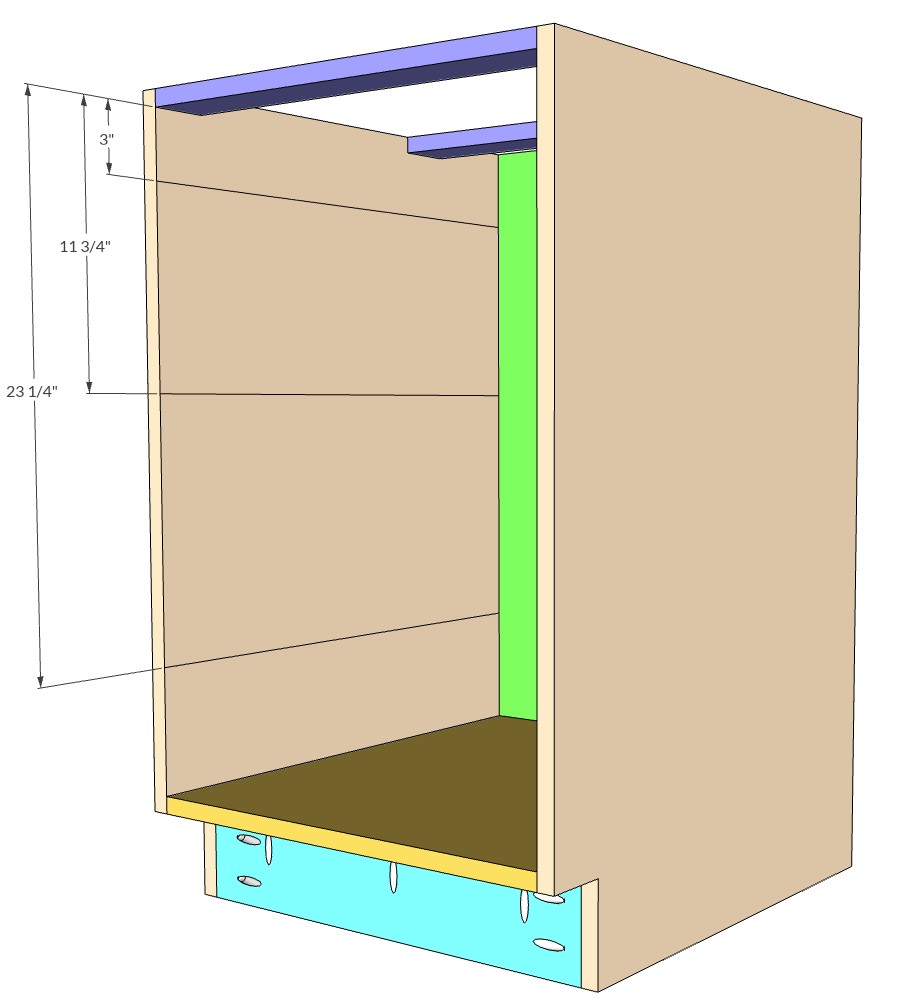
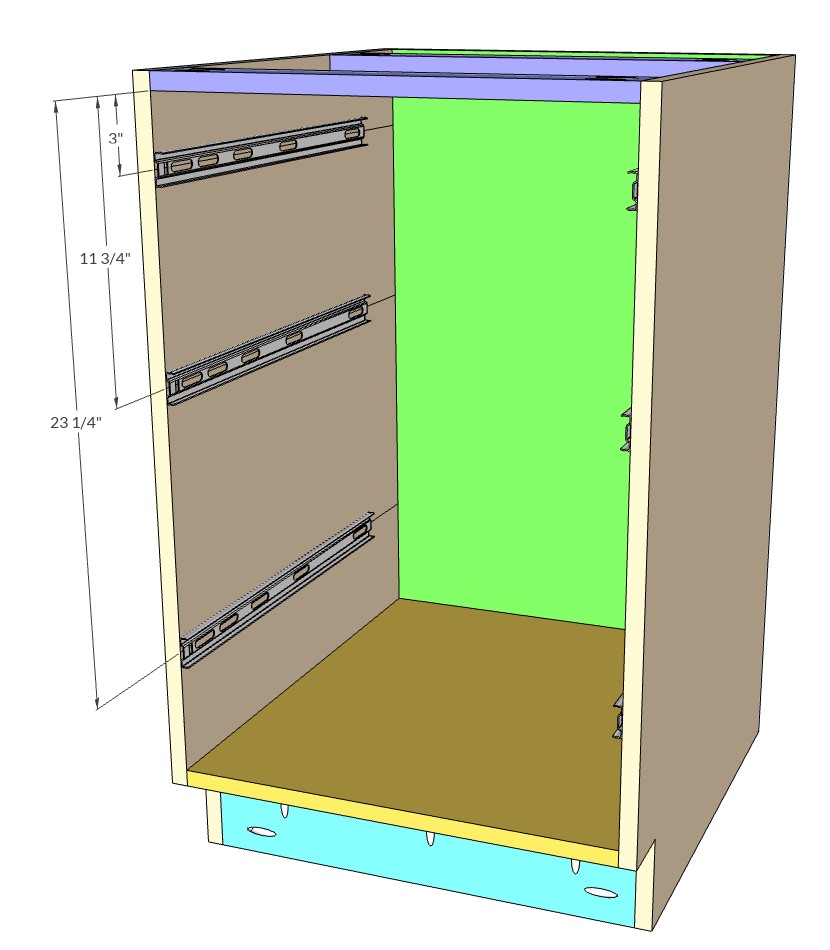
Step 13: Install the Drawer Slides Inside the Cabinet
With the drawer slides attached to the drawer boxes, the next step is to install the outer slide sections inside the cabinet.
On the inside face of both cabinet side panels, measure 3″ down from the bottom of the stretcher board and draw a level horizontal line for the top drawer slide. Next, measure 11 3/4″ down from the stretcher board and draw a line for the middle drawer slide. Finally, measure 23 1/4″ down from the stretcher board and draw a line for the bottom drawer slide.
Repeat these measurements on both the left and right cabinet side panels, ensuring the lines are level and aligned with one another.
Position the outer section of each drawer slide so that the mounting holes align with the corresponding reference line. Secure the slides to the cabinet sides using the screws provided with your drawer slide hardware.
As you install the slides, make sure the front edge of each slide is flush with the front edge of the cabinet. Proper alignment is critical for smooth drawer operation and consistent drawer front spacing.
Once all of the slides are installed, insert the drawer boxes into the cabinet and test their movement. The drawers should slide smoothly without binding, rubbing, or excessive side-to-side play. If necessary, make minor adjustments to the slide positions before proceeding to the drawer front installation.
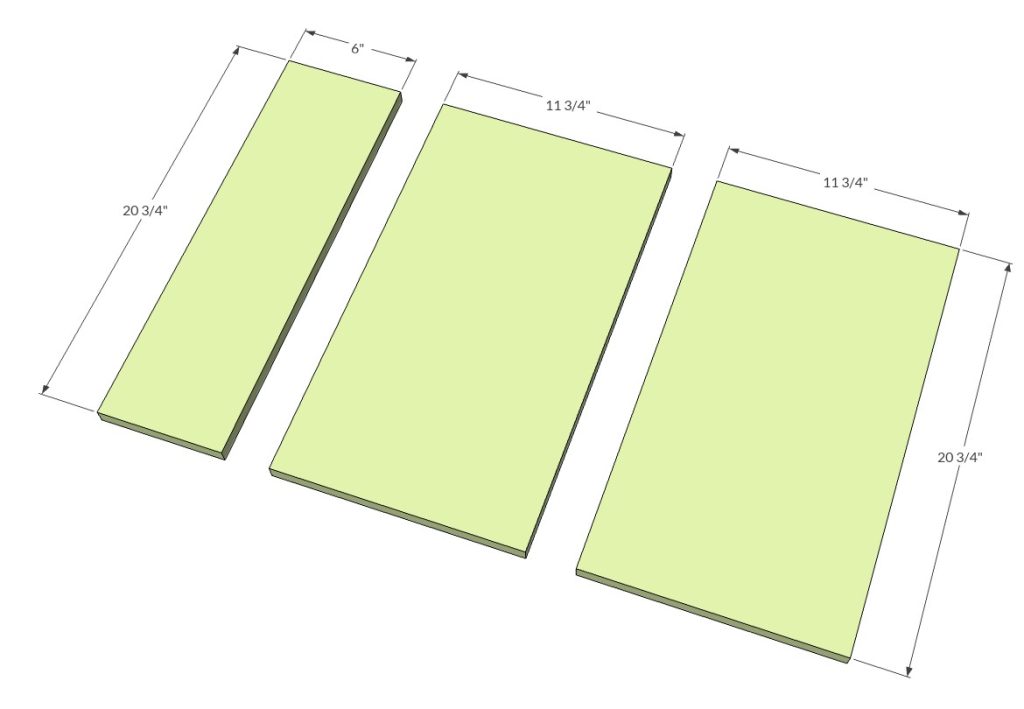
Step 14: Cut and Sand the Cabinet Drawer Fronts
The drawer fronts can be made from either cabinet-grade plywood or MDF. For this project, MDF was chosen because it provides a smooth, uniform surface that is ideal for painted cabinet finishes.
Cut the following drawer fronts:
- One top drawer front: 20 3/4″ x 6″
- Two drawer fronts for the middle and bottom drawers: 20 3/4″ x 11 3/4″
After cutting the pieces to size, sand all surfaces and edges using a random orbital sander with 320-grit sandpaper.
Proper sanding will help create a smooth, professional-looking finish and improve primer and paint adhesion.
Step 15: Paint or Finish the Cabinet and Drawer Fronts
After completing the final sanding, apply your chosen finish to the cabinet and drawer fronts.
For painted cabinets, begin by applying a high-quality primer to all surfaces, including exposed edges. Once the primer has dried according to the manufacturer’s recommendations, apply paint in even coats to achieve a smooth, durable finish.
Because MDF readily absorbs moisture, it is especially important to thoroughly seal all exposed edges with primer before painting. Proper sealing will help prevent swelling and produce a more uniform finish.
If you are building the cabinet with solid wood components instead of MDF, apply your preferred wood stain and allow it to dry completely. Follow with a protective polyurethane finish to help protect the wood from wear and moisture.
Allow the paint, stain, or clear finish to fully cure before installing the drawer fronts, hardware, and completing the final assembly of the cabinet.
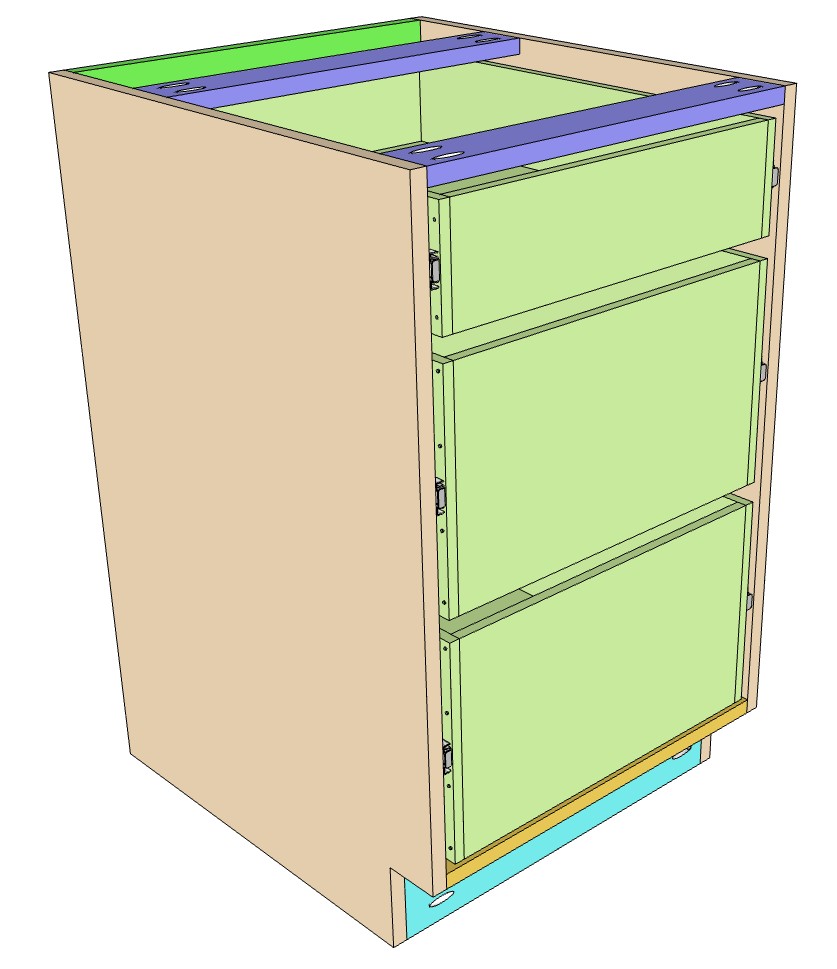
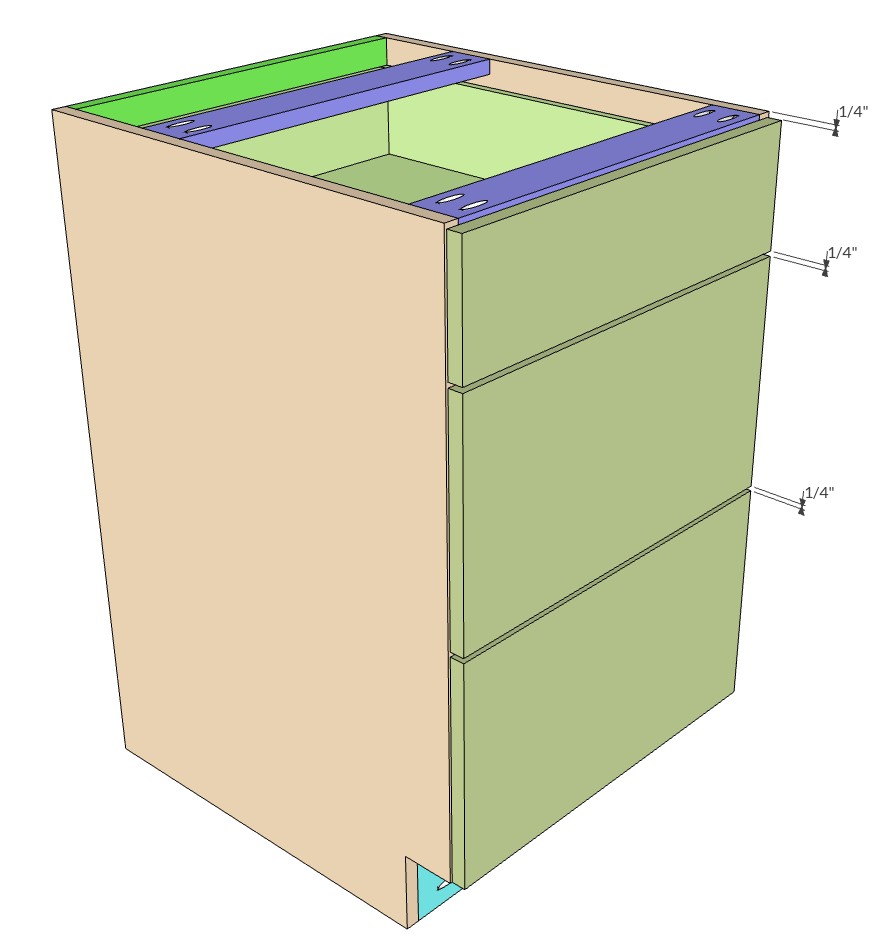
Step 16: Install the Drawer Fronts
Begin by installing the bottom drawer front. Position the drawer front so it is flush with the bottom edge of the cabinet frame. Once it is properly aligned, secure it by driving screws through the inside of the drawer box and into the back of the drawer front.
Next, install the top drawer front. Measure 1/4″ down from the top of the cabinet frame and position the drawer front so there is a consistent 1/4-inch gap above it. Secure the drawer front by driving screws through the inside of the drawer box and into the back of the drawer front.
With the top and bottom drawer fronts installed, position the middle drawer front between them. Adjust it until the spacing is equal above and below, then secure it with screws from inside the drawer box.
Before fully tightening the screws, verify that all drawer fronts are aligned and evenly spaced. When properly installed, there should be approximately a 1/4-inch gap between each drawer front, creating a clean and professional appearance.
Step 17: Install the Drawer Handles
Measure the distance between the handle mounting holes. Always measure from the center of one hole to the center of the other hole to ensure accurate placement.
Using a tape measure and pencil, mark the handle locations on each drawer front. Take your time during this step to ensure all handles are positioned consistently and aligned with one another.
Select a drill bit that matches the diameter of the handle mounting screws and drill the holes at the marked locations.
Place each handle over the drilled holes and insert the screws from the inside of the drawer box through the drawer front and into the handle. Tighten the screws with a screwdriver until snug.
Step 18: Install the Toe-Kick Cover and Countertop
To complete the cabinet, cut a 1/4-inch MDF toe-kick cover to 4 1/2″ x 21″. Position the cover over the front base section of the cabinet and secure it using a nail gun.
Next, install the countertop material of your choice. The best countertop option will depend on your budget, design preferences, and the intended use of the cabinet.
Popular countertop materials for kitchen cabinets include:
- Quartz
- Natural granite
- Marble
- Soapstone
- Butcher block
- Laminate countertops
For garage cabinets, workshop cabinets, or utility spaces, a cost-effective option is to laminate two layers of 3/4-inch plywood together to create a durable work surface. For a more finished appearance, apply plywood edge banding to cover the exposed plywood edges.
Once the toe-kick cover, countertop, and hardware have been installed, your DIY frameless base cabinet with drawers is complete and ready for use.
Reviews
There are no reviews yet.