
A freestanding pergola is one of the best ways to create a comfortable outdoor space while adding style and structure to your backyard. In this DIY pergola project, you’ll learn how to build a sturdy wooden pergola specifically designed to support a porch swing bench. Whether you place it on a patio, in the garden, or near a fire pit area, this pergola creates the perfect place to relax outdoors.
This woodworking project combines strength, function, and clean design while remaining approachable for both beginner and intermediate woodworkers. The pergola is built using standard lumber sizes and straightforward construction methods, making it a practical DIY build for anyone wanting a durable outdoor structure without overly complicated joinery or expensive materials.
Unlike decorative garden pergolas, this design is built with enough structural support to safely hold a hanging swing bench. The open roof design provides a classic pergola appearance while creating a strong overhead frame for mounting chains or ropes. You can also customize the pergola with stain, paint, lighting, or privacy screens to match your outdoor space.
A Beginner-Friendly Outdoor Woodworking Project
This pergola project is ideal for homeowners, DIY enthusiasts, and woodworkers looking for practical outdoor woodworking plans that are both functional and visually appealing. The structure uses commonly available lumber sizes, making it a budget-friendly build without requiring advanced woodworking experience or specialty tools.
If you’re comfortable using tools like a miter saw, drill, level, and jigsaw, you’ll be able to complete this project with confidence. Even if you’re newer to woodworking, the step-by-step instructions and measurements make the build easy to follow while teaching useful framing and assembly techniques along the way.
Beyond functionality, this pergola can also be customized to fit your outdoor space. You can stain or paint the wood, add lighting, or incorporate decorative details to match your patio or backyard style.

Download the PDF Woodworking Plans
Before starting the build, make sure to download the complete PDF woodworking plans. The printable plans include detailed dimensions, material lists, cut diagrams, and reference illustrations that make the construction process much easier and more efficient.
Having the plans nearby while building helps reduce mistakes, speeds up assembly, and gives you a clear reference for each stage of the project.
What You’ll Learn in This Tutorial
In this pergola building tutorial, you’ll learn how to:
- Build strong pergola side frames using pressure-treated lumber
- Install diagonal bracing for added structural stability
- Create decorative roof trusses with curved details
- Reinforce roof supports for safely hanging a swing bench
- Properly align and square outdoor framing components
- Assemble a durable pergola designed for long-term outdoor use
Let’s Start Building the Pergola
The first steps focus on preparing the main structural components and assembling the pergola side panels. Taking your time during these early stages will help ensure the entire structure stays square, level, and sturdy throughout the build.

| Time to Complete | Total Cost | Skill Level |
| 7 hours | $340 | Beginner |
Download Printable Plans in PDF


DIY Pergola Woodworking Plans PDF – Swing Bench Compatible
$14.97
Digital PDF woodworking plans to build a freestanding outdoor pergola — designed with built-in swing bench support. Includes step-by-step instructions, full cut list with measurements, material list, tools list, and assembly diagrams. Instant download, no physical product shipped. A beginner-friendly backyard woodworking project you can complete in a weekend.
Description
Build a Beautiful Freestanding Pergola for Your Backyard
A wooden pergola instantly transforms an empty outdoor space into a shaded retreat — a place to relax, entertain, and enjoy your backyard year-round. This one goes a step further. The structure is engineered from the ground up with reinforced roof trusses that can support a hanging swing bench, giving you the flexibility to add one now or down the road.
These step-by-step PDF woodworking plans walk you through the entire build — from cutting the pressure-treated corner posts and assembling the side frames to installing decorative roof trusses and the reinforced swing support hardware. The result is a strong, weather-resistant pergola with a clean, attractive finish that works beautifully as a standalone outdoor structure.
Note: The swing bench itself is a separate project. These plans cover the pergola structure only, including all necessary reinforcement for safely hanging a swing bench when you’re ready.
Who These Plans Are For
- Beginner to intermediate woodworkers
- DIY homeowners looking to improve their backyard or patio
- Anyone wanting a shaded outdoor structure they built themselves
- Woodworkers who want the option to add a swing bench later
- Weekend builders looking for a practical, impressive outdoor project
If you’re comfortable using tools like a miter saw, drill, jigsaw, and level, you have everything you need to complete this build. The instructions are written clearly for those newer to outdoor framing, while still including the technical details more experienced builders expect.
What’s Included in the PDF
Your instant download includes a complete, print-ready woodworking plan covering every stage of the pergola build:
- Step-by-step building instructions — 11 clearly written stages from first cut to finished structure
- Full cut list with measurements — exact dimensions for every post, board, brace, and truss
- Complete material list — know exactly what lumber and hardware to purchase before you start
- Tools required list — tape measure, drill, miter saw, jigsaw, reciprocating saw, level, construction square
- Assembly diagrams and reference illustrations — visual guides for framing, bracing, truss shaping, and swing hardware placement
- Swing support reinforcement details — metal angle iron specs and eye bolt placement included for future swing bench installation
- Estimated build time and project cost — plan your weekend and budget before buying a single board
- Printable PDF format — print at home or at any local copy shop
- Instant digital download — access your plans immediately after purchase
- Works on desktop, tablet, and mobile — view on any device, anywhere
Project Details
| Detail | Info |
|---|---|
| Difficulty Level | Beginner |
| Estimated Build Time | 7 hours |
| Estimated Project Cost | ~$340 |
| Lumber Type | Pressure-treated (recommended for all outdoor use) |
| Primary Lumber Sizes | 4×4, 2×6, 2×4, 1×6, 1×4 |
| Swing Hardware (included in plans) | Eye bolts, washers, nuts, metal angle iron |
Recommended Tools: Tape Measure · Drill · Miter Saw · Jigsaw · Reciprocating Saw · Level · Construction Square · Pencil or Marking Tool
What You’ll Build — Step by Step
The plans cover the full pergola construction process across 11 detailed steps:
- Cut the four main 4×4 pressure-treated corner posts
- Cut all horizontal support boards in 2×4 and 2×6 lumber
- Prepare diagonal corner braces with 15-degree angled end cuts
- Assemble the two pergola side panels with lower diagonal bracing
- Connect both side panels using 109-inch 2×6 top beams
- Build and shape upper diagonal braces with a decorative curved arch detail
- Install four upper braces for side-to-side structural stability
- Build the roof trusses — including reinforced 2×4 trusses with metal angle iron backing for swing support
- Install all roof trusses and evenly spaced decorative 1×4 slats
- Install the remaining four upper braces to complete the frame
- Install swing eye bolts through the reinforced trusses and metal supports
Every step includes exact measurements, fastener sizes, and practical tips to keep the frame square and level throughout the build.
The Swing Bench Option — What to Know
This pergola is designed and reinforced to support a hanging swing bench, but the swing bench itself is a separate woodworking project. The pergola plans include everything needed to properly prepare the structure for swing installation:
- Reinforced 2×4 roof trusses backed with 63-inch metal angle iron
- Pre-drilled 3/8-inch holes positioned 21 inches from each end of the swing trusses
- Eye bolt, washer, and nut hardware placement for a secure swing mount
When you’re ready to add a swing bench, the structure will already be built and waiting for it. The swing bench plans are available separately.
Why These Plans Are Worth It
Free tutorials give you a general idea of how a project works. A proper set of plans gives you the confidence to actually build it — accurately, safely, and without wasted time or materials.
Exact measurements from start to finish. Every cut is listed with precise dimensions so you’re never guessing at the lumber yard or mid-build.
Swing-ready engineering built in. The reinforcement details — metal angle iron, hole placement, eye bolt hardware — are already accounted for in the plans, whether you add the swing now or later.
Avoid costly mistakes. A complete cut list means you buy only what you need, with no wasted lumber and no extra hardware store runs.
Print it, take it outside, and build. No scrolling through a phone mid-cut. Bring the printed plans to your workspace and follow along.
Written for real DIYers. Squaring tips, lumber recommendations, fastener guidance, and moisture protection advice are all built into the instructions — not left for you to figure out on your own.
Digital Download — How It Works
This is a digital product only. No physical materials, lumber, hardware, or printed plans are shipped.
- After purchase, you’ll receive an instant download link for your PDF file
- No waiting, no shipping delays
- Open on any desktop, laptop, tablet, or smartphone
- Print at home or at any local print shop for easy reference while building
- Standard PDF format — compatible with Adobe Reader and any PDF viewer
Build the Backyard Structure You’ve Been Planning
A well-built pergola adds real value to your outdoor space — and building it yourself makes it even more rewarding. With these plans, you’ll have a clear, accurate roadmap from the first cut to the finished structure, with the added bonus of swing bench compatibility already built in.
Download the PDF plans today and start building.
Other Woodworking Projects


Tools for this project
- Tape Measure
- Drill
- Miter Saw
- Jig Saw
- Sawzall
- Level
- Pencil or Marking Tool
- Construction Square
Material List
- Available with the purchase of PDF plans.
Note: Lumber dimensions are listed as nominal size. See lumber sizes for actual dimensions vs nominal.
Disclosure: Some of the links on this page, as well as links in “tools for this project” and “material list” sections, are affiliate links.
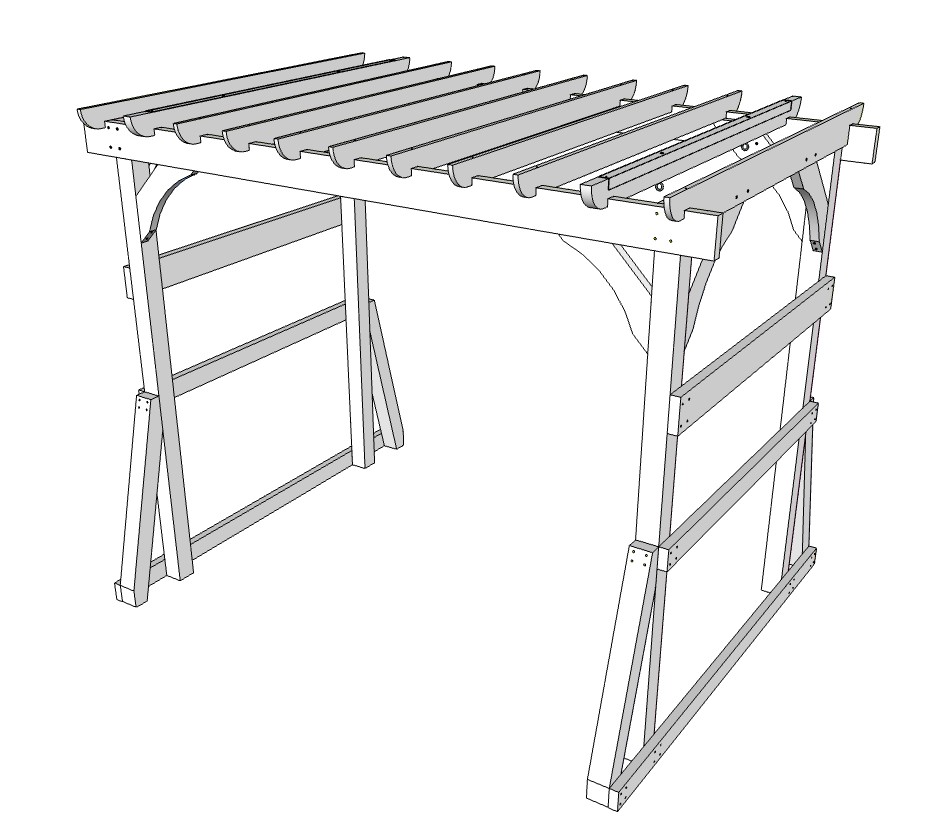
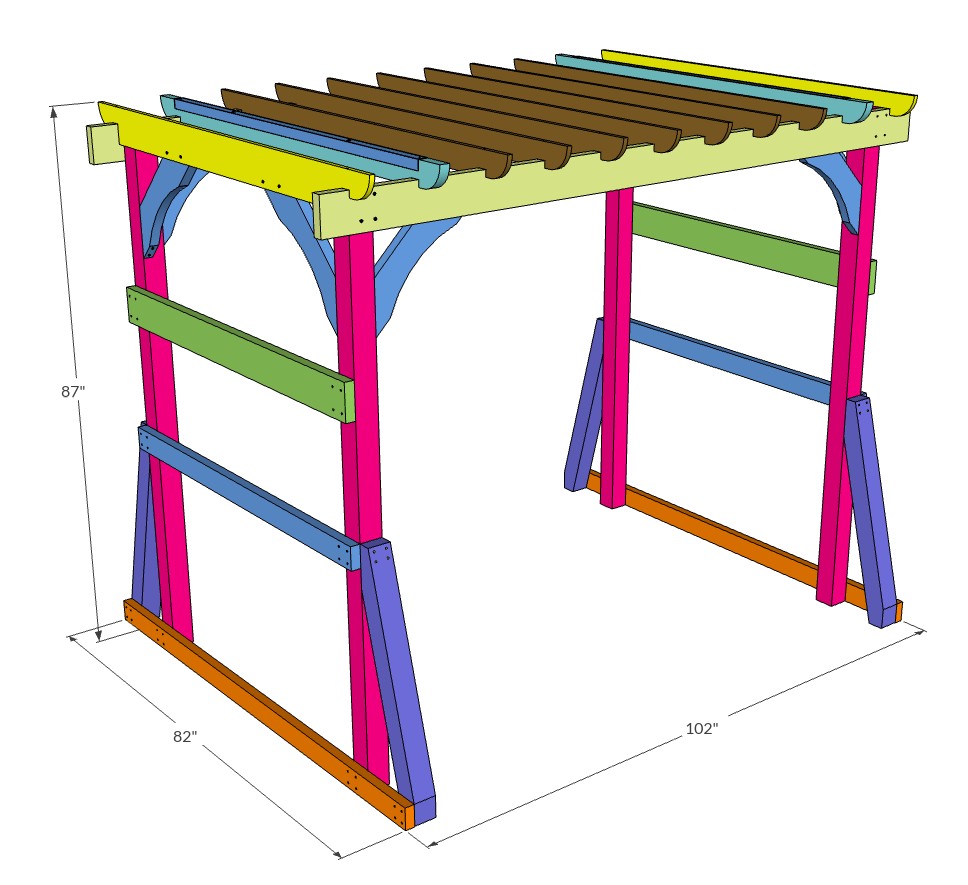
Dimensions
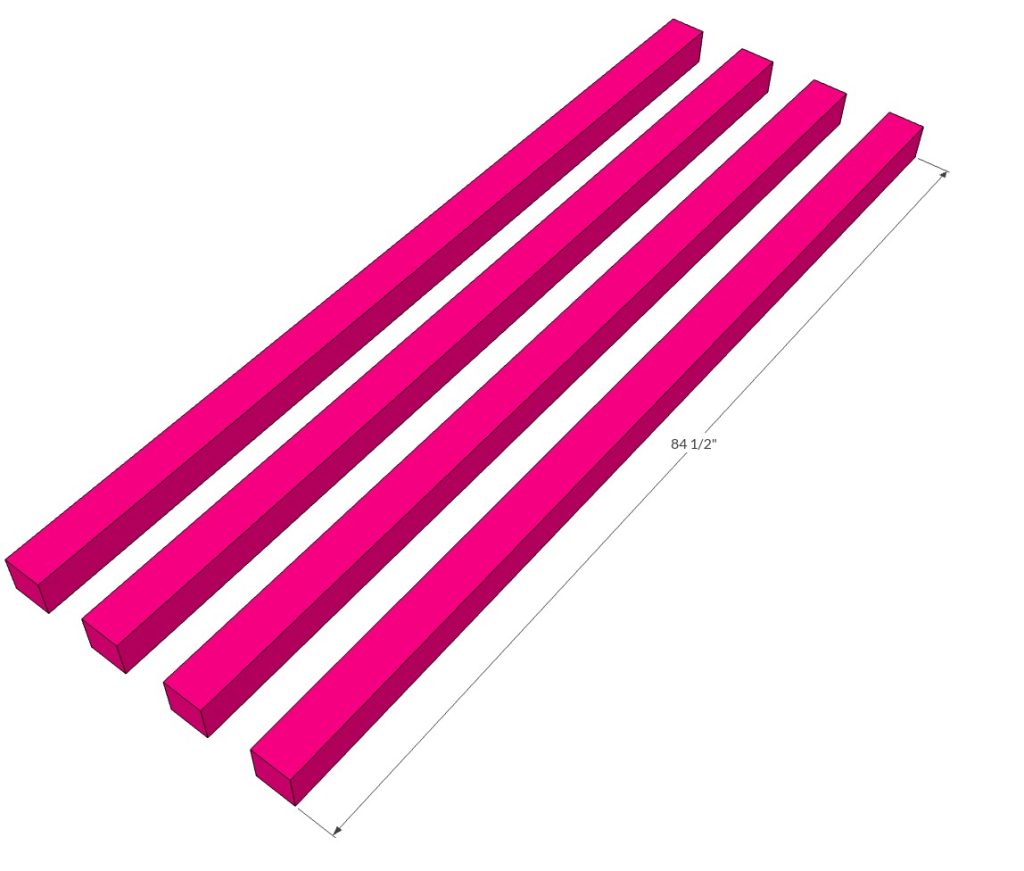
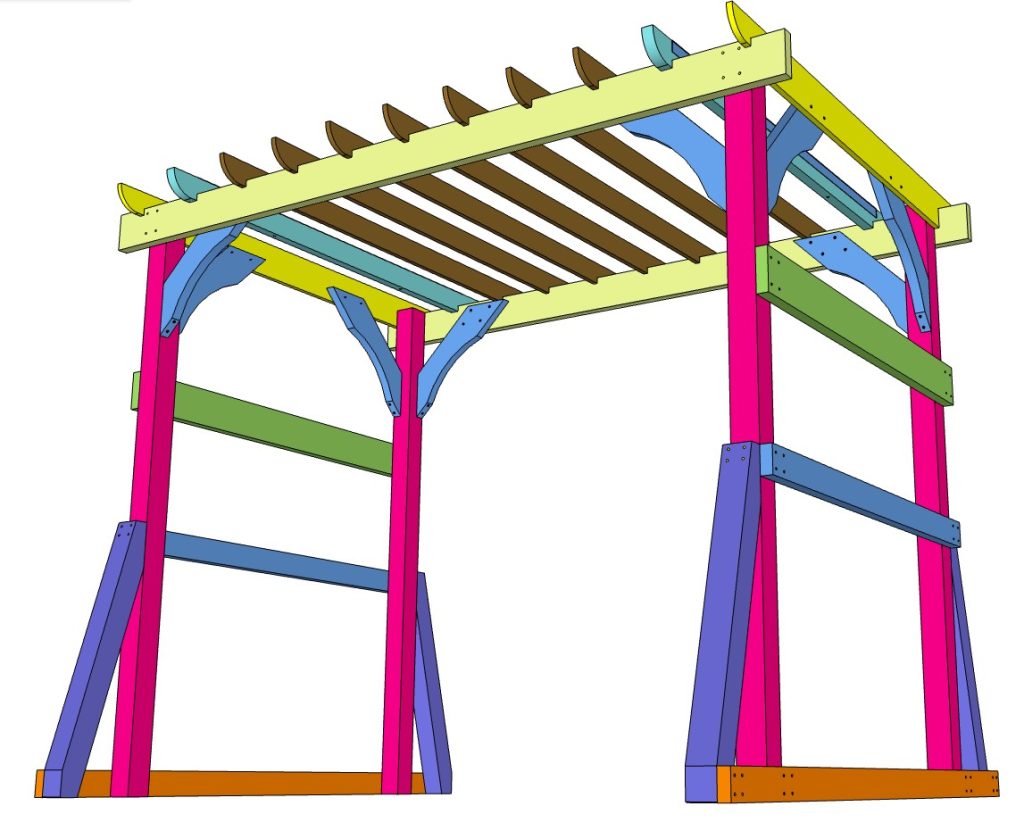
Step 1 – Cut the Pergola Corner Posts
When building any outdoor woodworking project, using pressure-treated lumber is highly recommended. Pressure-treated wood is far more resistant to rot, insect damage, mold, and moisture exposure than standard lumber, helping extend the lifespan of your pergola for many years.
Although pressure-treated wood is designed for outdoor use, it is still important to keep the posts from sitting directly on moist soil. Constant ground contact can speed up wood deterioration over time. For best results, position the pergola on concrete blocks, patio pavers, or brick supports to help protect the structure from excess moisture.
Begin by cutting the four main corner posts for the pergola frame. Using 4×4 pressure-treated lumber, cut four pieces to 84 1/2 inches long.
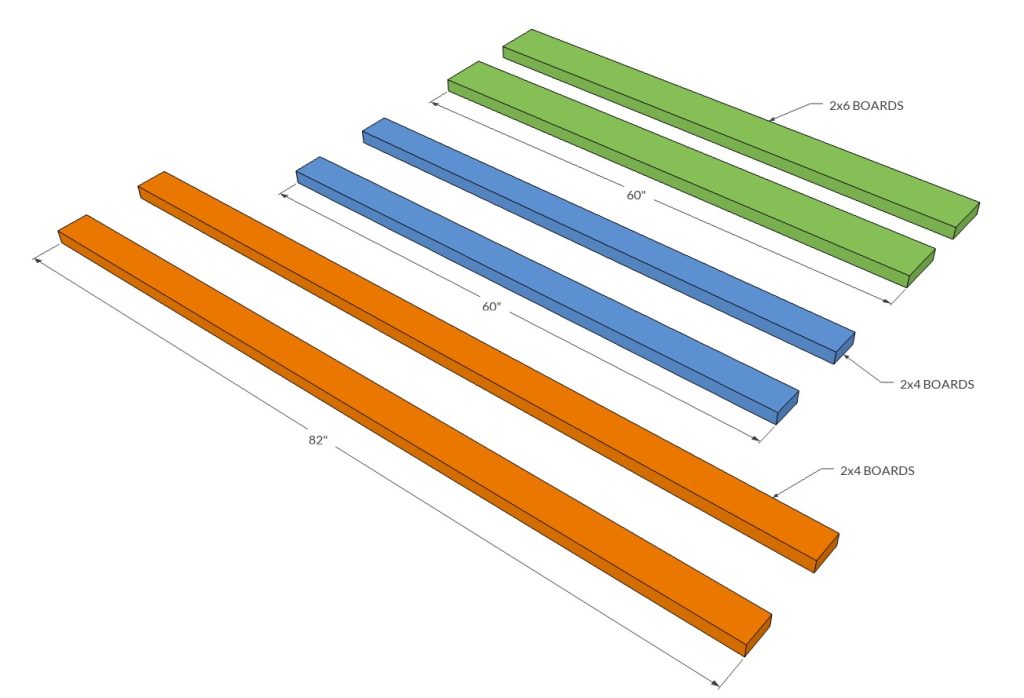
Step 2 – Cut the Horizontal Support Boards
Next, prepare the horizontal boards that will connect the pergola posts together and form the main left and right panel structures.
Using 2×4 lumber, cut:
- Two pieces to 82 inches
- Two pieces to 60 inches
Then, using 2×6 lumber, cut:
- Two pieces to 60 inches
These boards will be installed horizontally between the corner posts to strengthen the pergola frame and create a solid support structure.
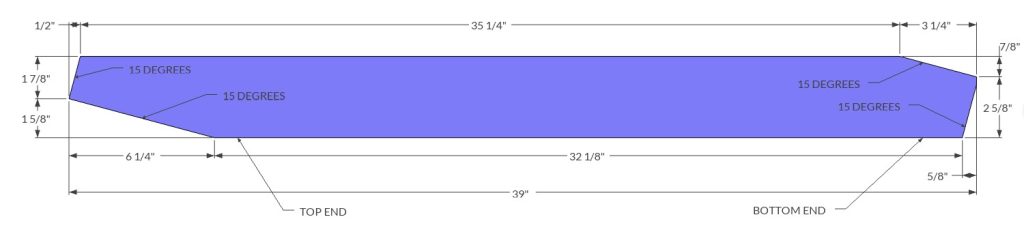
Step 3 – Prepare the Diagonal Corner Braces
To improve the overall rigidity and stability of the pergola, install diagonal braces at each corner of the frame. These braces help reduce movement and strengthen the structure against shifting or racking over time.
Using 4×4 lumber, cut four pieces to 39 inches long.
After cutting the boards to length, trim both ends of each brace at a 15-degree angle as shown in the image. The angled cuts allow the braces to fit tightly between the posts and horizontal supports for a cleaner and stronger connection.

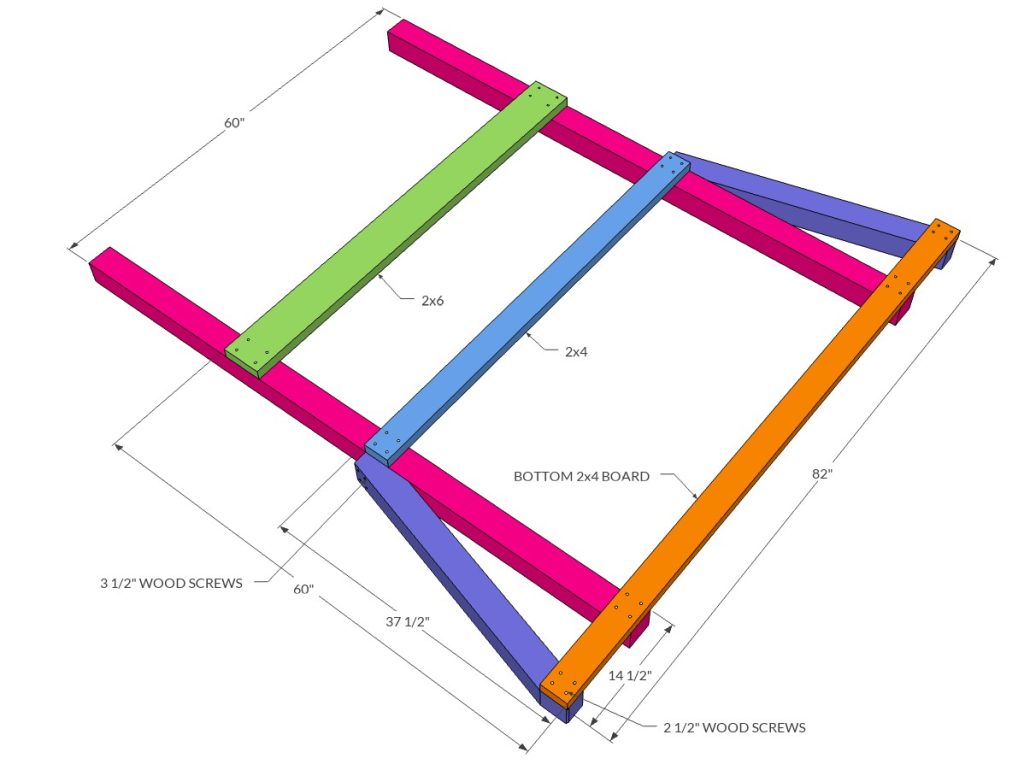
Step 4 – Assemble the Pergola Side Panels
Now it’s time to assemble the pergola side panels.
Start by laying two 4×4 corner posts on a flat surface, positioning them parallel to each other at 60 inches apart. Next, take one of the 82-inch 2×4 boards and measure 14 1/2 inches from both ends. Position the board across the two posts at those marks and secure it using 2 1/2-inch wood screws. See image.
As you assemble the frame, make sure the 4×4 posts remain perfectly square at 90 degrees to the horizontal board. Using a construction square will help keep the frame aligned properly during assembly.
If the lumber is especially dry, it’s a good idea to pre-drill pilot holes before driving screws. This helps prevent the wood from splitting near the ends or edges.
You can also use bolts and nuts instead of wood screws if preferred. Bolted connections offer additional long-term strength and can be tightened later as the pressure-treated lumber naturally dries and shrinks over time.
Next, install the lower diagonal braces between the posts and the lower 2×4 board. Attach the bottom end of each brace to the 2×4 board using 2 1/2-inch wood screws. For the upper connection into the thicker 4×4 post, use 3 1/2-inch wood screws for a stronger hold.
Position the diagonal brace so the upper end sits approximately 37 1/2 inches from the bottom of the post.
Once the lower braces are installed, attach the middle horizontal board. Position this board at the same elevation as the diagonal brace connection point and fasten it using 2 1/2-inch wood screws.
Finally, measure 60 inches up and install the upper boards using the same fastening method. Double-check that all boards remain square and level before fully tightening the screws. A construction square and level are very helpful here to ensure the pergola frame stays properly aligned.
Repeat the entire process to assemble the second pergola side panel.
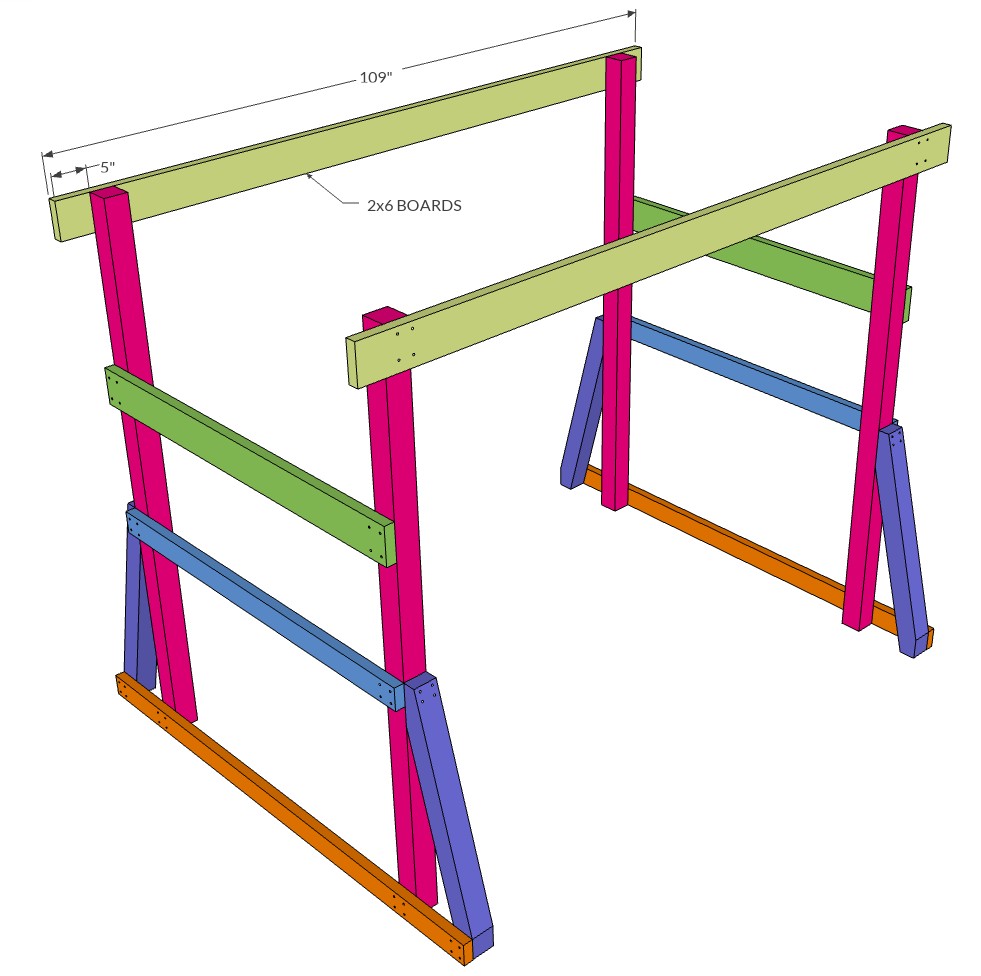
Step 5 – Connect the Pergola Side Panels
Before connecting the two side panels together, choose the final location for the pergola. Since this is an outdoor woodworking project, it’s important to keep the posts off direct soil contact. Place concrete blocks, patio pavers, or bricks beneath each corner post to help protect the wood from moisture.
To connect the two side panels, prepare the top support beams. Using 2×6 lumber, cut two pieces to 109 inches long.
With the help of another person, stand both side panels upright in their final position. Once the panels are aligned, take one of the 109-inch 2×6 boards and measure 5 inches from both ends. Attach the board to the tops of the posts at those marks.
The top 2×6 board should sit flush with the top of the 4×4 posts. Refer to the project diagram or reference image to confirm proper placement.
As you secure the boards, make sure both side panels remain level and square. Keeping the structure aligned at this stage is critical for overall stability and appearance. Use a level and construction square to verify the posts and horizontal supports are properly positioned before tightening all fasteners.
Step 6 – Build and Shape the Upper Diagonal Braces
In Step 4, you installed lower diagonal braces to prevent the pergola from swaying front to back. Now you’ll add upper diagonal braces to strengthen the frame from side-to-side movement and improve overall rigidity.
Using 2×6 lumber, cut eight pieces to 26 1/4 inches long. Then cut 45-degree miter cuts on both ends of each piece.
At this point, you can either install the braces as-is or add a decorative curved detail to improve the appearance of the pergola.
To create the curved arch detail, measure 3 1/4 inches from one end of the brace and draw a 15-inch-long arc along the bottom edge. The exact curve shape can be adjusted to match your preferred style.
Once the curve is marked, cut along the line using a jigsaw. After shaping the first brace, use it as a template to trace matching curves onto the remaining pieces. Then cut the rest of the braces to create a consistent decorative appearance across the pergola.

Step 7 – Install the Upper Diagonal Braces
Now it’s time to install four of the upper diagonal braces that were prepared in the previous step. These braces help stiffen the pergola frame and reduce side-to-side movement.
Start by measuring 64 inches up from the ground on each post and marking the location. Position the diagonal brace so it aligns with that mark and sits at approximately a 45-degree angle between the post and the upper 109-inch horizontal board.
Secure the brace to the 4×4 post using 3 1/2-inch wood screws. Then fasten the opposite end to the upper horizontal board using 2 1/2-inch wood screws.
As you install the braces, double-check that the frame remains square and level. Proper alignment at this stage will help ensure the roof trusses fit correctly later in the build.
Only install four upper braces for now. The remaining four braces will be installed later after the roof trusses are in place.

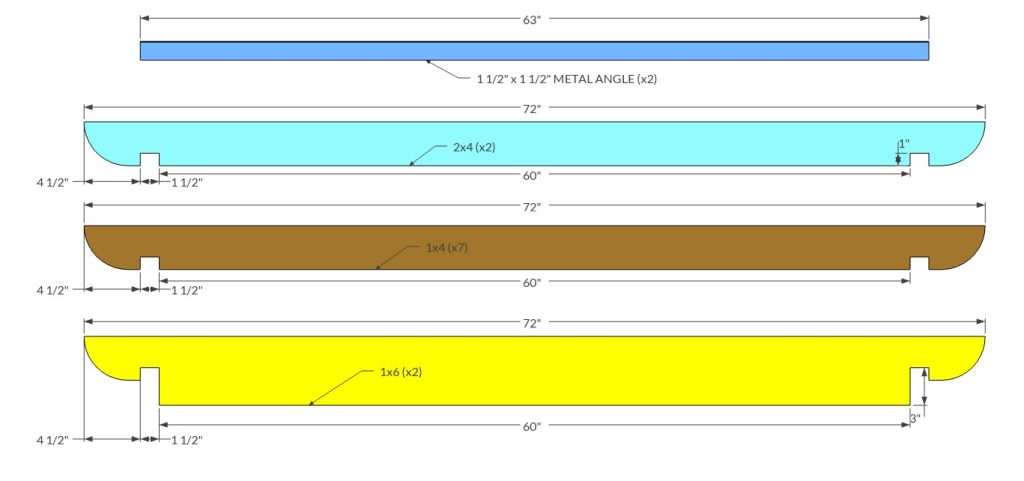
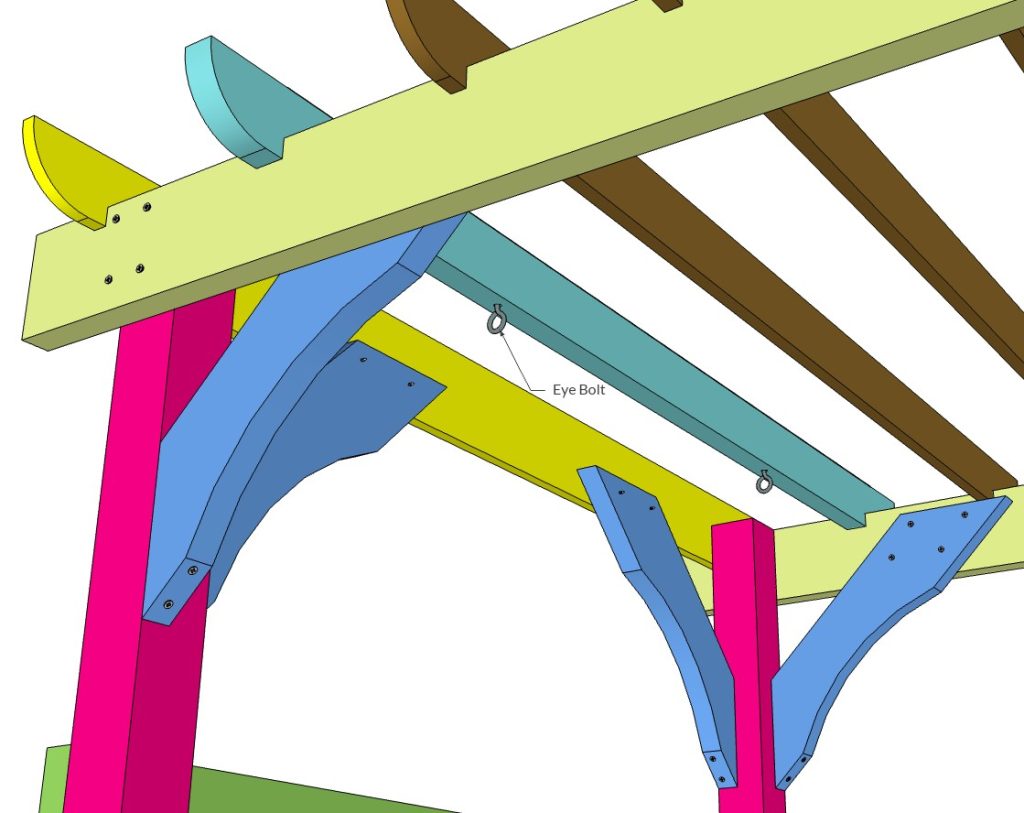
Step 8 – Build the Pergola Roof Trusses
The roof trusses give the pergola its decorative appearance while also providing structural support if you plan to install a swing bench.
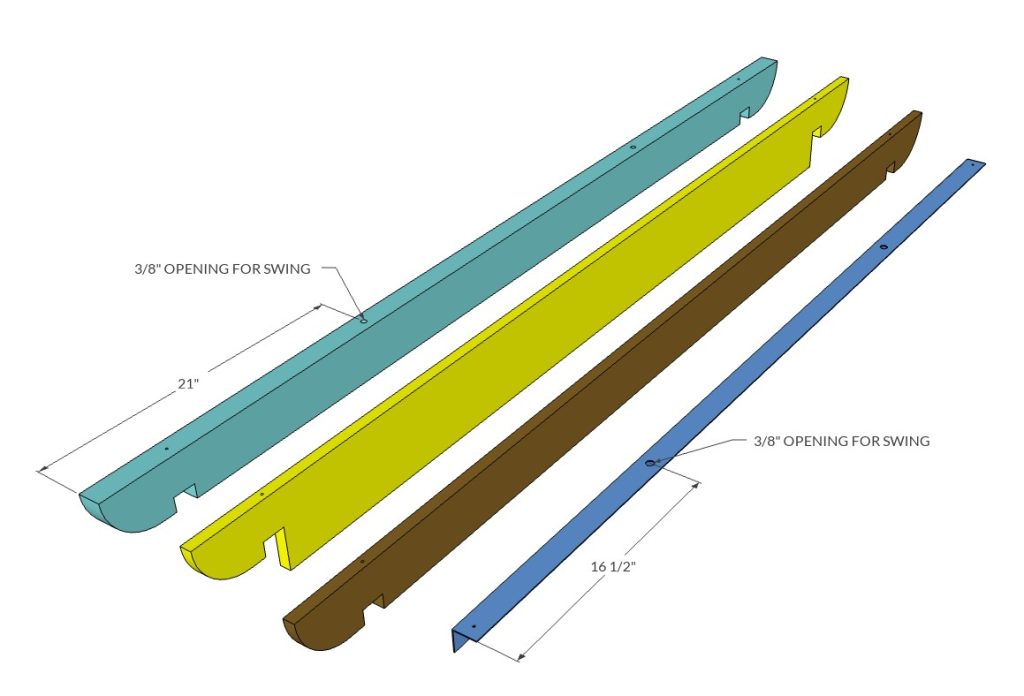
All truss boards are cut to the same overall length, but they use different lumber sizes. Cut the following pieces to 72 inches long:
- Two 1×6 boards
- Two 2×4 boards (only needed if installing a swing bench; for this project, we will assume you will install the swing bench)
- Seven 1×4 boards
If you do not plan to install a swing bench, the 2×4 trusses can be replaced with standard 1×4 boards to match the rest of the decorative roof slats.
Next, use the provided dimensions and reference diagram to cut the required notches and decorative curves on each truss board. The spacing between the notches should measure 60 inches.
Before cutting the notches, it’s a good idea to double-check the actual distance between the installed upper support boards on your pergola frame. Verifying this measurement first helps ensure the trusses fit properly during installation.
The 2×4 trusses are especially important if you plan to hang a swing bench. These boards will carry the weight of the swing and must be reinforced for additional strength and safety. A standard 2×4 by itself is not strong enough to safely support the long-term load of a hanging swing bench.
To strengthen the trusses, use 1 1/2-inch × 1 1/2-inch metal angle iron and cut two pieces to 63 inches long using a reciprocating saw with a metal-cutting blade.
Next, measure 21 inches from each end of the 2×4 truss boards and drill a 3/8-inch hole for the swing eye bolts. These holes will later hold the swing hardware.
Transfer the same hole locations onto the metal angle pieces and drill matching holes through the metal. When positioning the holes on the angle iron, the measurements should be approximately 16 1/2 inches from each end.
Make sure all holes align properly so the eye bolts can pass cleanly through both the wood and metal reinforcement.
Step 9 – Install the Roof Trusses
Begin by installing the 1×6 trusses onto the top of the pergola frame. Attach the trusses to the 4×4 posts on both sides of the pergola using 1 1/2-inch wood screws.
Next, install the reinforced 2×4 trusses. Since these boards will support the swing bench, their placement depends on the width of your swing.
Before attaching the boards, measure the overall width of the swing bench and determine the proper spacing needed for the hanging hardware. Position the 2×4 trusses so they are centered evenly within the pergola frame and spaced appropriately for the swing.
Secure the 2×4 trusses to the upper support boards using 2 1/2-inch wood screws.
Once the structural trusses are installed, attach the remaining 1×4 decorative trusses. Space these boards evenly across the top of the pergola before fastening them into place.
These 1×4 boards are primarily decorative and are not intended to support weight, but they help complete the pergola roof design and give the structure a more finished appearance.
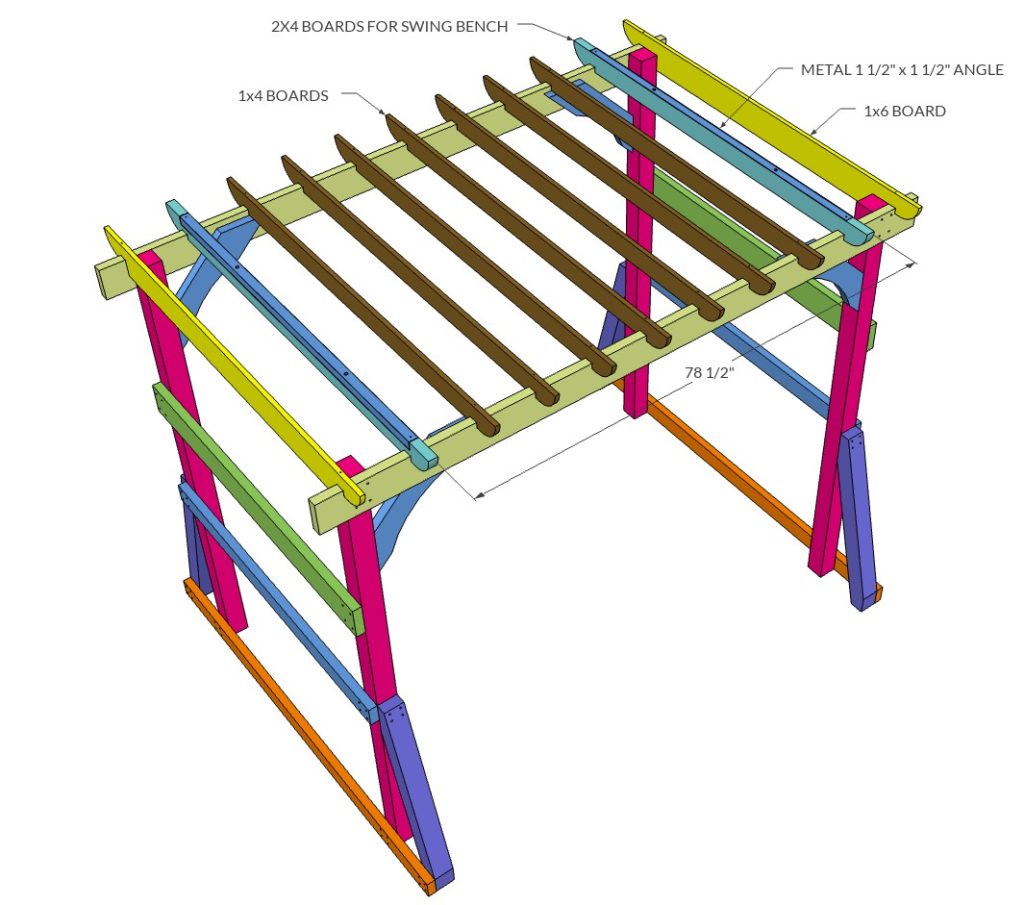
Step 10 – Install the Remaining Upper Braces
With the roof trusses installed, you can now attach the remaining upper diagonal braces.
Position each brace between the 4×4 post and the adjacent 1×6 roof truss board. Secure the braces using 1 1/2-inch wood screws.
Once installed, the diagonal braces will extend in all four directions around the pergola frame. This additional bracing helps strengthen the structure and greatly reduces movement or rocking over time, especially when the swing bench is in use.
As you fasten the braces, make sure everything remains square and aligned for a clean finished appearance.
Step 11 – Install the Swing Eye Bolts
The final step is installing the hardware for the swing bench.
Insert the eye bolts through the pre-drilled holes in the reinforced 2×4 roof trusses and metal angle supports. Then secure each eye bolt using the appropriate washers and nuts.
Tighten the hardware firmly so the swing mounting points are secure and stable. Double-check that all bolts are fully tightened and properly aligned before hanging the swing bench.
Once the eye bolts are installed, the pergola structure is complete and ready for the swing installation.


Reviews
There are no reviews yet.