Stop Wasting Space in Your Garage — Build the Storage You Actually Need
If your garage looks more like a junk room than a functional workspace, you’re not alone. Most garages are full of wasted vertical space, tools scattered across every flat surface, and zero real organization. The fix isn’t another set of wire shelving or a plastic bin tower — it’s a properly built garage base cabinet that actually does the job.
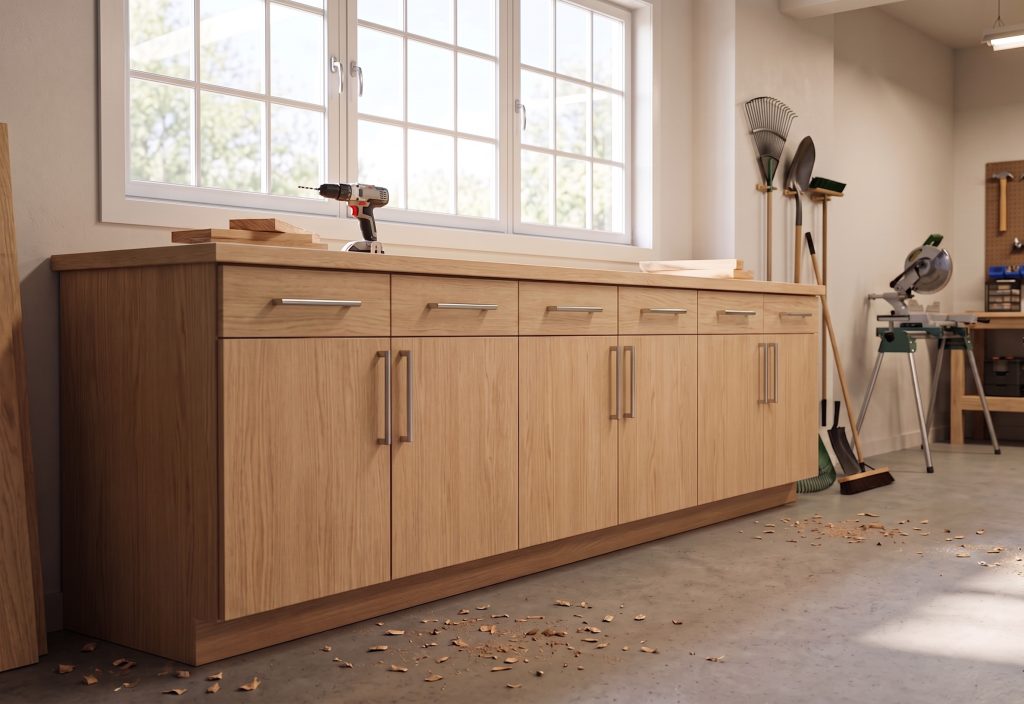
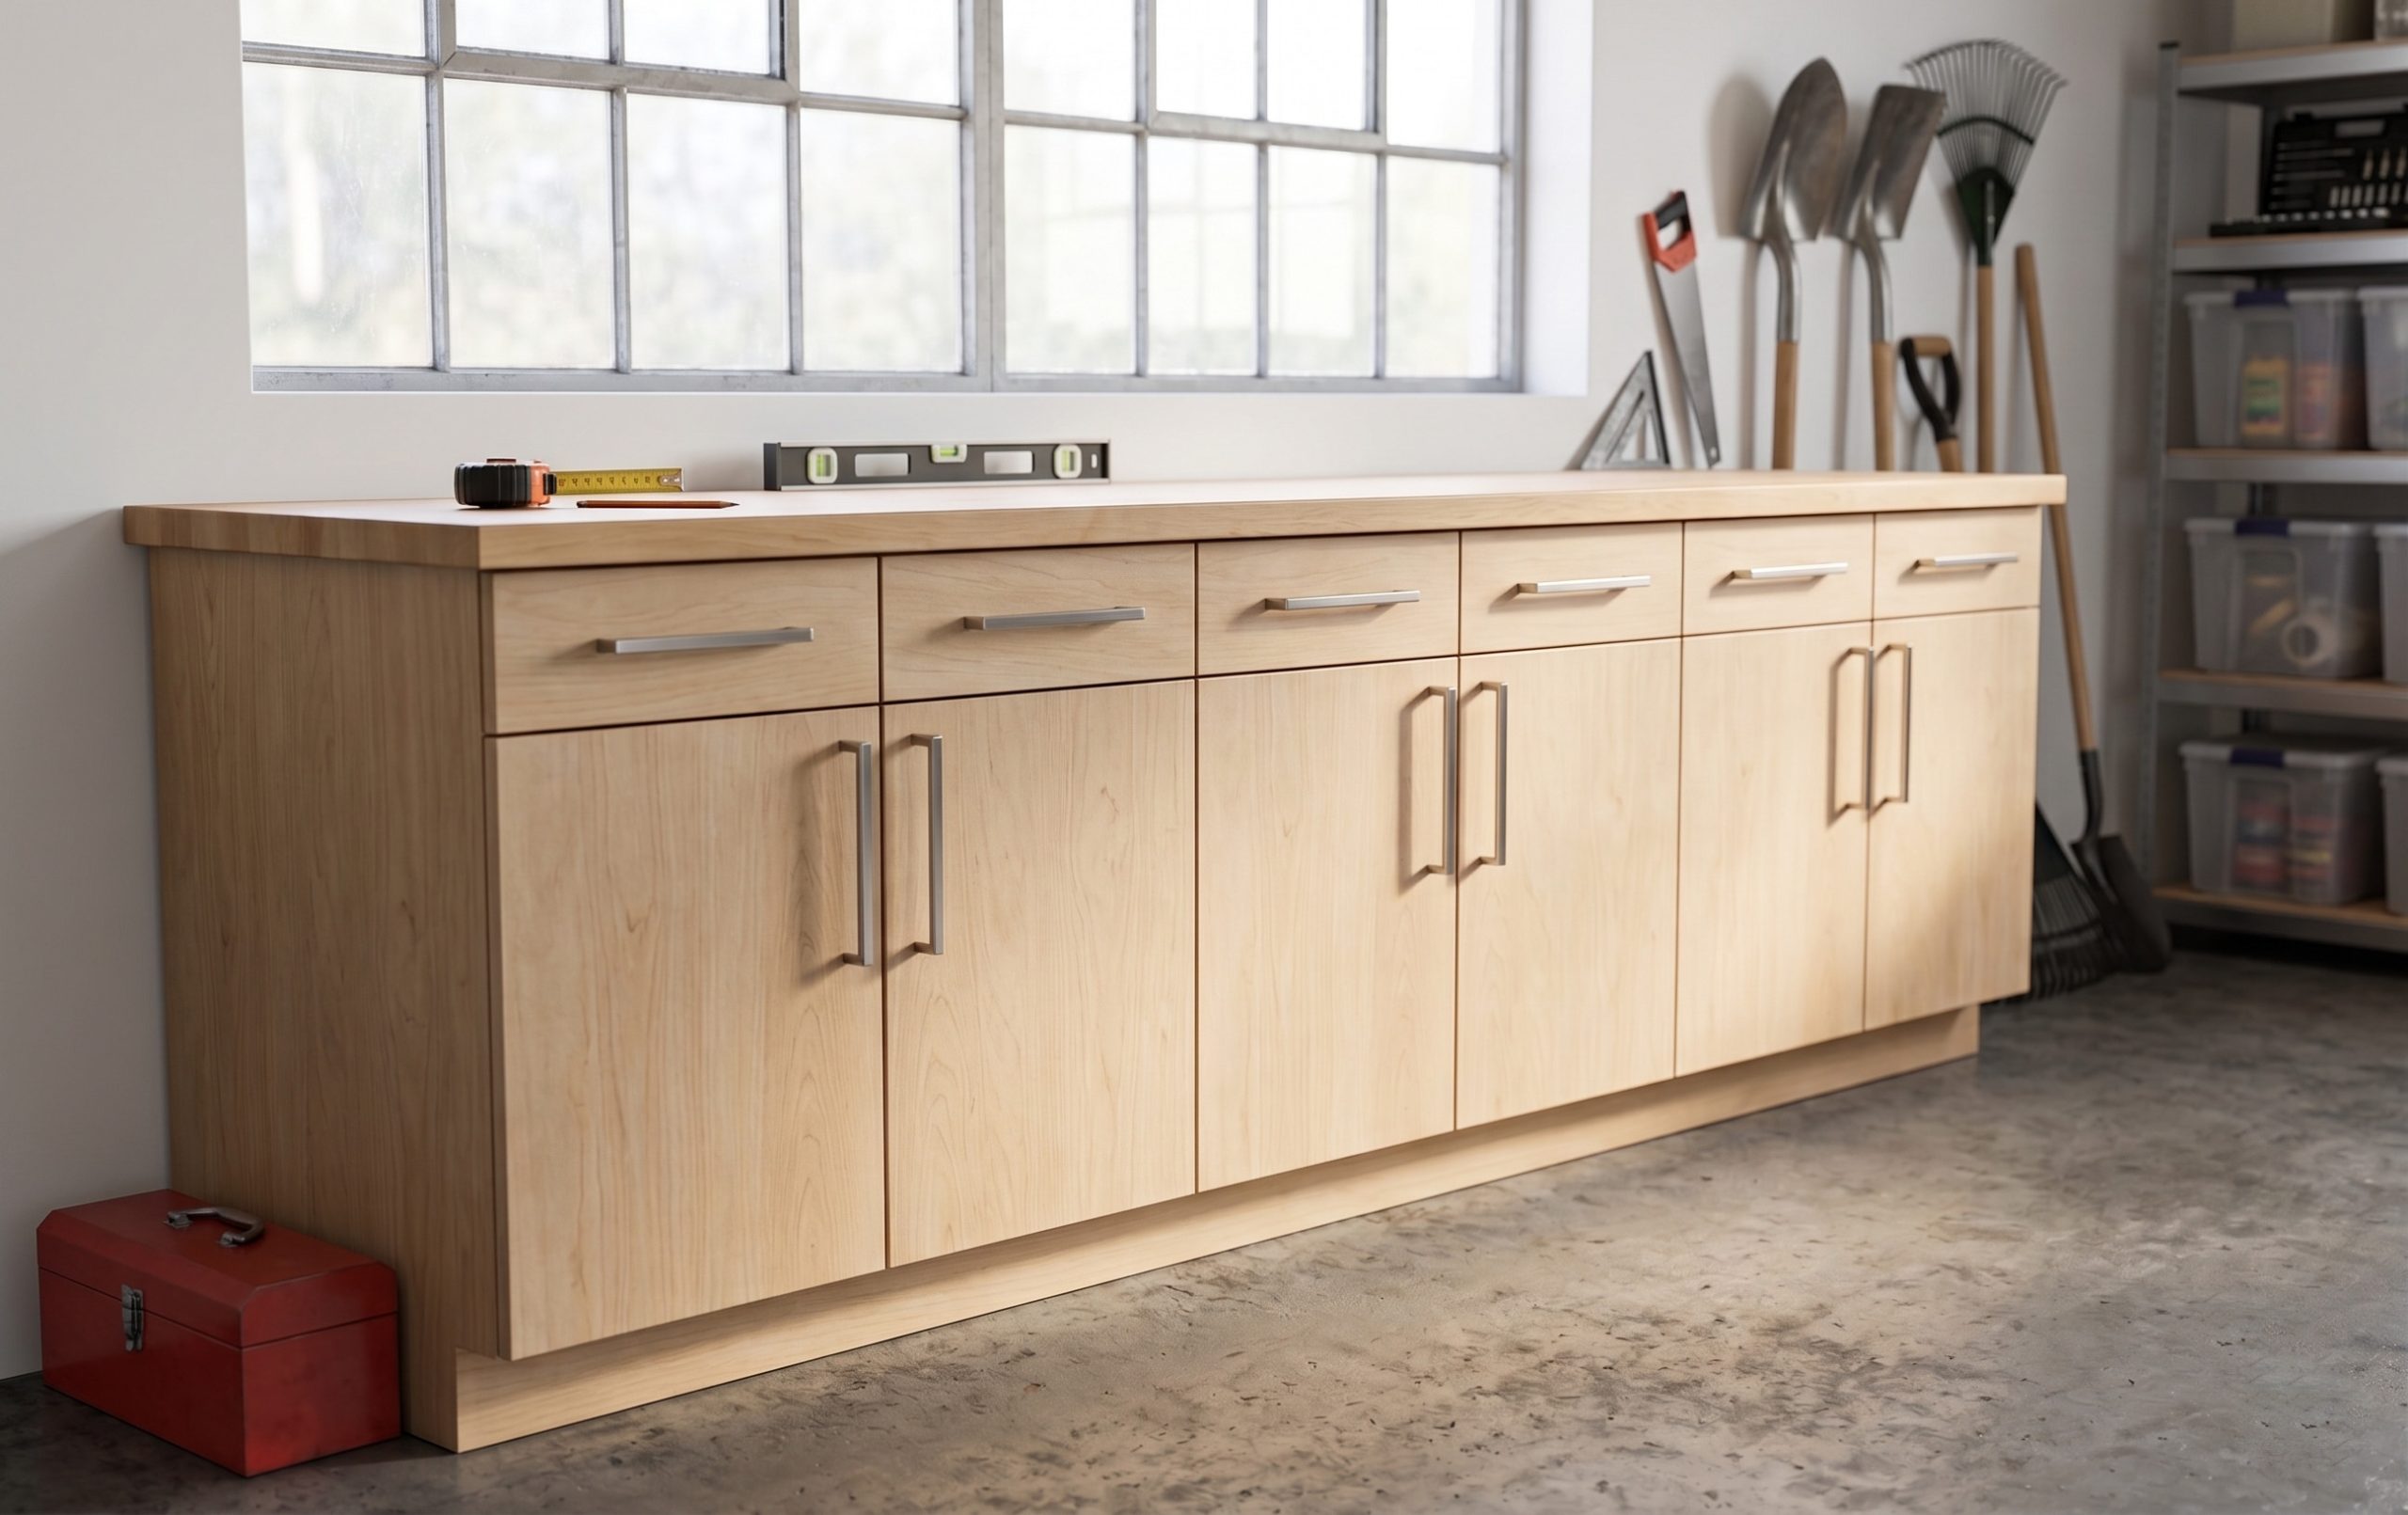
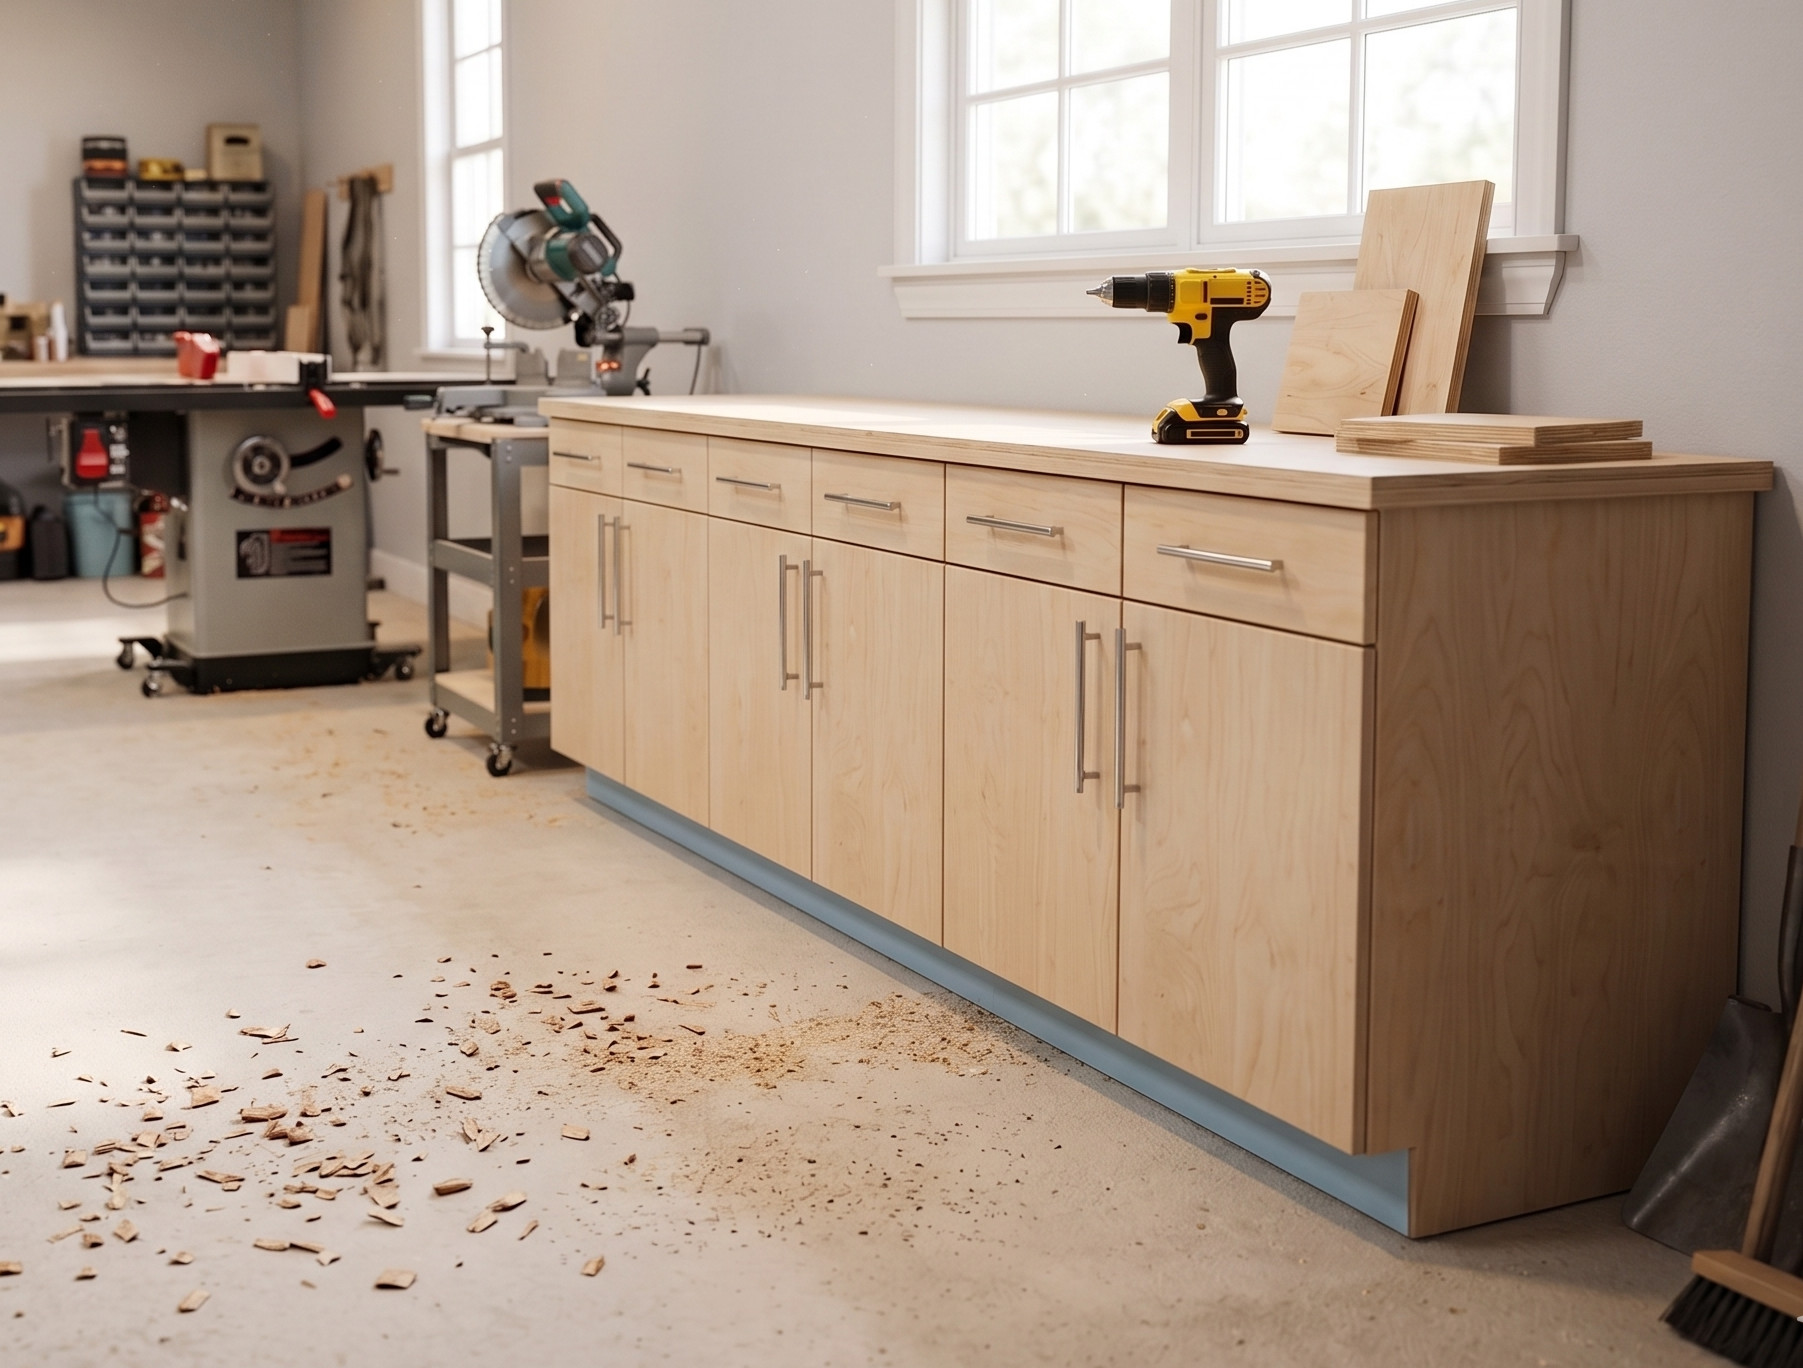
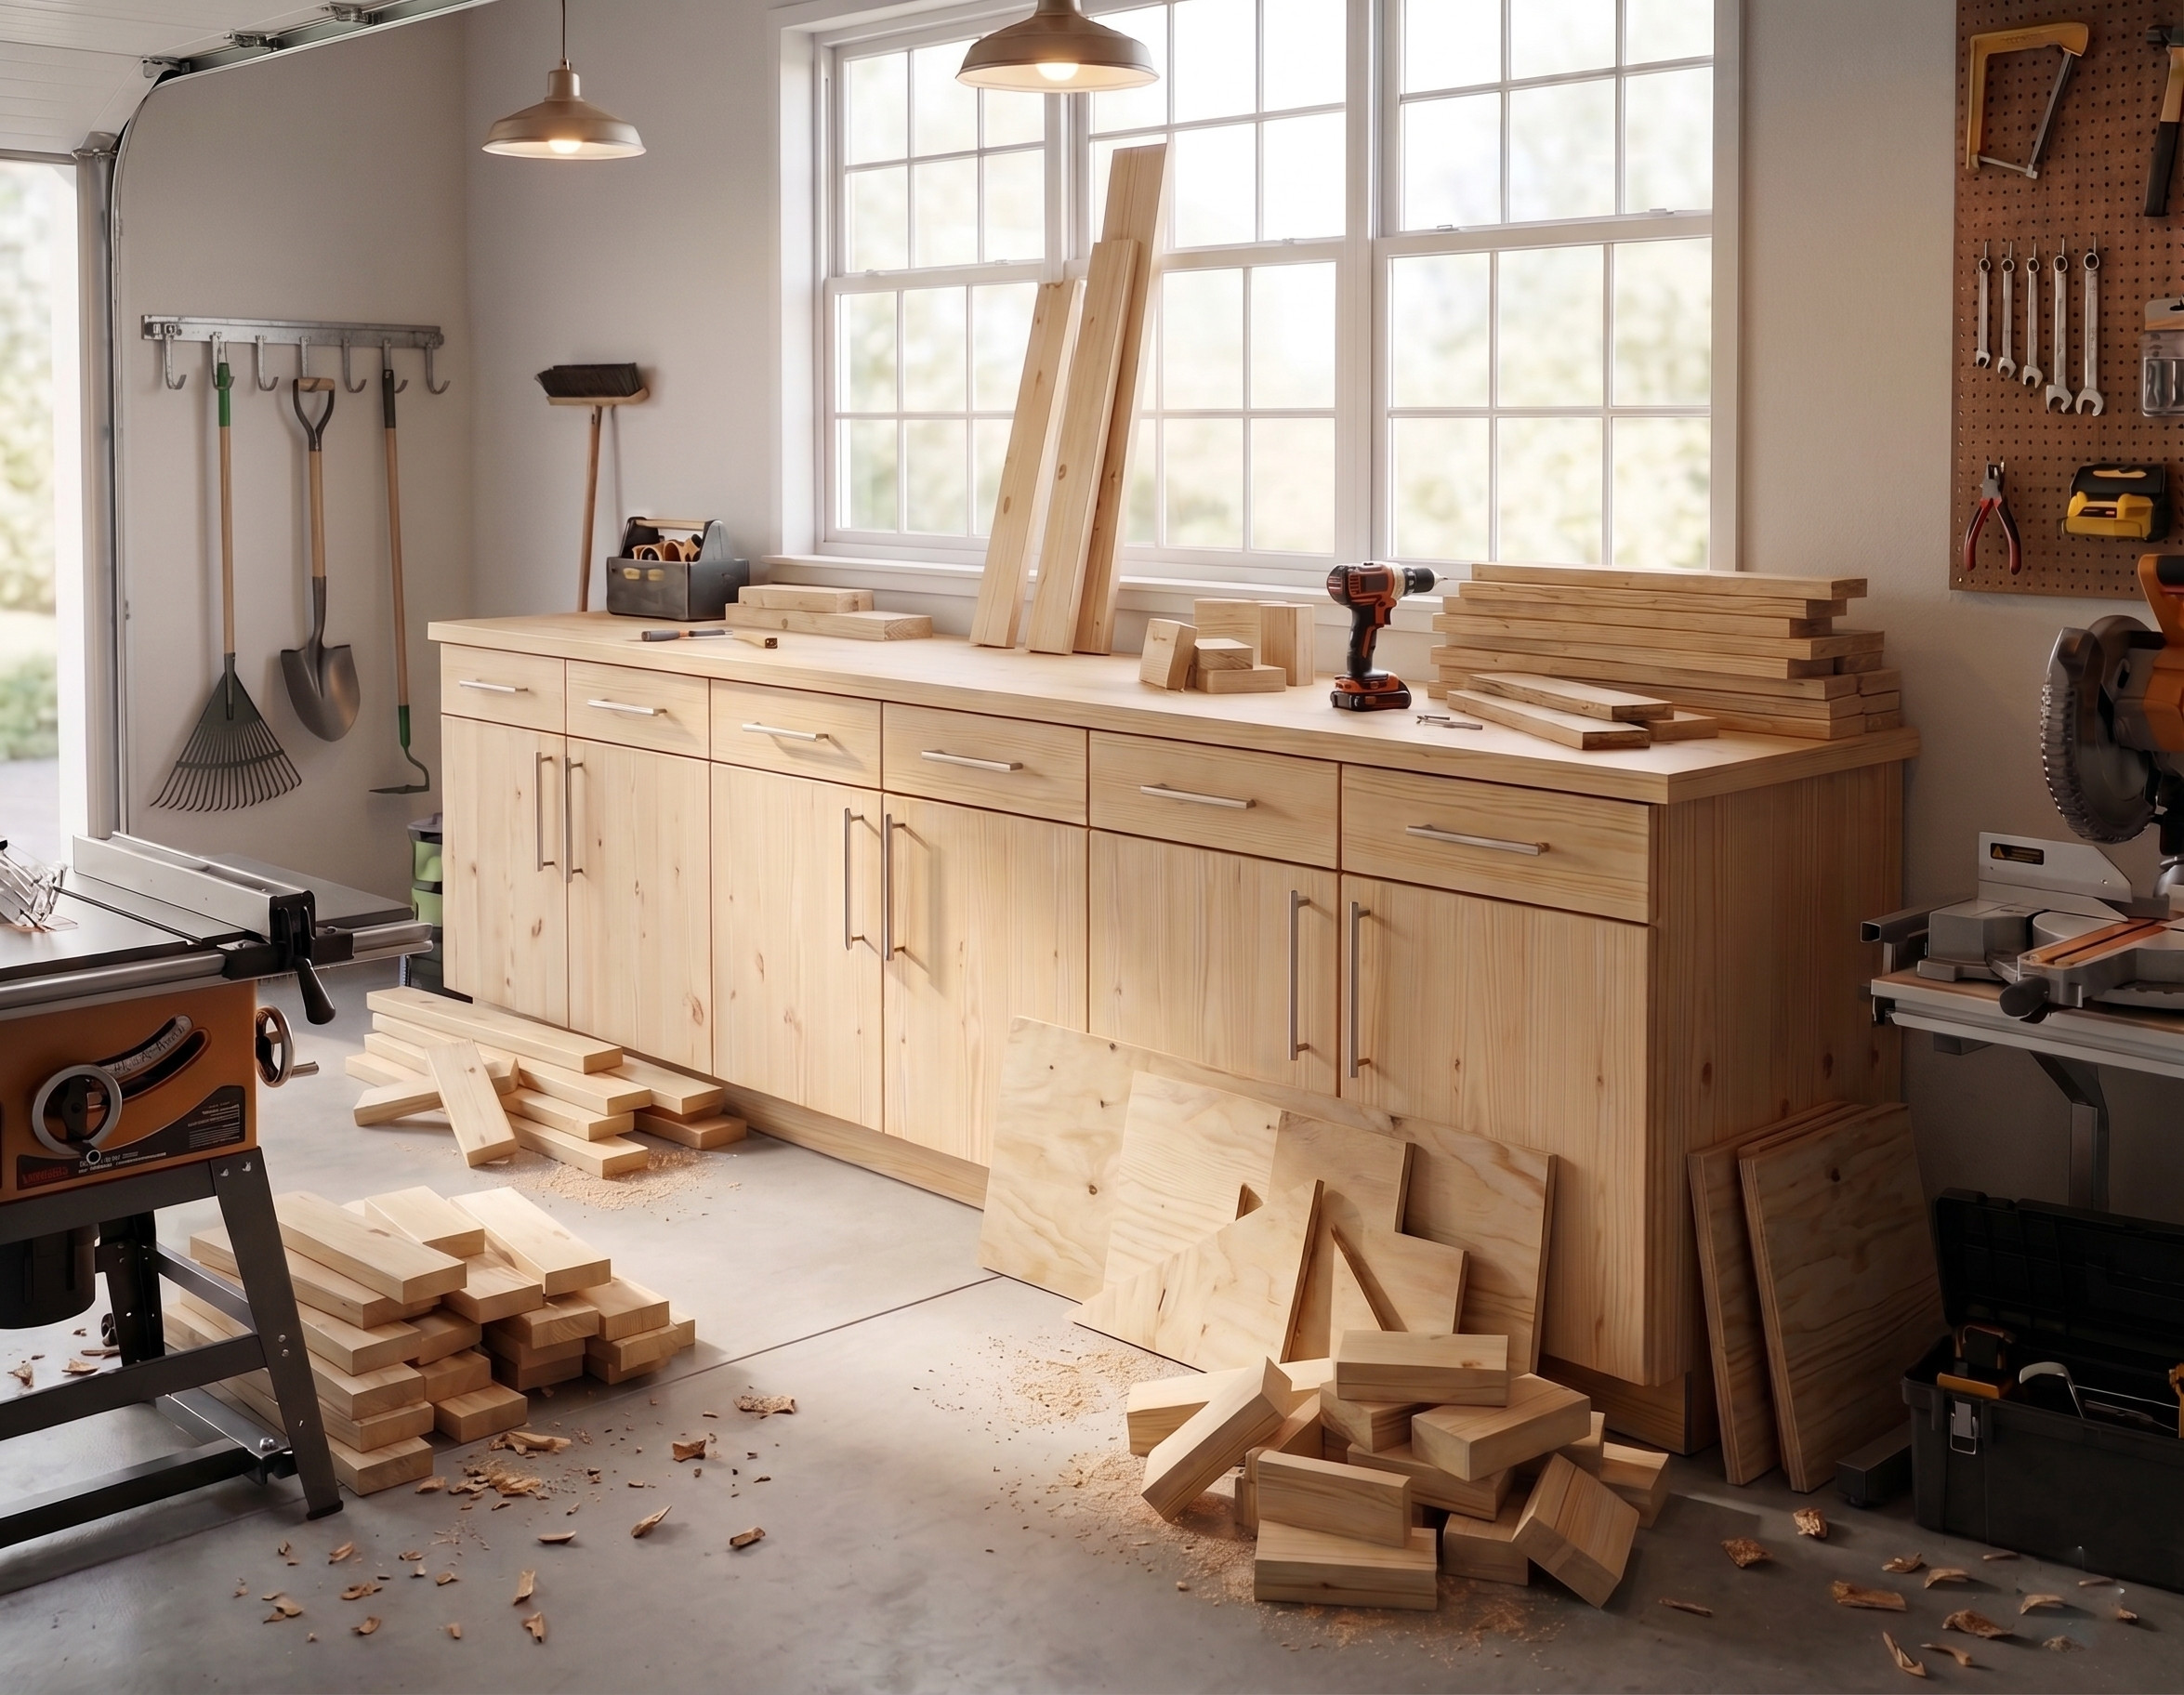
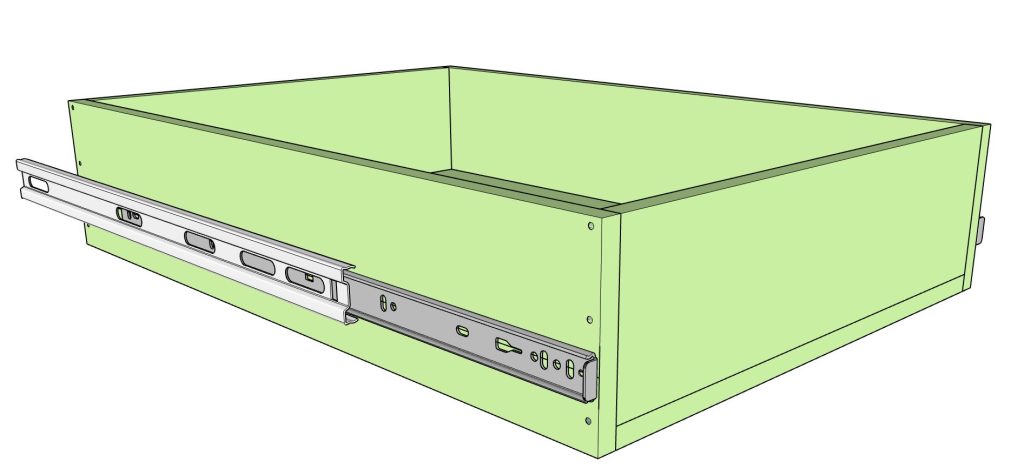
This step-by-step cabinet building tutorial walks you through how to build a frameless garage base cabinet with double slab-style doors and two full drawers. No fluff, no complicated joinery — just a clean, durable DIY woodworking project built from cabinet-grade plywood and assembled with pocket hole screws. If you’ve been searching for practical DIY cabinet plans for your garage, this is the project.
Why Slab Doors Are the Right Choice for a Garage Cabinet
Shaker doors look great in a kitchen. In a garage? They collect dust in every groove and take more time to build for no functional reason. Slab doors — flat, smooth panels — are easier to cut, easier to clean, and give your garage a sharp, workshop-ready look that holds up in a real working environment.
This frameless cabinet construction approach also gives you more interior storage space compared to face-frame designs. What you lose in trim detail, you more than make up for in usability. And since the frameless style is modular by nature, these woodworking plans can be repeated side by side to build out an entire wall of garage cabinets over time.
What You’ll Build — And What You’ll Learn
This DIY woodworking project produces a 36-inch wide frameless base cabinet designed specifically for garage use. It includes:
- A sturdy plywood cabinet box built with pocket hole joinery
- Two full-overlay slab doors with concealed hinges
- Two functional drawer boxes with drawer slides
- A toe kick base for a finished, built-in look
- A design that’s ready for paint, primer, or a shop-grade topcoat
Along the way, you’ll learn the fundamentals of cabinet construction — how to cut and square a cabinet box, how to build and install drawer boxes that operate smoothly, how to hang doors with consistent reveals, and how to size everything so it fits your space. Whether this is your first woodworking project or your twentieth, this tutorial gives you the detail you need without overcomplicating the process.
This project is beginner-friendly for anyone comfortable using a table saw, drill, and pocket hole jig. Estimated build time is around 8 hours, and material costs come in around $160 per cabinet section — a fraction of what comparable garage storage systems sell for at retail.
Download the Printable PDF Plans Before You Start
Before heading to the lumber yard or making your first cut, grab the printable PDF woodworking plans. The download includes a complete cut list with exact measurements, a full material and hardware list, assembly diagrams, drawer box instructions, and door layout details — everything organized so you can follow along in the shop without scrolling through a webpage on your phone.
Having printed woodworking project plans at the bench reduces mistakes, speeds up the build, and keeps you focused on cutting and assembling instead of second-guessing dimensions. It’s a small investment that pays off before you even make your first cut.

Ready to Build? Let’s Get Into It.
Review the material list and cut dimensions below before you start. Accurate cuts and square assembly are what separate a cabinet that looks professional from one that looks like a garage project. Get those two things right, and the rest of the build falls into place.
Here’s how to build a DIY frameless garage base cabinet with slab doors and drawers — step by step.
Related Cabinet Plans
If you’re building a full set of cabinets, these other plans may help:
- Frameless Kitchen Base Cabinet with Drawers and Double Doors, Shaker Style
- Frameless Base Cabinet with Drawers, Slab Style
| Time to Complete | Total Cost | Skill Level |
|---|---|---|
| 8 Hours | $160 per section (36″ wide) | Beginner to Intermediate |
Download Printable Plans in PDF


DIY Frameless Garage Base Cabinet Plans – Slab Style
$12.97
Digital PDF download — Step-by-step woodworking plans to build a 36″ frameless garage base cabinet with slab doors and drawers. Includes full cut list, measurements, material list, tools list, assembly diagrams, and drawer box instructions. Instant download. Print and build.
Description
Build a Clean, Functional Garage Cabinet That Actually Does the Job
If your garage is cluttered with tools, gear, and zero real organization, this project fixes that. These DIY woodworking plans walk you through building a 36-inch frameless base cabinet with double slab-style doors and two full drawers — a clean, workshop-ready storage solution built from cabinet-grade plywood using pocket hole joinery.
Slab doors are the right call for a garage: flat, easy to clean, and sharp-looking in a working environment. The frameless cabinet construction style gives you more interior storage than a face-frame design, and because it’s modular by nature, you can repeat the build side by side to create an entire wall of garage storage over time.
This is a practical, well-designed project — not a complicated one. If you’re comfortable using a table saw, drill, and pocket hole jig, you have everything you need to build this cabinet.
Who These Plans Are For
These woodworking plans are designed for:
- Beginner to intermediate woodworkers ready for a confidence-building cabinet project
- DIY homeowners who want real, functional garage storage without the retail price tag
- Workshop builders looking to organize tools, hardware, and supplies
- Anyone building out a garage workspace who wants a modular cabinet system they can expand over time
What’s Included in the PDF
When you purchase and download these plans, you get a complete, print-ready woodworking document that covers every stage of the build:
- Step-by-step building instructions — 19 detailed steps from first cut to finished cabinet, written in plain, practical language
- Full cut list with exact measurements — every part sized and labeled so you can cut confidently
- Complete material list — lumber, plywood, MDF, hardware, and fasteners, all listed clearly
- Tools required list — know what you need before you head to the shop
- Assembly diagrams and illustrations — visual references that show how every piece fits together
- Drawer box construction details — exact dimensions and assembly sequence for both drawer boxes
- Door and drawer front sizing — cut dimensions for MDF slab doors and drawer fronts
- Drawer slide installation guidance — step-by-step layout and alignment instructions
- Hinge installation details — concealed hinge placement and installation with a Kreg Concealed Hinge Jig
- Toe-kick and countertop instructions — how to finish the cabinet for a professional built-in look
- Printable PDF format — optimized for printing at home or at a print shop
- Instant download after purchase — no waiting, no shipping
Project Details
| Detail | Spec |
|---|---|
| Cabinet Width | 36 inches |
| Difficulty Level | Beginner to Intermediate |
| Estimated Build Time | 8 hours |
| Estimated Material Cost | ~$160 per cabinet section |
| Construction Method | Frameless (European-style) with pocket hole joinery |
| Primary Material | 3/4″ cabinet-grade plywood; 1/2″ plywood for drawer boxes; MDF for doors and drawer fronts |
| Door Style | Full-overlay slab with concealed hinges |
| Storage | Two full drawers + double-door cabinet section with interior shelf |
Recommended Tools: Tape measure, drill, miter saw, table saw, nail gun, Kreg Jig, random orbital sander, Kreg Concealed Hinge Jig, clamps, dovetail saw, speed square or carpenter’s square
Why Download These Plans Instead of Building From the Blog Post Alone
The blog post gives you a solid overview of the build — but the PDF goes further. Here’s why having the full plans at the bench makes a real difference:
- No second-guessing dimensions — every measurement is in one organized document, not scattered across a webpage
- Faster cuts, fewer mistakes — a complete cut list means you can prep all your parts before assembly starts
- No phone in the shop — print the plans and follow along without scrolling, zooming, or worrying about a screen getting dusty
- Diagram-guided assembly — visual illustrations show exactly how pieces fit together at each stage
- Better results — accurate measurements and clear sequencing are what separate a cabinet that looks professional from one that looks rough
At roughly $160 in materials per cabinet section, getting the build right the first time matters. These plans help you do exactly that.
Digital Download Information
- Instant access — your PDF is available immediately after purchase
- No physical product is shipped — this is a digital download only
- Works on any device — compatible with desktop computers, tablets, and mobile phones
- Printable format — take it to your local print shop or print at home for easy bench reference
- One purchase, permanent access — download and save your copy to use whenever you’re ready to build
Ready to Get Building?
If you’ve been putting off the garage organization project because you weren’t sure where to start, this is the plan that gets you started. Clear steps, exact measurements, and a design that’s built to work in a real garage — not just look good in a photo.
Download the PDF plans today and build the garage storage you’ve been planning.
Other Woodworking Projects

Tools for this project
Material List
- Available with the purchase of PDF plans.
Note: Lumber dimensions are listed as nominal size. See lumber sizes for actual dimensions vs nominal.
Disclosure: Some of the links on this page as well as links in “tools for this project” and “material list” sections are affiliate links.
Dimensions
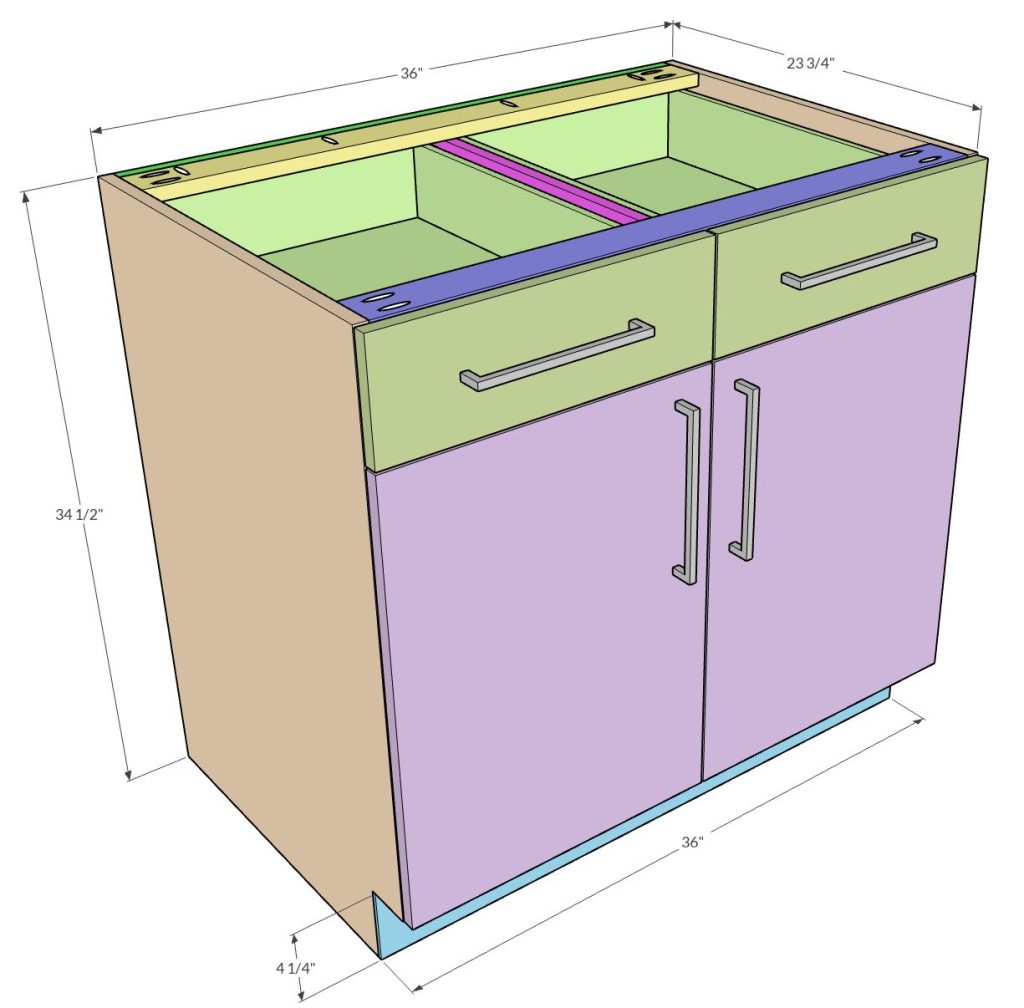
Base Cabinet Diagram

Note: When building the cabinets, it’s important to be precise when measuring and cutting each piece. Using the proper woodworking tools will help ensure the cabinet components are cut accurately and assembled correctly for a professional-looking result.
When choosing plywood for kitchen cabinets, there are several important features to consider. One of the most important factors is the plywood grade. A-grade cabinet plywood is generally more durable, reliable, and visually appealing than lower-grade plywood options. It’s also recommended to use rotary-cut plywood, which provides more consistent strength and typically contains fewer knots and imperfections.
For cabinet construction, 3/4-inch cabinet-grade plywood is commonly considered the best choice. Thinner plywood may flex or warp over time, while thicker material can add unnecessary weight and cost without providing much additional benefit.
For the best appearance and durability, consider using plywood with a birch veneer face on both sides. Birch plywood offers excellent structural stability and provides a smooth surface that works especially well for painted or finished cabinets.
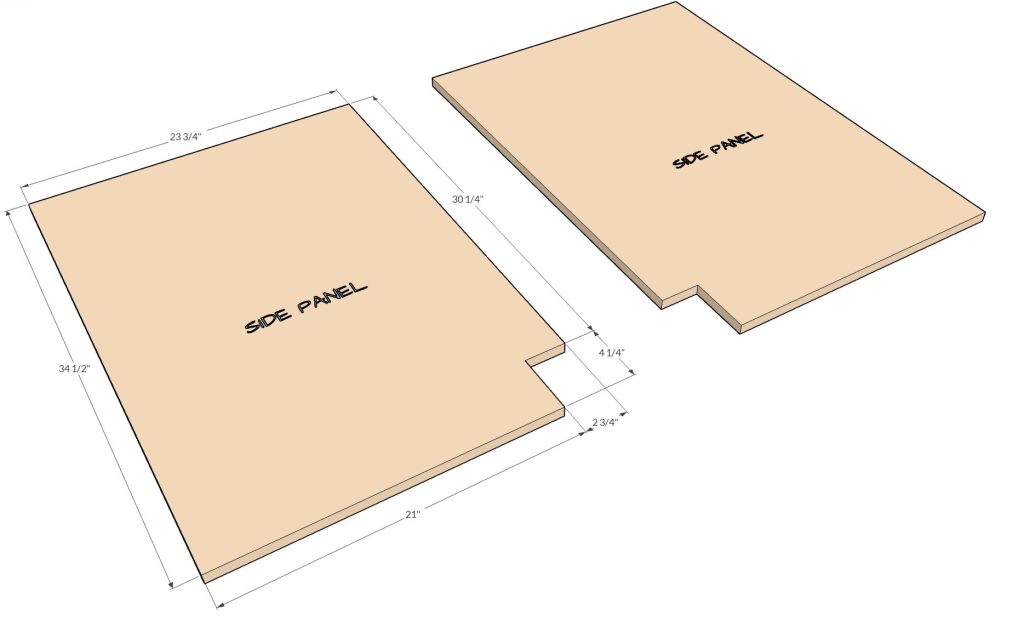
Step 1: Cut the Cabinet Side Panels and Toe-Kick Notches
Start by cutting the largest cabinet parts from the plywood sheet according to the cut list layout. The layout and grain orientation are designed to help reduce material waste and improve efficiency during cabinet construction.
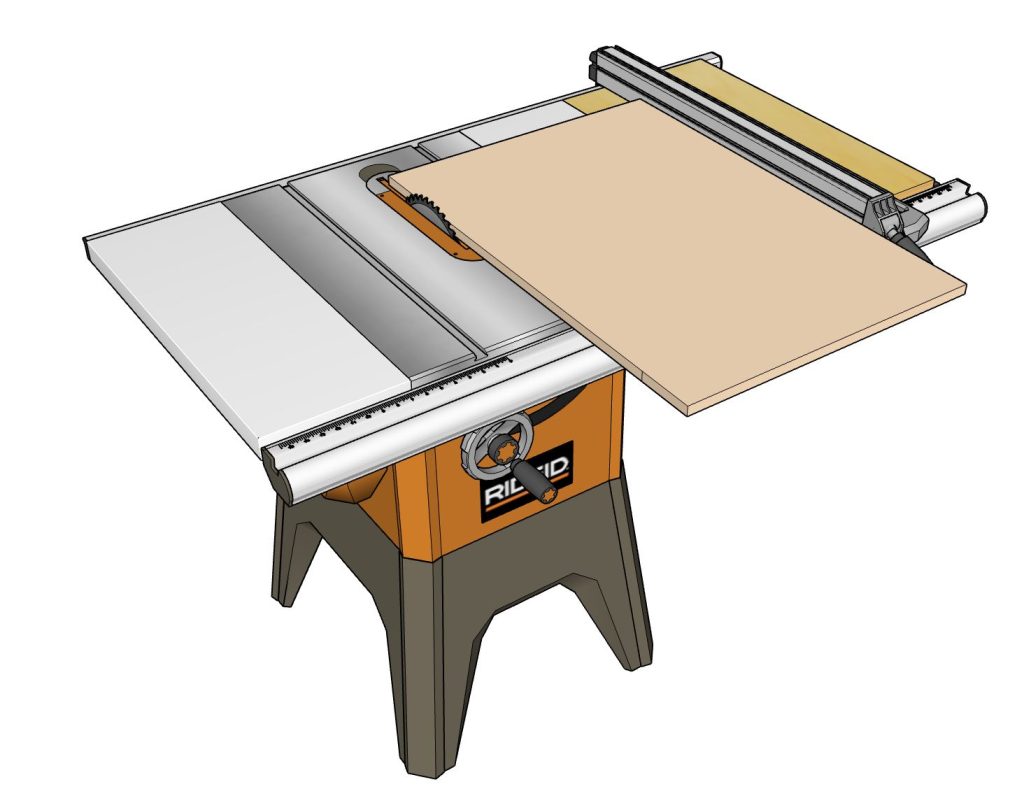
Using 3/4″ cabinet-grade plywood, cut two side panels to 23 3/4″ x 34 1/2″ using either a table saw or a circular saw with a Kreg Accu-Cut guide system.
Next, cut a 4 1/4″ x 2 3/4″ toe-kick notch from the bottom front corner of both side panels, as shown in the illustration. This toe-kick cutout creates recessed space at the bottom of the cabinet for comfortable standing access once the cabinet assembly is complete.
If you’re building multiple DIY kitchen base cabinets, it’s worth making a simple toe-kick template. A template allows you to quickly trace identical cutouts on every panel, saving time and improving consistency throughout the project.
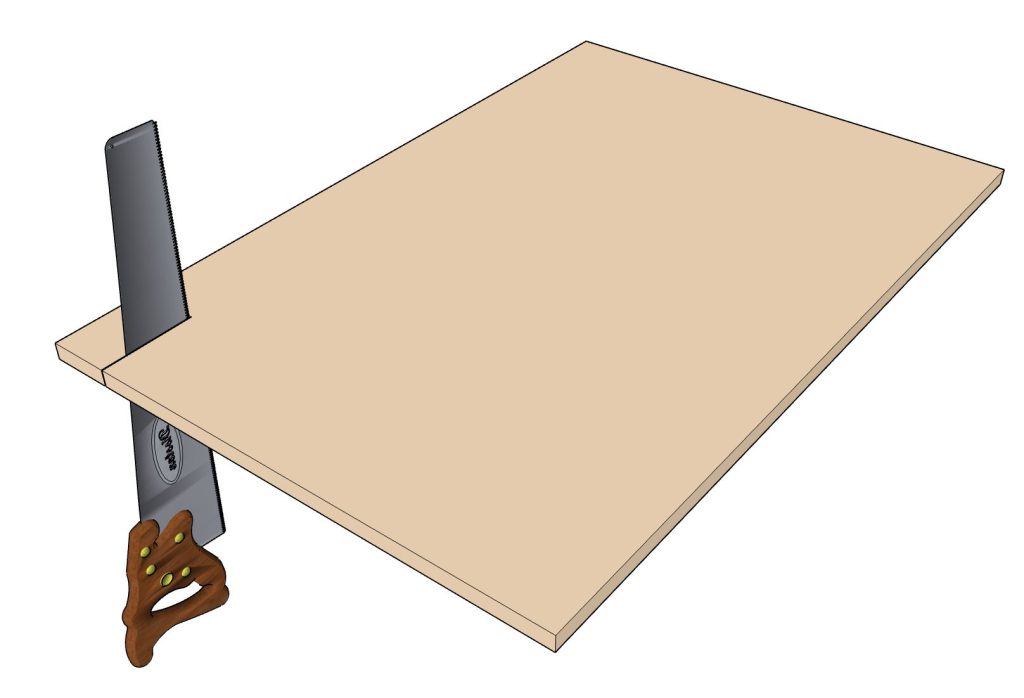
Step 2: Cut the Bottom and Shelf Panels and Drill Pocket Holes
Using the same 3/4″ plywood, cut the following cabinet pieces:
- One bottom panel: 34 1/2″ x 23 3/4″
- One shelf panel: 34 1/2″ x 9″
Next, set your Kreg Jig for 3/4″ material thickness. Drill four pocket holes along the front edge of the side panels, as shown in the picture.
When drilling pocket holes, spacing is important. Placing the holes closer together creates a stronger joint, but adding too many unnecessary holes only slows down the cabinet-building process without providing much additional strength. Aim for even spacing that provides solid support while keeping the assembly clean and efficient.
Then drill pocket holes in both the shelf panel and the bottom panel, as shown in the illustration. These pocket holes should face downward during cabinet assembly so they remain hidden after installation.

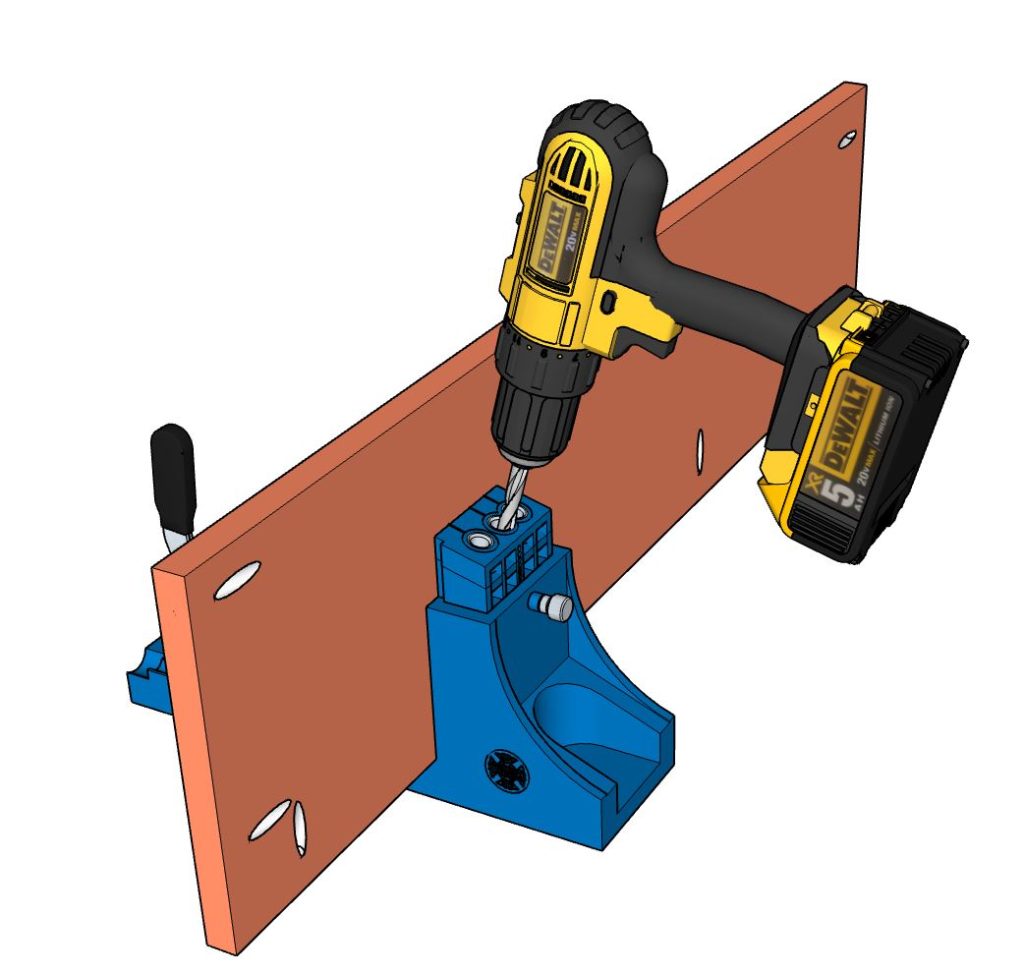
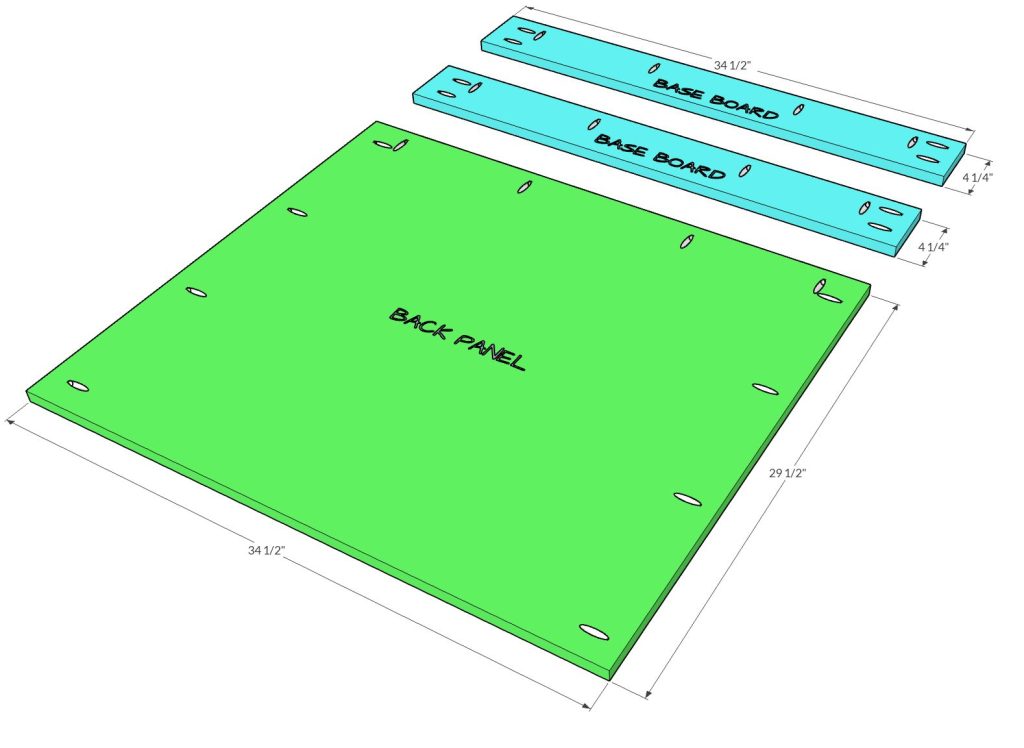
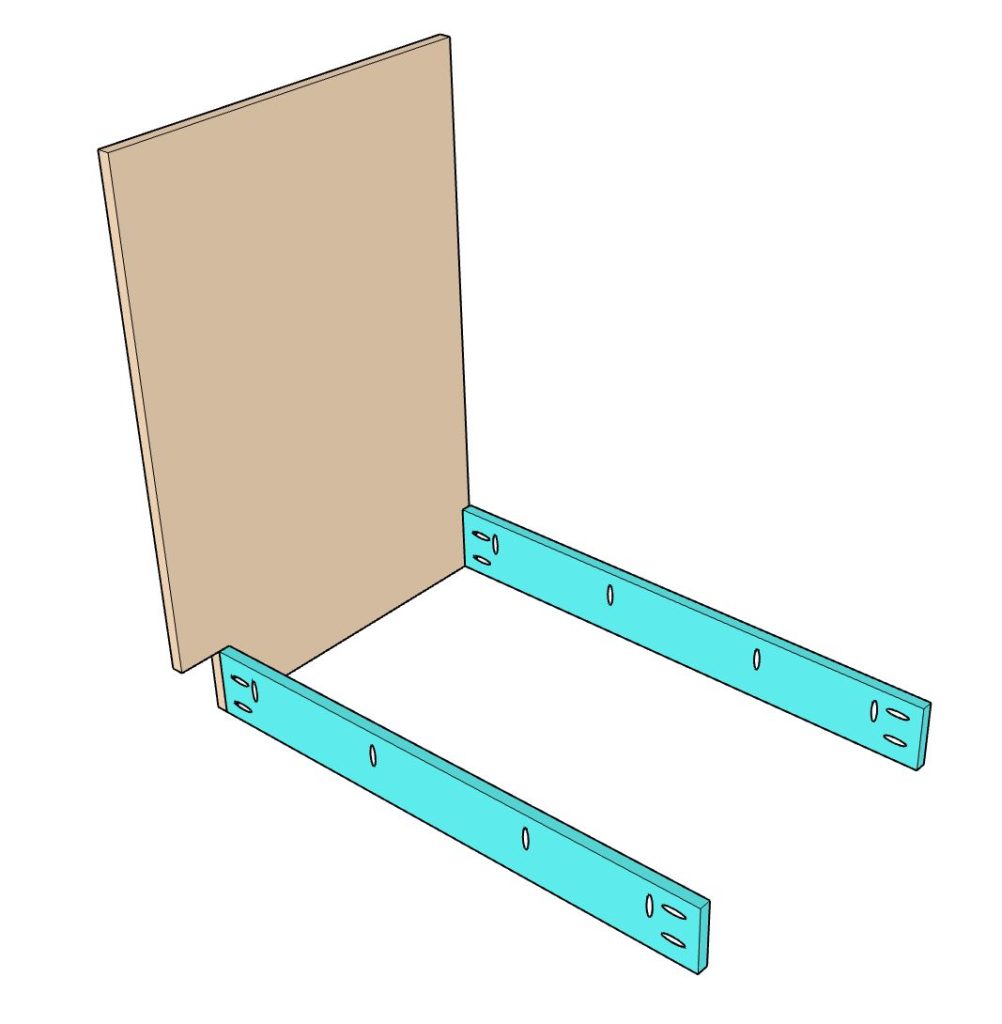
Step 3: Cut the Back and Base Support Pieces
Cut the remaining cabinet components from 3/4″ plywood:
- One back panel: 34 1/2″ x 29 1/2″
- Two base support pieces: 34 1/2″ x 4 1/4″
After cutting the pieces to size, drill the pocket holes as shown in the picture. These parts will help strengthen the cabinet frame and provide additional support during the cabinet assembly process.
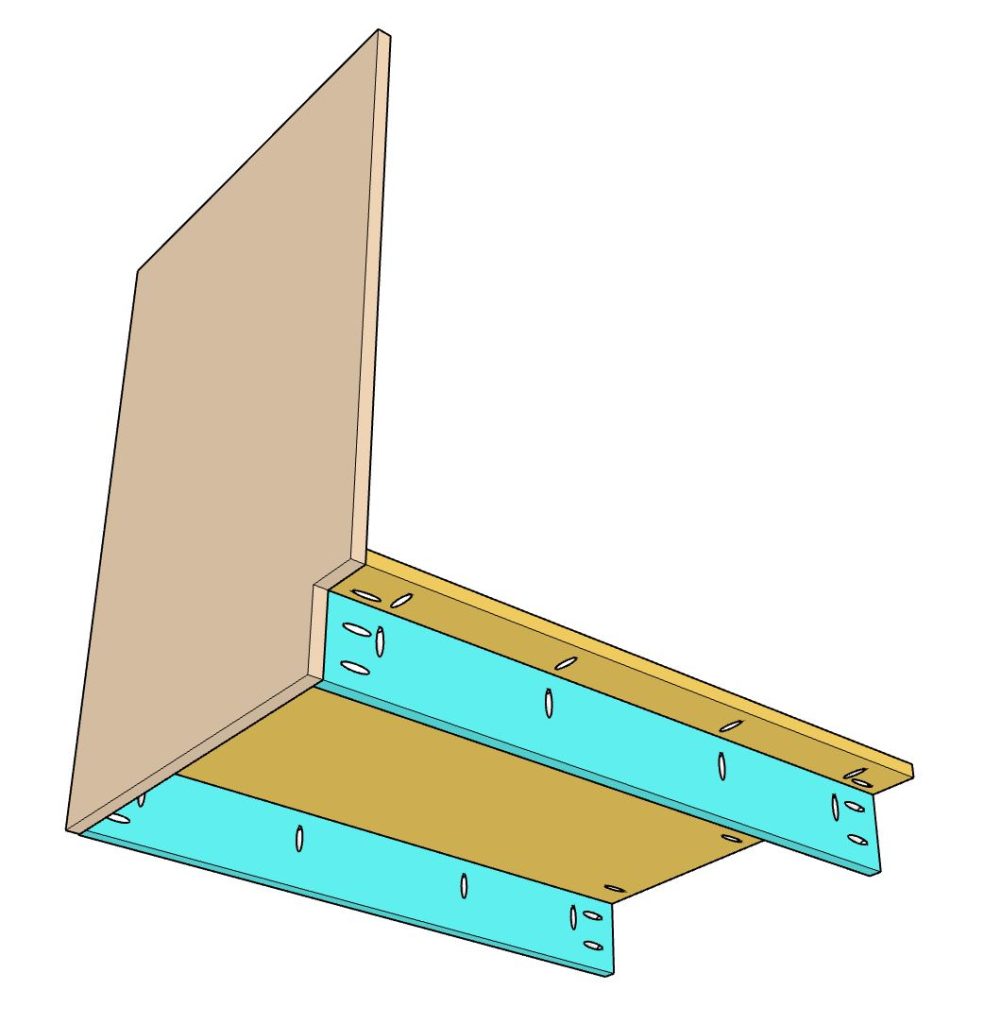
Step 4: Assemble the Cabinet Base Frame
When assembling cabinet parts with pocket holes, you can use either pocket hole screws alone or combine them with wood glue. Adding wood glue creates a stronger joint and helps prevent the connection from loosening over time. However, once the glue dries, the parts cannot be disassembled without causing damage, so plan accordingly before assembly.
Since the cabinet box will eventually be secured to the wall and won’t experience much movement, wood glue is generally unnecessary for the main cabinet frame. It is more beneficial for components such as the cabinet doors and drawers where added durability is important.
Begin the cabinet assembly by laying the left side panel flat on a work surface. Attach the front base support piece and the back base support piece using 1 1/4″ pocket hole screws.
When driving pocket hole screws, always clamp the boards securely before fastening them together. Proper clamping prevents the plywood pieces from shifting or becoming misaligned during assembly. Even slight movement can affect the overall appearance and squareness of the cabinet.
Step 5: Install the Cabinet Bottom Panel
Next, attach the bottom panel to the left cabinet side panel and the back base support piece using 1 1/4″ pocket hole screws.
Make sure the edges are flush and square before tightening the screws. Keeping the cabinet components aligned during this step is important for proper cabinet construction and will make the remaining assembly process much easier.
Step 6: Attach the Cabinet Back Panel
Take the back panel and attach it to the cabinet frame using the pre-drilled pocket holes. Make sure the pocket holes are facing toward the back of the cabinet so they remain hidden after installation.
As you secure the back panel, check that the cabinet stays square by verifying that all corners remain aligned. A square cabinet frame will ensure the doors and drawers fit properly later in the project.
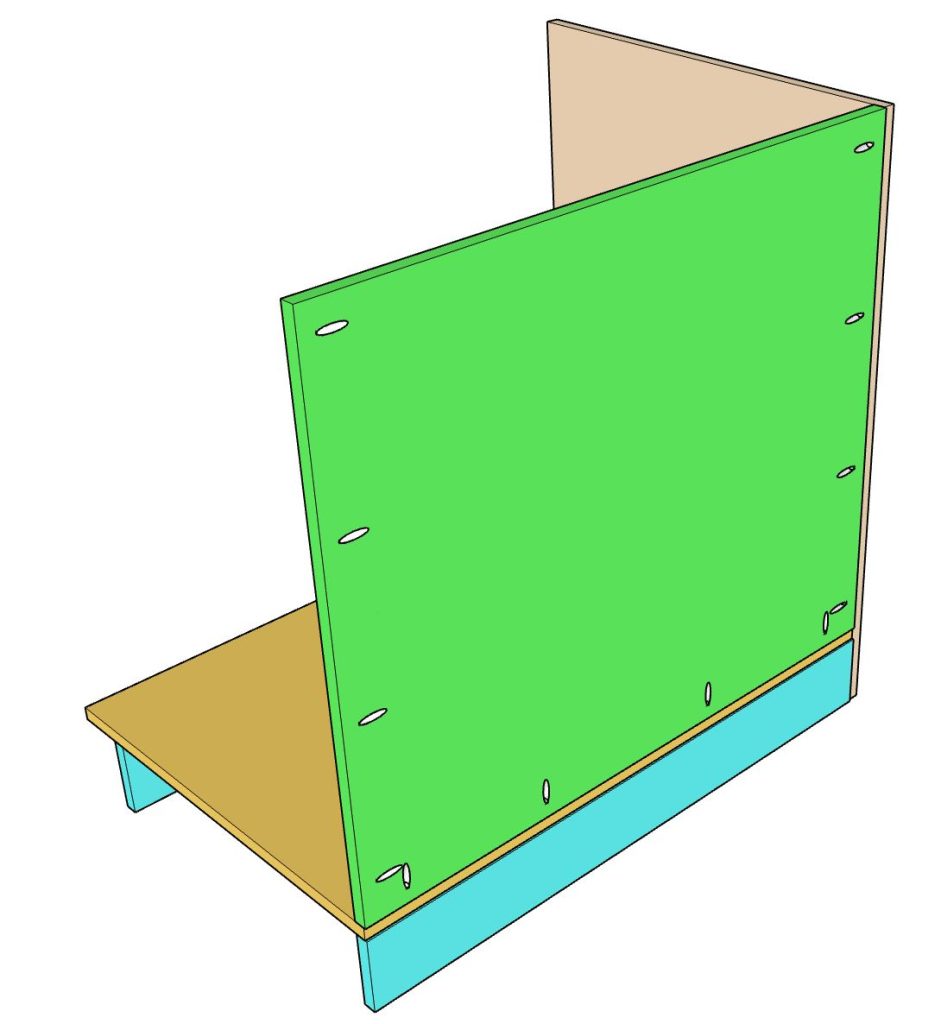
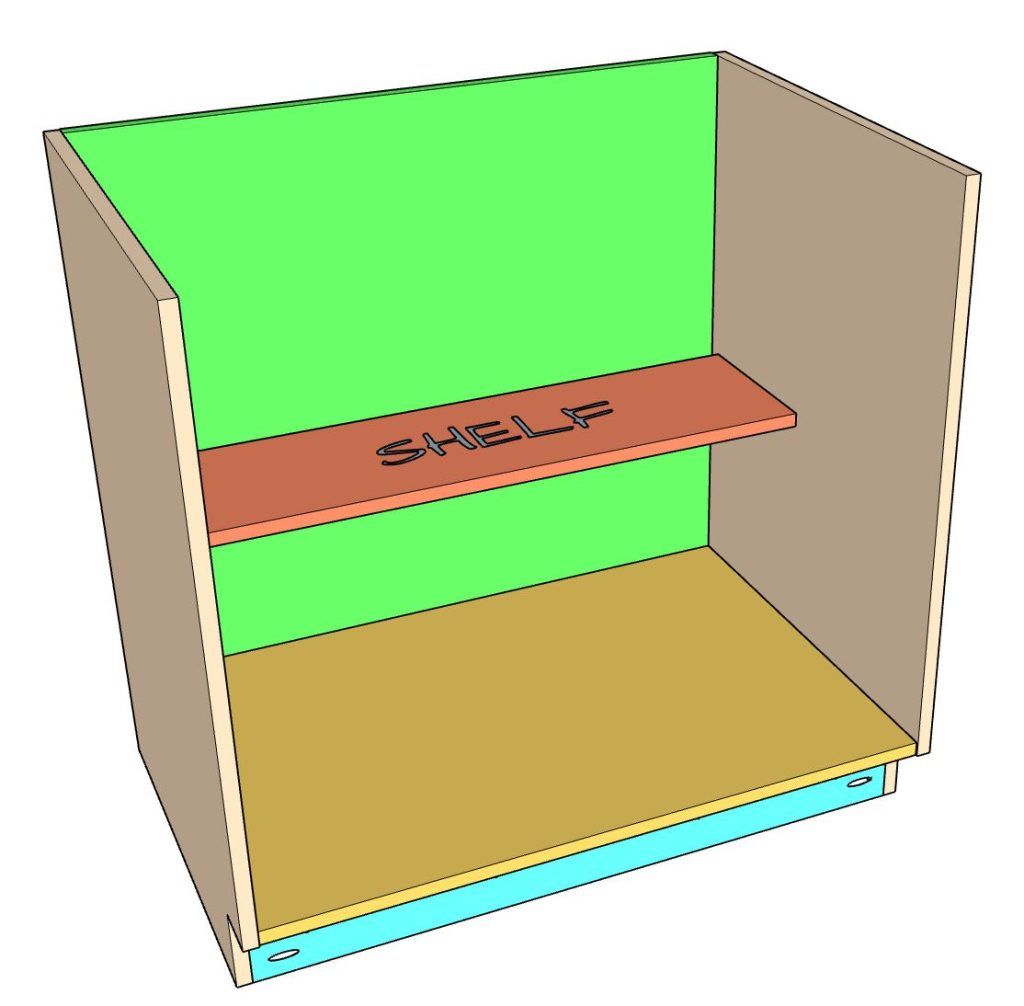
Step 7: Install the Right Side Panel and Shelf
Next, attach the right side panel to the cabinet frame using 1 1/4″ pocket hole screws. Before fully tightening the screws, make sure all cabinet edges are flush and the cabinet box remains square.
Now install the shelf panel with the pocket holes facing downward so they stay hidden after assembly.
To ensure the shelf is perfectly level and not slanted, first determine the exact shelf height you want inside the cabinet. Then cut two temporary support boards to that height. Place one temporary board under each side of the shelf to hold it in position while fastening it in place.
Once the shelf is properly aligned, secure it using the pocket hole screws. After all screws are installed, remove the temporary support boards. This method helps keep the shelf level and makes the cabinet assembly process much easier and more accurate.
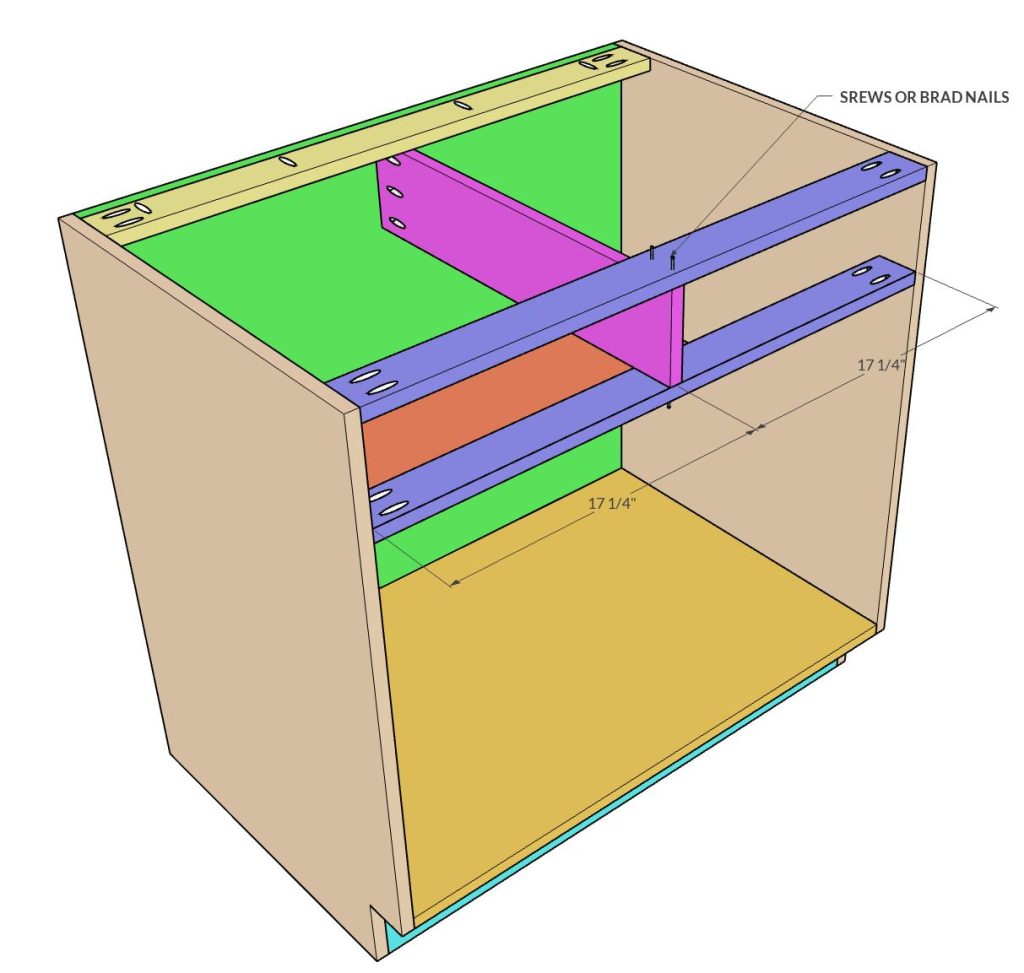
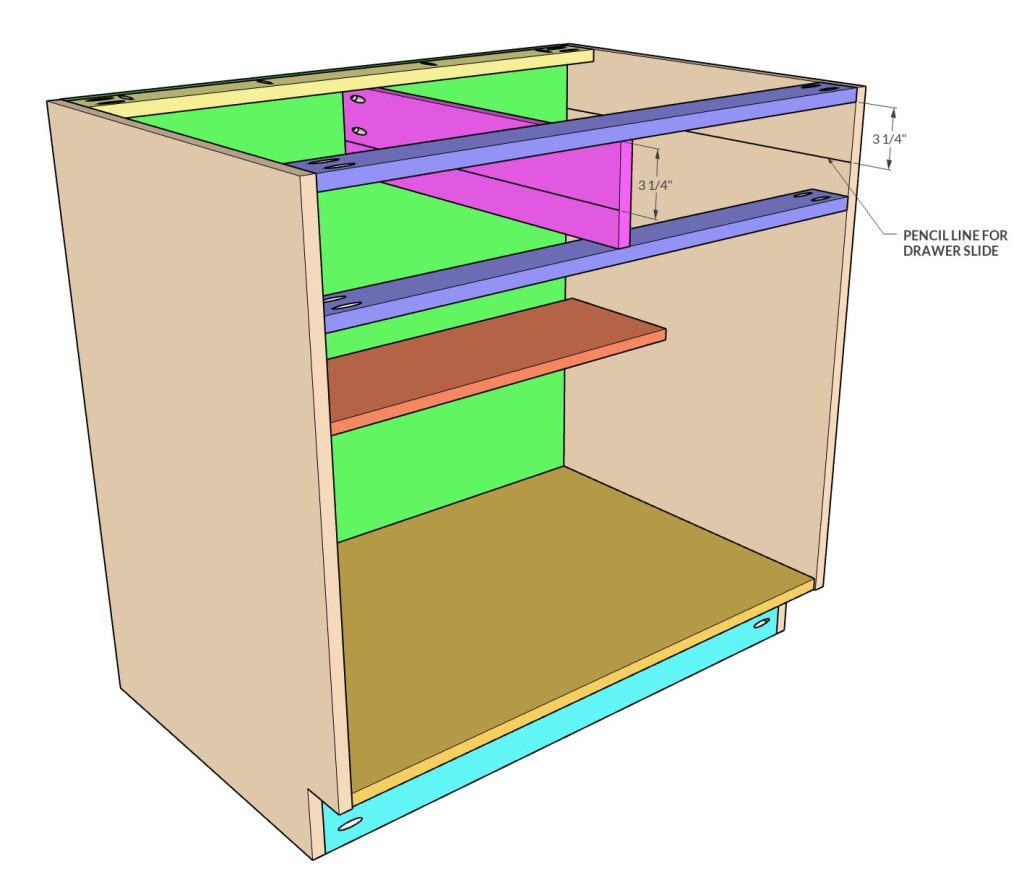
Step 8: Cut the Stretchers and Drawer Divider Panel
Cut three stretcher boards to 34 1/2″ x 2 1/2″. The stretcher boards can be made from either 3/4″ plywood or a 1×3 board, depending on the material you prefer for your cabinet construction.
Next, cut the divider panel to 23″ x 5 1/8″. This divider will be installed between the two drawer openings and will serve as the mounting surface for the drawer slides.
After cutting the pieces to size, drill the pocket holes as shown in the picture. Proper pocket hole placement will make the final cabinet assembly stronger and easier during installation.

Step 9: Install the Stretchers and Drawer Divider
Attach the front and back stretcher boards to the top section of the kitchen base cabinet using pocket hole screws.
Next, locate the center point on the front stretcher board. The center should measure 17 1/4″ from the inside edge of the cabinet. This mark indicates where the divider panel will be installed.
Attach the divider panel as shown in the picture. It is extremely important that this board is installed perfectly straight and square. Use a speed square or carpenter’s square to verify alignment before fully securing it in place. Even a slight angle can cause the drawer boxes to bind or prevent the drawer slides from operating smoothly.
Once the divider panel is secured, attach the bottom stretcher board. You can fasten the stretcher to the divider panel using a nail gun for quicker installation.
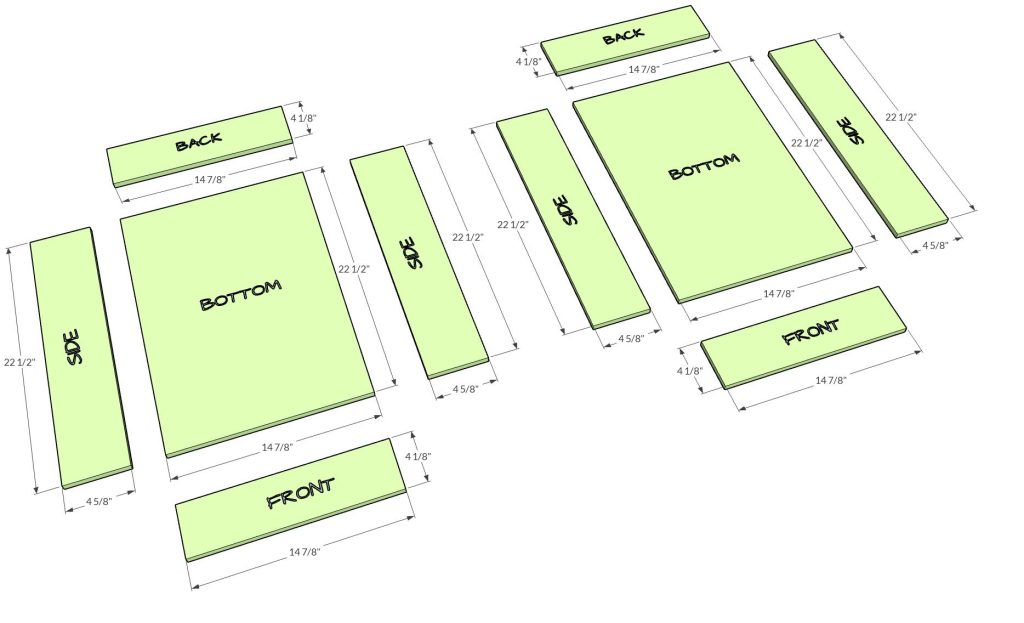
Step 10: Cut the Drawer Box Pieces
Now it’s time to build the drawer boxes for the cabinet.
For the drawer boxes, use either 1/2″ plywood or 1/2″ MDF. In this project, the drawer boxes are made from 1/2″ plywood for added strength and durability.
Cut the following drawer box pieces:
- Two bottom panels: 22 1/2″ x 14 7/8″
- Four front and back panels: 14 7/8″ x 4 1/8″
- Four side panels: 22 1/2″ x 4 5/8″
Before assembly, double-check all measurements and make sure the pieces are square. Accurate cuts are important for smooth drawer operation and proper cabinet assembly.
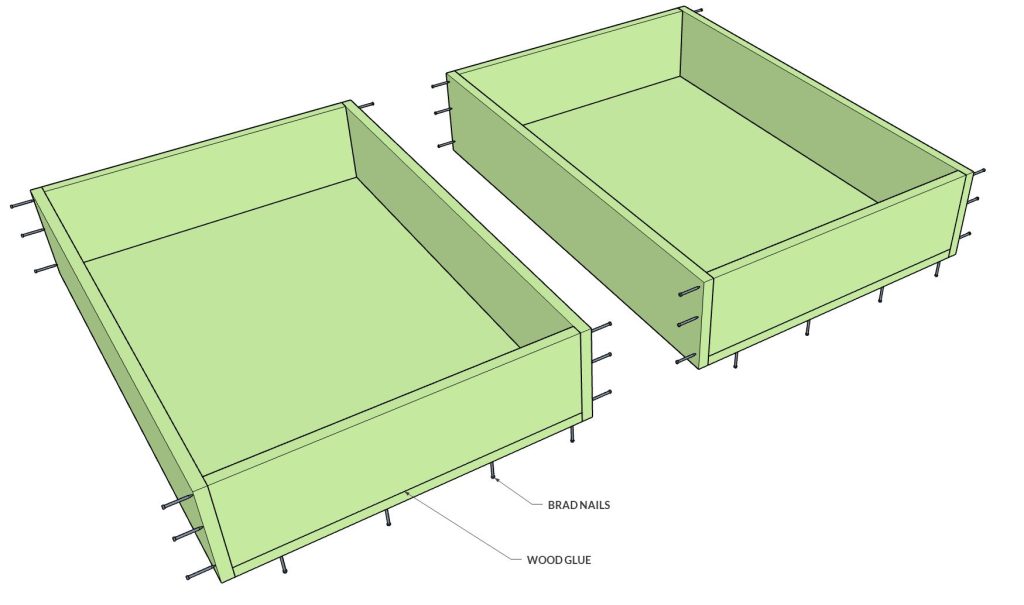
Step 11: Assemble the Drawer Boxes
For this step, you will need wood glue and a nail gun with 1″ brad nails.
Start by laying the drawer bottom panel flat on your work surface. Apply wood glue along the edge of the bottom panel, then attach the front and back drawer pieces using 1″ brad nails.
Next, apply glue to the remaining edges and attach the side panels to complete the drawer box assembly. Make sure all corners are flush and square before fastening the pieces together.Repeat the process for the second drawer box. Once complete, you should have two fully assembled drawer boxes ready for the drawer slides.
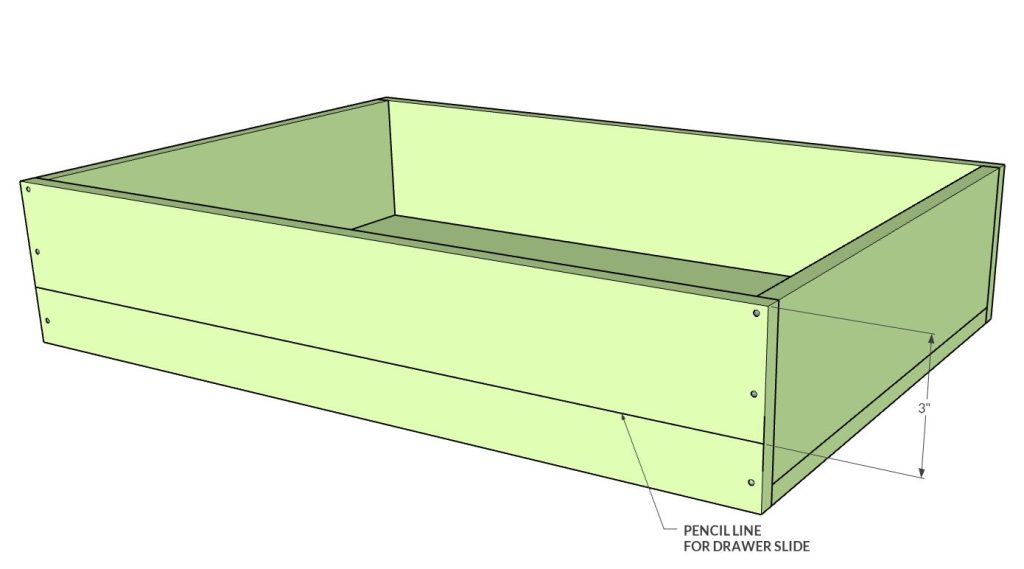
Step 12: Install the Drawer Slides on the Drawer Boxes
Now install the drawer slides onto the drawer boxes.
Proper drawer slide installation is critical for smooth drawer operation. If one slide is installed slightly higher or lower than the other, the drawer may bind, tilt, or become difficult to open and close. Both slides must remain perfectly parallel and level.
Measure 3″ down from the top edge of each drawer box side and draw a horizontal line on both sides. This line will be used to position the drawer slides consistently.
Next, pull the drawer slides apart by extending them fully and pressing the release clip. This separates the slide into two pieces. The inner slide section will be attached directly to the drawer box.
Align the screw holes of the inner drawer slide with the center of the line you marked earlier, then secure the slide with screws. Make sure the front edge of the slide is flush with the front of the drawer box.
Repeat the process for all remaining drawer slides, making sure each slide is installed straight and aligned evenly on both sides of the drawer boxes.
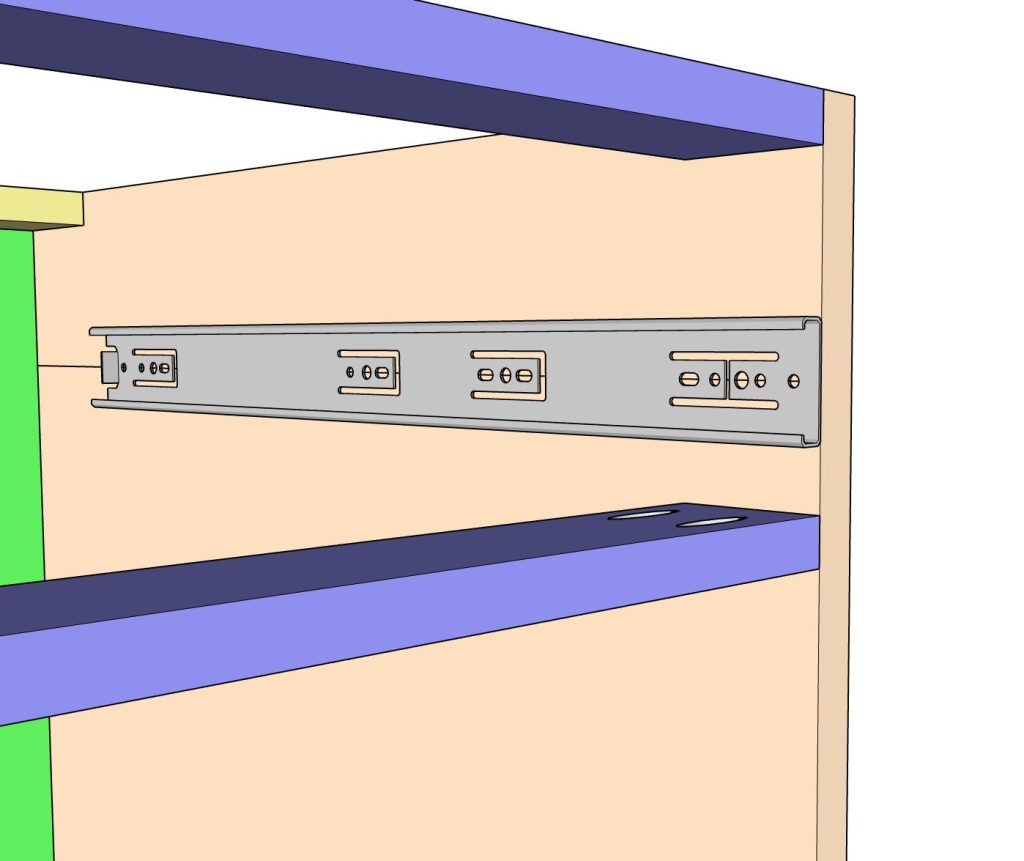
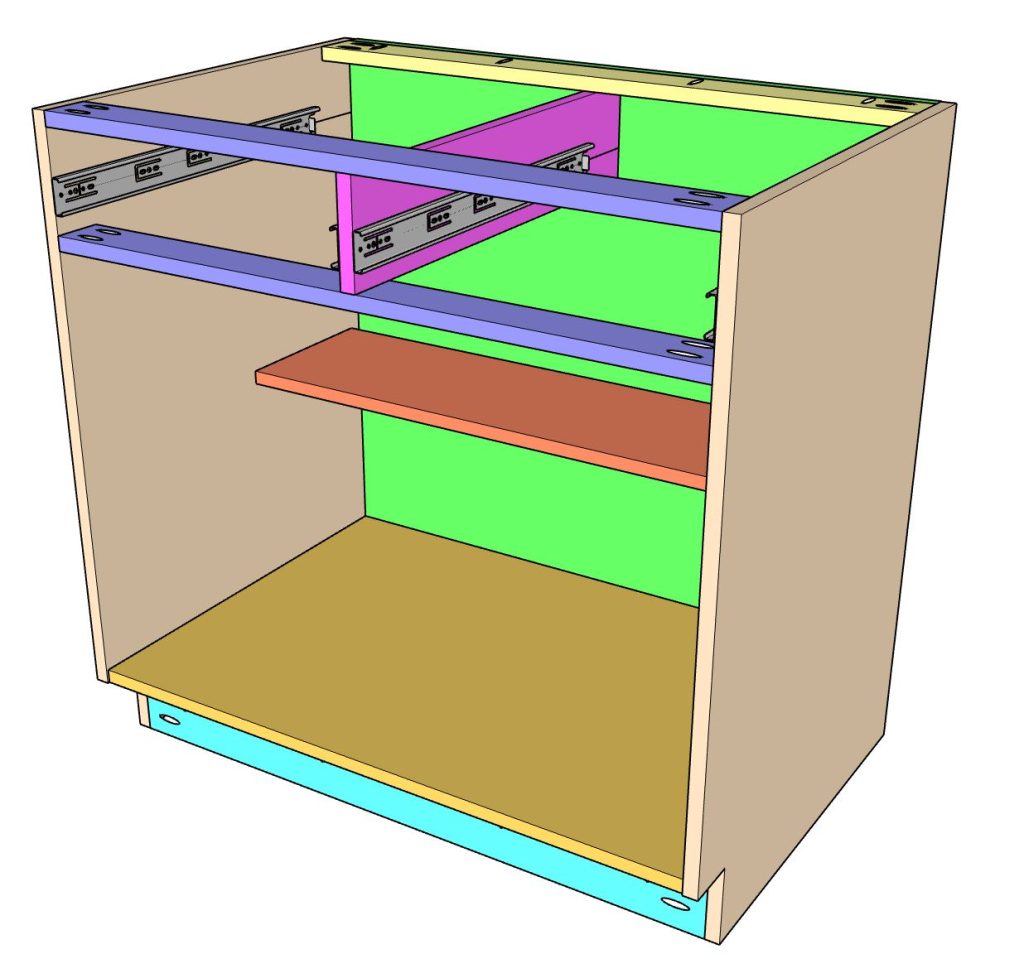
Step 13: Install the Drawer Slides Inside the Cabinet
Now it’s time to install the outer portion of the drawer slides inside the cabinet frame.
On the inside of the cabinet side panels, measure 3 1/4″ down from the stretcher board and draw a level pencil line. Repeat this step on both the left and right cabinet panels.
Next, do the same on the divider panel by measuring 3 1/4″ below the stretcher board and drawing a pencil line. These layout lines will help keep the drawer slides level and aligned during installation.
Take the outer section of the drawer slide and position it so the mounting screw holes align with the pencil marks. Secure the slides to the cabinet side panels and divider panel with screws.
Make sure the front edge of each drawer slide sits flush with the front edge of the cabinet frame. Keeping the slides aligned properly is critical for smooth drawer movement.
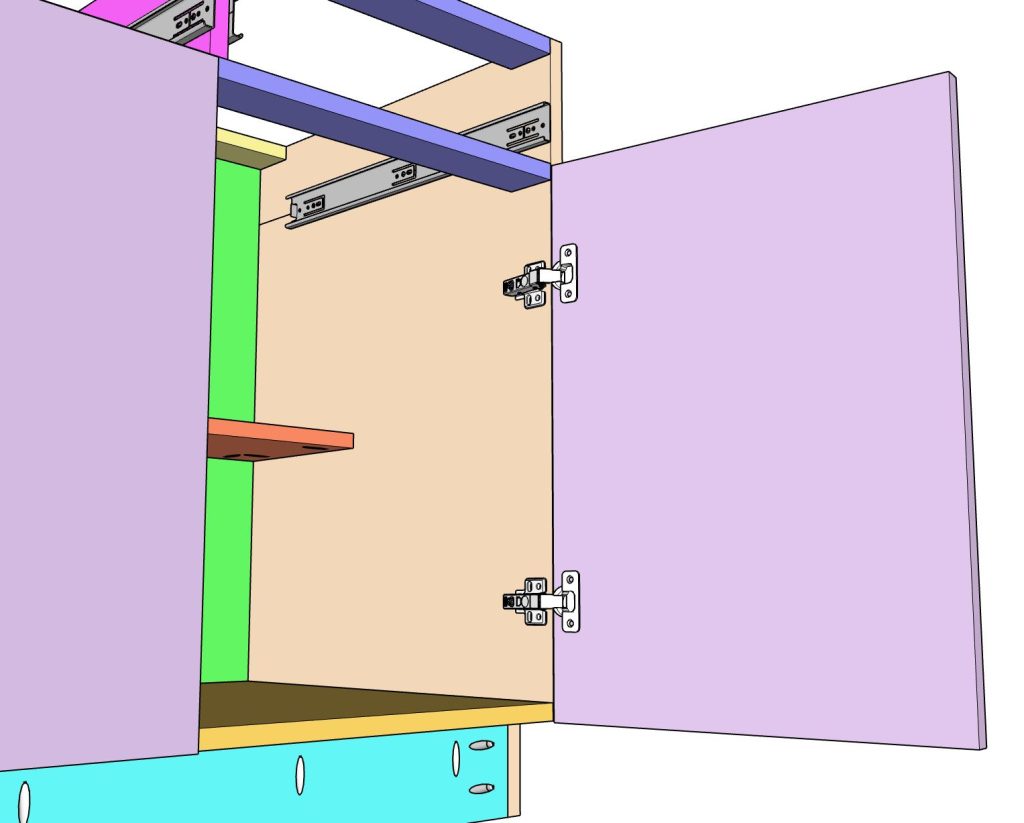
Once all drawer slides are installed, insert the drawer boxes into the cabinet and test their movement. The drawers should slide smoothly without binding or rubbing. If needed, make small adjustments before moving on to the cabinet door and drawer front construction.
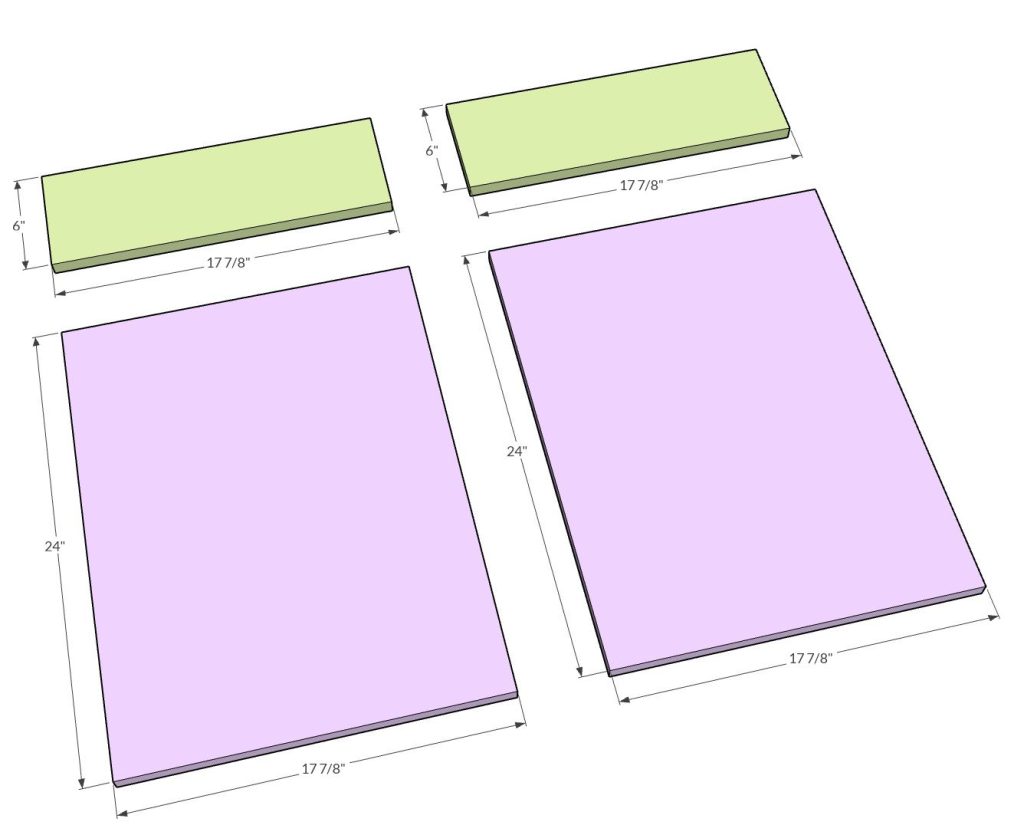
Step 14 – Cut and Sand the Cabinet Doors and Drawer Fronts
For the cabinet doors and drawer fronts, you can use either cabinet-grade plywood or MDF. For this DIY cabinet building project, MDF boards were used because they provide a smooth surface that is ideal for painted finishes.
Cut the following pieces from the MDF boards:
- Two cabinet doors to 17 ⅞” x 24”
- Two drawer fronts to 17 ⅞” x 6”
After cutting all pieces to size, sand the surfaces and edges thoroughly using a random orbital sander with 320-grit sandpaper. Make sure all edges are smooth and free of sharp corners or rough spots before applying paint or finish. Proper sanding helps achieve a clean, professional-looking cabinet finish and improves paint adhesion during cabinet assembly.
Step 15 – Paint or Finish the Cabinet Doors and Drawer Fronts
Once the final sanding is complete, apply the finish to the cabinet doors and drawer fronts.
For painted cabinets, first apply a quality primer to all surfaces, including the edges and any routed profiles. After the primer dries, apply your paint evenly for a smooth and durable finish. MDF absorbs moisture easily, so make sure the edges are fully sealed with primer and paint.
If you are building your cabinet using solid wood instead of MDF, apply your preferred wood stain followed by a protective polyurethane finish to protect the wood surface.
Allow the paint, stain, or clear coat to dry completely before installing hardware and moving on to the final cabinet construction and assembly steps.
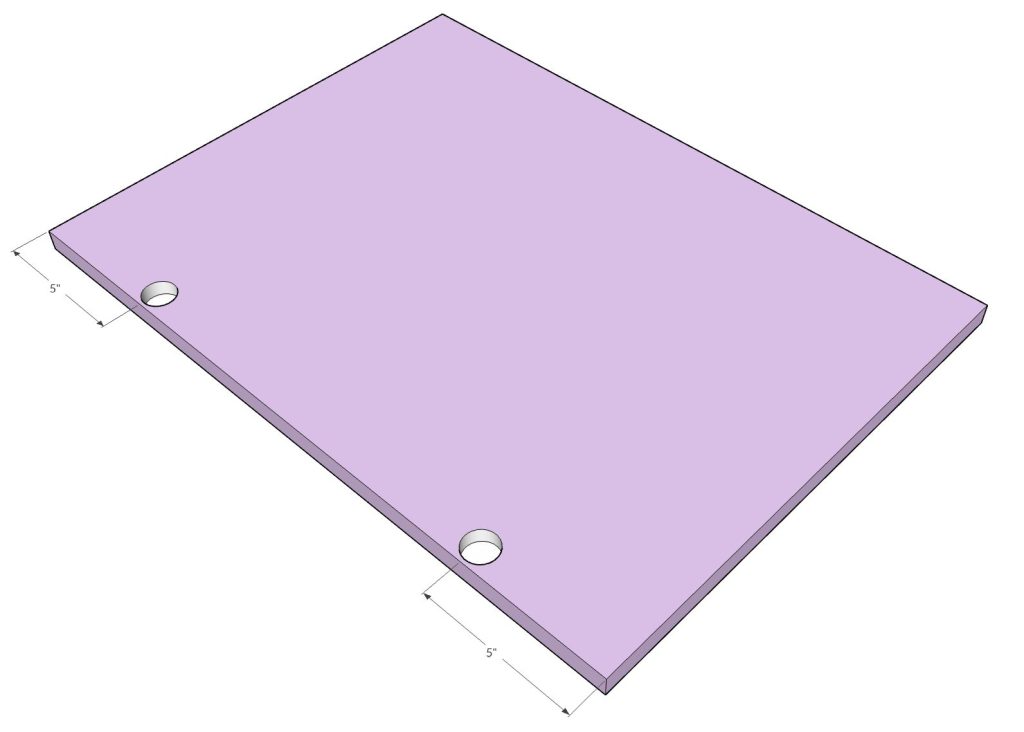
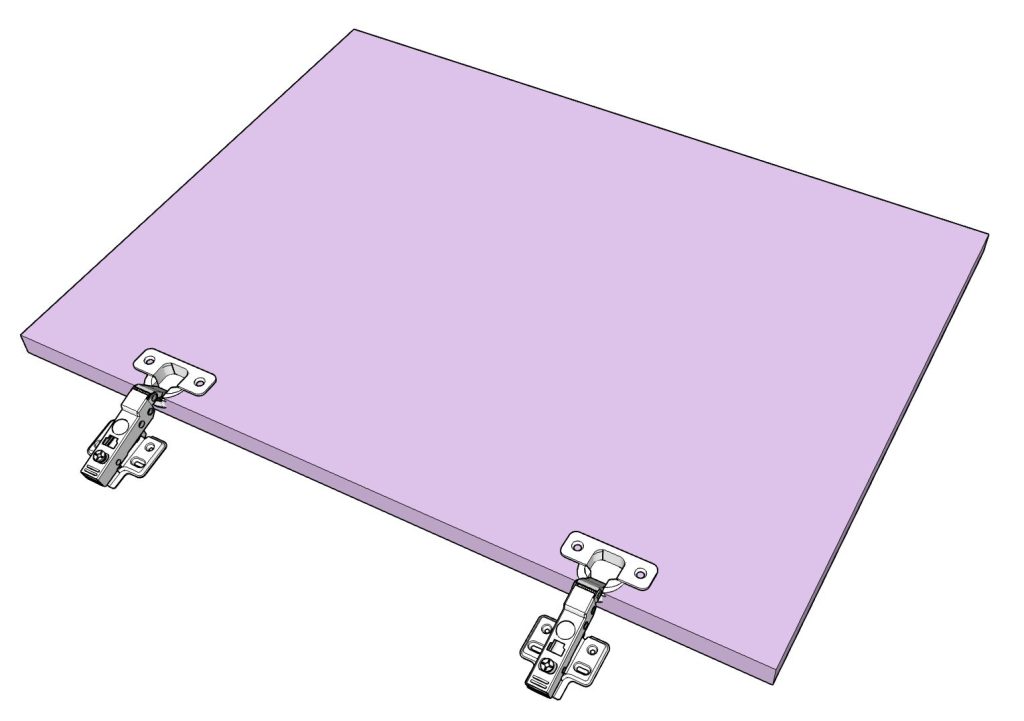
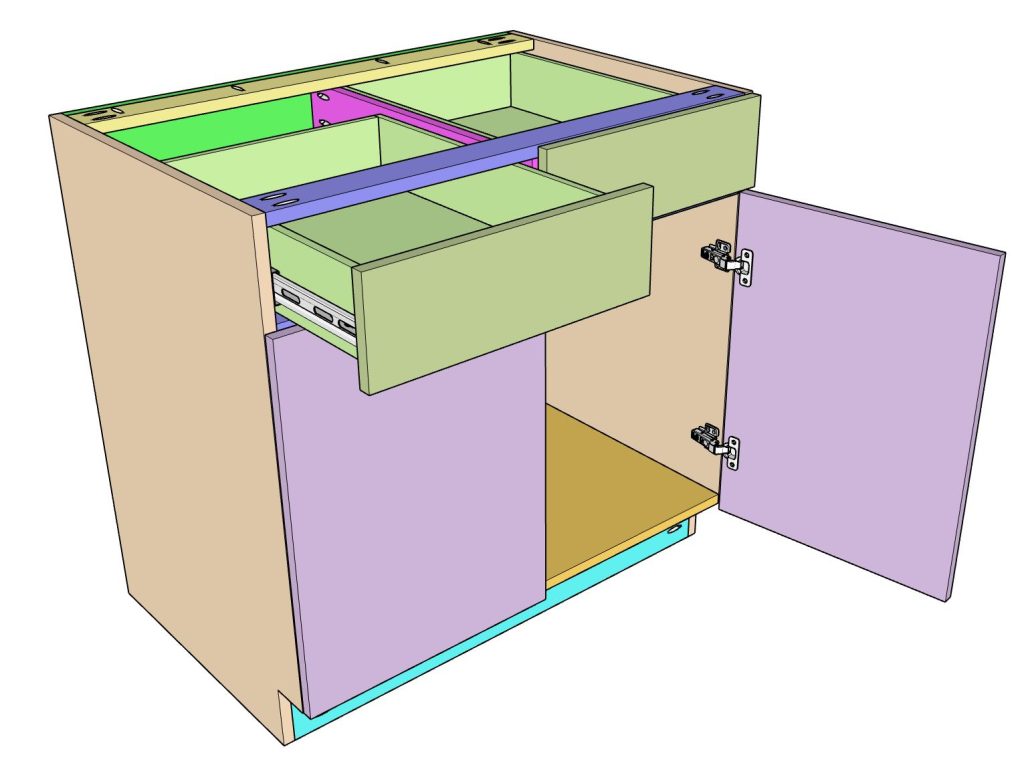
Step 16 – Install the Hinges, Doors and Drawer Fronts
After the paint has fully dried, measure and mark the hinge locations on each cabinet door. Mark 5″ down from the top and 5″ up from the bottom of the door using a pencil.
Use a Kreg Concealed Hinge Jig to drill the hinge cup holes. Follow the jig instructions carefully to determine the proper edge distance for the concealed hinges.Next, install the Frameless Full Overlay Hinges onto the doors. Then attach the doors to the cabinet side panels. Position the doors so the bottom edge sits flush with the cabinet bottom panel. Minor hinge adjustments can be made later to fine-tune the door alignment and spacing.
Step 17 – Install the Drawer Fronts
Once the doors are installed, position the drawer fronts over the drawer boxes. Hold each drawer front in place while making sure the gaps between the doors and drawer fronts remain even and consistent.
Secure the drawer fronts by driving screws through the inside of the drawer boxes into the back of the drawer fronts. The top edge of each drawer front should sit approximately 7/8″ above the top of the drawer box for proper alignment and spacing.
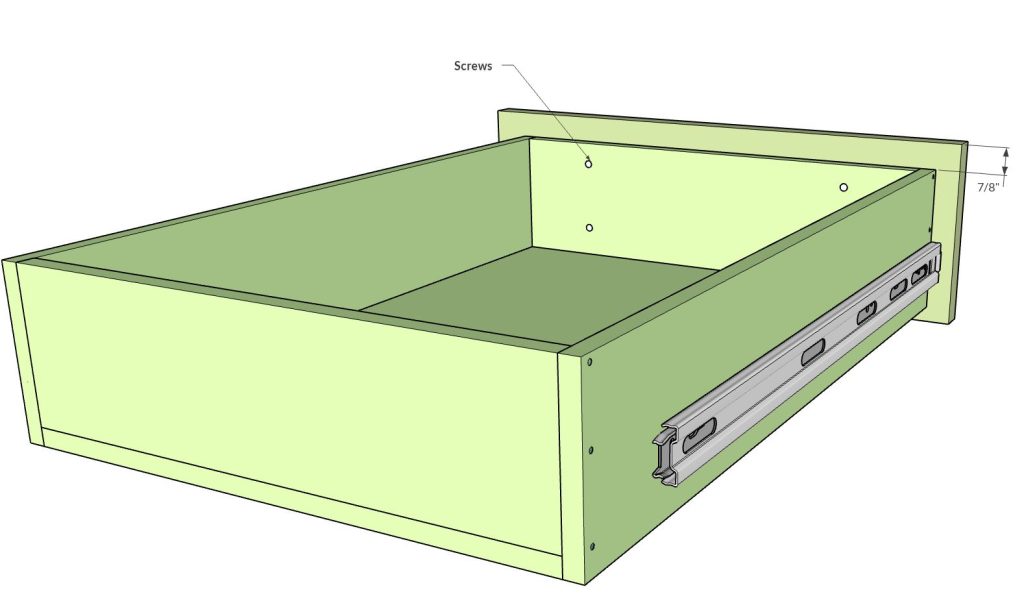
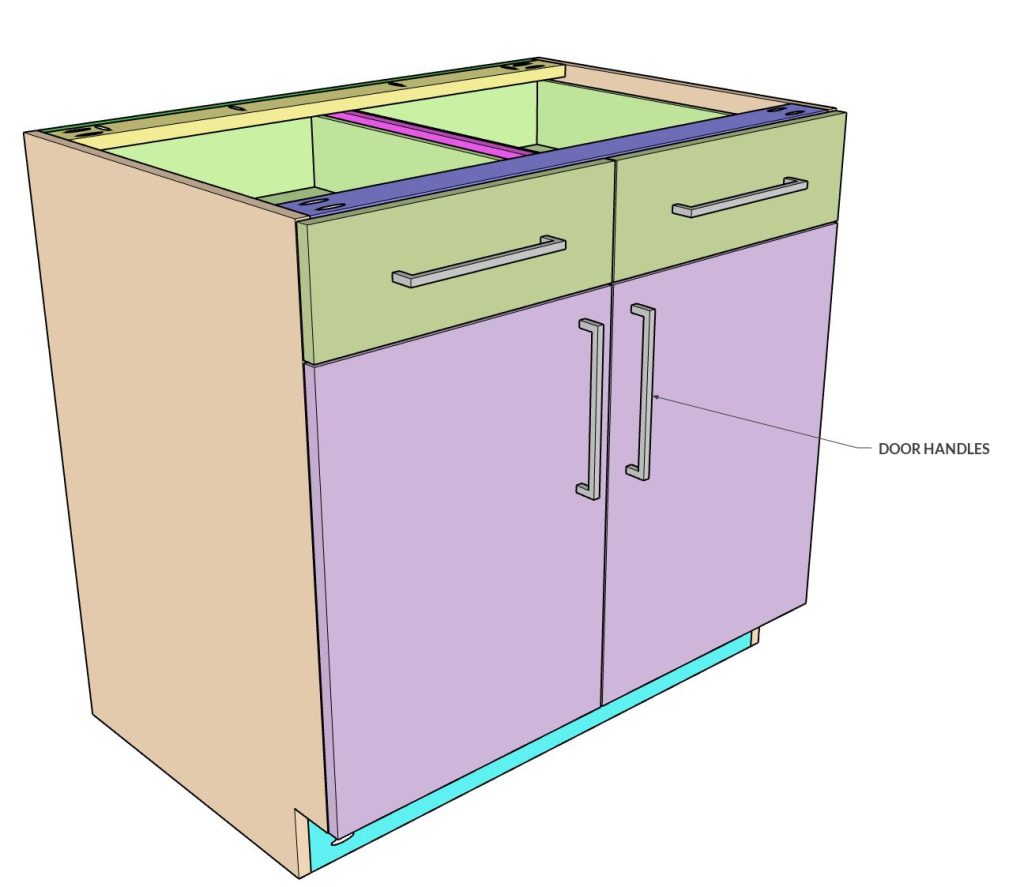
Step 18 – Install the Door and Drawer Handles
Use a measuring tape to determine the distance between the handle mounting holes. Always measure from the center of one hole to the center of the other hole to ensure accurate placement.
Next, use a pencil to mark the handle locations on the cabinet doors and drawer fronts. Take your time during this step to make sure all handles are aligned evenly for a clean, professional appearance.
Using a drill bit that matches the diameter of the handle screws, drill the mounting holes where you made the marks.
Place the handles over the drilled holes and insert the screws from the back side of the doors and drawer fronts. Tighten the screws with a screwdriver, being careful not to over-tighten them, which could strip the MDF or damage the hardware.
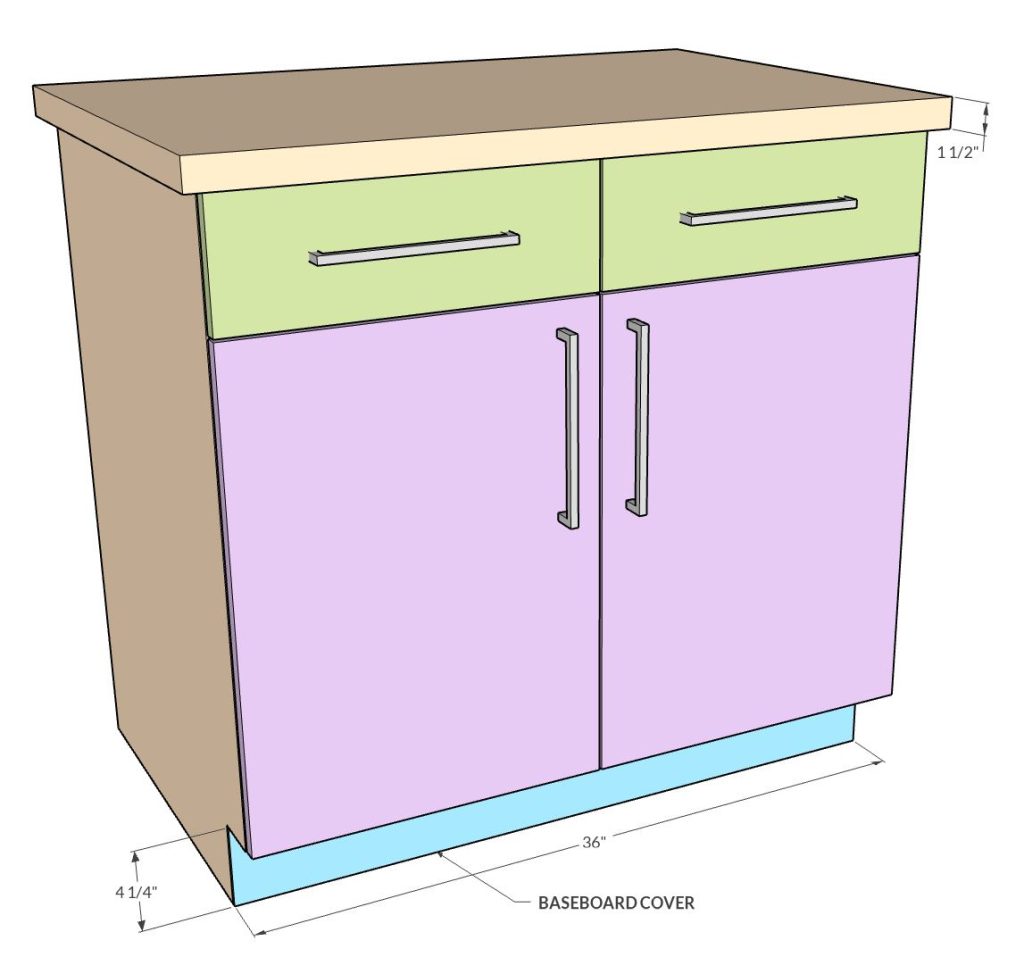
Step 19 – Install the Toe-Kick Cover and Countertop
To finish the cabinet, cut a 1/4″ MDF toe-kick cover to 4 1/2″ x 36″. Attach the toe-kick cover to the front base section of the cabinet using a nail gun.
Next, install your countertop material. There are many countertop options available depending on your budget, style, and where the cabinet will be used.
For kitchen cabinets, popular countertop choices include:
- Quartz
- Natural granite
- Marble
- Soapstone
- Butcher block
- Laminate countertops
If you are building cabinets for a garage or workshop, a simple and affordable option is to laminate two layers of 3/4″ plywood together to create a durable work surface. You can also apply plywood edge banding around the exposed edges to give the countertop a cleaner and more finished appearance. At this point, your DIY frameless kitchen base cabinet with double doors and drawers is complete.

Reviews
There are no reviews yet.