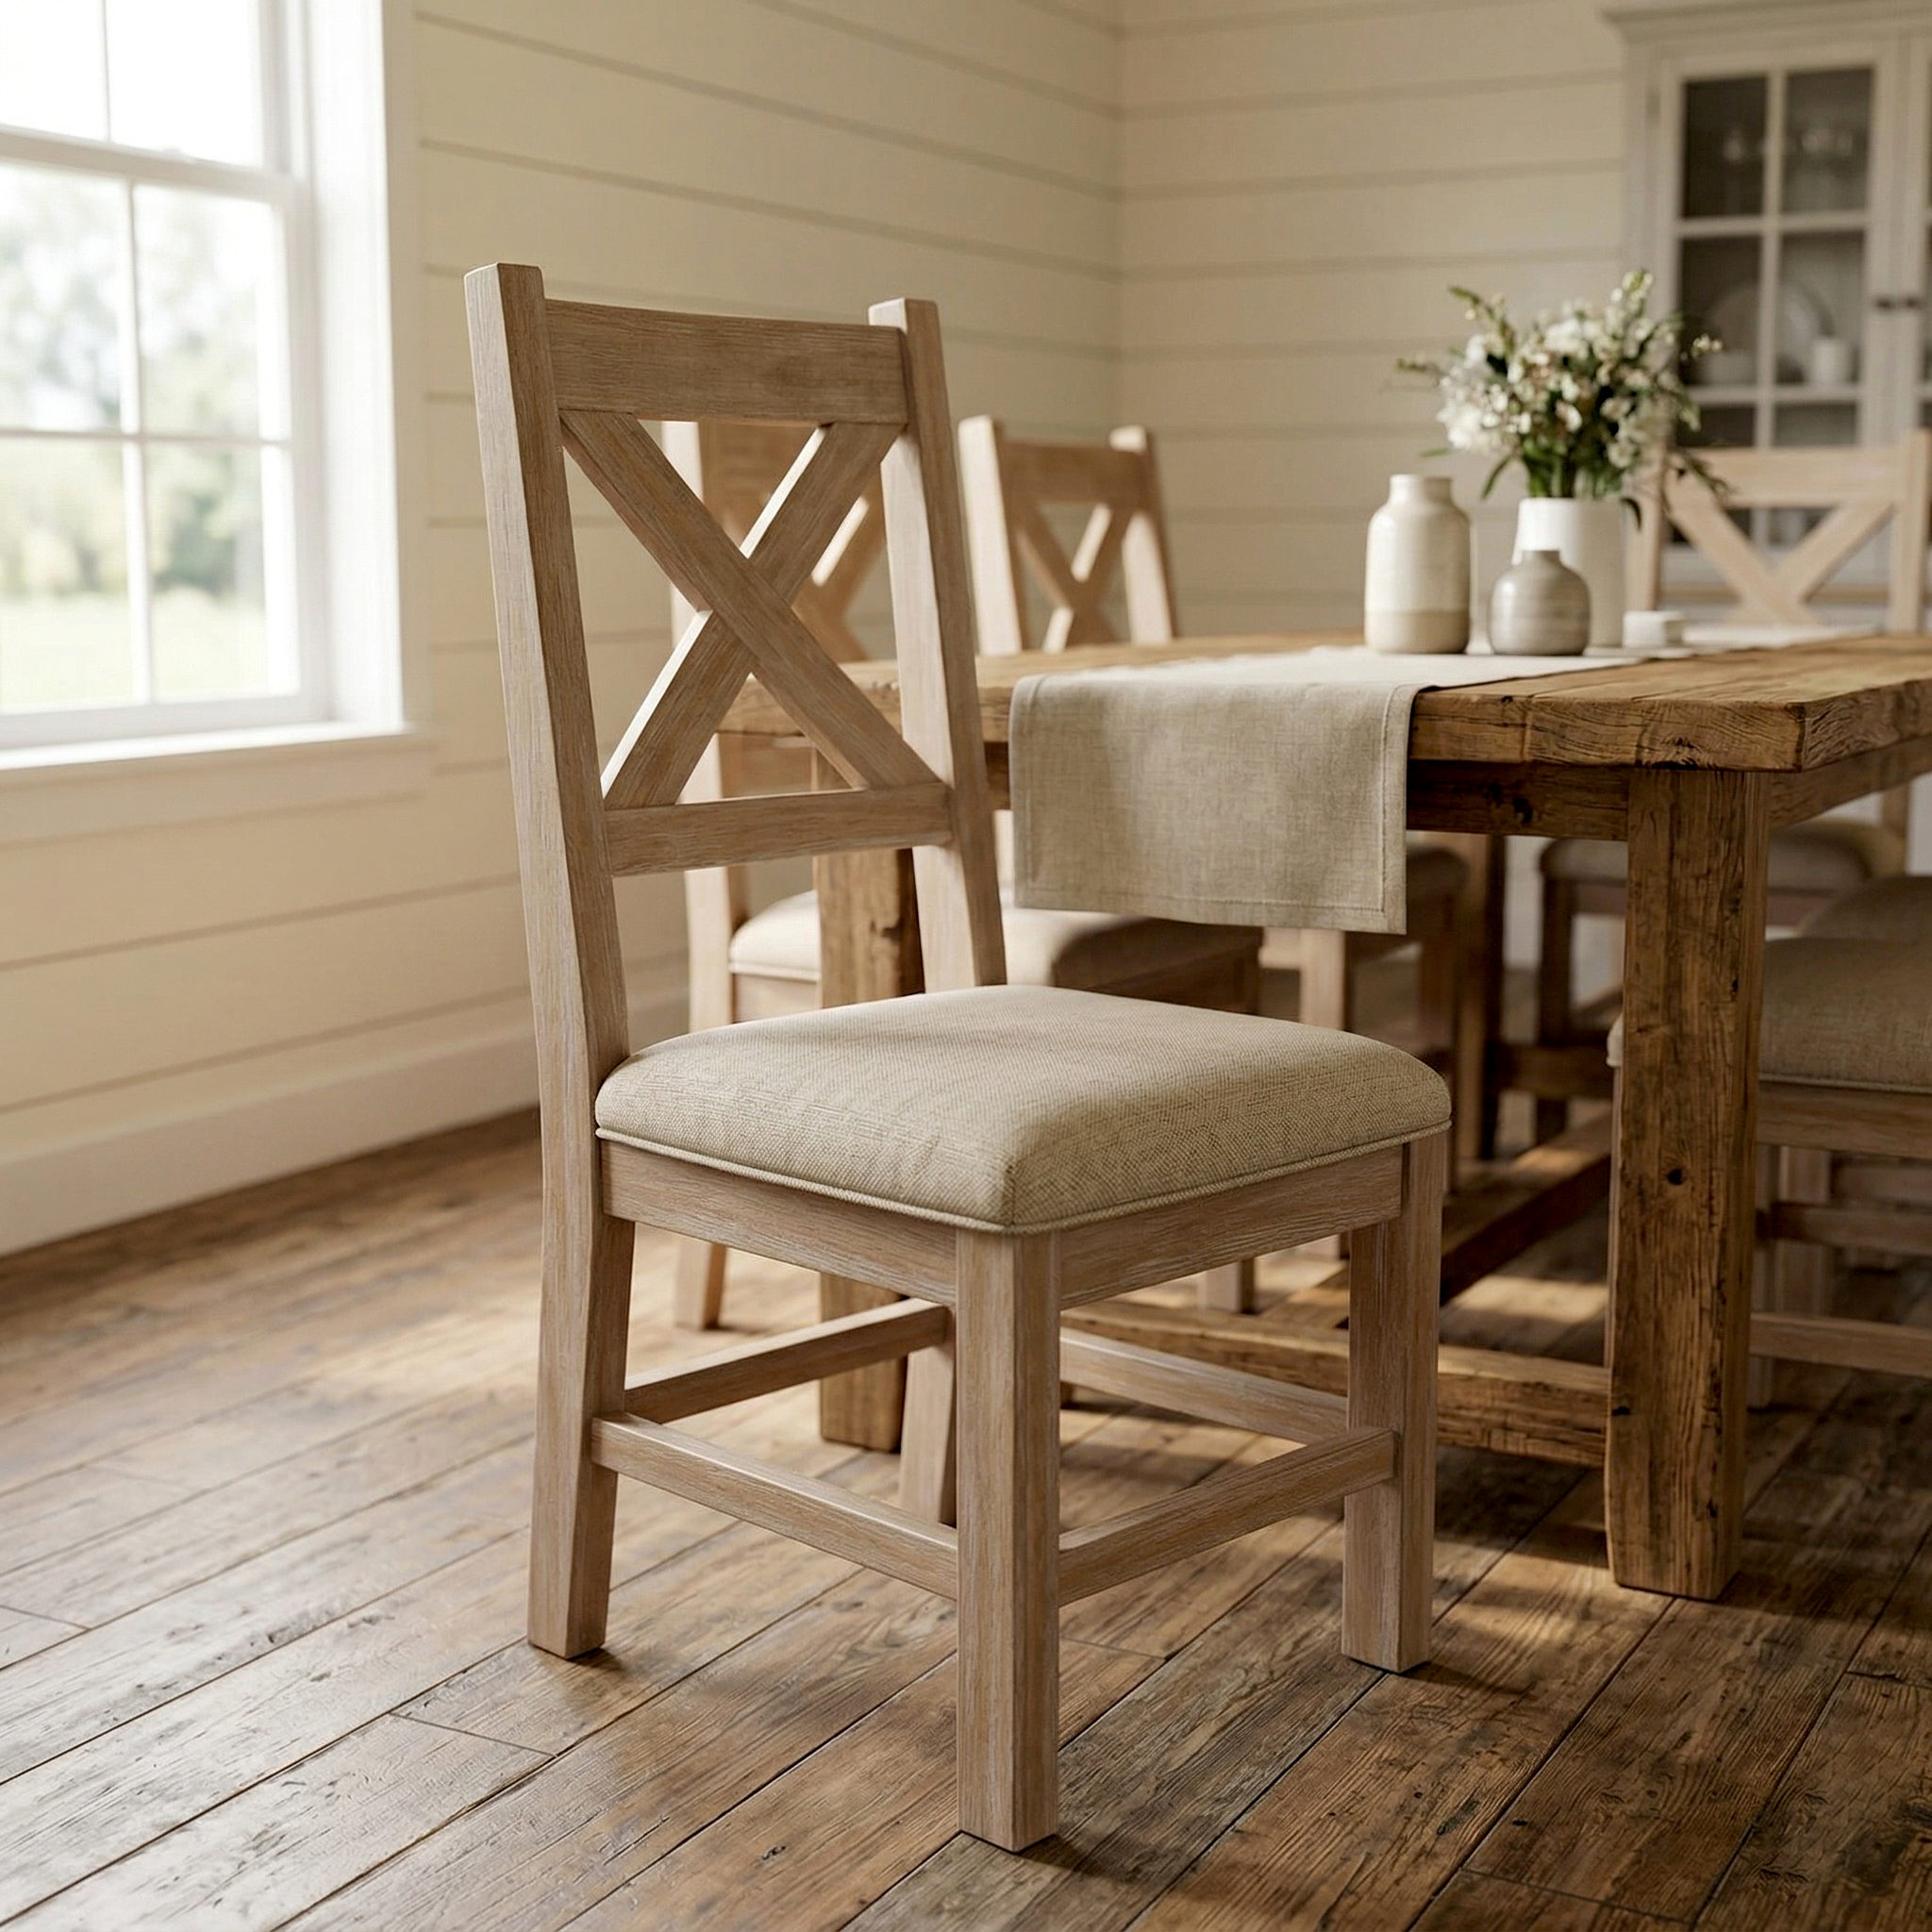
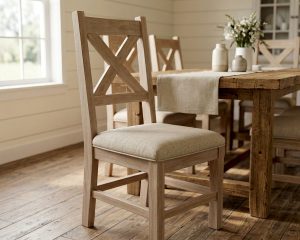
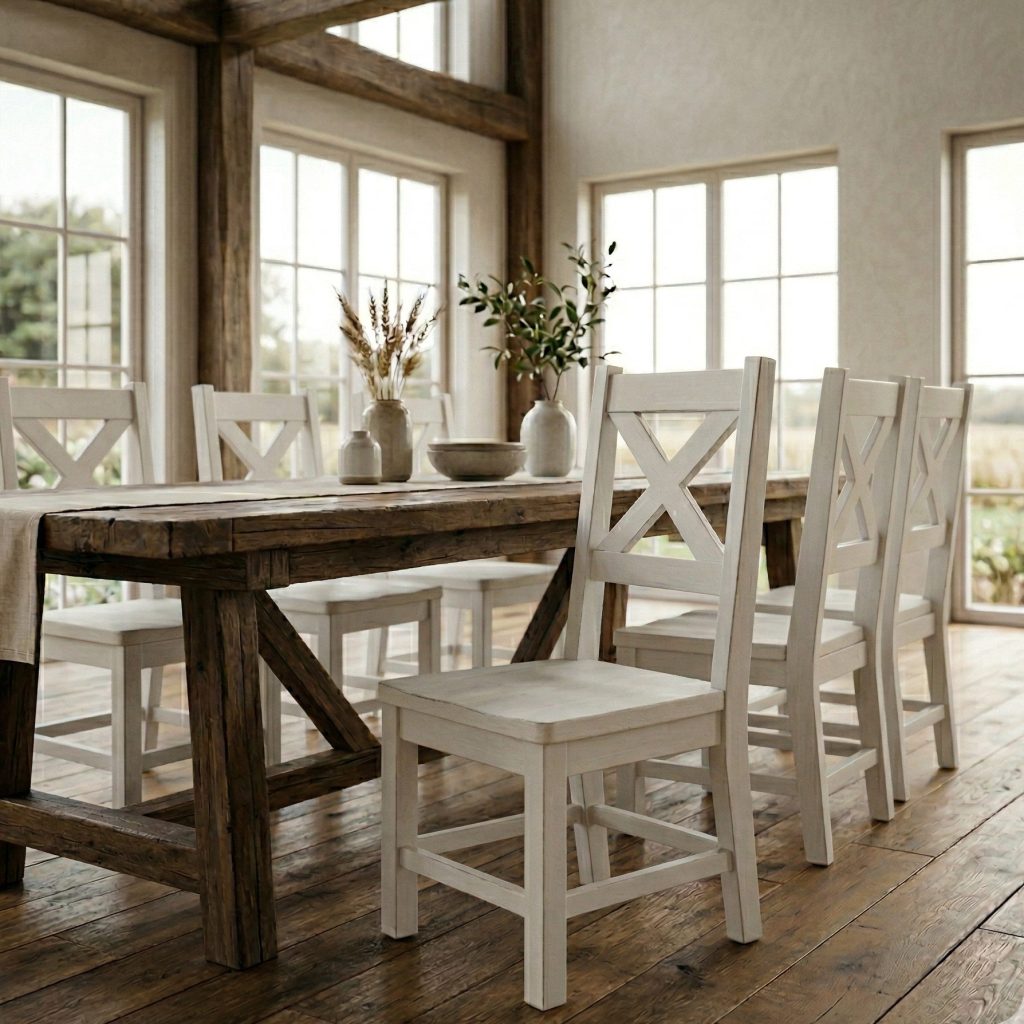
Finding solid wood dining chairs that are both attractive and affordable can be a challenge. Many store-bought options are expensive, made from lower-quality materials, or simply don’t match the style of your home. The good news is that you can build your own DIY farmhouse chair with basic woodworking tools, a few common lumber sizes, and a weekend in the shop. The result is a sturdy, comfortable chair with timeless farmhouse charm that looks great around a dining table, in a breakfast nook, or as an accent piece anywhere in the house.
In this step-by-step woodworking tutorial, I’ll show you exactly how to build a farmhouse dining chair from scratch, including how to shape the rear legs, assemble the frame, construct the decorative X-back design, and create a simple upholstered seat cushion. This project is designed to be approachable for beginner and intermediate woodworkers, while still offering techniques that experienced builders will appreciate. Using construction lumber and readily available materials also helps keep the project budget-friendly without sacrificing durability. Plus, you can easily customize the paint color, upholstery fabric, or chair dimensions to match your home’s style.
Download the Printable PDF Plans
If you prefer building from detailed drawings instead of working directly from a blog post, be sure to download the printable PDF plans for this project. The plans include measurements, cut lists, diagrams, and assembly details to help streamline the entire building process and reduce mistakes in the shop. Having a set of plans nearby makes it easier to stay organized and build with confidence.

What You’ll Learn in This Tutorial
By following this tutorial, you’ll learn how to:
- Cut and shape the rear legs and back posts
- Build and install a decorative X-back chair design
- Use pocket hole joinery to assemble a strong chair frame
- Create angled stretchers and aprons for added stability
- Build and upholster a comfortable seat cushion
- Finish a farmhouse chair for a clean, professional appearance
Whether you’re furnishing a new dining room, replacing worn-out chairs, or simply looking for your next woodworking project, this farmhouse chair build is a rewarding project that combines practicality with classic design.
Now, gather your tools and lumber, download the plans if you’d like a printable version, and let’s get started building this DIY farmhouse chair step by step.
Create a Complete Farmhouse Dining Set
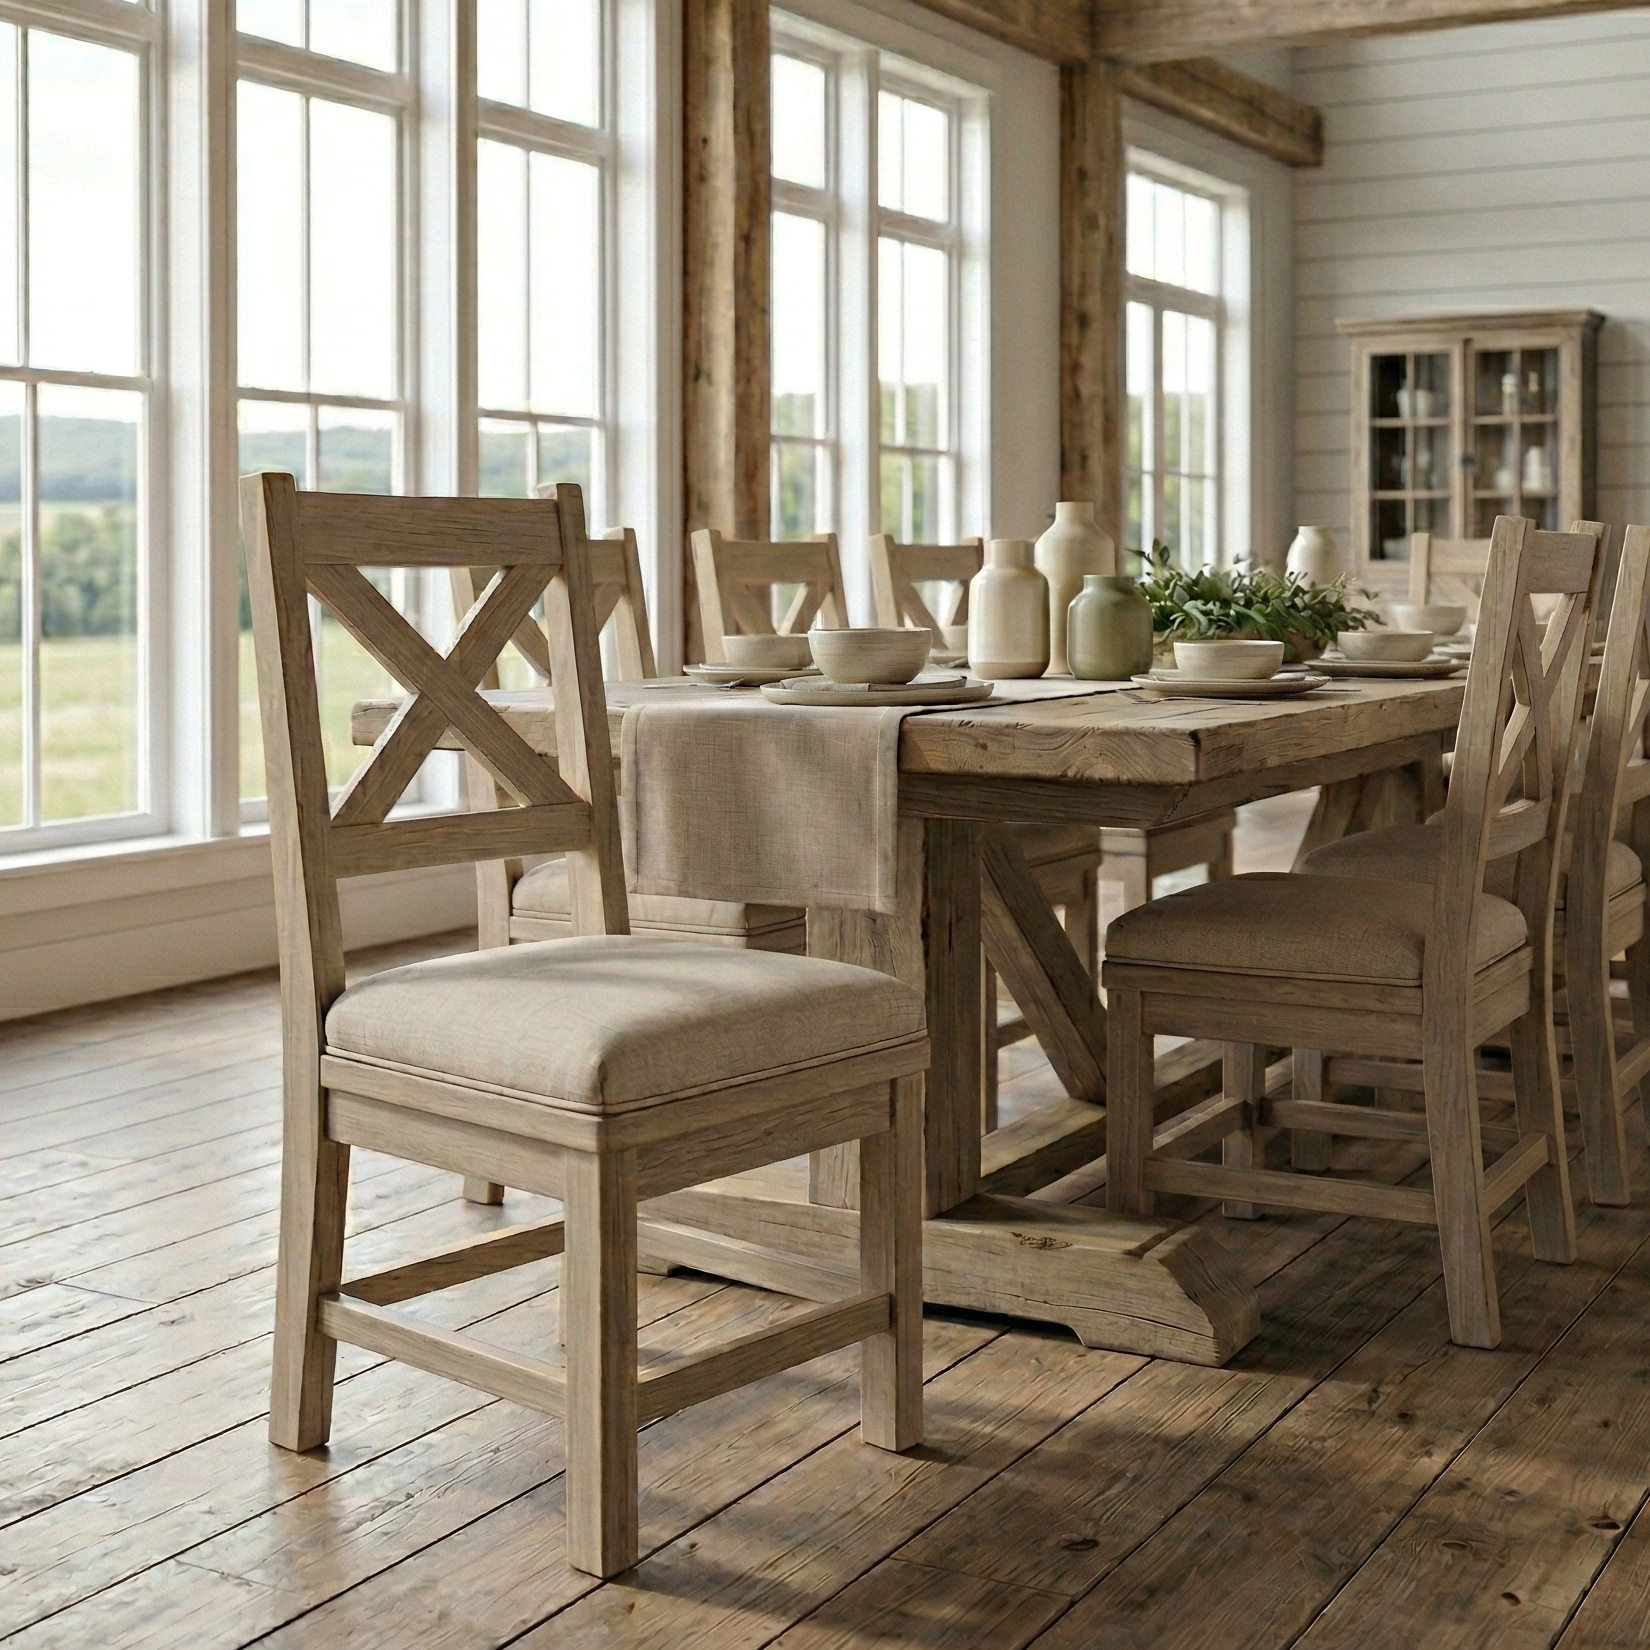
One of the best things about this DIY farmhouse chair is that it pairs perfectly with the matching DIY Farmhouse Dining Table and Farmhouse Bench plans available here on TheDIYPlan. Whether you’re furnishing a formal dining room or creating a cozy gathering space in your kitchen, building all three pieces gives you a coordinated, custom furniture set at a fraction of the cost of buying one from a store. The classic X-back design of these chairs complements the clean lines and solid construction of the farmhouse table, while the matching benches provide flexible seating for larger family meals and holiday gatherings. The dining table was designed to be durable enough for everyday use, and the benches easily tuck underneath when not in use, making the entire set both beautiful and practical.
If you’re planning to build a complete farmhouse dining collection, I recommend starting with the table, then adding the benches and chairs to fit your space and seating needs. Since each project uses common lumber sizes and straightforward woodworking techniques, they’re excellent builds for DIYers looking to create heirloom-quality furniture without the high price tag of retail dining sets.


DIY Farmhouse Chair Woodworking Plans PDF
$14.97
Digital PDF download — Complete woodworking plans to build a DIY farmhouse dining chair. Includes step-by-step instructions, full cut list with measurements, material list, tools list, and 3D illustrated assembly diagrams. Instant download. No physical product shipped.
Build a sturdy, upholstered farmhouse chair with an X-back design using common lumber. Beginner-to-intermediate friendly. Imperial measurements. Printable on any device.
Description
Build Your Own Farmhouse Dining Chair — No Guesswork Required
Finding solid wood dining chairs that are both attractive and affordable is harder than it should be. Store-bought options are often expensive, poorly made, or just don’t fit the style of your home. These DIY farmhouse chair woodworking plans give you everything you need to build a beautiful, sturdy, upholstered dining chair from scratch — using common lumber sizes and basic woodworking tools.
The finished chair features a classic X-back design, angled rear legs with a shaped profile, a solid wood frame assembled with pocket hole joinery, and a comfortable upholstered seat cushion. It’s a functional, heirloom-quality piece of furniture you built yourself — at a fraction of retail cost.
These plans are perfect for building a complete farmhouse dining set. The chair pairs directly with the matching Farmhouse Dining Table and Farmhouse Bench plans available in the TheDIYPlan shop.
Who These Plans Are For
These woodworking plans are designed for beginner to intermediate woodworkers and DIY homeowners who want to build real furniture without relying on vague tutorials or incomplete instructions.
These plans are a great fit if you:
- Are building a farmhouse dining room set from scratch
- Want to replace worn-out or mismatched dining chairs
- Are looking for a satisfying weekend woodworking project
- Prefer building with construction lumber to keep costs low
- Want a customizable chair — paint color, fabric, and dimensions can all be adjusted to suit your space
What’s Included in the PDF
This is a complete, printable PDF woodworking plan. After purchase, you’ll receive instant access to download a file that includes:
- Step-by-step building instructions — 7 detailed steps covering every phase of the build
- Full cut list with measurements — every component listed with exact dimensions in imperial units
- Complete material list — lumber sizes, plywood, foam, fabric, screws, and fasteners
- Tools required list — so you know exactly what you need before you start
- 3D illustrated assembly diagrams — clear visual references for each stage of the build
- Cut diagrams — showing how to lay out and cut parts efficiently
- Printable PDF format — optimized for printing in the shop or viewing on any device
- Imperial measurements — all dimensions in inches and feet
Note: Does not include SketchUp or CAD files.
Project Details
| Detail | Info |
|---|---|
| Difficulty Level | Beginner – Intermediate |
| Estimated Build Time | 1–2 weekends |
| Seat Height | Standard dining height |
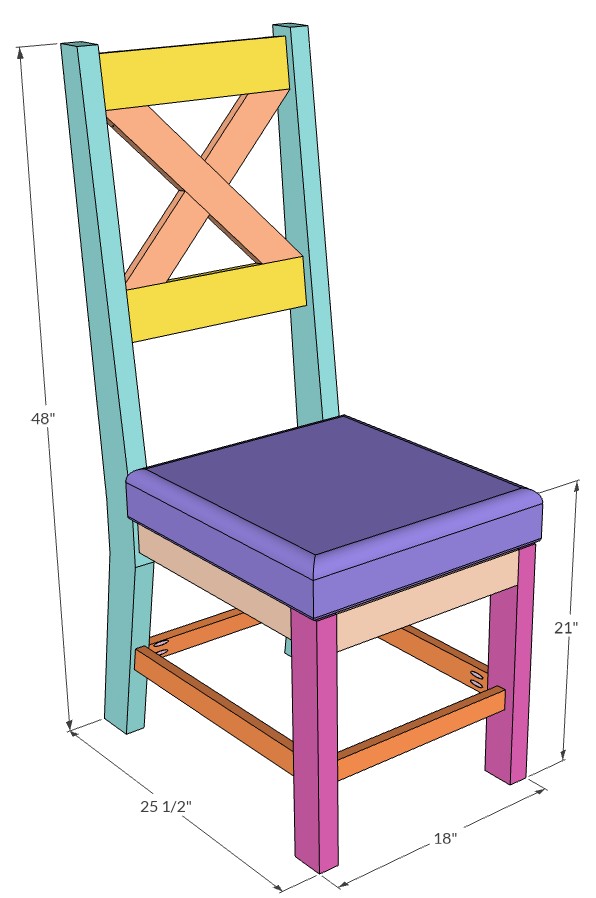
| Back Post Height | 48 inches (rear legs / back posts) |
| Seat Base | 18″ × 20″ plywood |
| Foam Cushion | 20″ × 22″ × 4″ (approximate) |
| Measurements | Imperial (inches) |
| Estimated Cost | Budget-friendly using construction lumber |
Tools You’ll Need: Miter saw, circular saw, jigsaw, drill/driver, Kreg Jig (pocket hole jig), nail gun, staple gun, table saw, wood chisel, speed square, tape measure, clamps, random orbital sander
Materials Used: 2×6, 1×4, 1×3, 2×3 lumber; 3/4″ plywood; upholstery fabric; 4″ thick foam cushion; pocket hole screws; wood glue; brad nails; primer and paint
What You’ll Learn How to Build
Following these plans, you’ll work through each phase of the chair build:
- Cutting and shaping the rear legs — using a circular saw and jigsaw to cut the angled profile
- Building the X-back cross rail — including notching and interlocking the two rail pieces
- Assembling the chair sides — connecting front legs, rear legs, side aprons, and stretchers with pocket hole joinery
- Connecting the full chair frame — front and rear aprons, stretchers, and installing the X-back assembly
- Upholstering the seat cushion — cutting foam, wrapping fabric, and securing to the plywood seat base
- Finishing the chair — primer coat, white paint, and optional dowel plug concealment for a clean, professional look
Why Use a PDF Plan Instead of Working From the Blog Post Alone?
The full blog post is available free on TheDIYPlan — but the PDF plan is designed for the shop. Working from a printable plan means you can:
- Keep the full cut list and diagrams in front of you while you build
- Avoid scrolling through a webpage on your phone between cuts
- Stay organized with all dimensions, materials, and steps in one document
- Reduce the chance of measurement errors and wasted material
- Work faster with a clear reference at every stage of the build
If you’ve ever started a project and lost your place mid-build, a printed plan at the workbench makes a real difference.
Digital Download Information
This is a digital product. No physical item will be shipped.
- Instant PDF download delivered immediately after purchase
- Compatible with desktop, tablet, and mobile devices
- Print at home or save to your device — works however you prefer
- Standard PDF format — no special software required beyond a PDF reader
- Measurements in imperial units (inches and feet)
Build Something You’re Proud Of
A well-made dining chair is one of those projects that gets used every single day. These plans give you the confidence to build it right the first time — with clear instructions, accurate measurements, and illustrated diagrams that take the guesswork out of the process.
If you’re ready to add a custom, handcrafted farmhouse chair to your home, download the plans and get started.
Other Woodworking Projects
-
DIY Farmhouse Chair Woodworking Plans PDF
$14.97 Add to cart Buy Now -

DIY Queen Size Loft Bed with Desk Plans
$18.97 Add to cart Buy Now -

DIY Modern Office Shed Plans -10×12
$26.97 Add to cart Buy Now -

Farmhouse Bench PDF Woodworking Plans
$8.97 Select options This product has multiple variants. The options may be chosen on the product page Buy Now
Tools for this project
- Drill / Driver
- Kreg Jig
- Miter Saw
- Tape Measure
- Staple Gun
- Skill Saw
- Jig Saw
- Nail Gun
- Wood Chisel
- Speed Square
- Clamps
Material List
- 2x6x8′ (x1)
- 2x3x8′ (x1)
- 1x3x6′ (x2)
- 1x4x6′ (x1)
- 1x2x6′ (x1)
- 19″x20″ – 3/4″ Plywood (x1)
- 33×33 Fabric
- 22x20x4″ Thick Cushion
- 2″ Brad Nails
- Staples
- 1 1/4″ Pocket hole screws
- Wood Glue
Note: Lumber dimensions are listed as nominal size. See lumber sizes for actual dimensions vs nominal.
Disclosure: Some of the links on this page, as well as links in the “tools for this project” and “material list” sections, are affiliate links.
Dimensions
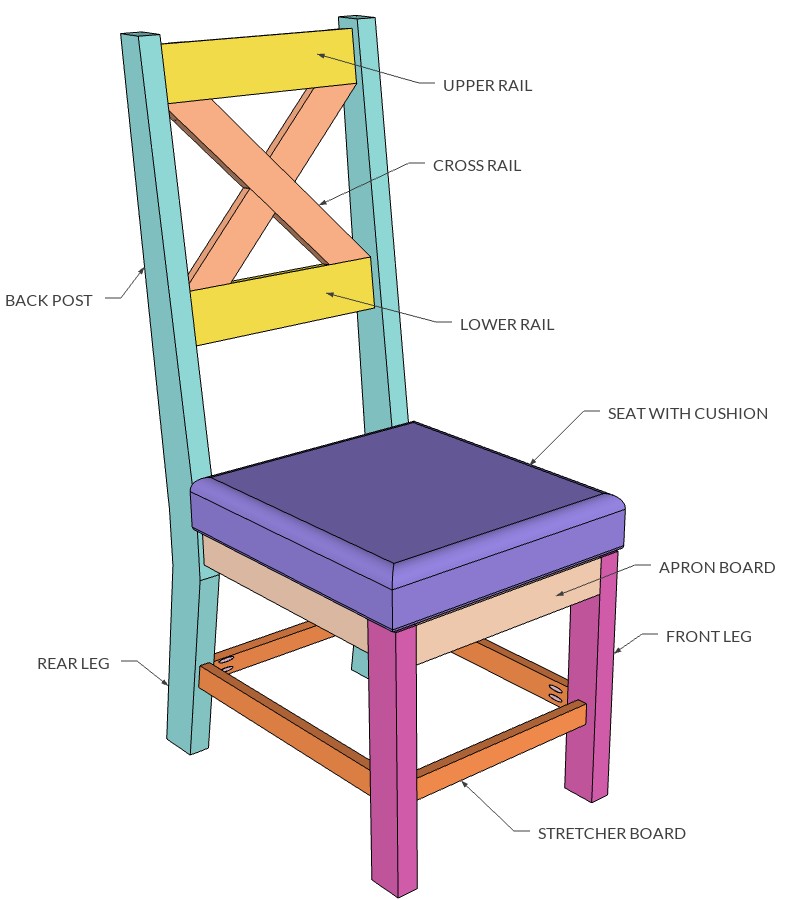
Farmhouse Dining Chair Diagram
Before You Begin: Choosing the Right Lumber
Before you start building this DIY farmhouse chair, take a few extra minutes to select quality lumber. The boards you choose at the beginning of the project can make a significant difference in how easily the chair goes together and how professional the finished piece looks.
When shopping for lumber, inspect each board carefully. Avoid boards that are warped, twisted, bowed, cupped, or kinked, as these defects can make assembly difficult and lead to gaps, uneven joints, or a chair that doesn’t sit square. To check for straightness, hold one end of the board near your eye and look down its length, much like sighting down a rifle barrel. If the board appears curved or twisted, set it aside and choose another piece.
It’s also a good idea to purchase a little more material than the cut list requires. Having an extra board on hand gives you flexibility if you discover hidden defects, make an incorrect cut, or want to select the best grain pattern for visible parts of the chair.
Before making your first cut, review the plans thoroughly and identify each component. Labeling your boards and organizing the cut list can help prevent mistakes and reduce wasted material. Measure carefully, double-check your layout lines, and remember the old woodworking rule: measure twice, cut once.
Finally, don’t overlook shop safety. Wear safety glasses, use hearing protection when operating power tools, and follow the manufacturer’s instructions for all equipment. Taking the time to prepare properly will make the building process more enjoyable and help ensure your farmhouse chair turns out strong, square, and built to last.
With your lumber selected and your tools ready, you’re all set to start building your DIY farmhouse chair.
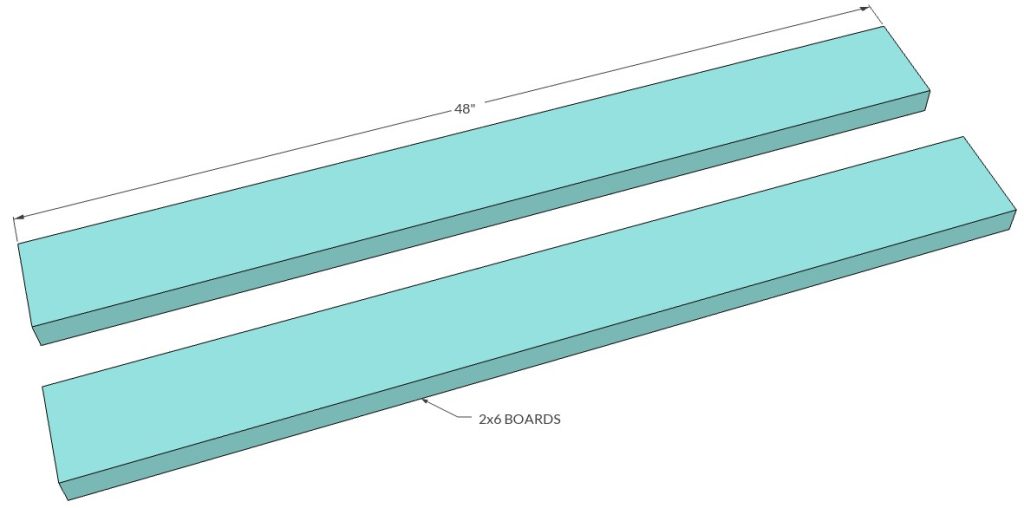
Step 1: Cut the Rear Legs and Back Posts
Using a miter saw, cut two 2×6 boards to 48 inches long. These pieces will become the rear legs and back posts of the DIY farmhouse chair.
If you prefer a chair with a shorter backrest, you can reduce the length of these boards to match your desired design. Keep in mind that shortening these pieces will affect the overall height and appearance of the finished chair.
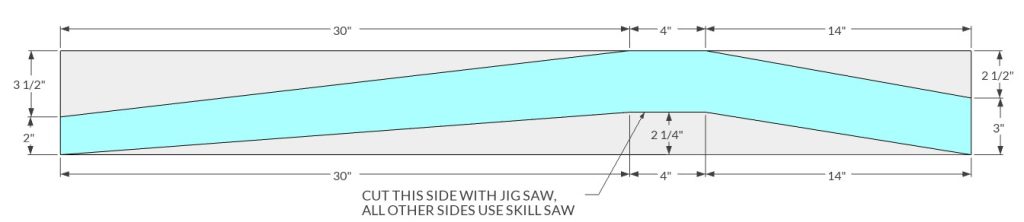
Using the reference diagram, trace the rear leg profile onto each 48-inch 2×6 board. Once the layout lines are marked, use a circular saw to make the majority of the cuts.
The recessed section in the center of the rear leg cannot be cut accurately with a circular saw. For this portion of the profile, switch to a jigsaw and carefully follow the marked lines to complete the shape.
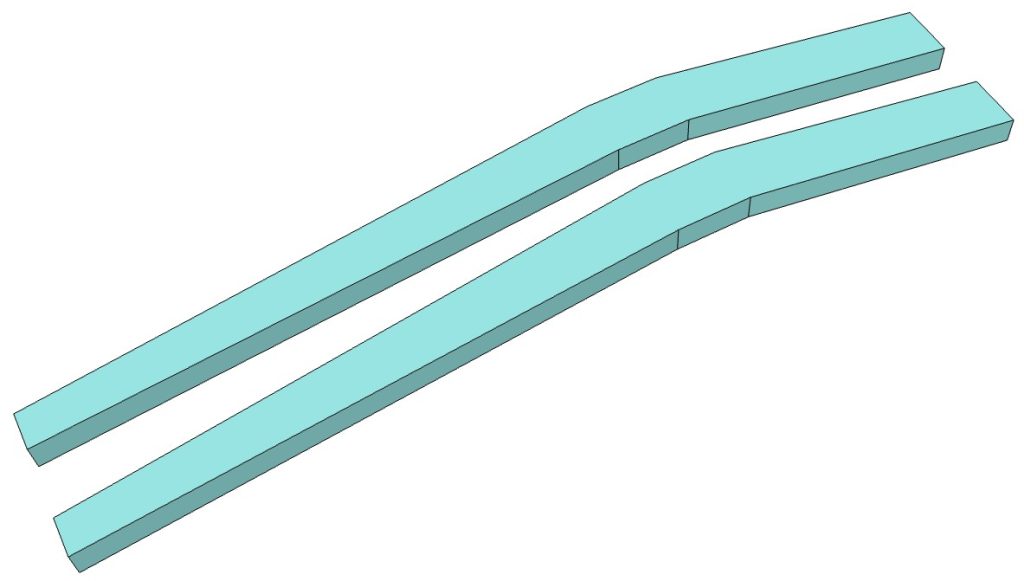
After both rear legs have been cut, use a random orbital sander to smooth any rough edges and remove saw marks as needed. Compare the two pieces to ensure they match closely before proceeding with assembly. Taking a few extra minutes to refine these parts will help the farmhouse chair go together more accurately in the later steps.
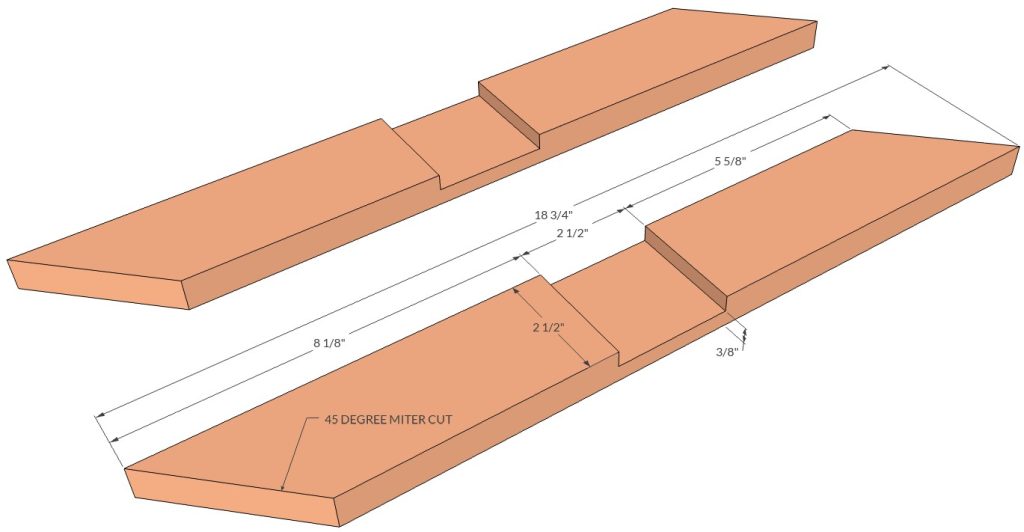
Step 2: Build the Back Cross Rail
The next step is to build the decorative X-shaped cross rail that connects the two back posts and gives the farmhouse chair its classic style.
Using a miter saw, cut two rail pieces measuring 18-3/4 inches long. Then make 45-degree miter cuts on both ends of each piece, as shown in the reference diagram.
Locate and mark the center of each rail. At the center mark, cut a notch measuring 2-1/2 inches wide by 3/8 inch deep on both pieces. The 3/8-inch depth is approximately half the thickness of the board, allowing the two rails to interlock flush and form the X-shaped design.
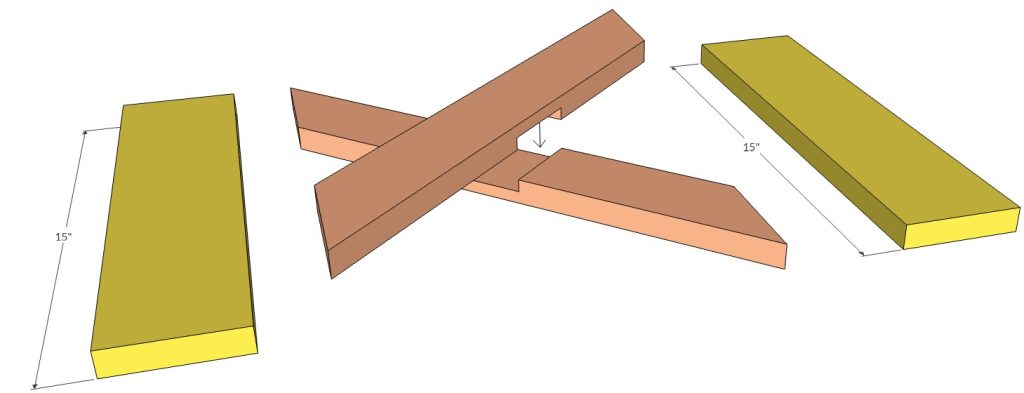
To create each notch, adjust the blade depth on your circular saw so it extends 3/8 inch below the base plate. Make a series of closely spaced cuts within the marked area until most of the material has been removed.
Use a wood chisel to clean out the remaining material and flatten the bottom of the notch. Test-fit the two rails together to confirm they slide into one another properly and create a tight-fitting X-shaped assembly. Make any necessary adjustments before moving on to the next step.
Step 3: Assemble the Cross Rail
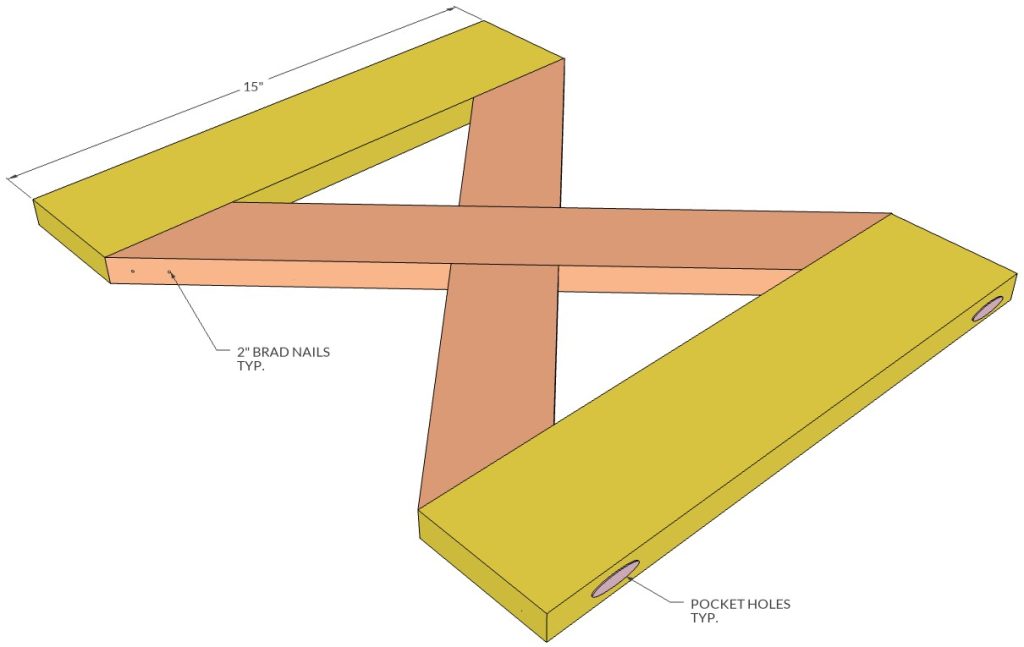
Cut two 1×4 boards to 15 inches long. These pieces will serve as the upper and lower rails that support the decorative X-shaped insert.
Using a Kreg Jig, drill one pocket hole at each end of both 15-inch 1×4 boards, as shown in the reference image.
Before assembly, apply wood glue to all mating surfaces to create a stronger bond. Slide the notched rail pieces from the previous step together until they interlock and form the completed X-shaped cross.
Position the assembled cross between the upper and lower rails. Use clamps to hold the components securely while checking that everything remains square and properly aligned.
Once the assembly is positioned correctly, attach the X-shaped cross to the upper and lower rails using a nail gun loaded with 2-inch brad nails. Continue checking the alignment as you fasten the pieces together to prevent the assembly from shifting.
Allow the wood glue to dry according to the manufacturer’s recommendations before proceeding to the next stage of the farmhouse chair build. Proper curing time will help ensure a strong and durable back assembly.
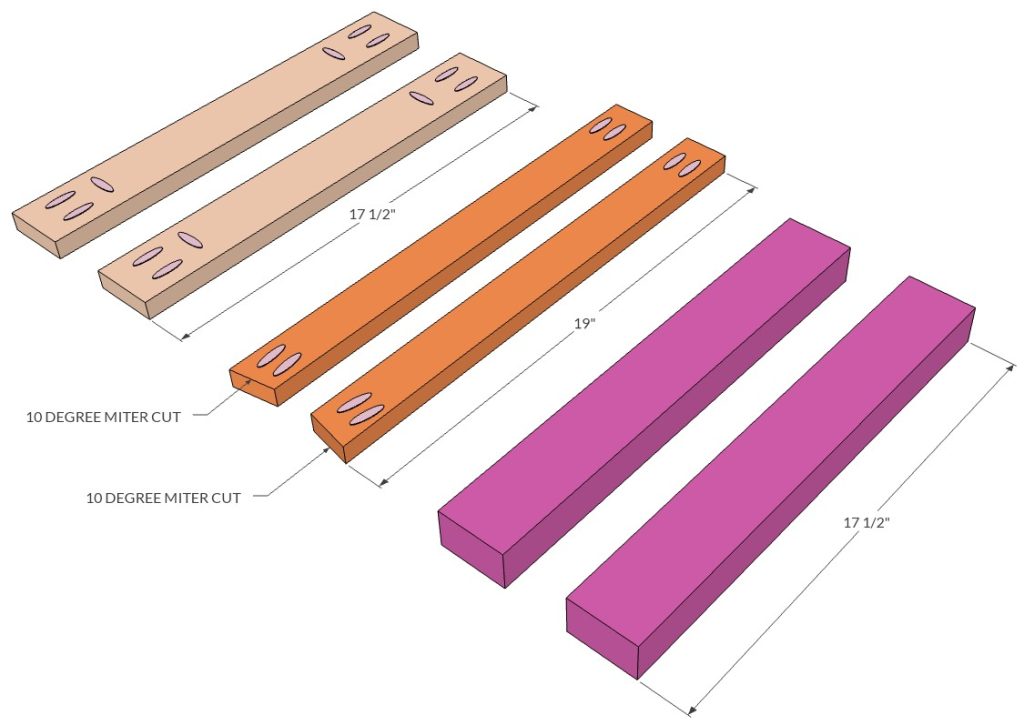
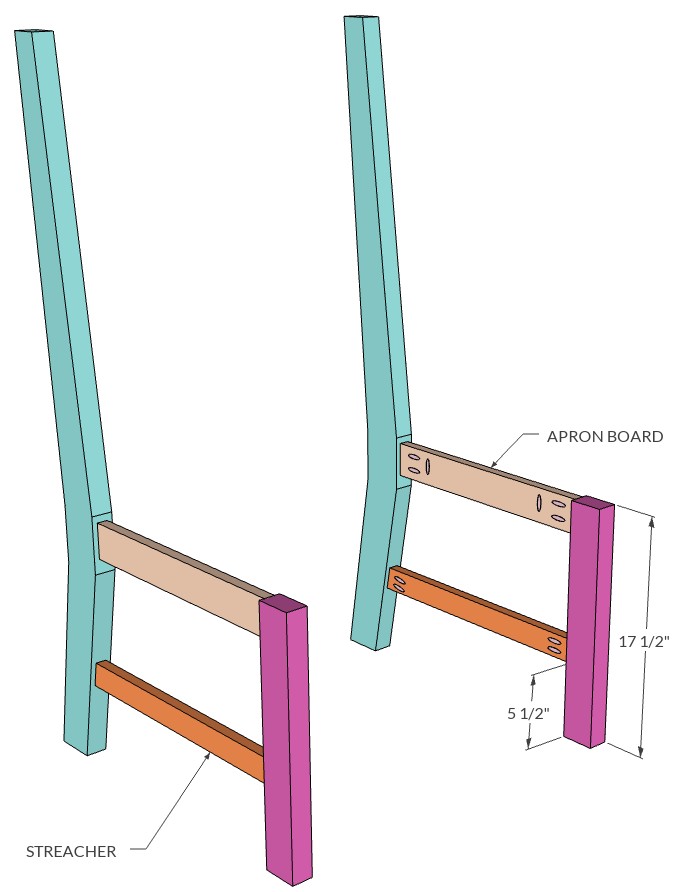
Step 4: Cut the Front and Rear Leg Assemblies
Using a miter saw, cut two 2×3 boards to 17-1/2 inches long. These pieces will serve as the front legs of the farmhouse chair.
Next, cut two 1×3 boards to 17-1/2 inches long for the side aprons. These aprons connect the front legs to the rear legs and provide support directly beneath the seat.
Then, cut two 1×2 stretchers to 19 inches long. On one end of each stretcher, make a 10-degree miter cut, as shown in the reference image. Repeat this process for both stretcher pieces.
Using a Kreg Jig, drill the necessary pocket holes in the apron and stretcher pieces according to the layout shown in the reference diagram. Double-check the orientation of each pocket hole before drilling to ensure the fasteners will be concealed during assembly.
Step 5: Assemble the Chair Sides
Apply wood glue to each mating surface before assembly. Position the 17-1/2-inch side aprons between the front and rear legs, then secure them using 1-1/4-inch pocket hole screws.
Next, install the 19-inch stretchers using 1-1/4-inch pocket hole screws. The stretchers should be positioned 5-1/2 inches up from the bottom of the legs, as shown in the reference image. This placement provides additional rigidity to the chair frame while maintaining the intended design.
As you assemble each side, use a speed square or measure diagonally across the assembly to verify that it remains square and properly aligned. Keeping these assemblies square will make the remaining steps of the farmhouse chair build much easier and will help ensure a professional-looking finished product.
Repeat the process to create the second side assembly.
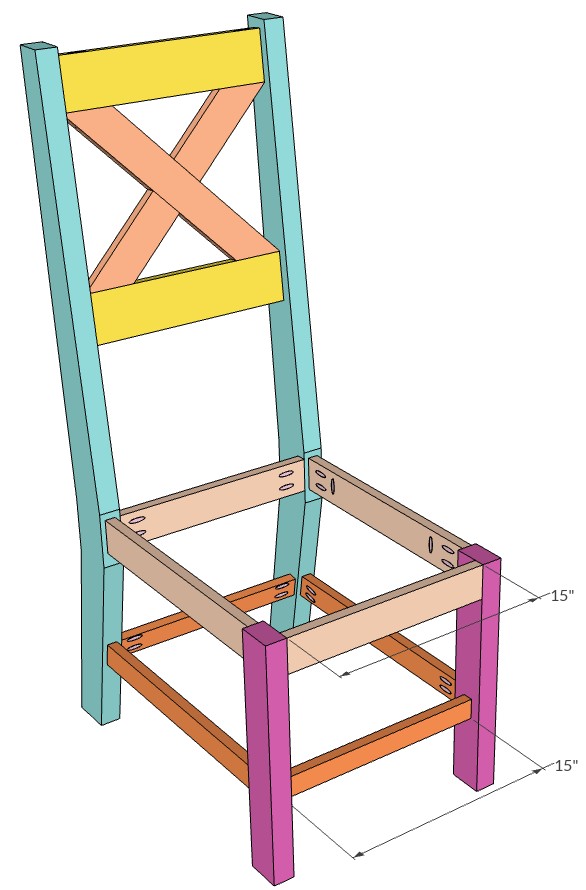
Step 6: Connect the Chair Sides and Install the Back Cross Rail
To connect the two side assemblies, cut two 1×3 boards to 15 inches long for the front and rear aprons. Then cut two 1×2 boards to 15 inches long for the front and rear stretchers.
Using a Kreg Jig, drill the required pocket holes as indicated in the reference image. Apply wood glue to the mating surfaces, then join the two side assemblies using 1-1/4-inch pocket hole screws. As you tighten the screws, verify that the chair frame remains square and properly aligned before fully securing all connections.
Once the chair frame has been assembled, install the completed X-shaped back cross rail assembly between the rear back posts. Secure it according to the pocket hole layout shown in the reference diagram.
If desired, conceal the visible pocket holes located near the top of the back cross rail using 3/8-inch wooden dowels. This simple finishing technique creates a cleaner, more refined appearance. For examples of installing and trimming 3/8-inch dowel plugs, refer to the DIY Farmhouse Dining Table or Kids’ Step Stool projects.
At this stage of the build, apply a coat of primer to the entire farmhouse chair frame. After the primer has dried completely, finish the chair with your preferred white paint to achieve a timeless farmhouse-style finish.
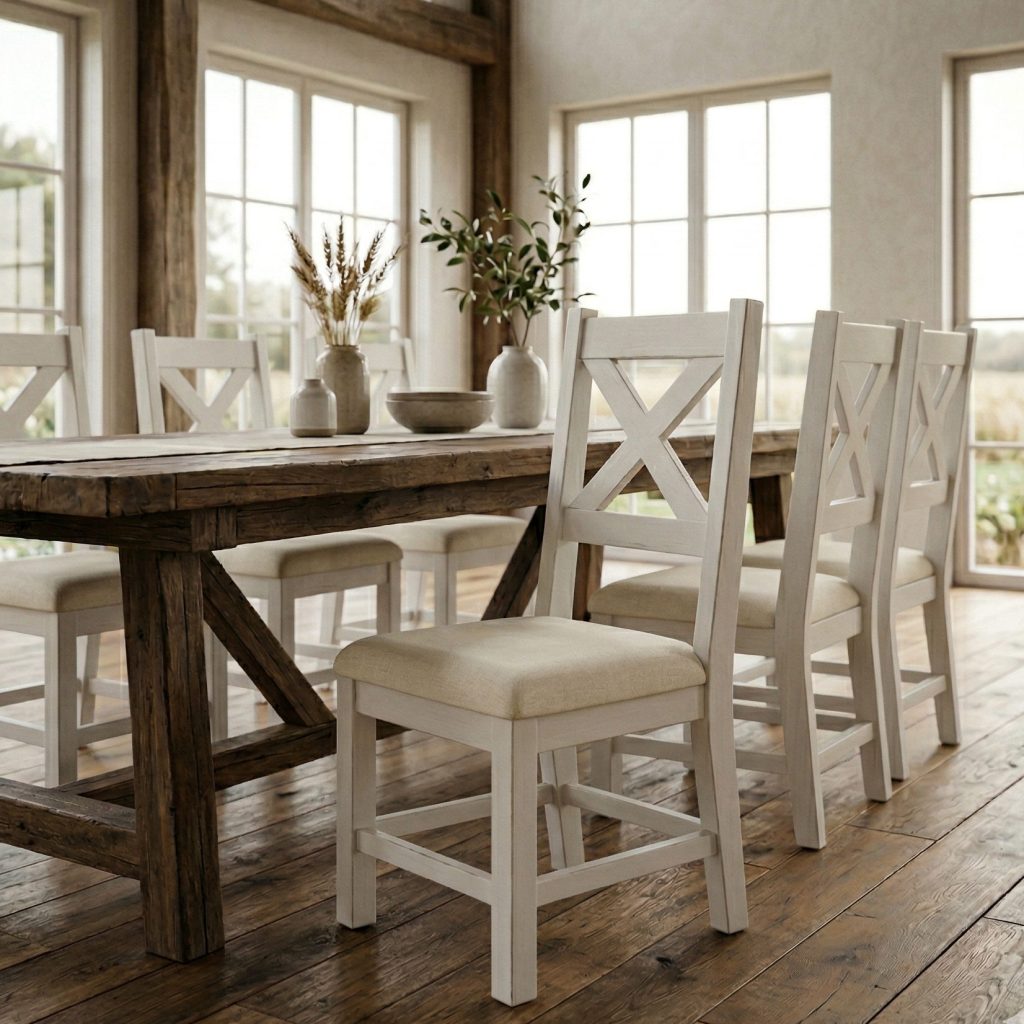
Step 7: Build and Install the Upholstered Seat Cushion
For the seat, you have two options: build a simple wooden seat or create an upholstered cushion seat. While a wooden seat is quicker to make, an upholstered seat provides a much more comfortable seating experience. In this tutorial, we’ll be building a cushioned seat for the farmhouse chair.
Using 3/4-inch plywood, cut one seat base measuring 18 inches by 20 inches. Sand any rough edges to prevent the upholstery fabric from snagging during installation.
Next, cut the seat cushion foam so that it extends 1 inch beyond the plywood on all four sides. For an 18-inch by 20-inch plywood seat base, the foam should measure 20 inches by 22 inches. The additional overhang helps create a fuller, more comfortable cushion with softer edges.
Lay the upholstery fabric face down on a clean work surface. Center the foam cushion on top of the fabric, then place the plywood seat base over the foam. Pull the fabric tightly around the edges of the plywood and secure it to the underside using a staple gun.
As you staple, work your way around the seat by alternating from one side to the opposite side. This technique helps maintain even tension across the fabric and minimizes wrinkles. Continue pulling the fabric snug before adding staples until the entire cushion is securely wrapped. Fold the corners neatly for a clean, professional appearance.
Once the upholstered seat cushion is complete, position it on the chair frame and secure it using 1-1/4-inch pocket hole screws, as shown in the reference image.
With the seat installed, your DIY farmhouse chair is complete and ready to use. Whether paired with a farmhouse dining table or matching farmhouse benches, this handcrafted chair adds both comfort and timeless style to your dining room or kitchen.


Reviews
There are no reviews yet.