
There’s nothing quite like relaxing on a handcrafted porch swing after a long day. Whether it’s hanging from a front porch, pergola, arbor, or backyard patio structure, a wooden porch swing adds both comfort and character to any outdoor space. The best part is that you can build one yourself using basic woodworking tools, affordable lumber, and a straightforward set of woodworking plans.
In this DIY porch swing tutorial, you’ll learn how to build a durable and comfortable swing bench step by step. This project features a curved seat for added comfort, angled back supports for better seating posture, and a strong frame designed for everyday outdoor use. The build is beginner-friendly while still offering enough detail and craftsmanship for experienced woodworkers who want a clean, professional-looking result.
If you’re looking for an easy DIY woodworking project that combines function and style, this porch swing is a great weekend build. The design can also be customized with different wood types, finishes, paint colors, ropes, or hanging chains to match your porch or outdoor living space.

Download the Printable PDF Plans
For easier building, be sure to download the printable PDF woodworking plans. The plans include detailed measurements, material lists, cut diagrams, and step-by-step illustrations to help simplify the entire build process and save time in the workshop.
Having the plans nearby while building makes it much easier to follow each step, especially when cutting angles, laying out the seat supports, and assembling the swing frame.
What You’ll Learn in This DIY Porch Swing Tutorial
In the step-by-step tutorial below, you’ll learn how to:
- Build the curved seat supports
- Assemble the porch swing frame
- Install the backrest and seat slats
- Build and attach the armrests
- Install the hanging hardware safely
- Prepare the swing for mounting on a porch, pergola, or arbor
Gather your tools, lumber, and hardware, and let’s start building this DIY wooden porch swing.

| Time to Complete | Total Cost | Skill Level |
| 6 hours | $120 | Beginner |
Download Printable Plans in PDF


DIY Porch Swing Bench Woodworking Plans
$14.97
Digital PDF download – Get the complete woodworking plans to build a DIY porch swing bench. Includes step-by-step instructions, full cut list with measurements, material list, tools list, assembly diagrams, and more. Instant download. Print at home. Start building today.
Description
Build a Beautiful DIY Porch Swing Bench – Complete Woodworking Plans
There’s nothing quite like relaxing on a handcrafted wooden porch swing after a long day. Whether you’re hanging it from a front porch beam, pergola, arbor, or backyard structure, this classic swing bench adds comfort and character to any outdoor living space — and you can build it yourself.
These step-by-step woodworking plans give you everything you need to go from raw lumber to a finished, hang-ready porch swing bench with confidence. No guessing, no searching for missing measurements, and no frustrating trial and error. Just clear, organized instructions designed to help you build smarter and faster.
Who These Plans Are For
These plans are designed for:
- Beginner and intermediate woodworkers looking for a rewarding weekend project
- DIY homeowners who want to add functional, handmade furniture to their porch or patio
- Backyard builders who enjoy working with lumber and basic tools
- Anyone searching for “how to build a porch swing” and wanting more than a vague blog tutorial
The build is rated beginner-friendly while still producing a clean, professional-looking result that experienced woodworkers will appreciate. If you can make basic miter cuts and use a drill, you can build this swing.
What’s Included in the PDF Plans
This is a digital PDF woodworking plan — not a physical product. After purchase, you’ll receive an instant download with everything needed to complete the project:
- Step-by-step building instructions — 11 clearly written build steps from first cut to hanging hardware
- Full cut list with dimensions — exact measurements for every board, including angled and mitered cuts
- Complete material list — all lumber sizes and hardware needed for the build
- Tools required list — tape measure, drill, miter saw, jigsaw, hole saw, and pencil
- Assembly diagrams and illustrations — visual references for each stage of the build
- Hanging hardware instructions — how to install screw eyes and attach rope or chain
- Estimated build time — approximately 6 hours
- Estimated project cost — approximately $120
- Printable PDF format — print the full plan at home for easy workshop reference
- Instant download — available immediately after purchase
Project Details
| Detail | Info |
|---|---|
| Skill Level | Beginner |
| Estimated Build Time | 6 Hours |
| Estimated Cost | ~$120 |
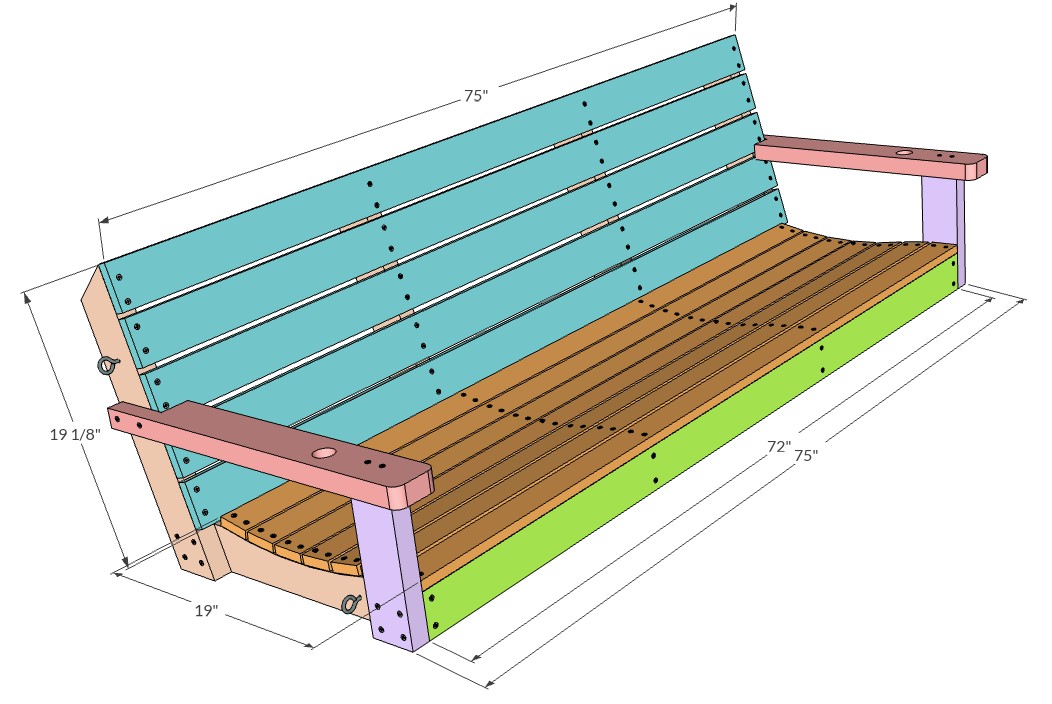
| Swing Width | 6 Feet (72″–75″ span) |
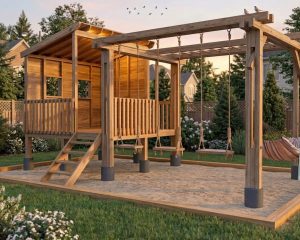
| Hanging Options | Porch beam, pergola, arbor, or outdoor frame |
Primary lumber used: 2×4 boards (frame, seat supports, back supports, armrests, legs), 1×4 boards (back slats, front rail), 1×3 boards (seat slats)
What You’ll Build — Step by Step
The plans walk you through all 11 stages of the build:
- Building the curved seat support pieces
- Cutting the angled back support pieces
- Assembling the seat and back supports
- Cutting the back slats and front rail
- Attaching the front rail and back slats
- Cutting the seat slats
- Installing the seat slats with proper spacing
- Building and attaching the front legs
- Cutting and preparing the armrests (with chamfered edges and rope/chain hole)
- Installing the armrests securely to the frame
- Installing hanging hardware and mounting the finished swing
The swing features a curved seat for improved sitting comfort, angled back supports for better posture, and notched armrests designed to accommodate rope or chain hanging hardware.
Why These Plans Are Worth It
Free tutorials are a starting point — but they often leave out the details that matter most when you’re standing in the workshop with a board in your hand.
These plans are different:
- Exact measurements for every cut — including 15-degree and 30-degree miter angles, notch dimensions, hole placement, and spacing guides
- Consistent, repeatable results — assembly is organized into left-hand and right-hand sub-assemblies for proper frame alignment
- Fewer mistakes — clear diagrams show you how each piece connects before you drive a single screw
- Faster build time — having everything organized in one printable document saves hours of back-and-forth guesswork
- Customizable design — the swing works with different wood species, paint or stain finishes, rope or chain hardware, and can be adapted for different hanging structures
Digital Download Information
This is a digital product. No physical item will be shipped.
- After completing your purchase, you’ll receive an instant download link for the PDF file
- The PDF is compatible with desktop computers, tablets, and mobile devices
- The plans are printable — take them to the workshop or use them on a tablet while you build
- Files are available immediately — no waiting, no shipping costs
Ready to Build Your Porch Swing?
If you’ve been wanting to add a handcrafted wooden swing to your porch, patio, or pergola, this is the project to start with. The materials are affordable, the tools are common, and the step-by-step plans make the build straightforward from start to finish.
Download the PDF plans today and start building this weekend.
Other Woodworking Projects


Tools for this project
- Tape Measure
- Drill
- Miter Saw
- Jig Saw
- Hole Saw or Wood Drill Bit
- Pencil
Material List
- Available with the purchase of PDF plans.
Note: Lumber dimensions are listed as nominal size. See lumber sizes for actual dimensions vs nominal.
Disclosure: Some of the links on this page, as well as links in “tools for this project” and “material list” sections, are affiliate links.
Dimensions

Step 1 – Build the Porch Swing Seat Support Pieces
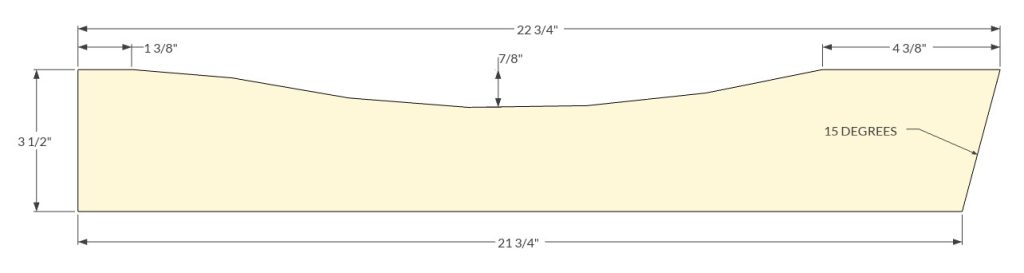
Start by building the bottom seat support pieces for the DIY porch swing bench. Take a 2×4 board and cut four pieces to 22 ¾” long. On one end of each board, make a 15-degree miter cut. This angled cut will match the slope of the back support and help create the proper porch swing seat angle.
Next, create the curved seat profile to make the swing more comfortable to sit on. On the side with the 15-degree miter cut, measure 4 ⅜” from the angled edge and mark it with a pencil. From the opposite end of the board, measure 1 ⅜” and make another mark.
Find the center point between those two marks, then measure down ⅞” to 1” from the edge of the board. This mark will become the lowest point of the curve. Using those three reference points, draw a smooth arch with a pencil. Refer to the image for guidance on the curve layout.
Use a jigsaw to carefully cut along the pencil line. Once the first curved seat support is complete and you are satisfied with the shape, use it as a template to trace the remaining pieces. Cut the same curve on all four seat support boards so the porch swing seat remains consistent and comfortable.
If you do not have a jigsaw or prefer a simpler build, you can leave the boards flat instead of cutting the curve. However, the curved seat design provides a more comfortable seating surface for the finished porch swing.
Step 2 – Cut the Porch Swing Back Support Pieces
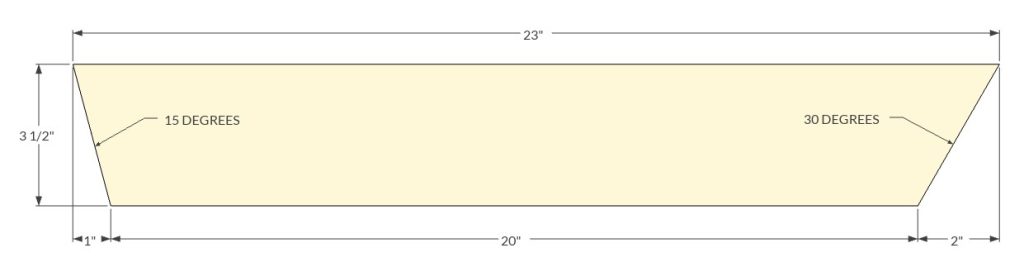
Now cut the back support pieces for the porch swing frame. Take a 2×4 board and cut four pieces to 23” long.
On each board, make a 15-degree miter cut on one end. This will be the bottom of the back support where it connects to the seat support. Then make a 30-degree miter cut on the opposite end of the board. This will be the top of the back support.
Be sure all four boards are cut identically so the backrest angle stays consistent across the entire porch swing bench.
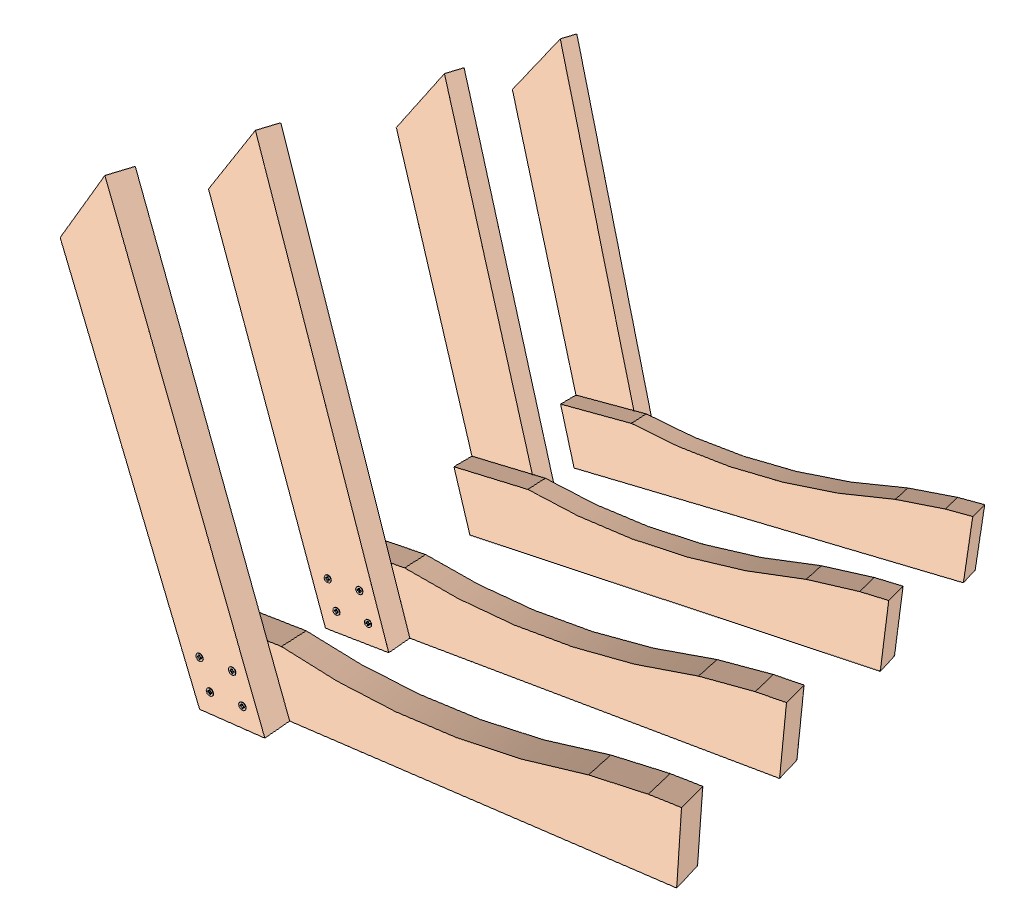
Step 3 – Assemble the Seat and Back Supports
Lay one seat support piece flat on your work surface with the curved side facing up. Position one back support board against the angled end of the seat support, making sure the miter cuts align correctly.
Attach the two pieces together using 2 ½” wood screws. Pre-drilling the screw holes is recommended to help prevent the wood from splitting and to keep the assembly aligned during installation.
You will need to build two left-hand assemblies and two right-hand assemblies. This mirrored layout keeps the spacing and alignment of the porch swing frame consistent during assembly.
Step 4 – Cut the Porch Swing Back Slats and Front Rail
Next, cut the boards for the porch swing backrest and front seat rail. Using a 1×4 board, cut five back slat pieces to 75” long. These boards will create the backrest of the porch swing bench.
Then cut one front rail piece to 72” long from the same 1×4 material. This board will connect the front of the seat support assemblies and help strengthen the overall frame.
Before moving to assembly, make sure all boards are straight and the ends are cut square for a clean fit during installation.

Step 5 – Attach the Front Rail and Back Slats
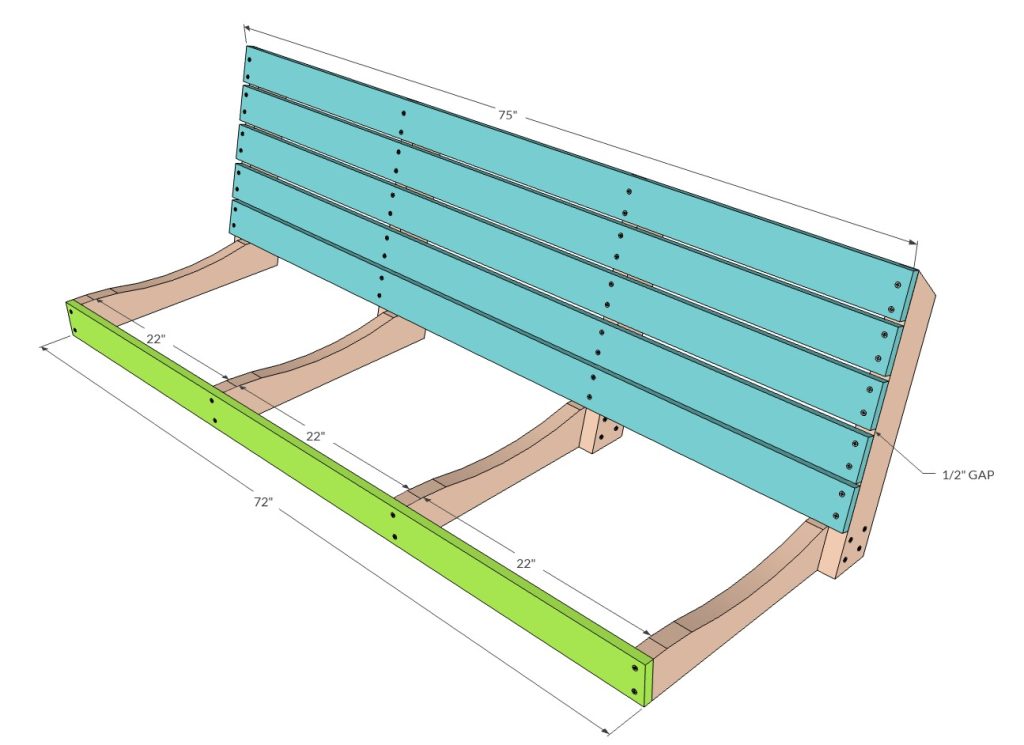
Start by attaching the 72” front rail board to the front edge of the seat support assemblies using 1 ½” wood screws. Position the seat support assembly pieces so they are spaced 22” apart from each other. Check the reference image to confirm the correct layout and spacing before fastening everything together.
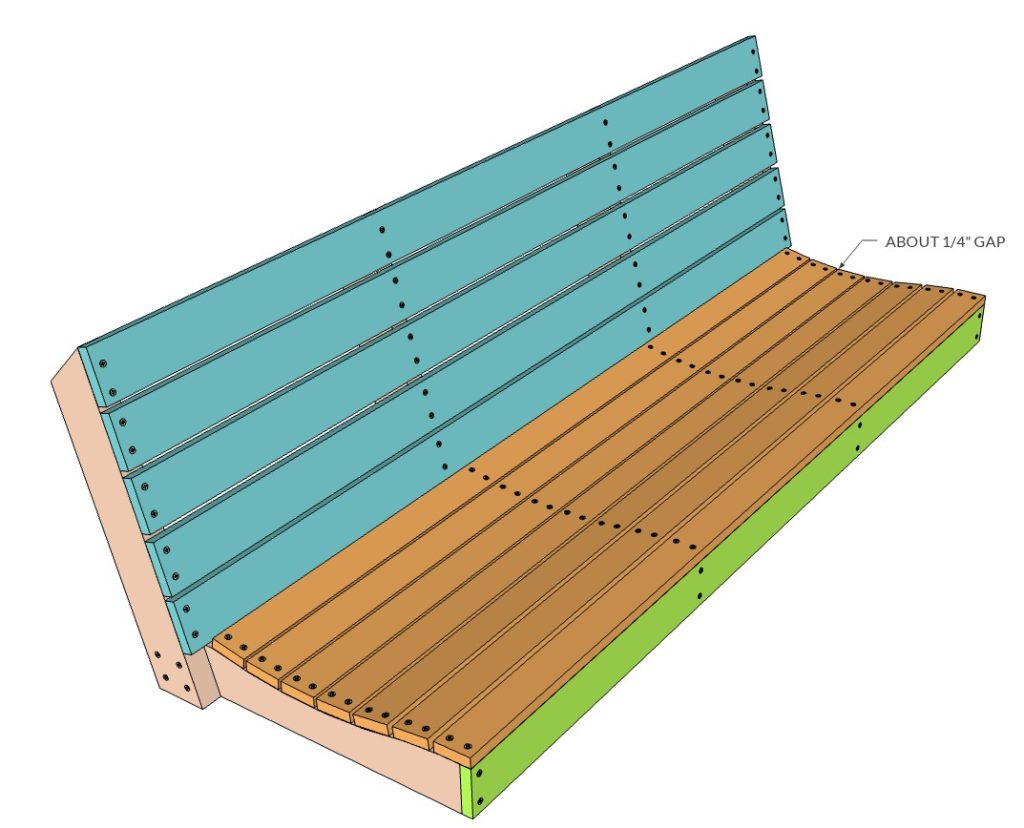
Once the front rail is secured, begin installing the 75” back slats onto the back support assemblies. Position the first slat at the bottom of the backrest, then continue working upward toward the top.
Space each slat approximately ½” apart to create an even and consistent appearance across the back of the porch swing. Using a spacer block can help maintain equal spacing between the boards during installation.
Make sure the slats stay aligned as you work to keep the finished porch swing looking clean and professional.
Step 6 – Cut the Porch Swing Seat Slats
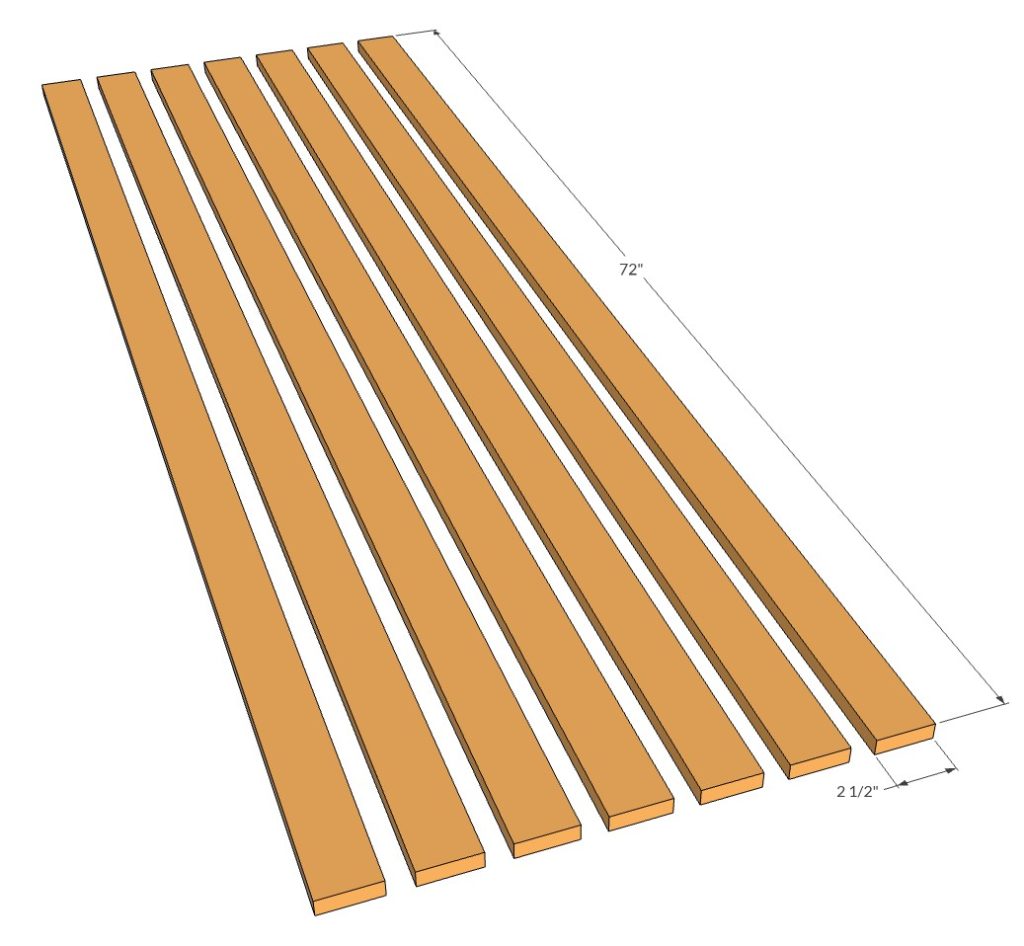
Now cut the bottom seat slats for the porch swing. Using a 1×3 board, cut seven pieces to 72” long.
The seat slats are made from 1×3 boards instead of 1×4 boards because the narrower width fits the curved seat supports better. This allows the slats to follow the contour of the seat more naturally and creates a more comfortable sitting surface on the finished DIY porch swing.
Step 7 – Install the Porch Swing Seat Slats
Before attaching the seat slats, lay all seven 72” seat slats across the bottom seat supports to check the spacing and overall fit. Adjust the boards until the spacing between each slat is even. The gap between the slats should be approximately ¼”.
Once all the slats are properly aligned, attach them to the seat support boards using 1 ½” wood screws. Start at one end and work your way across the seat, checking the spacing as you go to keep everything uniform.
For the best results, pre-drill the screw holes and use a spacer block to maintain consistent gaps between the slats. Proper spacing helps improve the appearance of the porch swing while also allowing water and debris to pass through the seat more easily.
Step 8 – Build and Attach the Front Porch Swing Legs
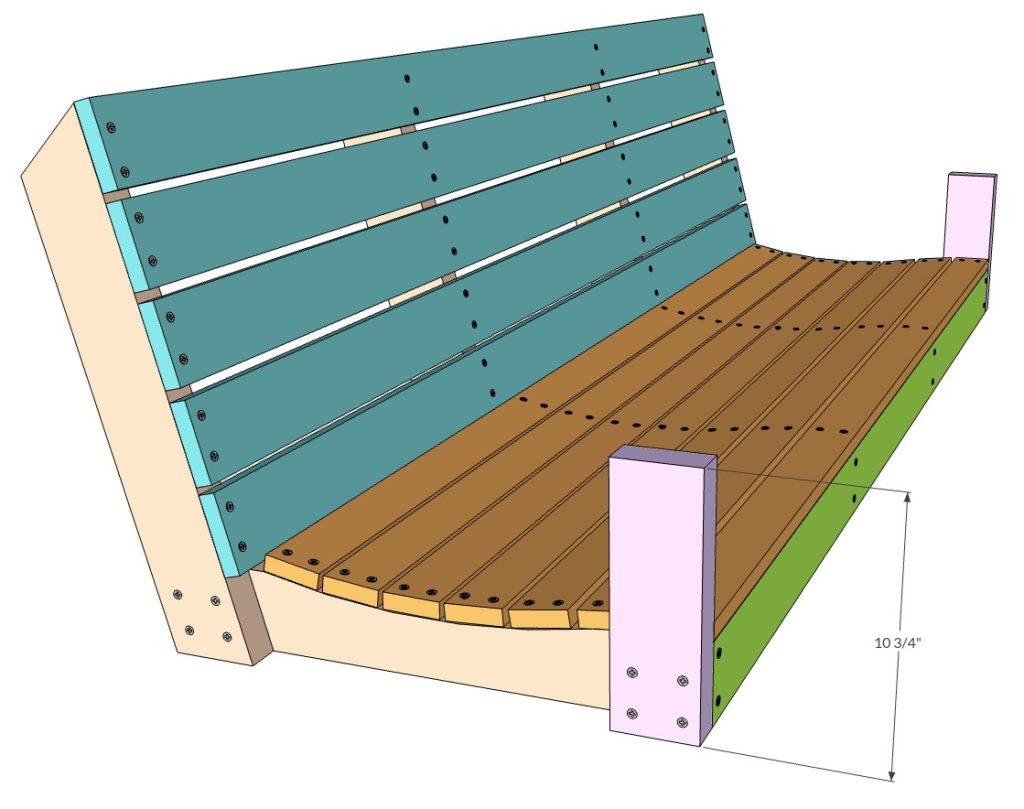
Take a 2×4 board and cut two front leg pieces to 10 ¾” long.
Position one leg on the left side of the porch swing bench and the other on the right side. Attach the legs securely to the frame using 2 ½” wood screws.
Make sure both legs are installed square and flush with the frame so the porch swing remains level and properly supported during use.
Step 9 – Cut and Prepare the Porch Swing Armrests
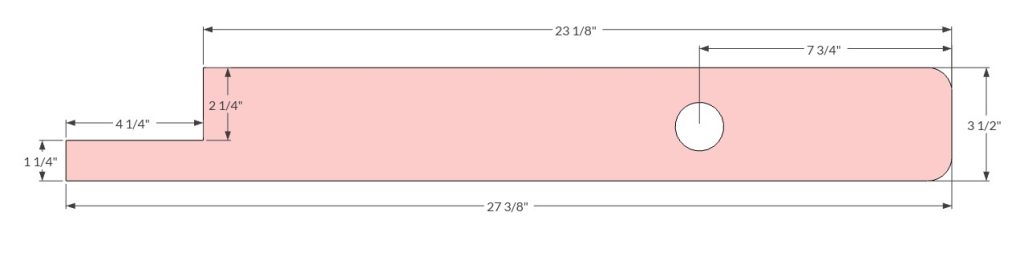
Now build the armrests for the porch swing. Take a 2×4 board and cut two armrest pieces to 27 ⅜” long.
At the front end of each armrest, chamfer the edges as shown in the reference image. This helps soften the appearance of the armrests and gives the porch swing a cleaner finished look.
Next, cut a notch at the back of each armrest measuring 4 ¼” x 2 ¼”. This notch allows the armrest to fit around the back slats and back support pieces during assembly.
Finally, drill a hole through each armrest approximately 7 ¾” from the front edge. The diameter of the hole will depend on the type and size of the rope or chain you plan to use for hanging the porch swing. If you are using heavier chain hardware, you may need to drill a larger opening to allow proper clearance.
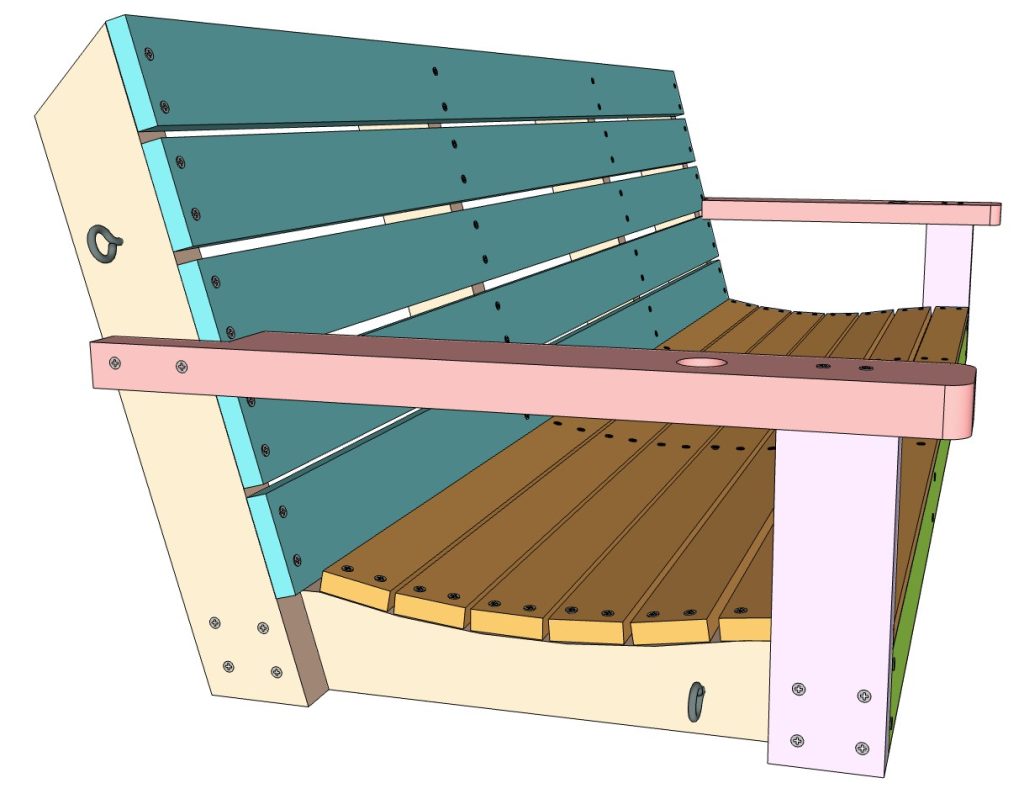
Step 10 – Install the Porch Swing Armrests
Position the armrests on both sides of the porch swing bench and align them with the front legs and back supports. Make sure the notched section at the back of each armrest fits properly around the back slats and support boards.
Once everything is aligned correctly, attach the armrests using 2 ½” wood screws. Secure the armrests firmly to the frame so they remain solid and stable during use.
Check that both armrests are level and evenly positioned before fully tightening the screws.

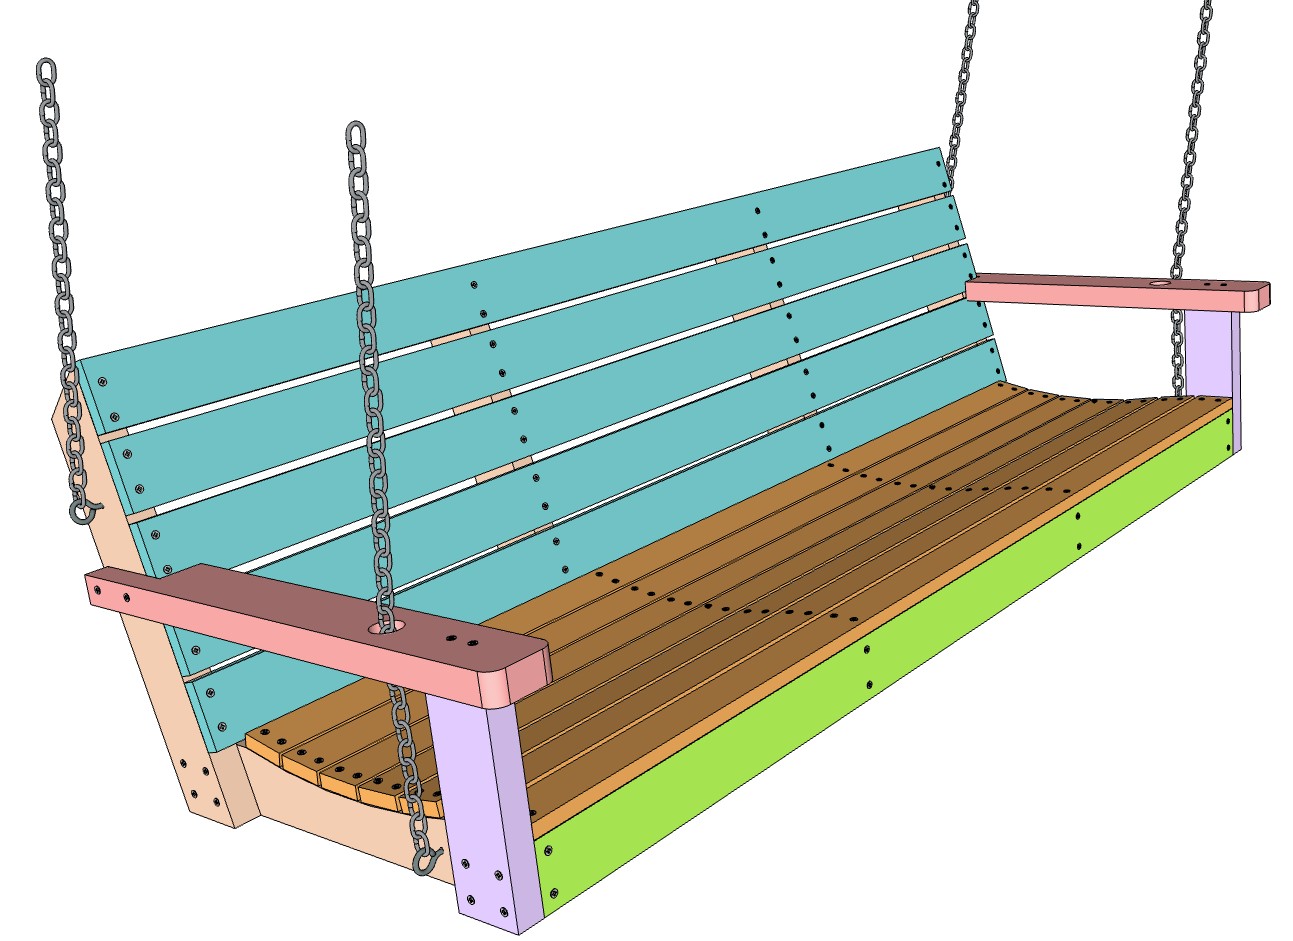
Step 11 – Install the Hanging Hardware and Hang the Porch Swing
Install a screw eye directly below the hole drilled through each armrest. The hanging chain or rope will pass through the armrest opening and connect to the screw eye underneath.
Next, install another screw eye into the side of the back support board as shown in the reference image. These mounting points will support the hanging system for the porch swing.
Attach the chains or ropes securely to the screw eyes, making sure all hardware is properly tightened and rated to support the weight of the swing and its occupants.
Once the hardware is installed, hang the DIY porch swing from a strong overhead structure such as a porch beam, pergola, arbor, or another properly supported frame.
Your DIY porch swing is now complete and ready to enjoy.


Reviews
There are no reviews yet.