
Sand is one of the very best nature-made toys. Almost every child enjoys playing in the sand — digging, searching for buried treasures, building roads, and sandcastles. Playing in sand helps children develop fine motor skills, fuels imagination, and encourages problem-solving. But finding a good sandbox for your child could be sometimes challenging or expensive. So I decided to create plans on how to build a DIY Sandbox Table for kids to have fun.
This sandbox table does not take up a lot of space and could be easily moved around your backyard for a good spot.
I made this sandbox table for a private school that my kids go to. And to make this interesting, I had the kids help me assemble the pieces together and paint it. I pre-cut the boards according to the cut list and sanded everything with a random orbital sander.
In the photos below, I had kids paint the pieces separately before assembling everything together. But the painting could also be done once the project is completely done.
You also might be interested in other projects that I’ve built for kids such as DIY Pucket Game, Toddle Step Stool with Guard Rails, and DIY Wall Ball Maze Game.

Time to Complete
4 hours
Total Cost
$120
Skill Level
Intermediate

Sandbox Table for Kids PDF
$7.97
This PDF download includes Cut Diagrams, a List of Supplies, and 3D illustrations with detailed steps to build the project. Measurements are in imperial and not metric. Does NOT include SketchUp/CAD files.
The plans are embedded on the webpage for free, but if you would like to support the website, you can pay a small fee to purchase the printable PDFs.
Thank you for your support!
Additional information
| Height of the Table | 23 1/2" Tall, 28 1/2" Tall |
|---|
Other Woodworking Projects
-
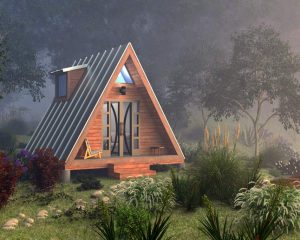
A-Frame House Woodworking Plans PDF – DIY Tiny Cabin Build Guide
$45.97 Add to cart Buy Now -
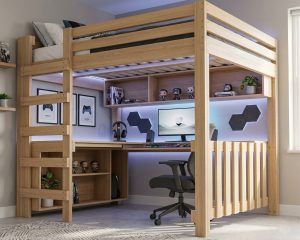
DIY Queen Size Loft Bed with Desk Plans
$18.97 Add to cart Buy Now -
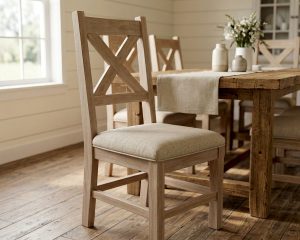
DIY Farmhouse Chair Woodworking Plans PDF
$14.97 Add to cart Buy Now -
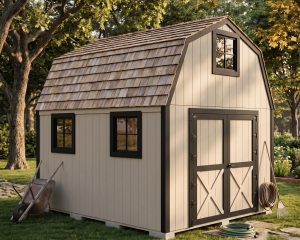
Two-Story 10×12 Barn Style Shed with Loft PDF
$26.97 Add to cart Buy Now
Tools for this project
- Tape Measure
- Drill
- Miter Saw
- Sander
- Skill Saw
Material List
- 2x4x8′ Redwood (x3)
- 1x6x6′ Redwood (x8)
- 1x4x6′ Redwood (x4)
- 2 1/2″ Wood Screws
- 1 1/2″ Wood Screws
- Sand
Note: Lumber dimensions are listed as nominal size. See lumber sizes for actual dimensions vs nominal.
Disclosure: Some of the links on this page as well as links in “tools for this project” and “material list” sections are affiliate links.
Dimensions

Step 1 – Measure and Cut Four Legs
Since this is an outdoor project, I decided to use redwood instead of standard 2×4 pine construction lumber. Redwood has a tendency to withstand outdoor weather better than pine. It’s less prone to warping when exposed to sun or moisture.
First, start by cutting the four legs. Take redwood 2×4 and cut four pieces to 21″ in length at 30-degree parallel miter cut on both ends. This way we will install the legs at 30-degree angle.


Step 2 – Cut the Upper Leg Attachment and the Seat Support
The top of the legs will be attached to 2×4 boards and then the seat support will be attached at the middle of the legs. This will prevent the legs from sliding apart.
Again take the redwood 2×4 and cut two pieces to 22 1/2″ in length with 30 degree inward miter cut on both ends. See picture. Next, cut two seat support boards to 48″ in length, but now at 45 degree inward miter cut. The 30 and 45-degree cuts are mainly to eliminate sharp 2×4 edges so that kids won’t hurt themselves.


Step 3 – Cut the Bottom and Side Boards for the Sandbox
Now it’s time to cut the boards for the sandbox. Again, because this sandbox will be exposed to weather I used redwood 1×6 boards for the box. The cheapest 1×6 redwood that I found were the boards typically used for a fence. They are a little rough, but good sanding should do the trick.
These 1×6 fence boards are typically sold having the top two corners trimmed at 45 degrees. This eliminates sharp edges and makes the fence look prettier. But since we are not using this for a fence, we need to cut off the trimmed top section of the board. This leaves us with a board about 70 1/2 long.
Once the top section is trimmed off, take the board and cut it in half. This should leave you with two boards at 35 ¼” in length. Repeat this process to get a total of six boards at 35 ¼” in length. Four of the boards will be at the bottom of the sandbox and two boards will be for the sides.


Step 4 – Measure and cut the End Boards of the Sandbox
The best way to cut these end boards accurately is to lay out the boards on the workbench and measure the total distance of the end pieces. Each of these fence boards could slightly vary in width, so my measurement might be different than yours. The dimension I got was 24 ¼”. If your dimensions are the same, then cut two end boards to that measurement.


Step 5 – Trim Boards that go Under the Sandbox
The bottom pieces of the sandbox will be held together with two perpendicular boards. These two boards will be attached under the box. The intent of these boards is to keep the bottom of the box from sliding apart over time and preventing the sand from falling out from the sandbox. Also, we need to add two diagonal boards under the sandbox that will hold everything from swaying from left to right.
Take redwood 2×4 and cut two boards to 24″ in length and two boards at 12 1/2″, with 45-degree bevel cut on both ends. See picture.


Step 6 – Cut the Seat Pieces
To make the seat boards, use 1×4 redwood fence boards. These boards are also very rough and need a lot of sending.
Take 1×4 board and cut four pieces to 44 1/2″ in length. Then on two of the corners trim off 1″ at 45 degrees, see picture.


Step 7 – Finish Cutting the Boards for the Box Lid and Sand
To prevent the sand from getting dirty or from cats getting inside, we’re going to need a lid to cover the box. Take 1×6 boards and cut seven pieces to 26″ in length. Then take 2×4 and cut two pieces to 33″ in length.
Now that all of the boards are cut, use a random orbital sander and sand all of the pieces for the entire project.

Step 8 – Attach the Legs to the Top Board
Now that all of the boards are cut, it’s time to assemble the sandbox together.
First, take two of the legs and attach them to the top board using 2 1/2″ wood screws. If the wood is dry then it’s a good idea to pre-drill the pilot holes to prevent the wood from splitting. The top board should be flushed with the legs on the top.

Step 9 – Connect the Seat Support Boards to the Legs
Next, attach the seat support board to the legs on the opposite side of the top board.
Measure 6 3/4″ from the bottom of the legs to the bottom of the seat support board. Then attach the seat support board with 2 1/2″ wood screws. The top of the seat support board should be 11” from the ground and should have about 12” of space to attach the seat boards on both ends. Repeat steps 7 and 8 to complete the second set of legs.


Step 10 – Assemble the Bottom of the Sandbox
Now take four 1×6 bottom sandbox boards and attach them together with two perpendicular support boards that are 5 1/2″ from the ends. These support boards will be longer by 3/4″ on both ends.


Step 11 – Attach the Side Boards to the Box
Take two 1×6 sideboards and attach them to the box. Pre-drill the pilot holes before using 1 1/2″ wood screws.


Step 12 – Attach the End Boards to the Box
Similar to step 10, attach the end boards with 1 ½” wood screws to the box.


Step 13 – Connect Both Leg Sets to the Sandbox
Stand the leg sets on the floor and then place the sandbox over the legs. Attach the box with 1 1/2″ wood screws from the top. The legs should be flush with the end of the sandbox.

Step 14 – Place and Attach the Seat Boards
Place the seat boards over the seat supports and drive in the 1 ½” wood screws. The seat boards will be 2” longer on both ends.

Step 15 – Secure Diagonal Boards under the Sandbox
Flip the entire sandbox upside down. Then take the 12 ½” boards and attach them diagonally as shown on the picture. One side of these boards will be attached to the seat support board and the other side to the 2×4 under the sandbox.


Step 16 – Assemble the Lid Boards Together
To make the box lid, take two 33″ long 2×4 and attach them to seven 26″ boards using 1 1/2″ wood screws.


Step 17 – Paint the DIY Sandbox Table
Now you could paint the entire project with any exterior paint you want or just leave it the way it is.
Once the paint completely dries, fill in the sandbox with sand. You’re done with the DIY Sandbox Table.


