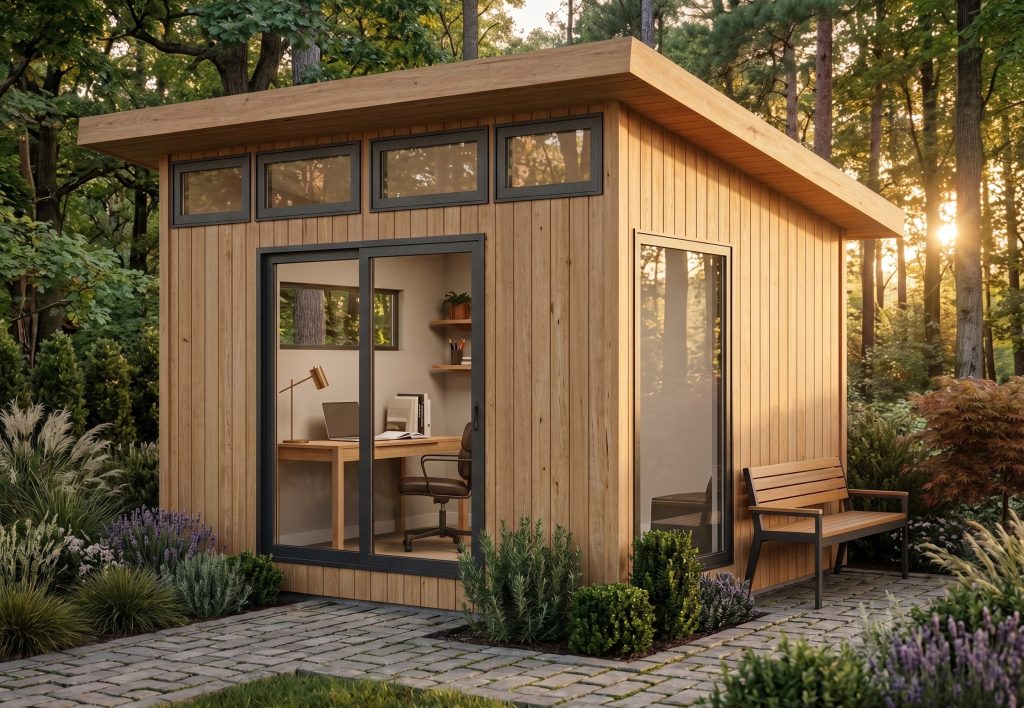
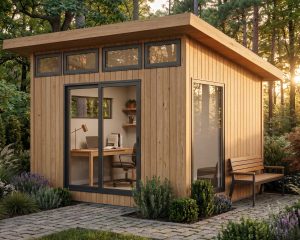
Working from home becomes a whole lot easier when you have a dedicated space that is quiet, functional, and built exactly the way you want it. In this tutorial, I’ll show you how to build a DIY modern office shed 10×12 using simple framing techniques, durable materials, and practical construction methods that work well for both beginners and experienced woodworkers.
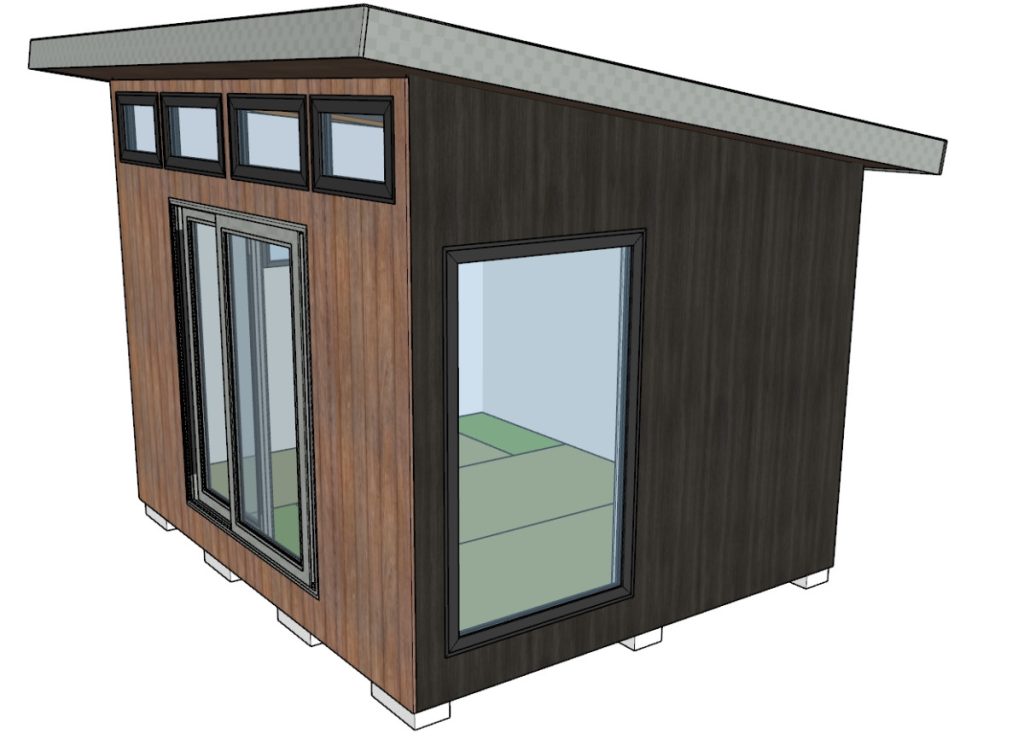
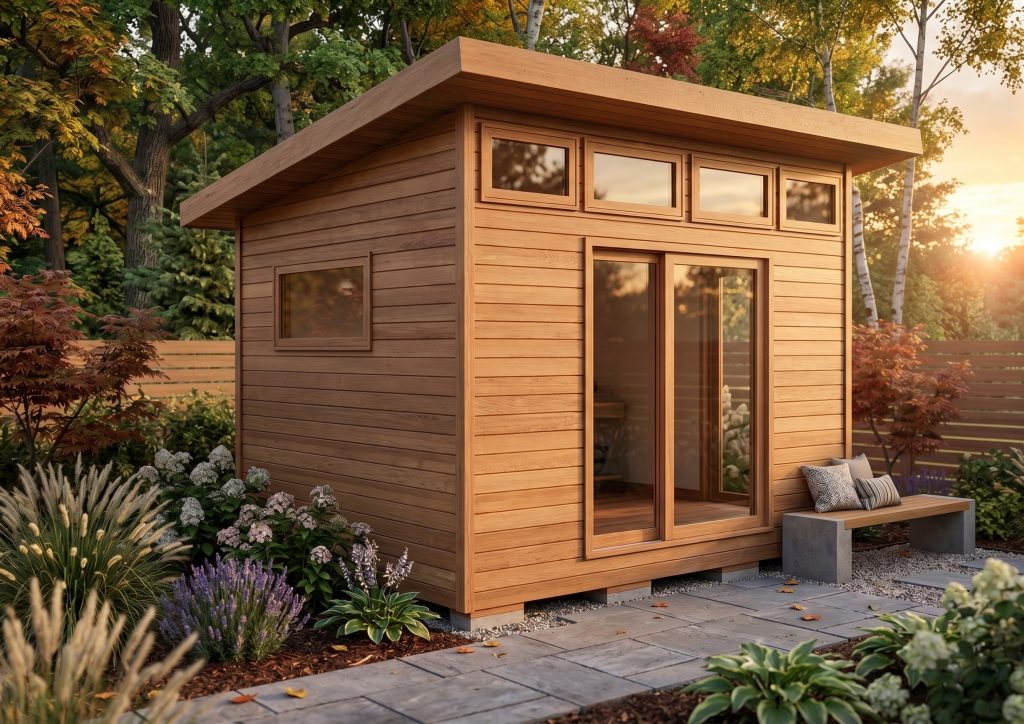
This backyard office shed is designed to create a clean, modern workspace without the high cost of hiring contractors. The design features a strong floor system, durable wall framing, and a modern shed style that works well as a home office, studio, workshop, hobby room, or backyard retreat.
A Practical DIY Woodworking Project for Any Skill Level
If you’ve been searching for woodworking project plans for a backyard office or small modern shed, this project is a great option. The build is straightforward, budget-friendly, and designed with standard lumber sizes to make the construction process easier.
Throughout this tutorial, you’ll learn important woodworking and framing techniques including foundation layout, floor framing, wall construction, roof framing, and exterior finishing. The project can also be customized with different siding, windows, doors, or interior finishes to match your style and workspace needs.
Whether you are building your first large DIY woodworking project or already have experience with shed construction, these plans are designed to help you complete the project with confidence.
Download the PDF Plans
To make the build process easier, you can download the complete DIY modern office shed plans with detailed measurements, material lists, cut diagrams, and step-by-step illustrations. Having the printable PDF plans nearby during the build helps save time and keeps every step organized from start to finish.
Start Building the 10×12 Modern Office Shed
Below, you’ll find the full step-by-step tutorial for building the shed foundation, floor frame, walls, and roof system. Follow along carefully, take your time with measurements, and you’ll end up with a strong and durable modern office shed that will last for years.

| Time to Complete | Total Cost | Skill Level |
|---|---|---|
| 4 -8 days | $3,500 – $6,000 | Intermediate |
Download Printable Plans in PDF


DIY Modern Office Shed Plans -10×12
$26.97
Build a stunning 10×12 modern office shed in your backyard with this instant PDF download. Includes step-by-step woodworking instructions, full cut list with measurements, material list, assembly diagrams, and tools list. Perfect for beginner and intermediate builders. Digital download — no shipping.
This printable woodworking PDF covers every phase of the build: foundation layout, floor framing, wall construction, roof framing, siding, windows, sliding door installation, and interior finishing. Estimated build time: 4–8 days. Estimated cost: $3,500–$6,000. Start building today — download instantly after purchase.
Description
Turn Your Backyard Into a Private Modern Office — Without Hiring a Contractor
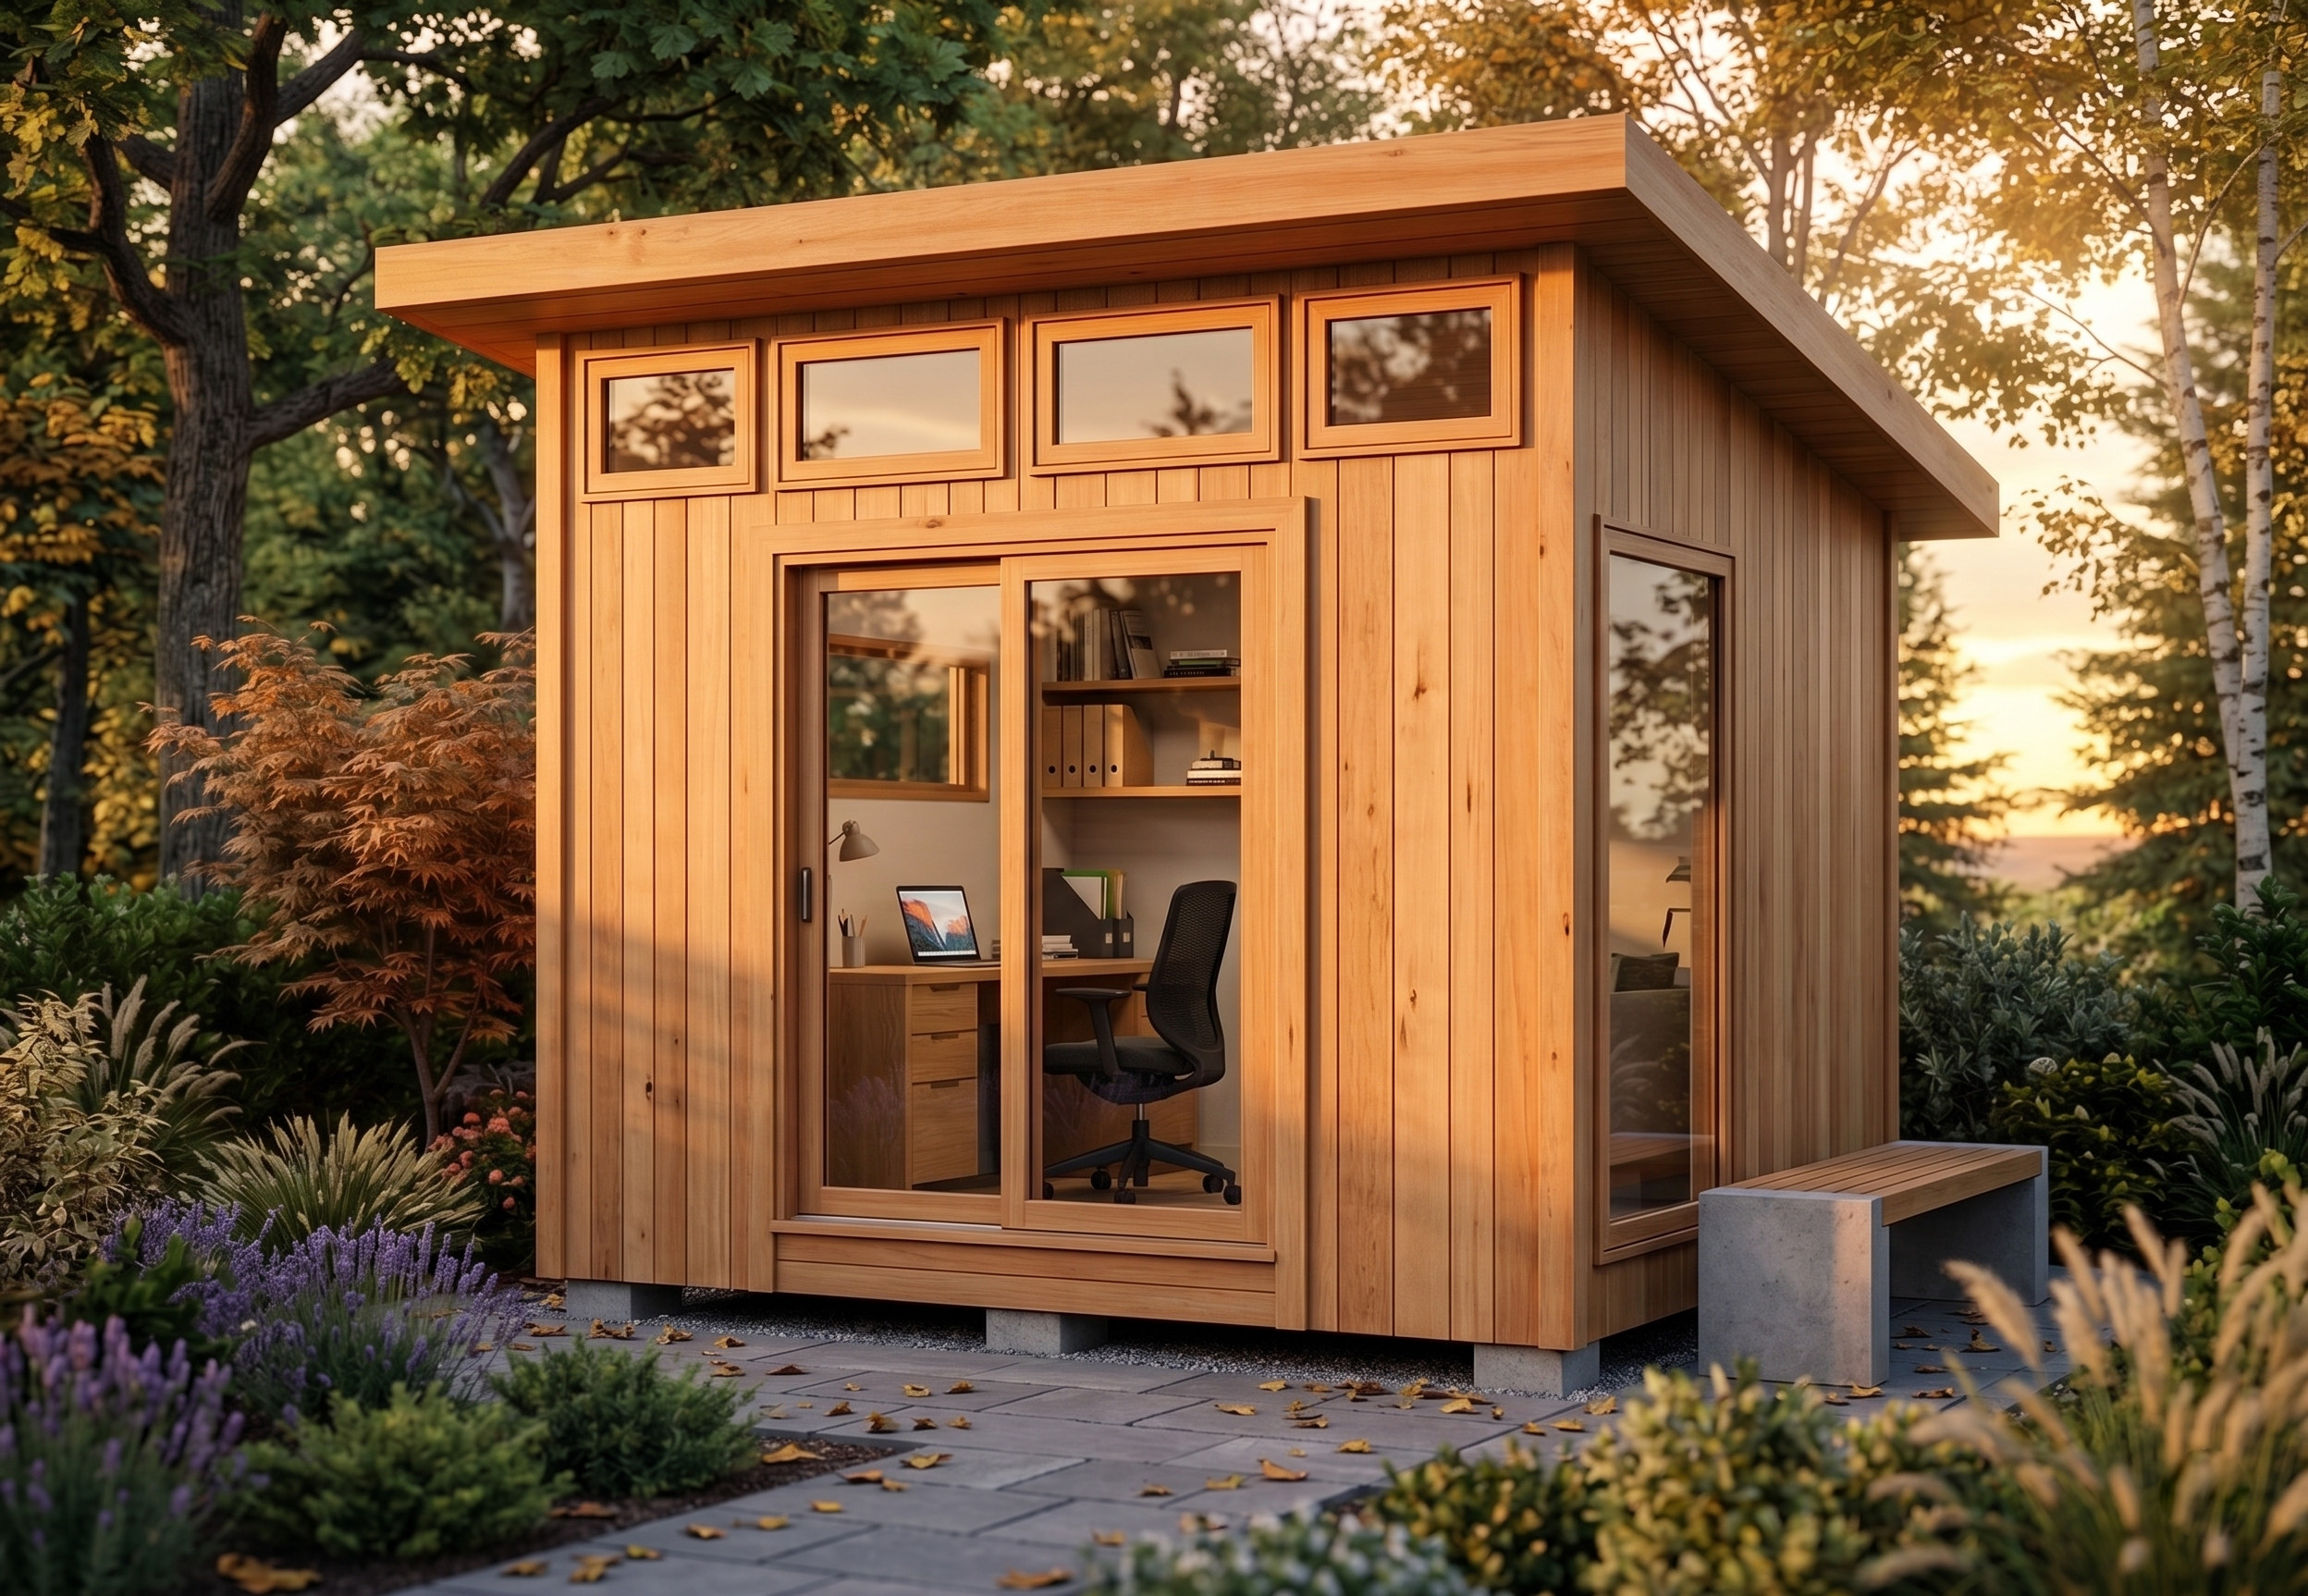
If you’ve been dreaming of a quiet, dedicated workspace just steps from your back door, this 10×12 modern office shed is exactly what you need. Designed with clean lines, a contemporary silhouette, and durable construction, this backyard shed works beautifully as a home office, creative studio, woodworking shop, hobby room, or personal retreat.
These woodworking plans take the guesswork out of the entire build. Instead of piecing together scattered tutorials and hoping the measurements line up, you get one complete, organized PDF document that walks you through every step — from leveling the ground to finishing the interior.
Whether you’re searching for how to build a modern office shed, DIY shed woodworking plans with a cut list, or step-by-step backyard shed building instructions, this is the plan that gets it done.
Who These Plans Are For
These plans are written for:
- Intermediate woodworkers who want a manageable, rewarding large-scale project
- DIY homeowners looking to add functional square footage without hiring contractors
- Remote workers and freelancers who need a dedicated, distraction-free home office
- Hobbyists and makers who want a private studio, workshop, or creative space
- Anyone who wants to add lasting value to their property with a backyard structure they built themselves
You don’t need advanced carpentry experience to complete this project. You need solid plans, accurate measurements, and a willingness to follow each step carefully. That’s exactly what this PDF provides.
What’s Included in the PDF Download
This is not a basic overview — it’s a complete, professional-grade woodworking plan designed to support your build from start to finish.
- Step-by-step building instructions covering all 12 phases of construction
- Full cut list with exact measurements for every piece of lumber
- Complete material list with all supplies needed for the build
- Tools required list so you can prepare before you start
- Assembly diagrams and illustrations for foundation, framing, roofing, and more
- Estimated build time — 4 to 8 days depending on experience and help
- Estimated total project cost — $3,500 to $6,000 depending on materials and local pricing
- Printable PDF format — print full sheets or individual sections as needed
- Instant download after purchase — no waiting, no shipping
- Works on desktop, tablet, and mobile devices
Project Details at a Glance
| Detail | Specification |
|---|---|
| Dimensions | 10 feet × 12 feet |
| Style | Modern shed with sloped roof |
| Difficulty Level | Intermediate |
| Estimated Build Time | 4–8 days |
| Estimated Project Cost | $3,500–$6,000 |
| Foundation Type | Solid concrete blocks (no concrete pour required) |
| Primary Framing | Pressure-treated 2×6 floor system; 2×4 wall framing |
| Roof Type | Single-slope (shed roof) with asphalt shingles |
| File Format | Printable PDF — instant download |
What You’ll Build, Step by Step
The PDF plans cover all 12 construction phases in detail:
- Foundation layout — leveling ground and setting solid concrete blocks
- Base supports — installing pressure-treated 2×6 base boards across the foundation
- Floor frame — building the floor structure with 2×6 joists at 16″ on center
- Floor sheathing — laying staggered 3/4″ exterior-grade plywood for maximum strength
- Back wall framing — building and raising the back wall with double top plates
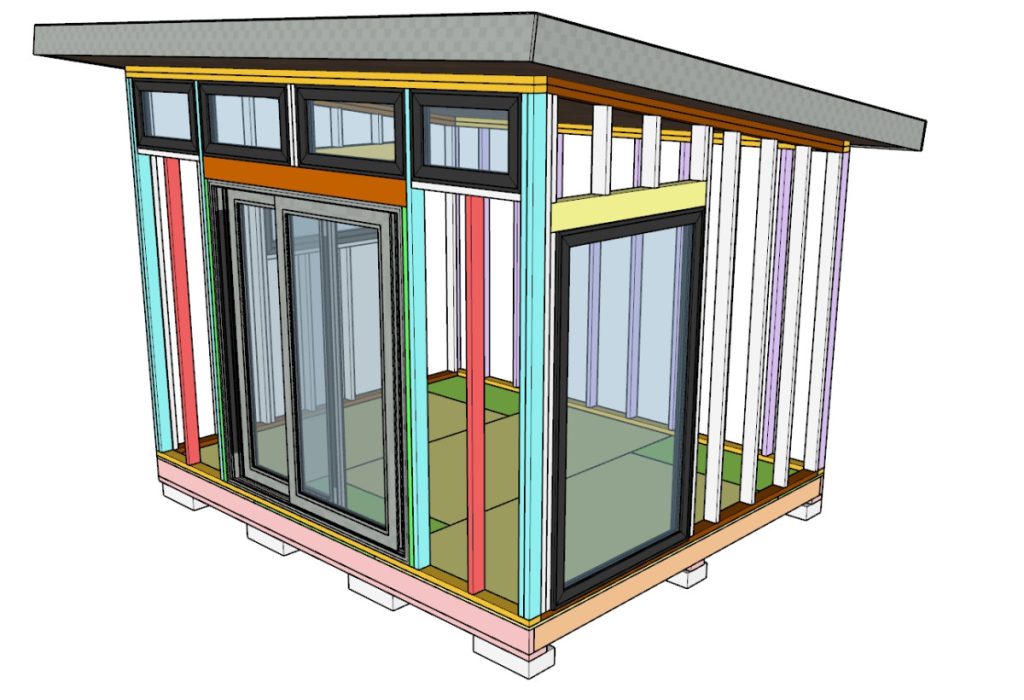
- Front wall framing — framing the front wall with rough openings for the sliding door and windows
- Side wall framing — cutting angled studs to match the roof slope on both side walls
- Roof framing — installing 2×6 roof trusses at 24″ on center with proper overhang
- Roof sheathing and finishing — plywood, fascia boards, roofing paper, and asphalt shingles
- Windows and sliding door — installation with weather stripping and exterior caulk
- House wrap and siding — waterproof barrier and exterior siding panels
- Interior finishing — electrical rough-in, insulation, drywall, and custom use configuration
Why These Plans Save You Time, Money, and Frustration
Building a shed from a collection of YouTube videos and random blog posts is possible — but it’s slow, stressful, and full of costly mistakes. Here’s why a complete, professionally written plan makes the difference:
Accurate measurements from the start. Every cut is listed. No estimating, no guessing.
Everything in one place. Foundation, framing, roofing, siding, windows, and interior finishing — all in a single organized PDF you can print and bring to the job site.
Avoid expensive mistakes. Incorrect rough opening sizes, improperly spaced joists, or a roof slope that doesn’t drain — these are the kinds of errors that cost time and money to fix. The plans account for every detail upfront.
Build at your own pace. The step-by-step format means you can stop and start without losing your place. Pick up where you left off with clear instructions and visual diagrams.
Customize as you go. The plans support different siding types, window sizes, door styles, and interior configurations. The structure is designed to be adapted to your needs.
Digital Download Information
This is a digital product only. No physical materials are shipped.
- Instant download — access your PDF immediately after checkout
- No shipping, no waiting — start planning your build today
- Printable format — print the full plan or individual pages at home or at a print shop
- Device-friendly — open and view on desktop, laptop, tablet, or mobile
- Keep it forever — save to your device or cloud storage for easy reference during the build
Ready to Build Your Modern Backyard Shed?
This 10×12 modern office shed is one of the most rewarding DIY woodworking projects you can take on. It adds real value to your home, gives you a dedicated space for work or creativity, and proves that you built it yourself.
The plans are complete, the measurements are accurate, and the instructions are written clearly for real builders — not just professional contractors.
Download the PDF today and start building your modern backyard office shed.
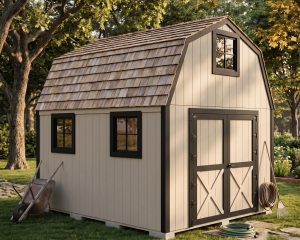
Other Woodworking Projects
Tools for this project
Material List
- Available with the purchase of PDF plans.
Note: Lumber dimensions are listed as nominal size. See lumber sizes for actual dimensions vs nominal.
Disclosure: Some of the links on this page, as well as links in “tools for this project” and “material list” sections, are affiliate links.
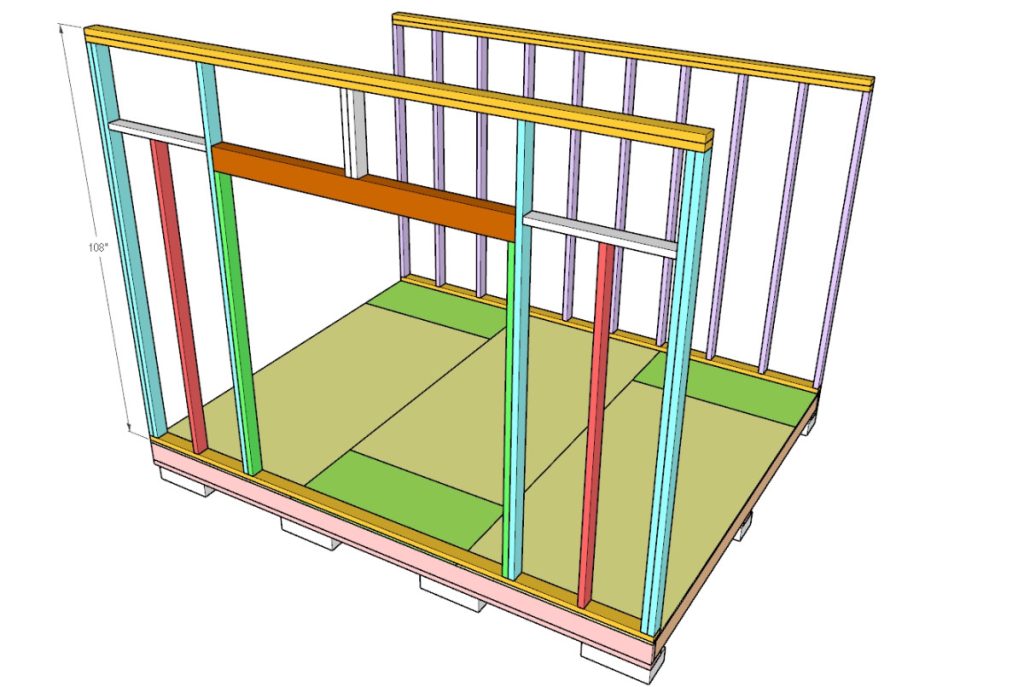
Dimensions
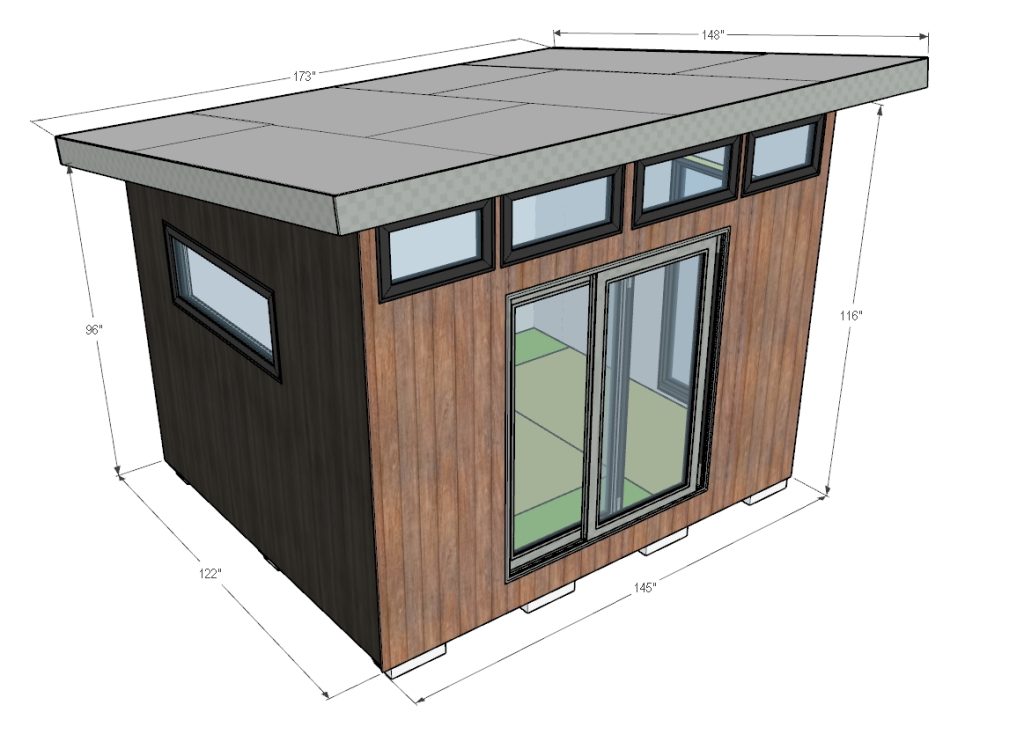
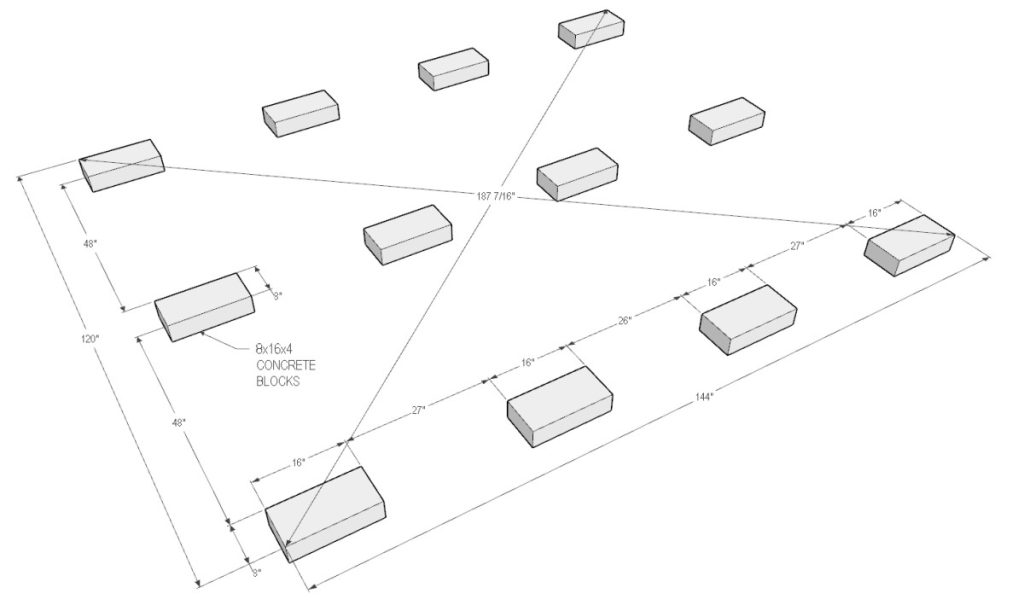
Step 1 – Level the Ground and Set the Concrete Blocks
A strong foundation is essential for keeping your DIY modern office shed level and stable over time. For this project, use 4x8x16 solid concrete blocks, which provide a simple and cost-effective foundation without pouring concrete.
Prepare the Ground
Clear the shed area by removing grass, weeds, rocks, roots, and loose soil. Use a shovel and rake to level the surface as much as possible.
Check for any high or low spots and make sure the ground is flat before placing the blocks.
Place and Square the Concrete Blocks
Position the concrete blocks according to the dimensions shown in the plans. These blocks will support the entire shed, so proper spacing is important.
To square the foundation, measure diagonally from corner to corner in both directions. Both measurements must match exactly. Adjust the blocks as needed until the foundation is square.
Level the Blocks
Use a level, straight board, or string line to make sure all blocks sit at the same height. Adjust the soil under the blocks if needed until every block is fully supported and level.
Taking extra time here will make the rest of the shed build much easier.
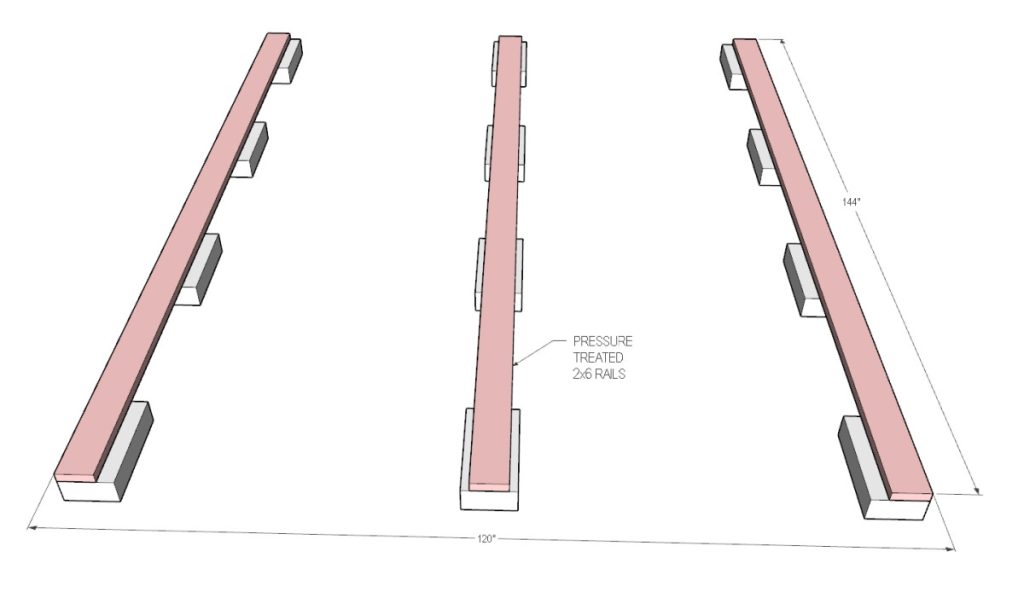
Step 2 – Install the Pressure-Treated 2×6 Base Supports
Use pressure-treated 2×6 lumber for the shed base since it resists moisture, rot, and insect damage.
Place the 12-foot-long 2×6 boards flat across the concrete blocks as shown in the plans. These boards will support the floor framing in the next step.
Because the concrete blocks are wider than the boards, position the two outer boards closer to the outside edges of the blocks and center the middle board evenly.
Make sure all boards sit flat, straight, and fully supported before continuing.
These support boards help distribute the shed’s weight evenly across the foundation and provide solid support for the floor framing.
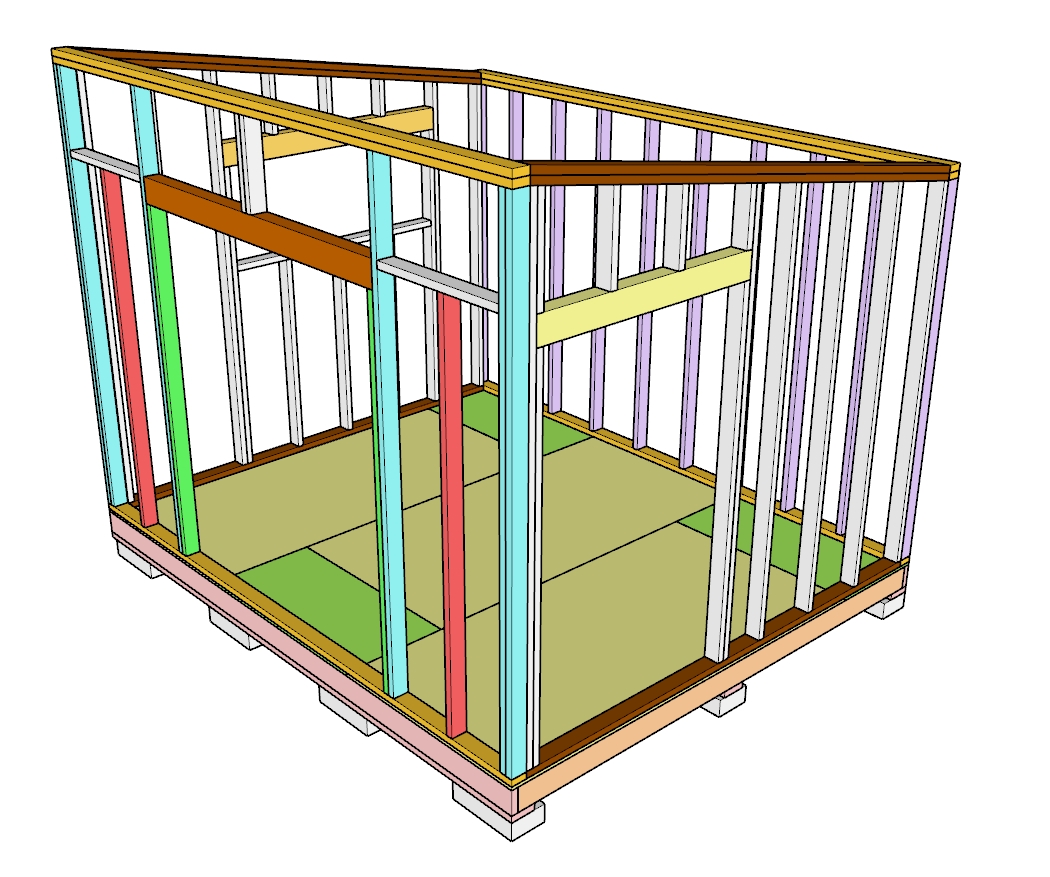
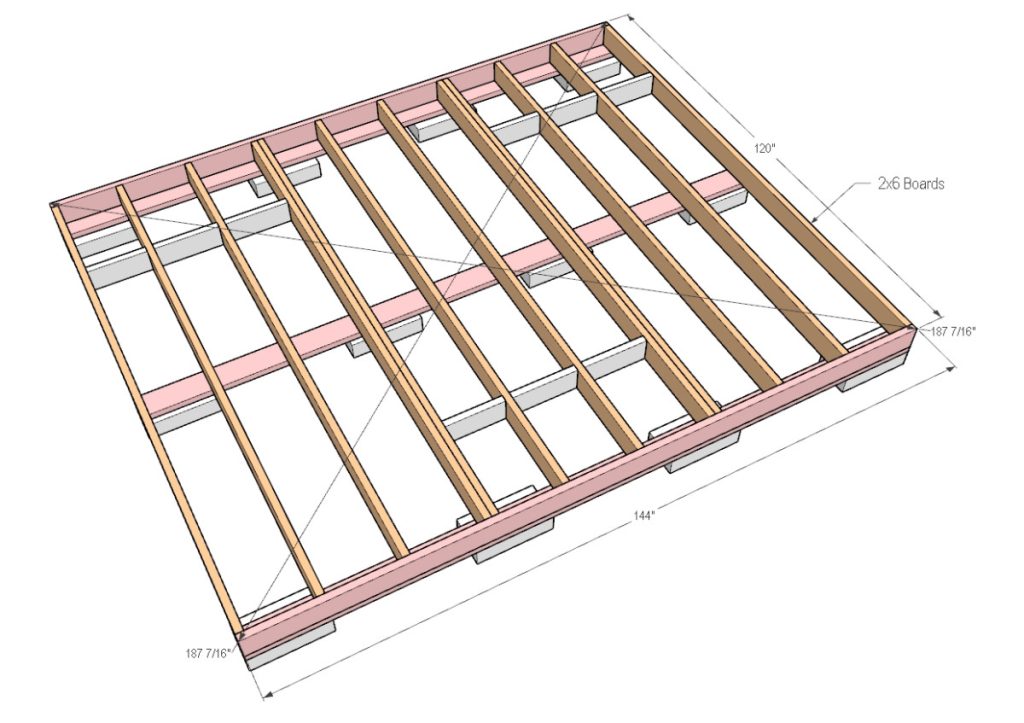
Step 3 – Build the Shed Floor Frame
Build the foundation frame using pressure-treated 2×6 lumber.
Start by placing two 12-foot-long 2×6 boards on top of the base supports from Step 2. Position one board along each outer edge to form the sides of the floor frame.
Next, install the perpendicular 2×6 floor joists between the outer boards, spacing them 16 inches on center. Secure the joists using framing nails or 2 1/2-inch deck screws.
Once assembled, check that the frame is square by measuring diagonally from corner to corner in both directions. Both measurements should match exactly. Adjust the frame if needed until it is perfectly square.
Before moving to the next step, make sure all plywood edges will land on a 2×6 framing member for proper support.
A square and properly supported floor frame creates a strong base for the entire shed.
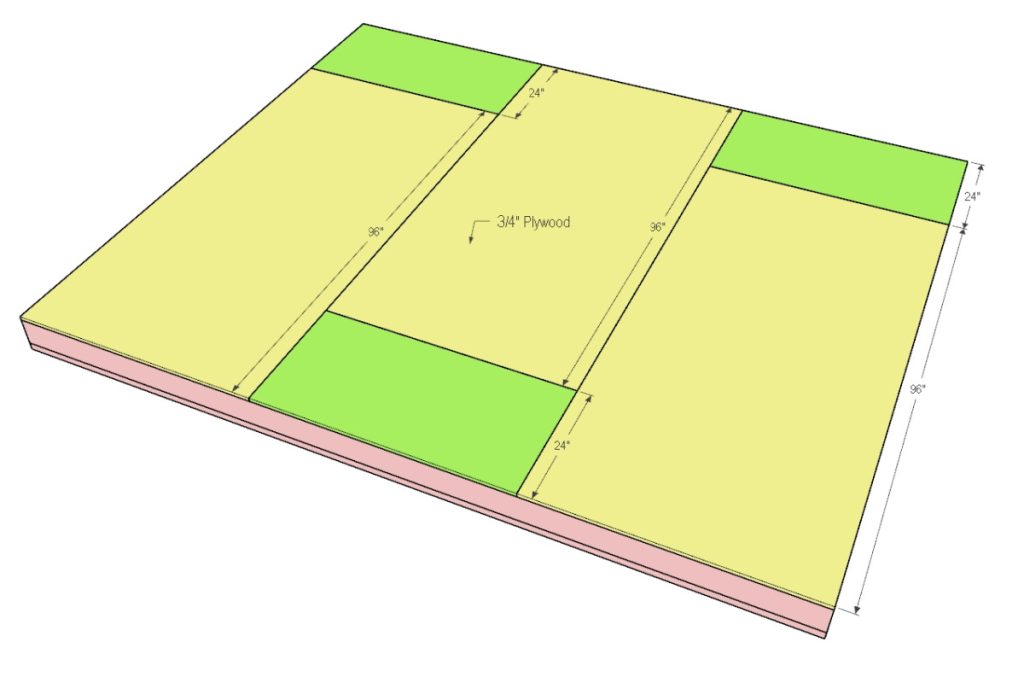
Step 4 – Cover Foundation Framing with Plywood
Place 4×8 sheets of 3/4-inch plywood on top of the completed foundation framing. Use exterior-grade plywood for better strength and durability.
Lay the plywood sheets across the frame so that all edges are fully supported by the 2×6 framing underneath. Do not leave any edge hanging without support.
Stagger the plywood sheets instead of lining all seams in one straight line. This means the joints between sheets should be offset. Staggering improves strength and helps distribute weight more evenly across the floor.
Place each sheet carefully before fastening. Make sure the plywood is aligned properly and sits flat on the framing. Adjust as needed before securing.
Once positioned correctly, fasten the plywood to the framing using screws or nails. Make sure every edge is securely attached to the 2×6 frame members.
This staggered layout creates a stronger and more stable floor system. It reduces weak points and helps prevent movement or flexing over time.
Follow the provided diagram to ensure the plywood layout is correct and matches the intended design.
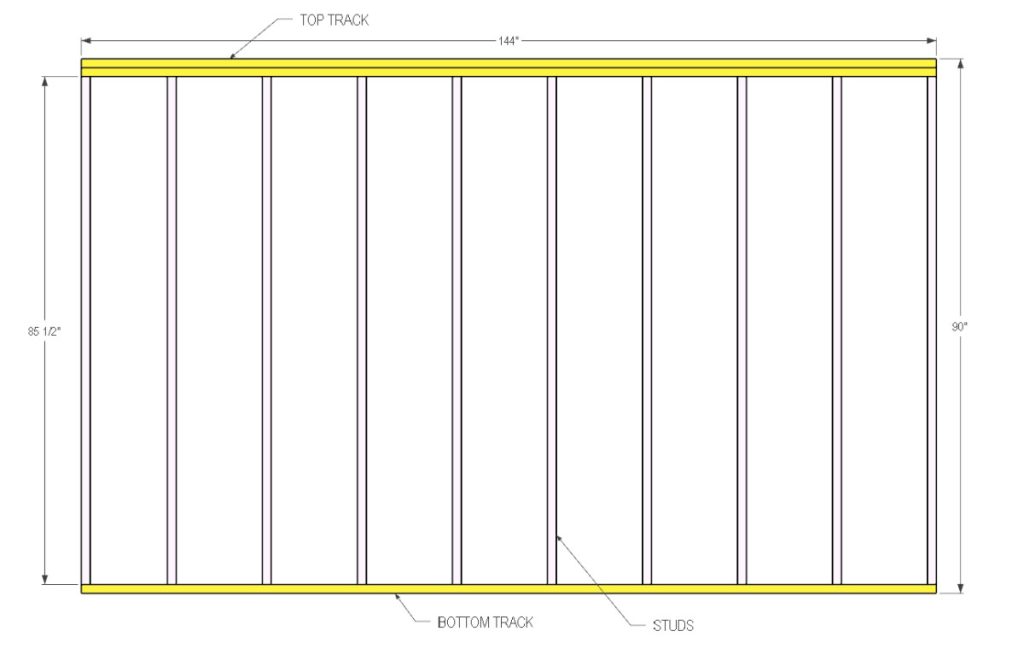
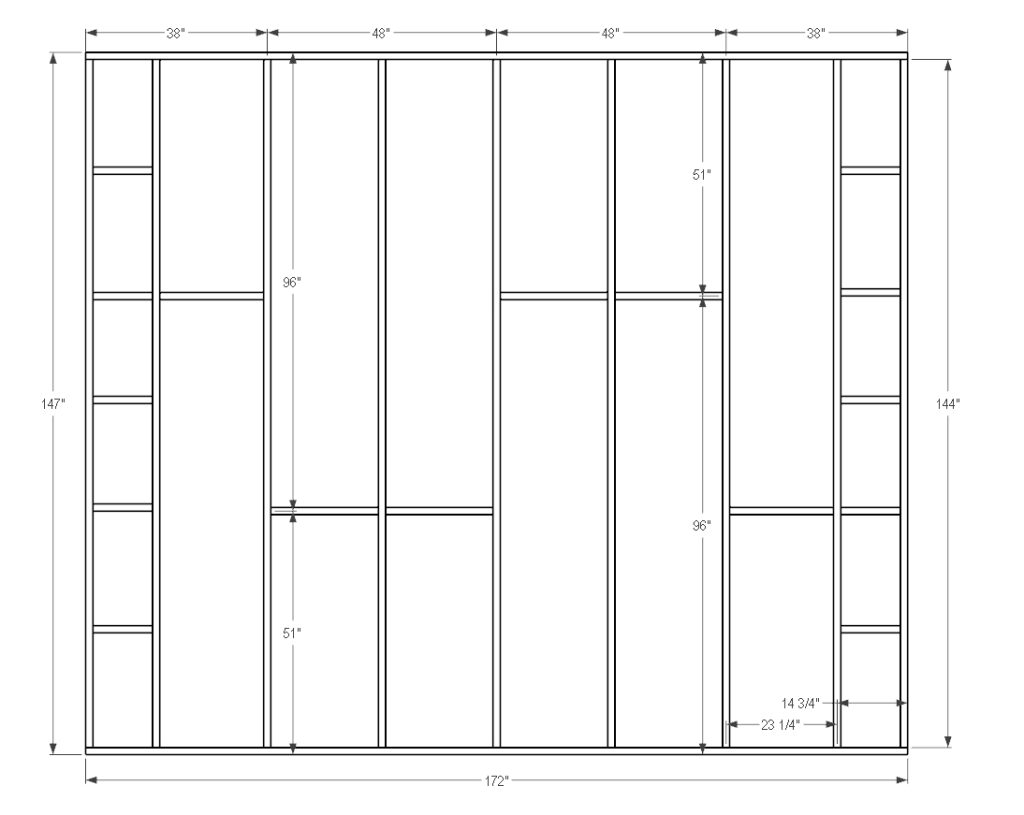
Step 5 – Build the Back Wall
Building the back wall is a straightforward process.
Start by cutting and preparing all your lumber before assembly. This will make the build faster and more accurate.
Use one 12-foot-long 2×4 board for the bottom plate (bottom track). Then use two 12-foot-long 2×4 boards for the top plate (top track). The double top plate adds extra strength and stability to the wall.
Next, cut ten wall studs to 85 1/2 inches in length. These studs will form the vertical structure of the wall.
Lay the bottom plate on a flat surface, such as the plywood floor you built in Step 4. Then position the top plates above it to match the wall height.
Space the studs 16 inches apart on center. This spacing provides strong support and is standard for wall framing.
Attach each stud to the bottom plate and top plates using screws or nails. Make sure every connection is tight and square. Check that all studs are straight and evenly spaced before securing everything permanently.
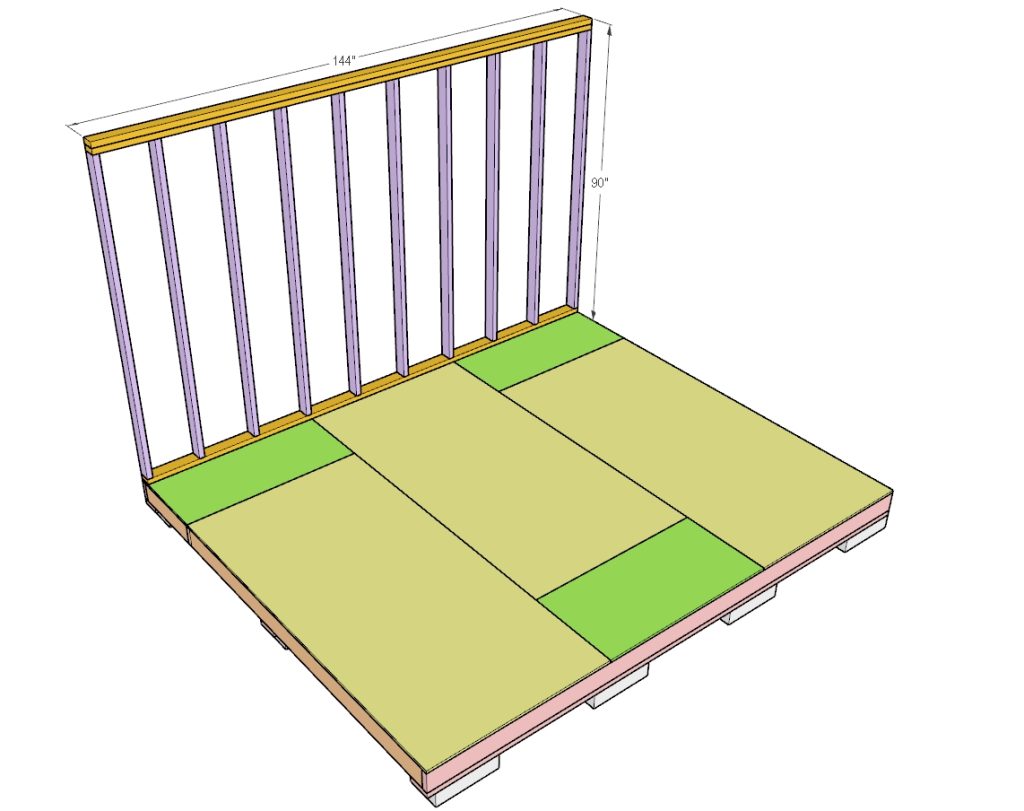
Build the entire wall flat on the floor first. This makes it easier to assemble and keeps everything aligned.
Once the wall frame is complete, carefully lift it into a vertical position. Use at least one or two people for safety, depending on wall weight and size.
After standing the wall up, align it with the foundation framing. Check that it is plumb using a level. Adjust as needed.
Finally, secure the back wall to the floor framing using screws or nails. Make sure the wall is firmly anchored before moving on to the next step.
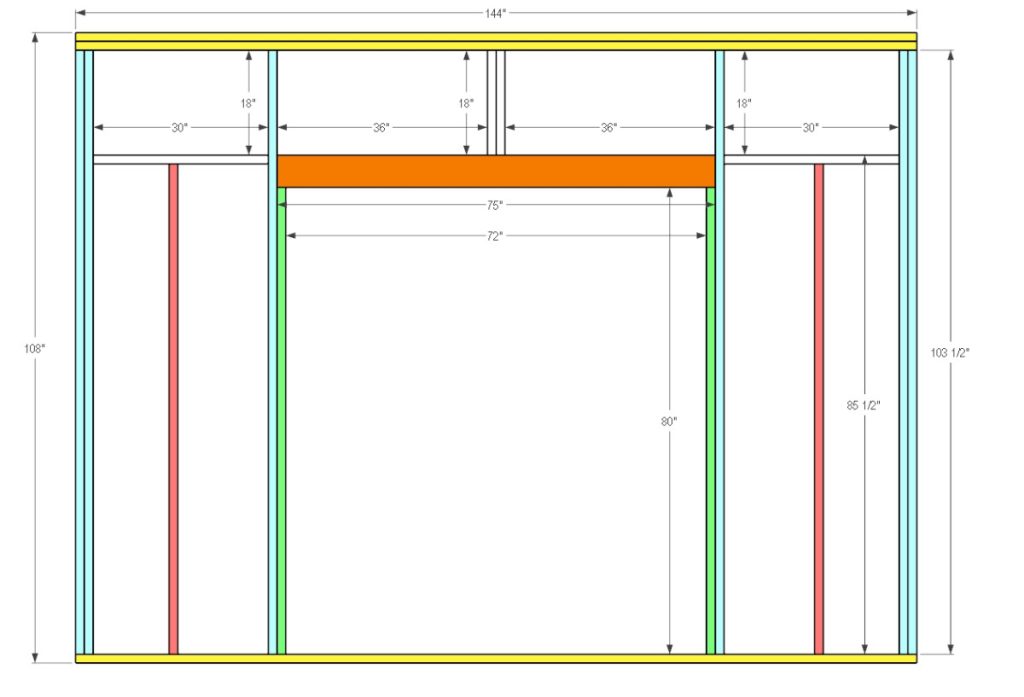
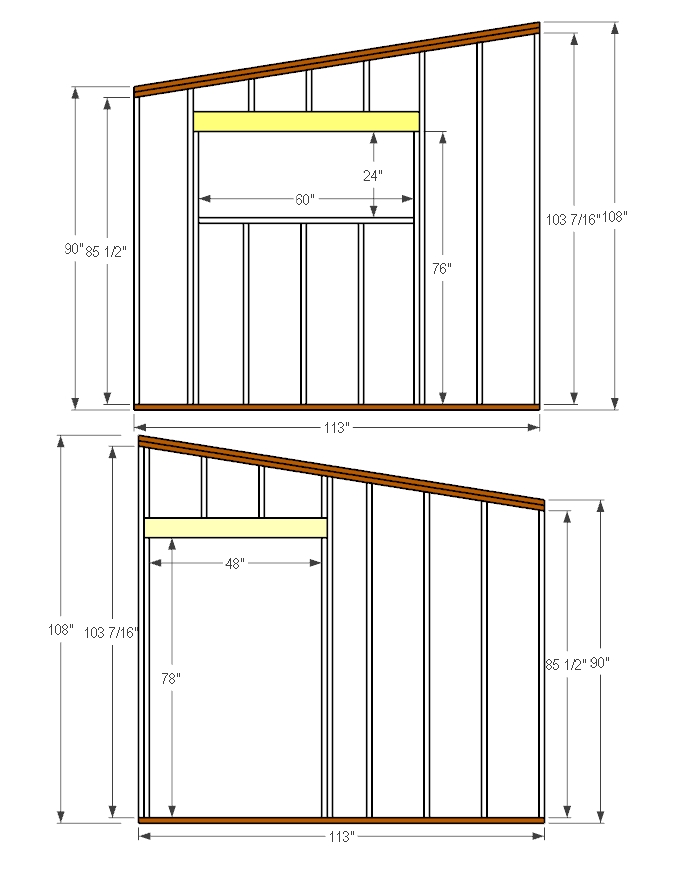
Step 6 – Build the Front Wall
Build the front wall in the same way as the back wall.
Start with one 12-foot 2×4 for the bottom plate (bottom track). Then use two 12-foot 2x4s for the top plate (top track). The double top plate adds strength and helps lock the wall structure together.
Next, cut your wall studs to 103 1/2 inches in length. These taller studs are used for the front wall to match the shed design and door height requirements.
Lay the bottom plate and top plates flat on the floor. Then install the studs between them, spacing each one 16 inches apart on center. Make sure each stud is straight, properly aligned, and securely fastened with screws or nails.
The stud layout in this wall will depend on your door and window locations. You must frame openings based on the exact sizes of your sliding door and windows.
Before installing any studs around openings, double-check the manufacturer’s rough opening requirements for each window and the sliding door. This is very important. Incorrect measurements can cause installation problems later.
Frame each opening carefully so there is enough space for proper installation, shimming, and adjustment.
If you are following the same design shown in the plans, use the provided diagram as a guide for exact placement of doors and windows. This ensures everything lines up correctly when you install the windows and sliding door later.
Once the frame is complete, the front wall is ready to be raised and attached in the next step.
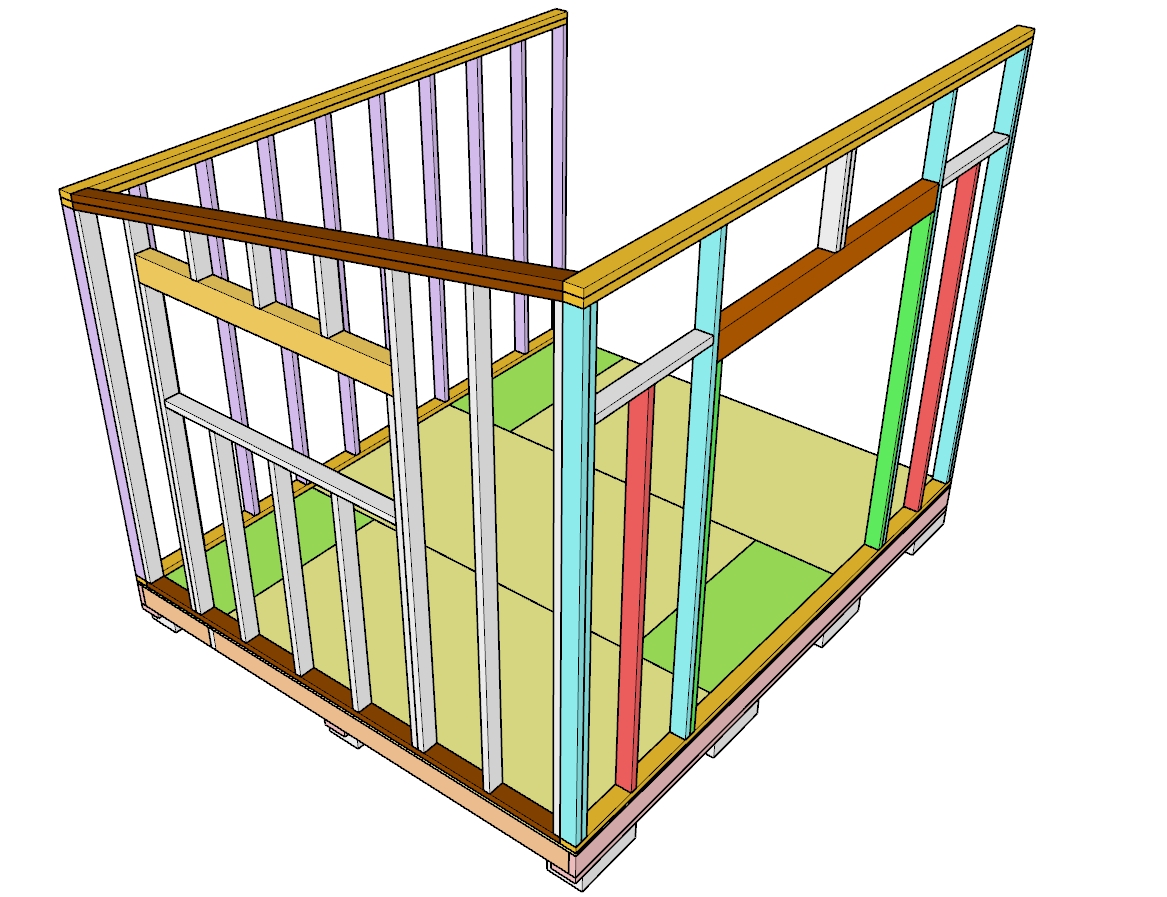
Step 7 – Assemble the Side Walls
Before cutting any lumber for the side walls, measure the exact height of both the front and back walls. Do not assume the measurements are the same. Take accurate measurements from the top of the bottom plate to the top of the double top plate.
The top plate of the side walls must match the height of the front and back walls. This is important because the shed roof is sloped from front to back. Matching the correct wall heights ensures the roof will sit properly and drain water correctly.
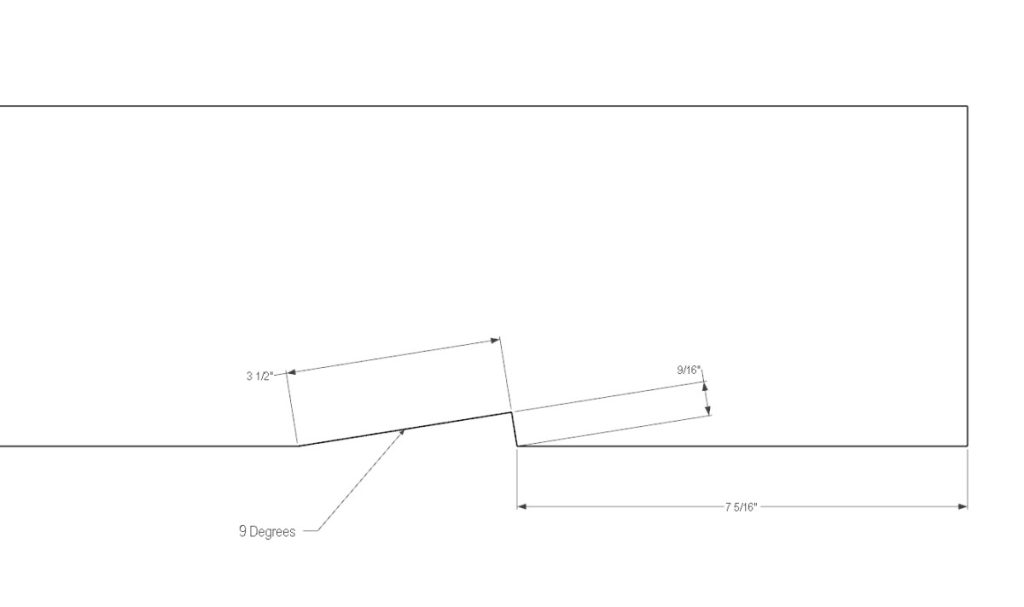
Because the roof slopes downward from the front wall to the back wall, the side wall top plate will also be sloped. This means the wall studs will not be cut straight on both ends.
Each stud must be miter cut at a 9-degree angle on the top. This angled cut allows the top plate to sit flush and follow the roof slope correctly. Make sure all angled cuts are consistent so the wall stays straight and stable.
Lay out the side wall frame on a flat surface. Install the bottom plate and the sloped top plate first. Then cut and install the studs based on your wall layout.
Before placing the studs, check the window locations carefully. Measure and confirm the exact rough opening sizes for each window. Frame the studs according to these measurements so the windows will fit correctly during installation.
Space the studs evenly, typically 16 inches on center, unless your window layout requires adjustments. Secure each stud firmly to both the bottom plate and the angled top plate using screws or nails.
Double-check all measurements before securing the frame. The side walls must align perfectly with the front and back walls to ensure the roof framing will fit correctly in the next step.

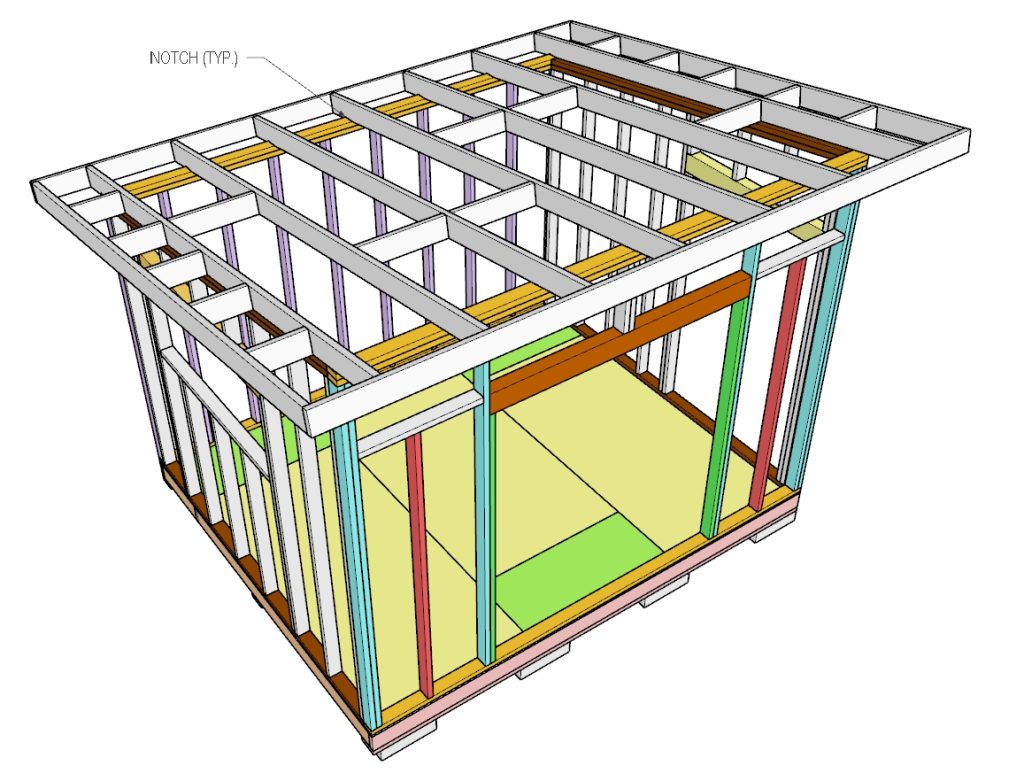
Step 8 – Install the Roof Framing
The roof framing is built using 2×6 boards. These boards create a strong roof structure that slopes downward from the front of the shed to the back. This slope allows water to drain properly and prevents pooling on the roof.
Because the top plates of the front and back walls are flat and not sloped, each roof truss will need a notch cut into it. This notch allows the truss to sit securely on top of the wall framing. It ensures a tight and stable fit between the roof structure and the walls. Refer to the plan drawings for the exact notch size and placement.
Start by installing the roof trusses across the top of the shed. Space each truss 24 inches apart on center. This spacing provides strong structural support for the roof and ensures the plywood sheathing will be properly supported.
Make sure each truss is aligned correctly and securely fastened to the wall plates. Check that all trusses follow the same slope from front to back.
Next, install the left and right roof overhangs. Use the provided measurements from your plan to position and attach them correctly. These overhangs help protect the walls from rain and improve the overall look of the shed.
Before moving on, double-check that all trusses are evenly spaced at 24 inches on center. Proper spacing is very important because the roof plywood must land on solid framing for full support.
A well-spaced and properly installed roof frame creates a strong structure and prevents future issues such as sagging or weak spots.
Also consider any local building codes and safety requirements before finalizing truss placement. Some areas may require specific spacing or additional reinforcement depending on snow load and wind conditions.

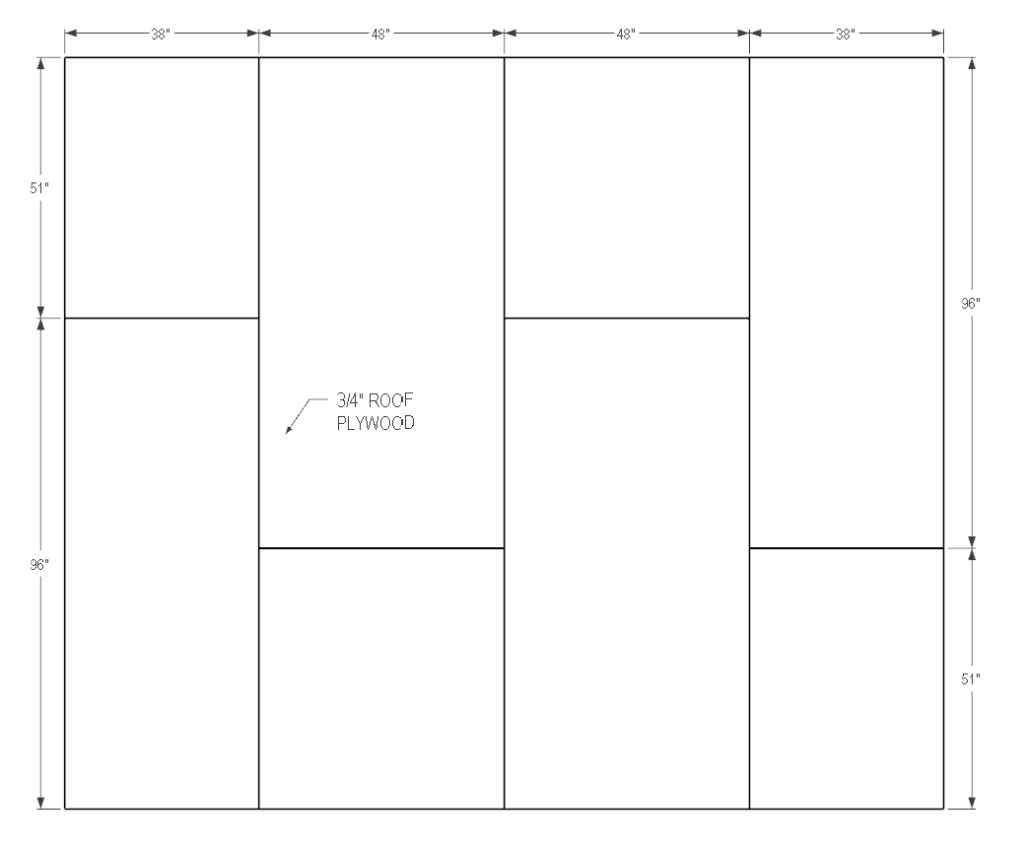
Step 9 – Secure Roof Plywood and Fascia Boards
Start by installing the roof plywood over the completed roof framing. Use full 4×8 sheets of plywood and place them carefully on top of the trusses.
Stagger the plywood sheets so that the seams do not line up in a straight row. This improves roof strength and helps distribute weight more evenly across the structure.
Make sure every edge of each plywood sheet is fully supported by a roof framing member. Each end must land on a truss or rafter. If a plywood edge does not land on framing, install additional blocking underneath it. This prevents weak spots and stops the plywood from cracking or bending when weight is applied.
Once all plywood is installed and secured, move on to the fascia boards. Install fascia boards around the entire perimeter of the roof. These boards cover the ends of the roof framing and create a clean, finished edge.
Fascia boards also provide protection against wind and rain. They help seal the roof edges and improve the durability of the structure.
After the fascia is installed, cover the roof with roofing paper (underlayment). Roll it out across the plywood surface and secure it with roofing nails or staples. Make sure each row overlaps the previous one. This overlap is important to prevent water from getting underneath.
Next, install asphalt shingles over the roofing paper. Start from the bottom edge of the roof and work your way upward. Overlap each row of shingles to ensure proper water shedding. Nail each shingle securely according to the manufacturer’s instructions.
Proper installation of plywood, fascia, roofing paper, and shingles creates a strong, weather-resistant roof that protects the entire shed from rain, wind, and moisture.
Step 10 – Install Windows and Sliding Door
Now it is time to install the sliding door and all windows.
Start by carefully positioning each window into its framed opening. Make sure each window fits properly within the rough opening you built in the previous steps. Do not force the window into place. If it is too tight, adjust the opening slightly before securing it.
Follow the manufacturer’s installation instructions for each window. Every window type may have slightly different mounting and sealing requirements, so it is important to follow the provided guide exactly.
Once the windows are in place, secure them into the framing using the recommended screws or fasteners. Make sure each window is level, plumb, and square before fully tightening the screws.
After the windows are installed, move on to the sliding door.
Position the sliding door into its framed opening. Check that it sits level on the bottom track and aligns correctly with the side framing. Adjust as needed before securing it permanently.
Fasten the sliding door according to the manufacturer’s instructions. Make sure it opens and closes smoothly without binding or gaps.
After all windows and the sliding door are installed, apply weather stripping around each frame. This is very important.
Weather stripping helps seal gaps between the window or door and the framing. It prevents water from entering the shed during rain. It also helps reduce air leaks and improves overall protection.
Check all edges carefully and seal any small gaps with exterior caulk if needed.
Proper installation of windows and the sliding door ensures your shed stays dry, secure, and protected from weather conditions.
Step 11 – Attach Siding Around the Shed
Before installing any siding, wrap the entire shed with waterproof house wrap. This layer is important because it protects the structure from moisture and wind-driven rain. It acts as a barrier between the wood framing and the exterior siding.
Start at the bottom of the shed and work your way up. Overlap each row of house wrap as you go. Each upper layer should overlap the lower layer. This helps direct water downward and prevents it from getting behind the siding.
Make sure the wrap is tight against the walls. Remove any wrinkles or loose areas. Secure it using staples or roofing nails, fastening it into the studs underneath.
Once the entire shed is fully wrapped, move on to installing the siding.
Begin attaching siding panels around the shed walls. Start from one corner and work your way across each wall. Keep the panels straight and level as you install them.
Fasten each siding panel securely into the wall framing using nails or screws. Make sure every panel is properly supported and firmly attached.
If your siding has seams, align them carefully so they stay straight and evenly spaced. Leave proper spacing if required by the siding manufacturer for expansion and contraction.
Cut openings carefully around windows and doors so the siding fits cleanly around all frames.
Proper installation of house wrap and siding is important. It protects the shed from water damage, improves durability, and gives the shed a clean, finished exterior appearance.
Step 12 – Finish Inside the Shed
At this stage, the structure is complete, and you can finish the inside of the shed to match your needs. This is where the shed becomes a functional and comfortable space.
You can start by adding electricity if needed. Hire a licensed electrician if required by local code. With power installed, you can add interior lighting for better visibility. This makes the shed more useful, especially if you plan to work inside during the evening or in low light conditions.
Next, you can install insulation inside the wall cavities. Insulation helps regulate temperature and makes the shed more comfortable year-round. It also helps reduce moisture buildup inside the structure.
After insulation, you can install sheetrock (drywall) on the interior walls. This gives the shed a clean, finished look and makes it feel more like a real room. Tape, mud, and sand the seams for a smooth surface before painting.
Once the basic interior is complete, you can customize the space based on your needs.
You can turn the shed into:
- A home office
- A woodworking shop
- A storage and organization space
- A kids’ playroom
- A hobby or craft room
- A small entertainment area
Add shelving, storage cabinets, or a workbench depending on how you plan to use the space. Good organization will help you get the most out of the shed.
This final step is all about personalization. The structure is already built strong and weather-resistant. Now you can design the inside to fit your lifestyle.
With the right finishing touches, your shed can become much more than storage. It can become a comfortable, useful, and fully functional extension of your home.
Conclusion
Building your own DIY backyard shed is one of the most rewarding woodworking projects you can complete.
You save money, gain valuable building experience, and create something that adds real value to your home.
With a solid foundation, proper framing, and weather-resistant materials, your shed can last for decades.
Take your time, measure carefully, and focus on keeping everything level and square.
That is the real secret to a successful shed build.
If you’ve been thinking about building your own storage shed, this is the perfect project to start.
Now grab your tools and start building.
Reviews
There are no reviews yet.