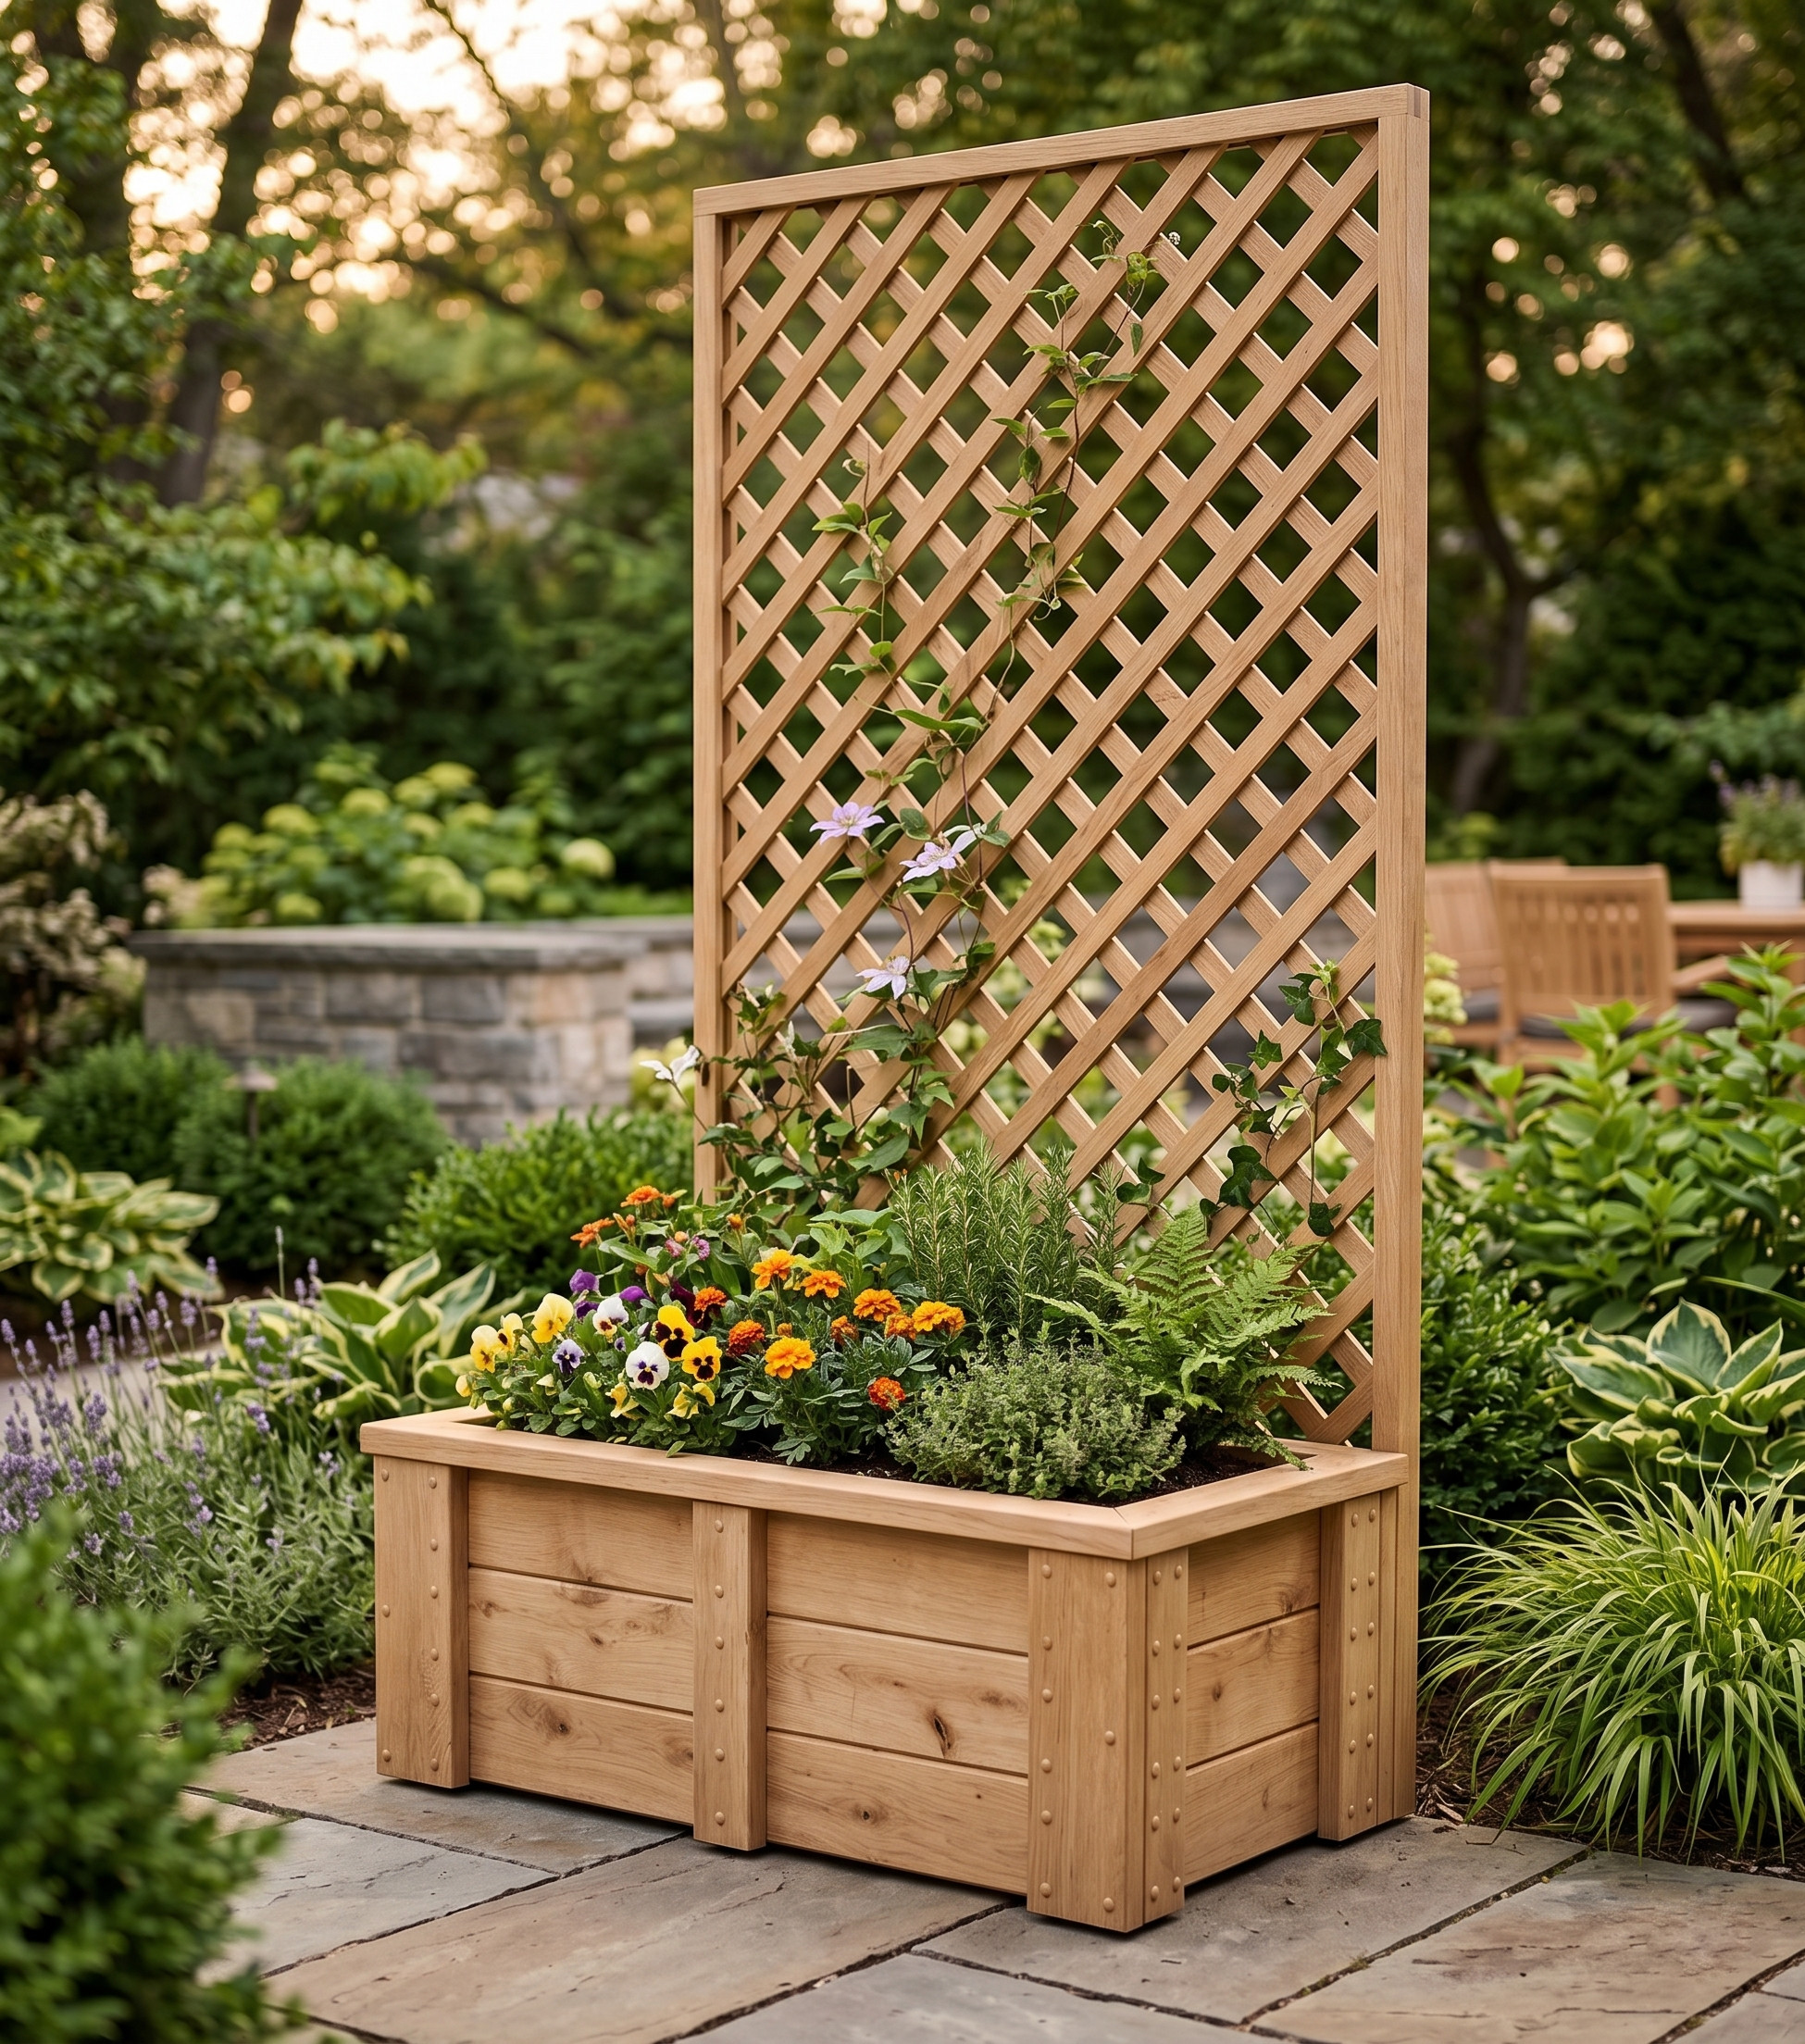
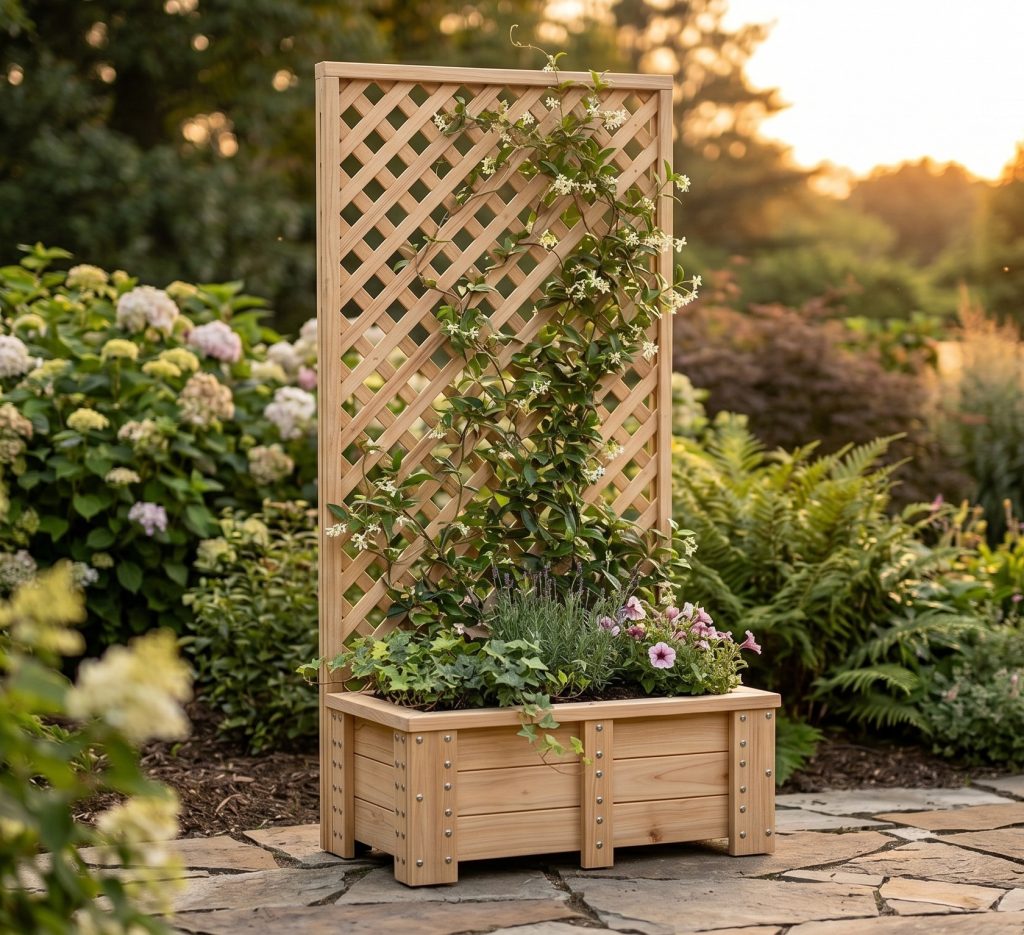
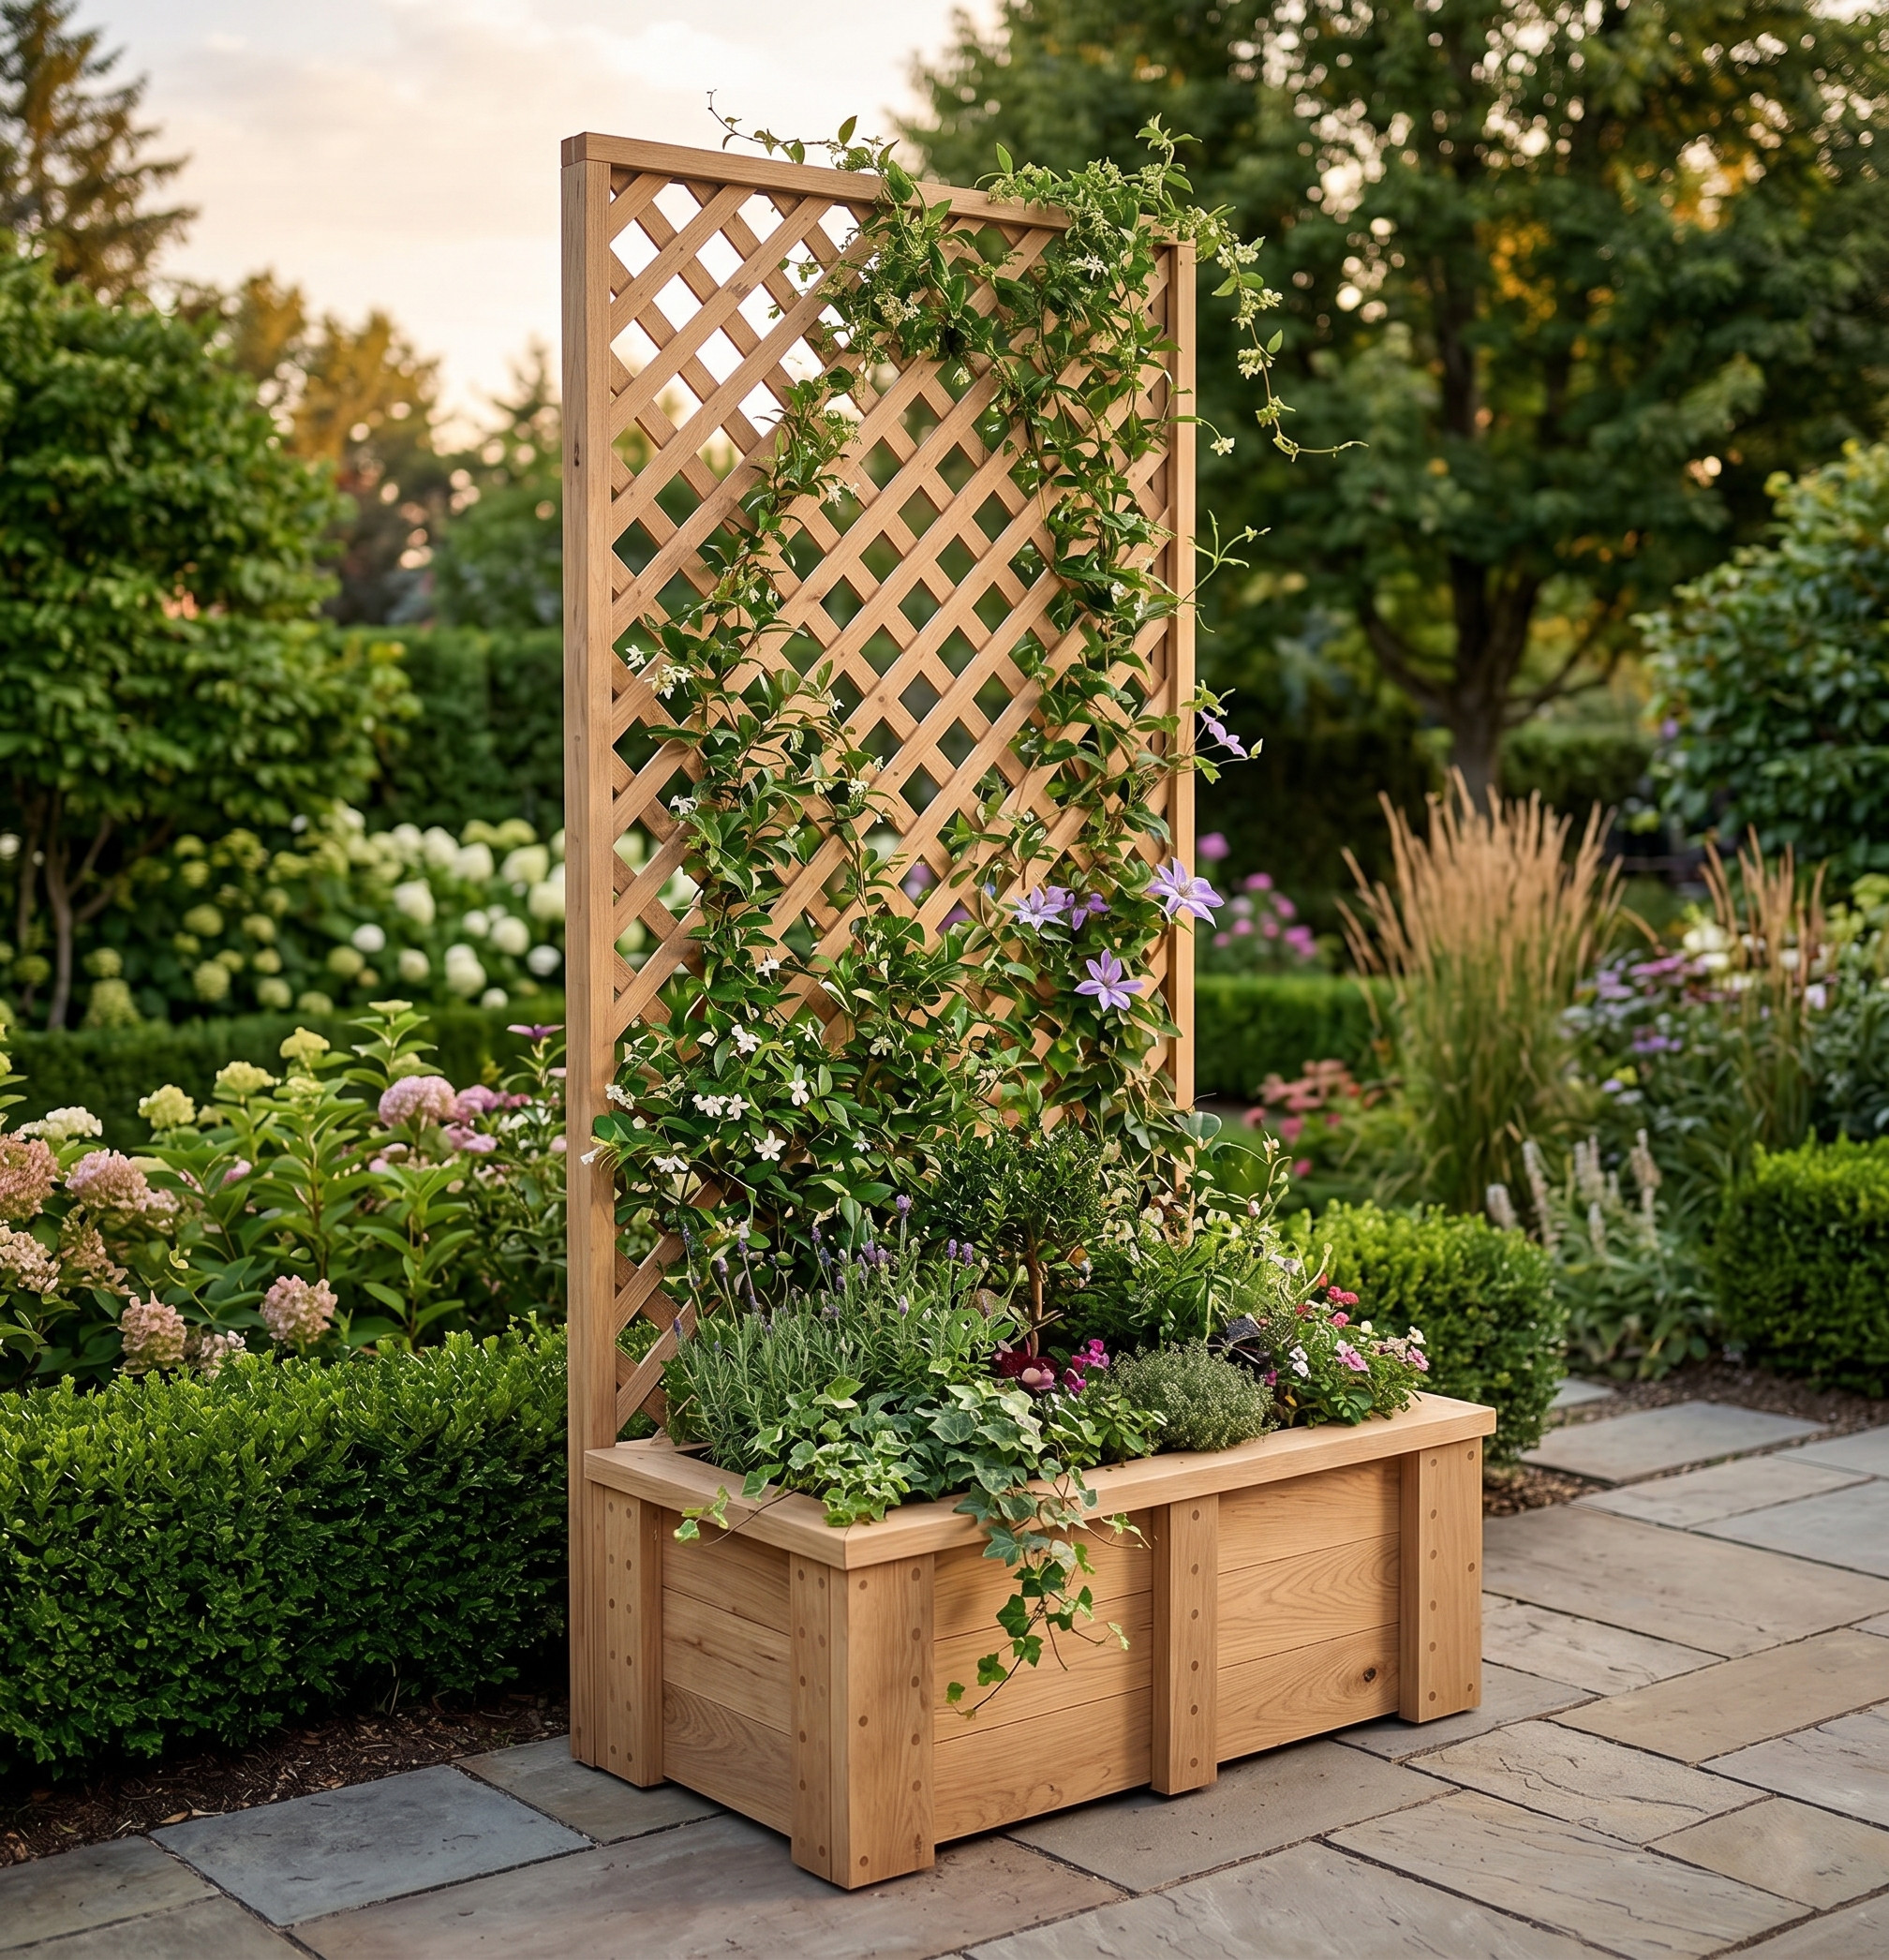
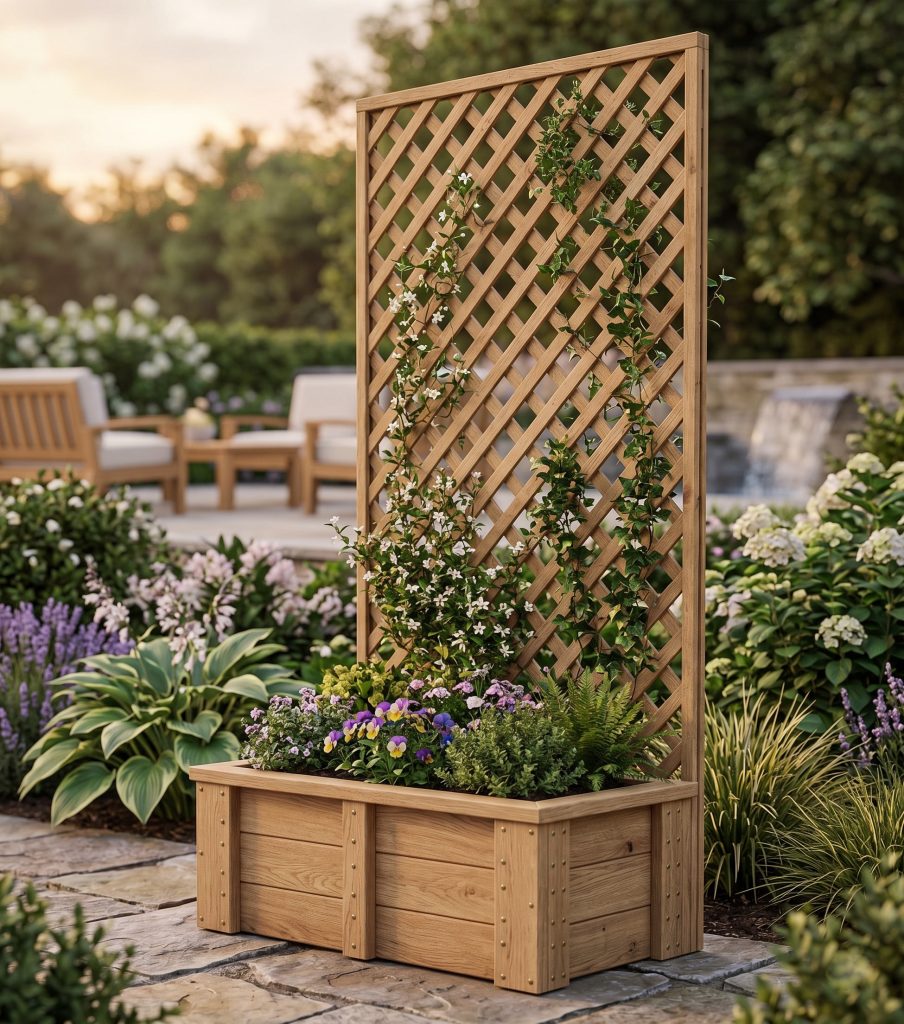
If you’re looking for an outdoor woodworking project for your garden that is easy to build, look no further than this DIY Planter Box with a Trellis! This project is perfect for growing your organic vegetable or herb plants, and it can be built in just a few hours.
A trellis planter box is a great way to add some vertical space to your garden. You can plant climbing plants like cucumbers or tomatoes, or you can use the trellis to support other plants.
Having a trellis on the back of your planter box is a great way to save space in your garden. If you have a small space, you can use the trellis to support plants that would otherwise take up too much ground space. This way, you can maximize your planting area and still have a beautiful garden.
Building a DIY trellis planter box is a simple project that anyone can do. You can find all the supplies you need at your local hardware store. Start by measuring the space where you want to put your planter box. Then use the plans provided below to build the planter. You could modify these plans to suit your space. You might even build a few of these planters if you have a larger area.
Should There be a Bottom on a Raised Planter Box for Vegetable Plants?
There are a few opposing thoughts on this subject. Some say that having a bottom on a raised planter box helps to keep the soil in and deters pests. Others believe that having a bottom decreases drainage, which can lead to root rot. Ultimately, it is up to the gardener to decide what works best for their plants.
If you are considering adding a bottom to your raised planter box, there are a few things to keep in mind. First, the type of material you use will affect drainage. If you use a material that does not allow for proper drainage, your plants may suffer. Second, the size of the bottom will also impact drainage. If the bottom is too small, water may pool and cause problems. Finally, make sure the bottom is securely attached to the sides of the planter box, so it does not collapse.
You also might be interested in a DIY Planter with Corrugated Steel or a Planter Box on Wheels.
Time to Complete
6 hours
Total Cost
$120
Skill Level
Intermediate
Download Printable Plans in PDF


DIY Planter Box with Trellis Plans
$12.97
Digital PDF download: Get full woodworking plans to build a DIY planter box with trellis. Includes step-by-step instructions, complete cut list with measurements, material list, tools list, and 3D assembly diagrams. Instant download. Print at home. Build yours today.
Description
Build a Beautiful DIY Planter Box with Trellis — Complete Woodworking Plans Included
If you’ve been looking for a rewarding outdoor woodworking project that’s both practical and visually impressive, this DIY planter box with trellis is exactly what you need. Designed for backyard gardens, patios, and small outdoor spaces, this project gives you a sturdy raised planter combined with a built-in trellis — perfect for growing climbing vegetables like tomatoes or cucumbers, herbs, flowers, and more.
These detailed woodworking plans take all the guesswork out of the build. Instead of piecing together vague tutorials or trying to reverse-engineer a project from photos, you’ll have everything laid out clearly — from the first cut to the final screw.
Who These Plans Are For
These plans are written for beginner to intermediate woodworkers and DIY homeowners who want clean, professional results without needing years of shop experience.
These plans are a great fit if you:
- Want to add a functional garden feature to your outdoor space
- Are new to woodworking but comfortable with basic tools
- Prefer growing vegetables or herbs in a contained, elevated planter
- Want to maximize vertical garden space with a built-in trellis
- Are looking for a weekend project with clear, step-by-step guidance
Whether you’re building for yourself or as a gift for someone who loves to garden, this is a manageable and satisfying build that looks impressive when finished.
What’s Included in the PDF
This is a digital PDF download — not a physical product. After purchase, you’ll receive instant access to the full woodworking plan document, which includes:
- Step-by-step building instructions — 10 clearly explained steps from cutting your first board to attaching the finished trellis
- Complete cut list with measurements — every board dimension you need, using imperial measurements
- Full material list — lumber, hardware, and trellis lattice all specified
- Tools required list — so you know exactly what you need before you start
- 3D illustrations and assembly diagrams — visual guidance at every stage of the build
- Cut diagrams — showing how pieces fit together
- Printable PDF format — print at home in any size that works for your workshop
- Instant download after purchase — no waiting, no shipping
Project Details
| Detail | Info |
|---|---|
| Difficulty Level | Intermediate |
| Estimated Build Time | 6 Hours |
| Estimated Project Cost | ~$120 |
| Measurements | Imperial (inches) |
| Planter Dimensions | Approx. 49″ wide × 27″ deep × 18″ tall (plus trellis rising to approx. 93″) |
Recommended Tools:
- Tape measure
- Drill
- Miter saw
- Nail gun
Key Materials Used:
- 2×6 lumber (front, back, and side boards)
- 2×4 lumber (corner supports and top trim)
- 1×2 boards (trellis frame)
- 4 ft. × 8 ft. garden wood trellis lattice
- ½″ plywood (plywood block for trellis alignment)
- 2½″ wood screws
Full material list with quantities is included in the PDF.
Why These Plans Make the Build Easier
Free tutorials and YouTube videos can get you started, but they rarely give you everything in one place. These plans are designed to remove the frustration of guessing, estimating, or making costly cutting mistakes.
Here’s what makes them worth downloading:
- Accurate measurements mean fewer wasted boards and less time at the hardware store making return trips
- 3D diagrams help you visualize each assembly stage before you pick up a tool
- Clear wood selection guidance — the plans explain the best lumber choices for outdoor longevity (cedar, redwood, or pressure-treated wood) and the tradeoffs of each
- Practical design notes — including whether to add a bottom to your planter, how to handle drainage, and how to brace the trellis for heavy plants
- Printable format means you can take the plans right into your garage or workshop without staring at a screen
About This Project
This planter box is intentionally designed without a fixed bottom, so plant roots can grow deep into the soil below — the way most vegetable gardeners prefer. The plans include guidance on adding a bottom if you want one, along with notes on drainage. The built-in trellis frame stands nearly 8 feet tall and is designed to support real climbing plants — not just decorative vines. It’s sturdier and more practical than a standalone trellis because it anchors directly to the planter structure.
The top trim adds a polished, finished look using 45-degree miter cuts — a satisfying detail that makes this planter look like it came from a garden center, not a first-time build.
Digital Download Information
This product is a digital PDF file. No physical item will be shipped to you.
- Instant download — available immediately after your purchase is complete
- Printable — open and print from any standard PDF viewer
- Works on desktop, tablet, and mobile — take it to the hardware store on your phone or print it for the shop
- Imperial measurements only — not available in metric
- Does not include SketchUp or CAD files
Ready to Build?
If you’ve been putting off this project because you weren’t sure where to start, these plans are the missing piece. For less than the cost of a bag of potting soil, you’ll have a complete, professional-grade woodworking guide ready to download right now.
Add to cart and start building today.
Other Woodworking Projects

Tools for this project
Material List
- Available with purchase of PDF plans.
Note: Lumber dimensions are listed as nominal size. See lumber sizes for actual dimensions vs nominal.
Disclosure: Some of the links on this page as well as links in “tools for this project” and “material list” sections are affiliate links.
Dimensions

Step 1 – Cut Boards for the Back, Front, and Sides of the Planter Box
When building a wooden planter box, the idea here is to use the correct wood type to increase the longevity of the planter. The wood will eventually rot when it is exposed to soil and moisture, but you could prolong this process by selecting the most suitable wood for outdoors.
The best woods to use for this purpose are redwood or cedar. You could also use pressure-treated wood. But be careful when using pressure-treated wood because it contains chemicals that might seep into the soil when watering the plants.
Once you have selected the wood type, take 2×6 and cut six pieces to 45″ in length using a miter saw. These six pieces will be used for the front and back of the planter.
Next, cut another six pieces to 20″ in length. These pieces will be used for the ends of the planter.

Step 2 – Assemble the Three Planter Box Sections
For this step, you will need to build three frame sections of the planter box.
Take two 45″ pieces and two 20″ pieces and attach them together as shown in the picture. Make sure to orient the pieces correctly so that the shorter two boards are placed between the two longer boards.
Use 2 1/2″ wood screws to join the frame. When driving in the screws, be careful not to split the wood, especially if the wood is extremely dry. You might have to pre-drill the pilot holes if the wood splits.
Repeat the process to build three of the exact same pieces for the planter box.

Step 3 – Attach Planter Box Sections Together
Take the three sections that you’ve built in step 2 and stack them one on top of the other.
Then take 2×4 and cut four vertical pieces to 16 1/2″ in length. Attach these boards to the ends of the planter box with 2 1/2″ wood screws. Make sure the 2x4s are flush with the corner of the box as shown in the picture. This will secure the three sections together from sliding apart.

Step 4 – Attach the Vertical Pieces to the Front and Back of the Planter
Cut another four vertical pieces to 16 1/2″ in length but this time using 2×6 boards. Then place them on the front and back corners of the planter and attach using 2 1/2″ wood screws.

Step 5 – Cut Boards for the Top Trim Around the Planter
The top trim of the planter box could be made from 2×4 boards or 2×6 depending on how wide you want it. This trim is not required, but it makes the planter box look more aesthetically pleasing.
Take 2×4 and cut two pieces to 49″ in length with a 45-degree inside miter cut on both ends on the board. Then cut another two pieces to 27″ in length with the same 45-degree miter cut.

Step 6 – Secure the Top Trim Pieces to the Planter Box
Now take the trim boards you cut in step 5 and place them on top of the planter box. Make sure the inside of the planter is flush with the inside of the trim. Using 2 1/2″ wood screws, secure the trim to the planter.
This planter box is intentionally left without the bottom. Typically you would want to place the planter on top of the soil and have the roots of your plants go as deep as they need to. In case you do want to build a bottom, this would be a good time to do so. You will need to purchase additional boards to build the bottom.

Step 7 – Build a Frame for the Trellis
For this step, you will need to purchase one 4 ft. x 8 ft. garden wood trellis lattice at your local hardware store. They come in different shapes and sizes. Some are framed and some are not. You could also purchase a vinyl trellis or a pressure-treated wood lattice; it all depends on your preference and what you’re planning to grow.
I would recommend a wooden trellis, especially if you’re going to have plants growing on it, because it is much sturdier than vinyl. Typically vinyl lattices are used for a privacy screen. It’s too flimsy for growing plants.
Sometimes Home Depot sells wooden trellis with a frame. In that case, you could just purchase it and attach it to the planter. Otherwise, you will need to build a frame to keep it upright.
Take 1×2 board and cut four pieces to 93″ in length for the sides. Then cut four pieces to 48″ in length for the top and bottom. Lay these boards flat on the floor and attach them together with 2″ wood screws, as shown in the picture. You will need to build two of the same exact frames.

Step 8 – Attach the Frames to Trellis
Now take a 4 ft. x 8 ft. garden wood trellis and attach one frame on the front and one frame on the back of the trellis. When driving in the screws, make sure it goes through the frame and the trellis. Be careful not to split the wood, you might need to predrill the pilot holes. The other option is to use brad nails with a nail gun if you don’t want to use screws.

Step 9 – Place a Plywood Block Piece at the Bottom of the Planter Box
Before attaching the trellis to the backside of the planter box, you will need to attach a plywood piece at the bottom of the box. Since the top trim is protruding out by 1/2″, adding the plywood block at the bottom will make the back vertically straight to attach the trellis.
Take 1/2″ plywood and cut one piece to 48″x8″. Then place it at the very bottom of the planter on the backside. Then drive in a few screws through the plywood to hold it in place.

Step 10 – Attach Trellis to the Backside of the Planter Box
Once you have the plywood block attached. Place the trellis frame flush with the bottom and the end of the box and drive in the wood screws.
Depending on what plants you will be growing, you might need to attach optional diagonal boards from the top of the planter to the trellis frame. If you have heavy plans, this will prevent the trellis from swaying back and forth.
You are done with the DIY Planter Box with Trellis. Enjoy growing your plants.

Frequently Asked Questions
Planter boxes offer many benefits over traditional gardening methods. They are easier to set up and require less maintenance than in-ground gardens. Planter boxes also prevent soil erosion and help to conserve water.
Just about any plant can be grown in a planter box, as long as the box is the appropriate size for the plant. Some plants that do well in planter boxes include herbs, vegetables, and flowers.
If your planter box is not draining properly and it has a bottom, you may need to drill drainage holes in the bottom of the box. You can also add gravel or rocks to the bottom of the box to improve drainage.
Watering frequency will depend on the type of plants you are growing, the size of the planter box, and the climate. In general, most plants in a planter box will need to be watered about once per week. during hot weather, you may need to water more frequently.
Reviews
There are no reviews yet.