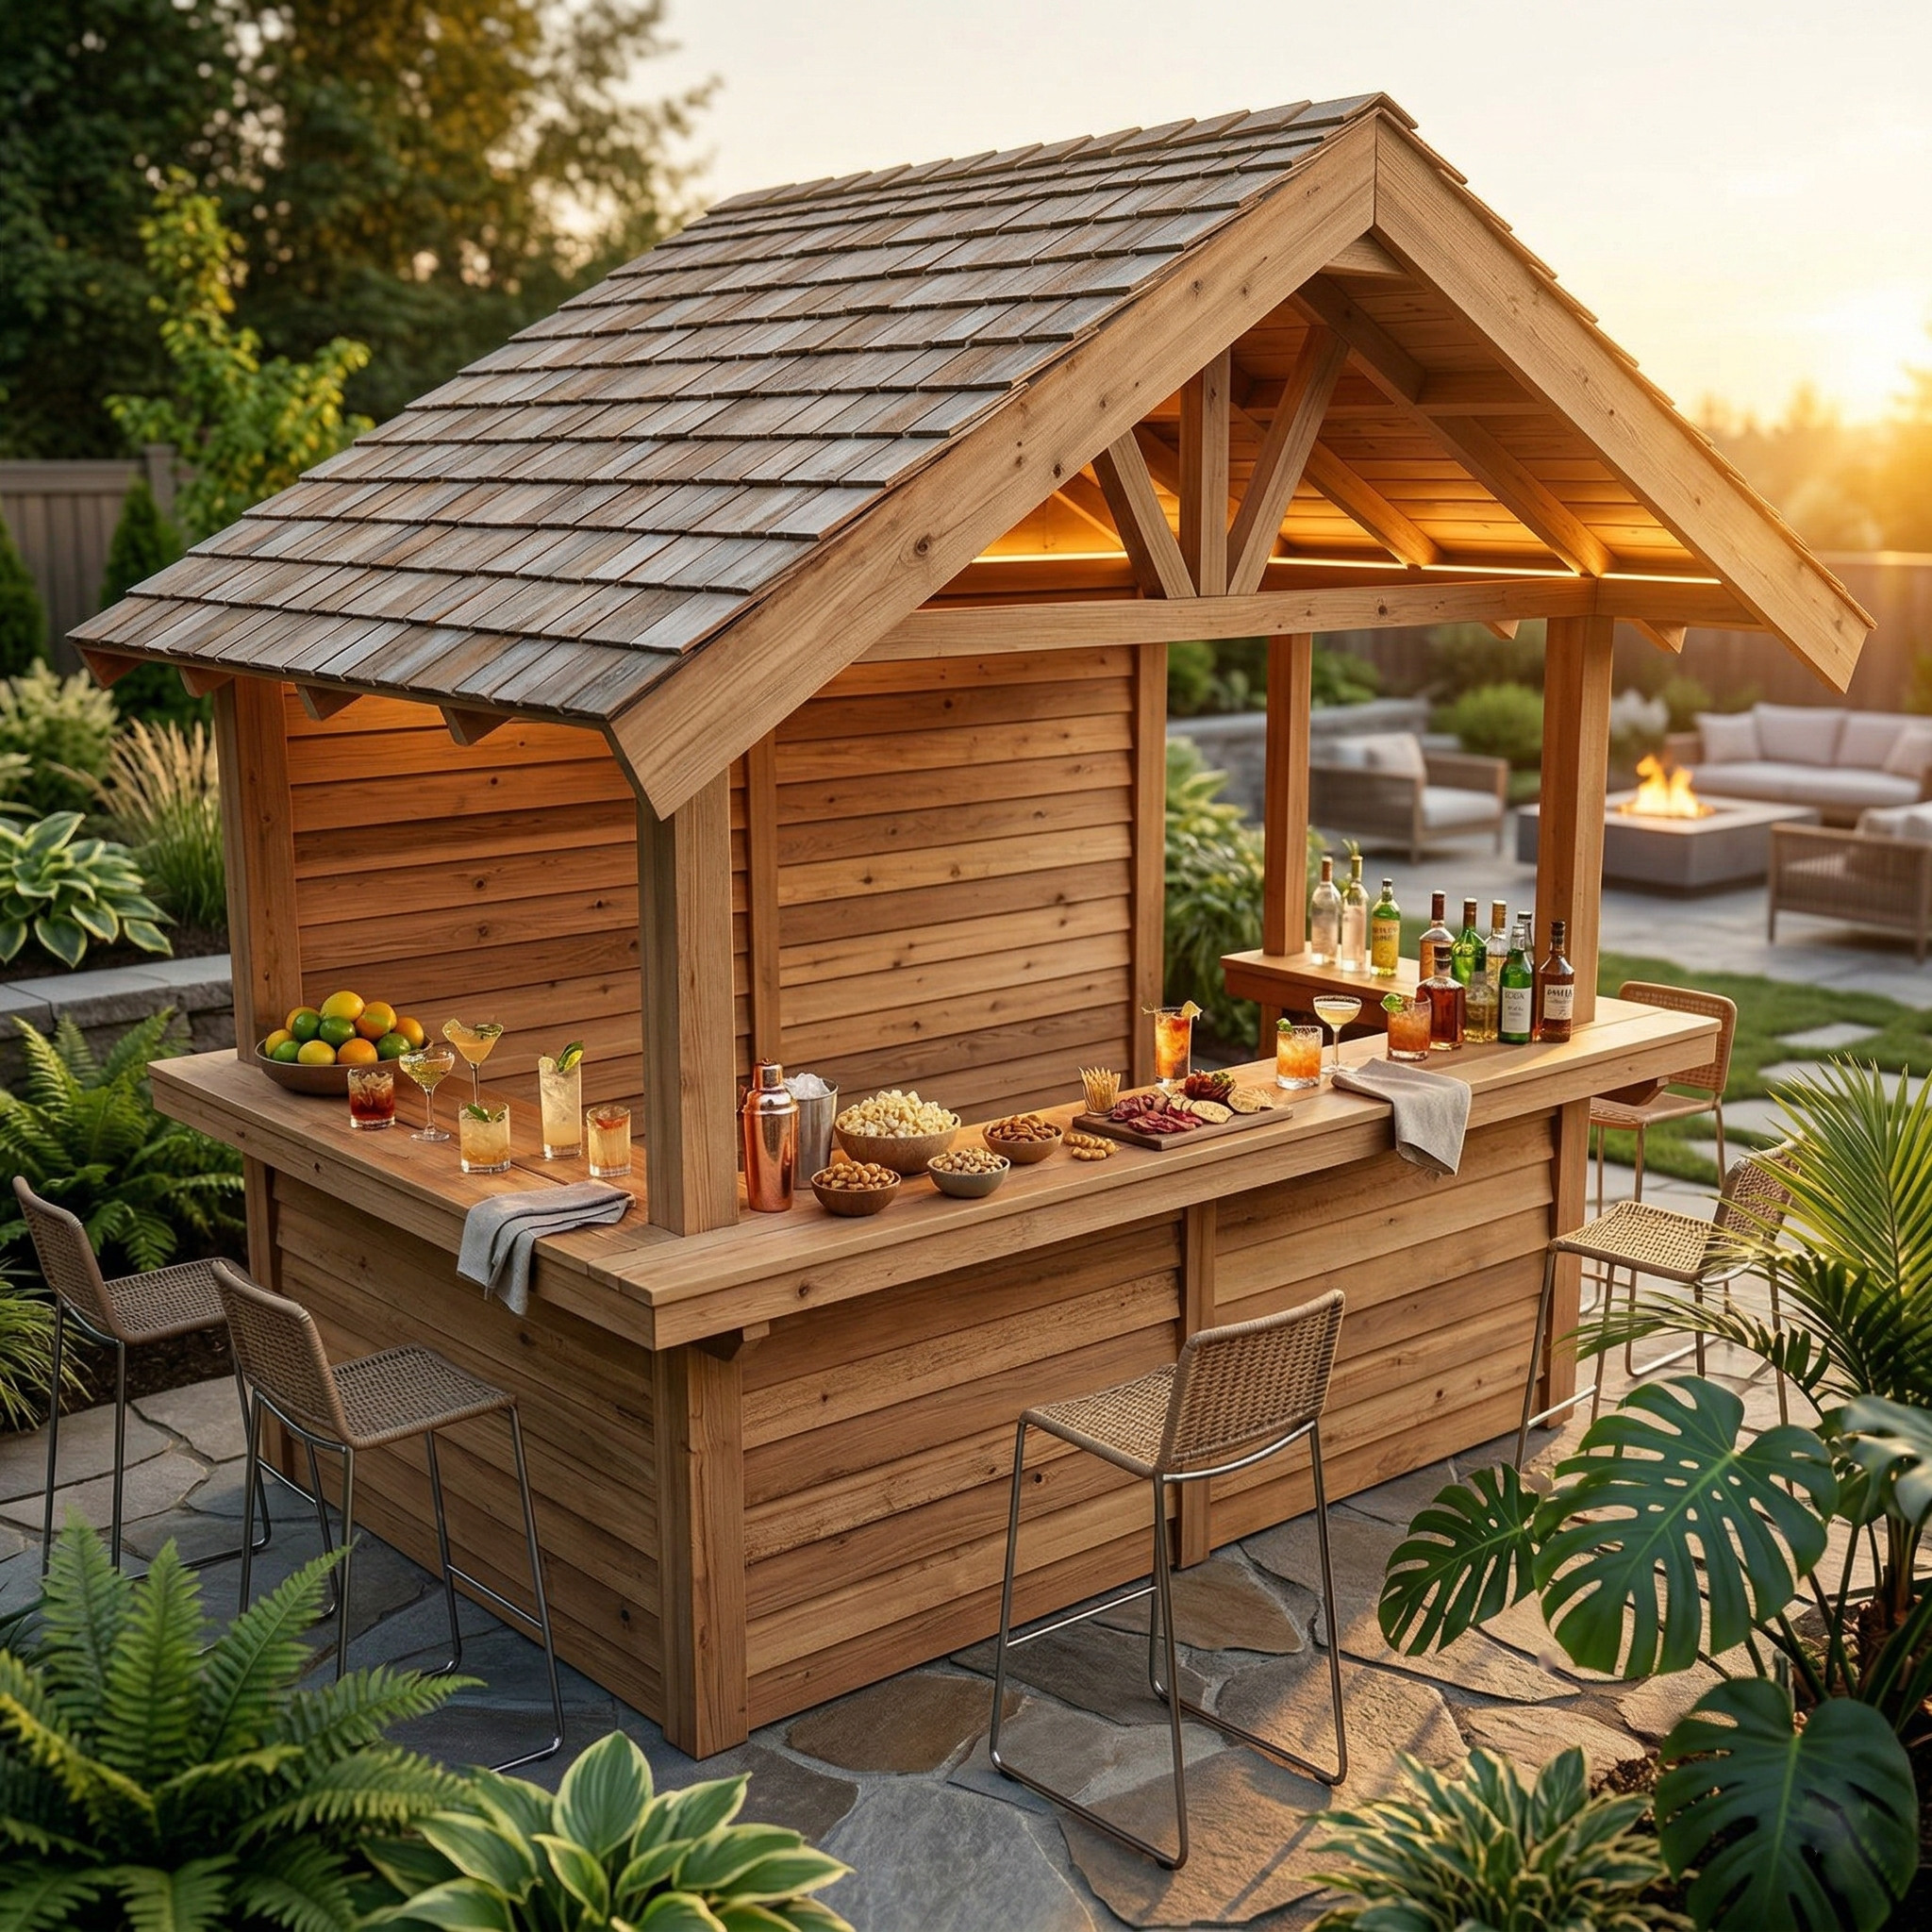
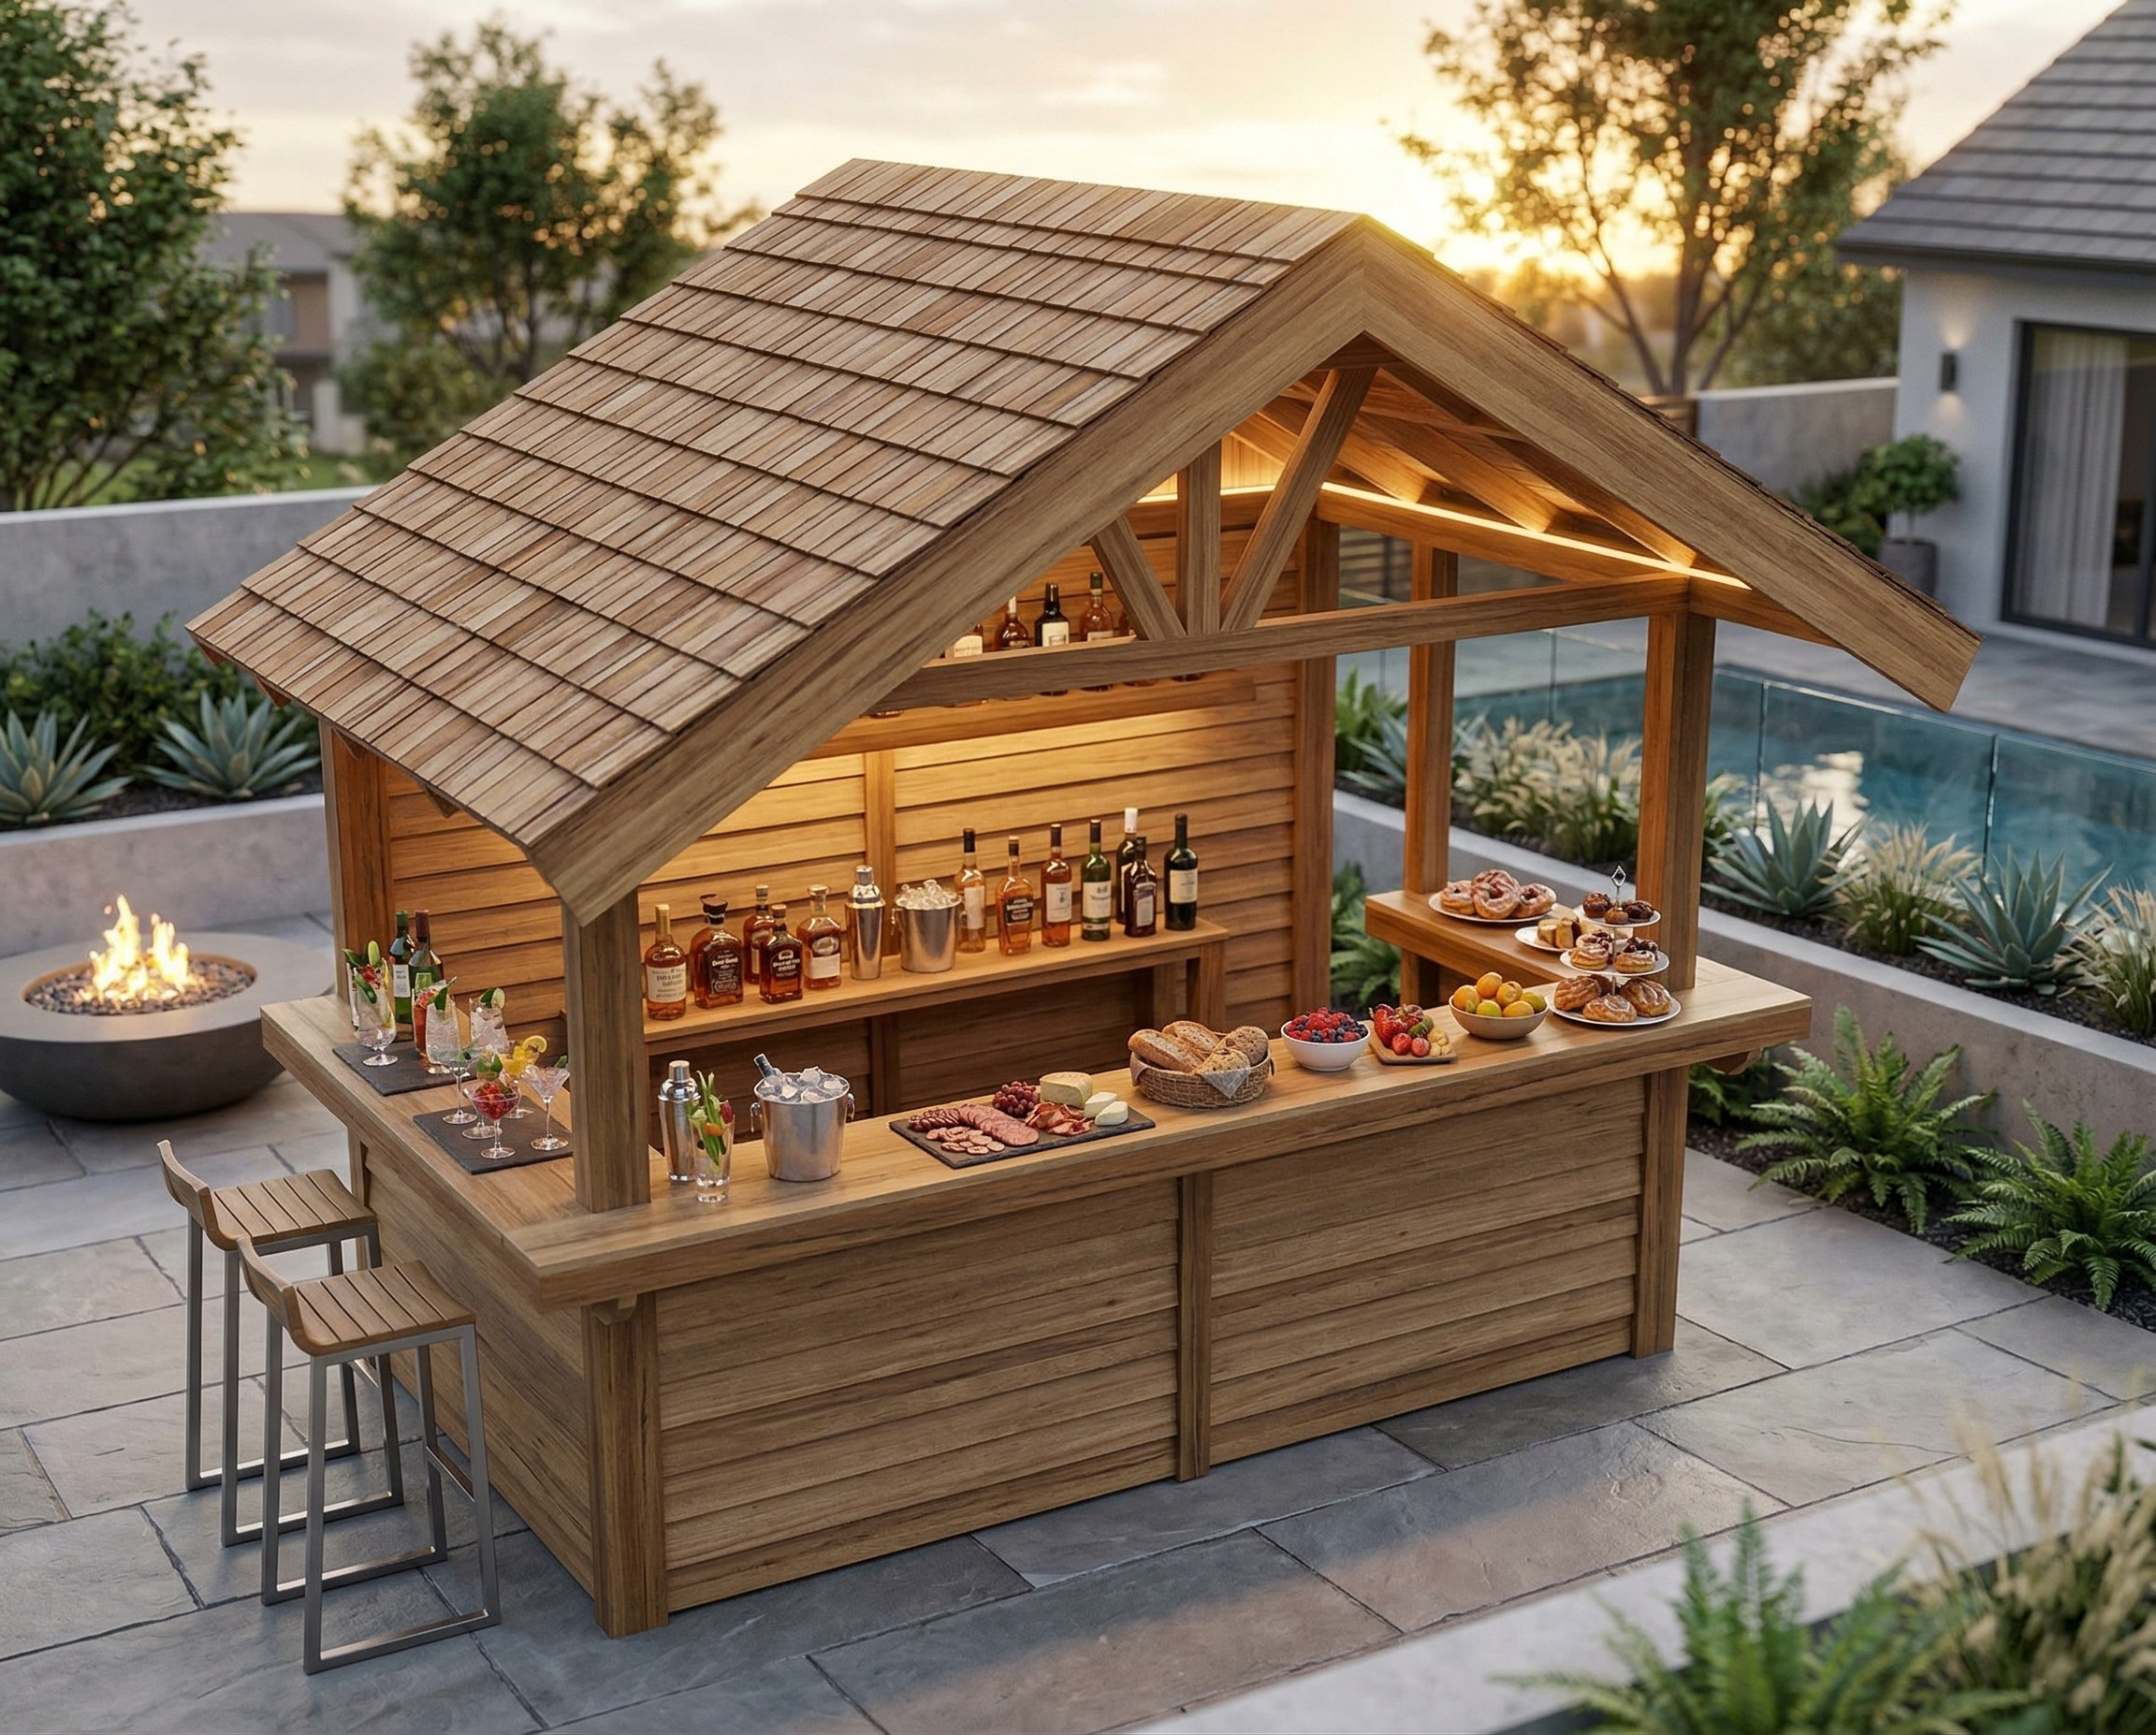
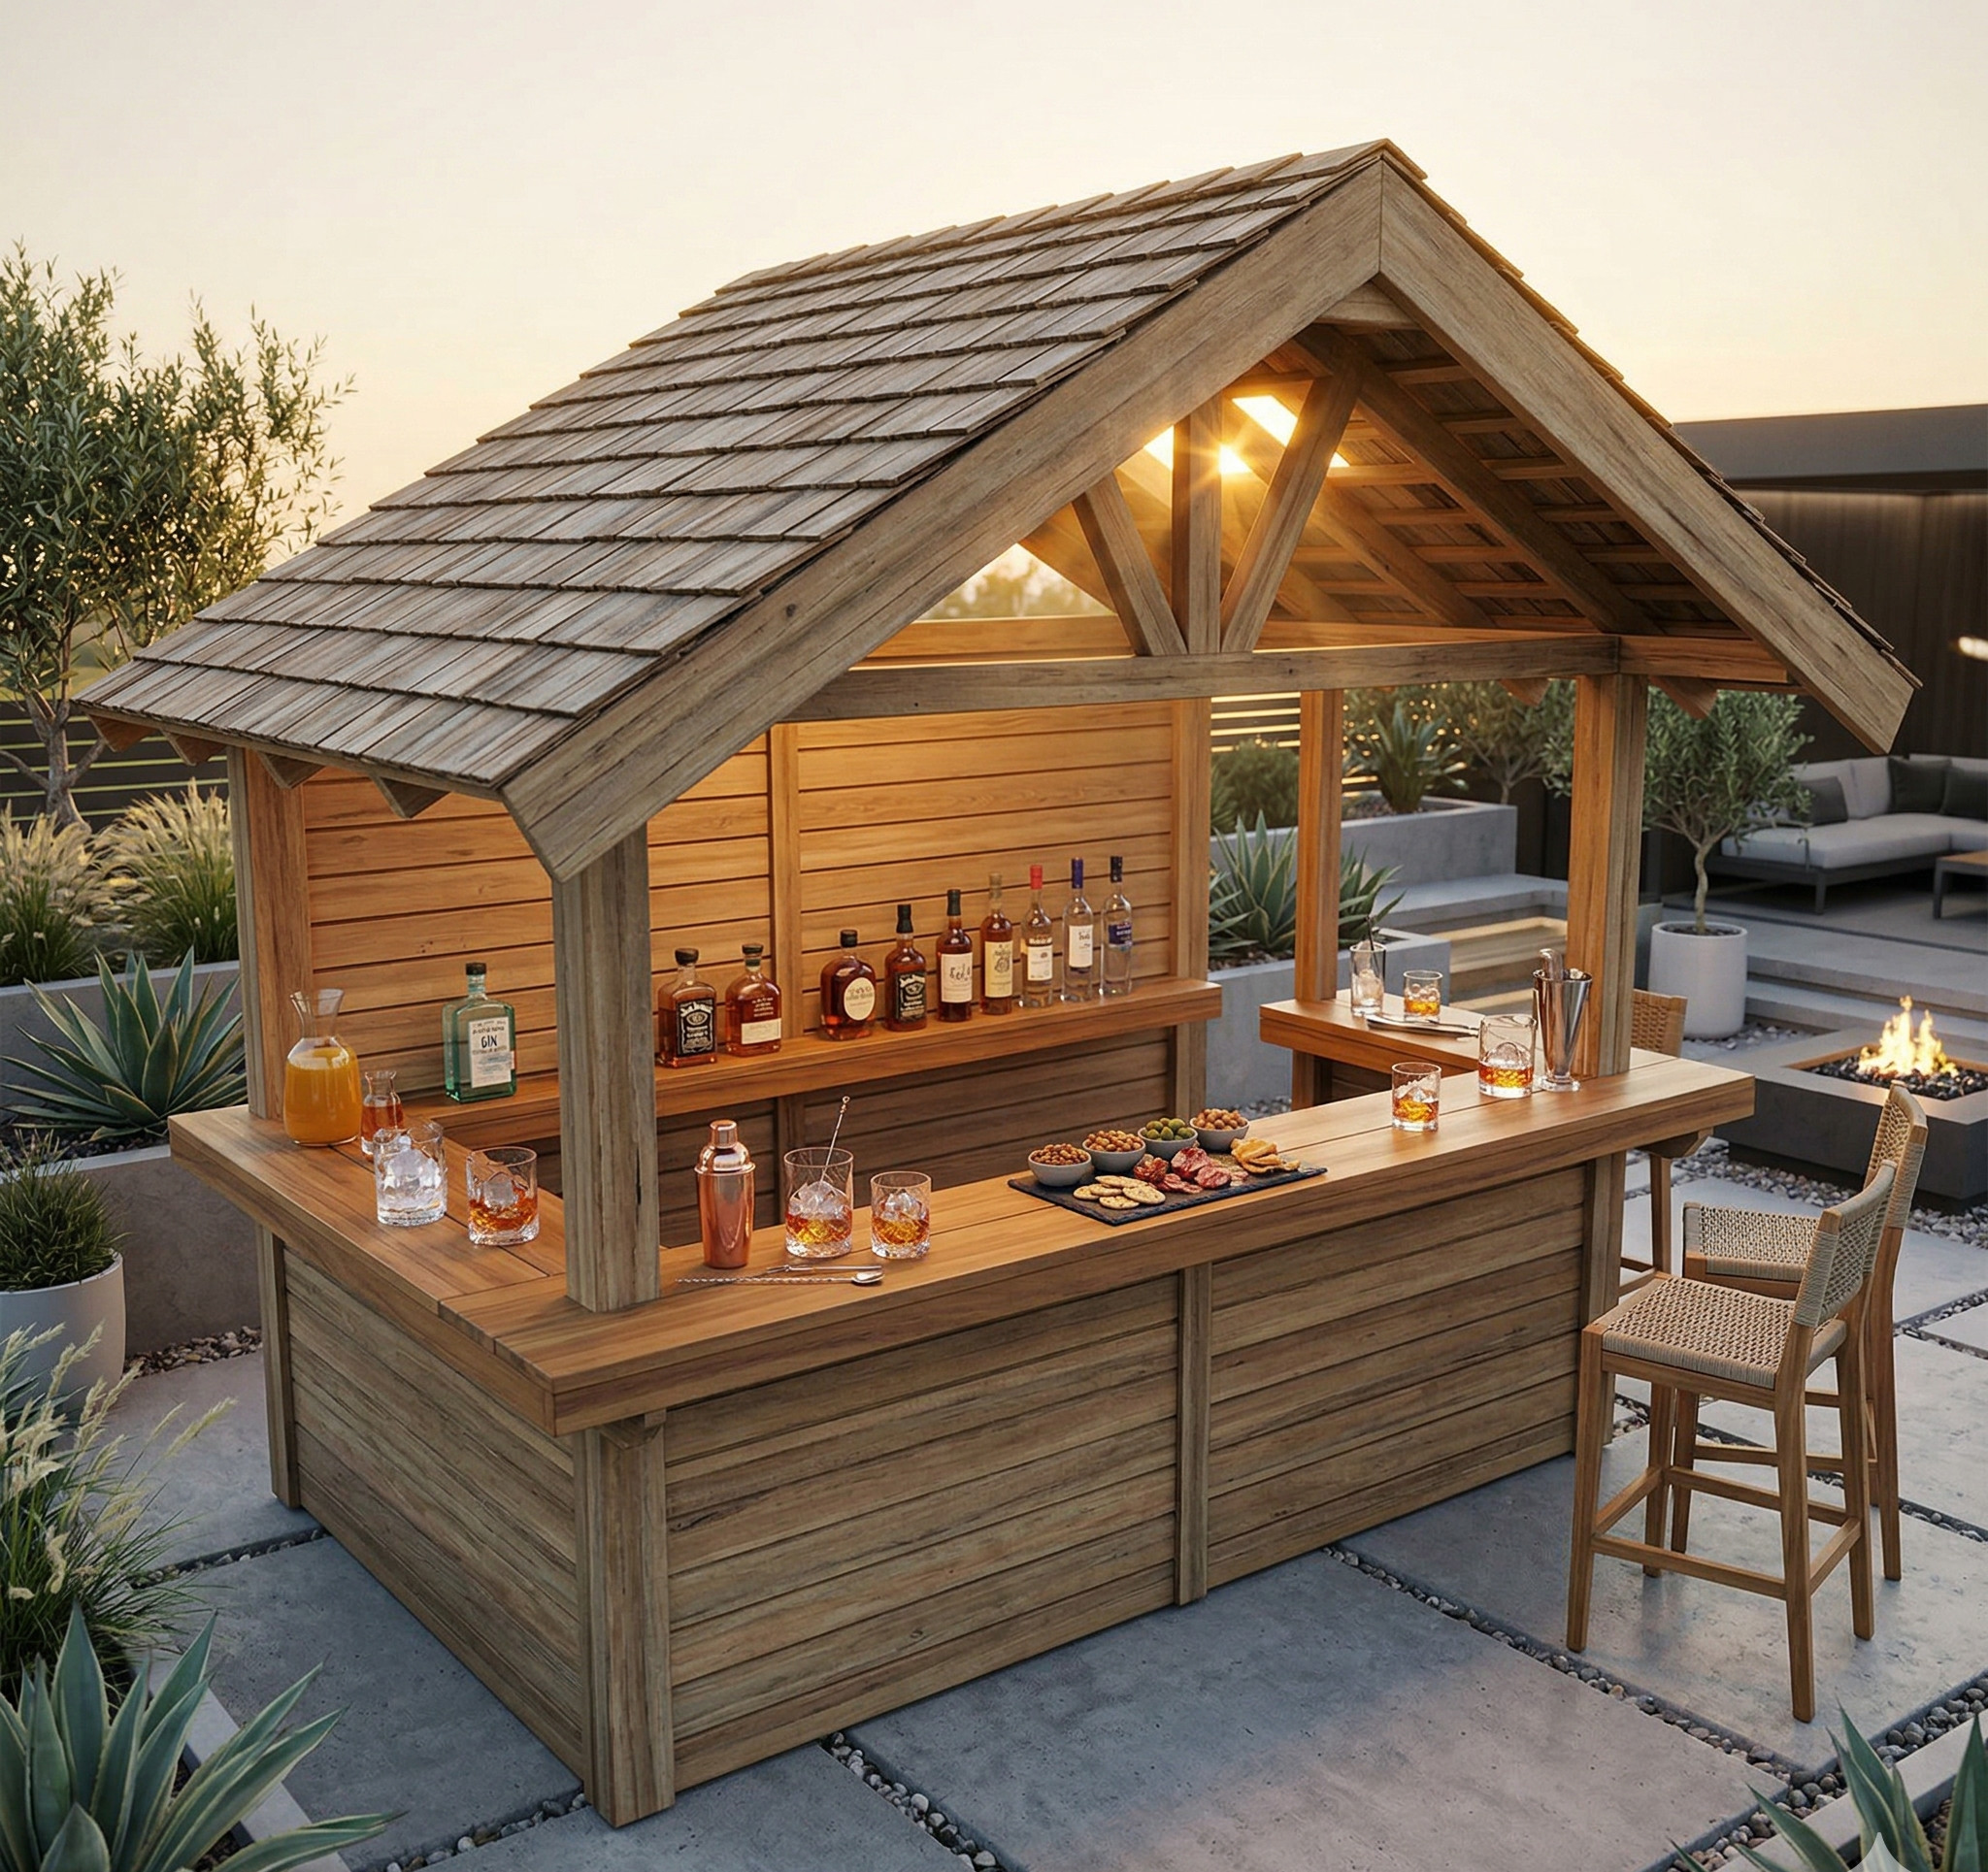
Building your own DIY outdoor bar with a roof is a great way to upgrade your backyard and create a space for relaxing, entertaining, and hosting guests. In this guide, you’ll learn exactly how to build a sturdy, professional-looking outdoor bar from scratch—even if you’re a beginner.
This project is perfect if you want a dedicated space for drinks, food prep, or outdoor gatherings. Plus, building it yourself saves money and gives you full control over the design and size.
Why Build a DIY Outdoor Bar?
- Creates a functional outdoor entertaining space
- Adds value and visual appeal to your backyard
- Customizable size, design, and finish
- Much more affordable than buying a pre-built bar
Project Overview
In this tutorial, you’ll start by building the front frame of the bar, which is the main structural base. These first steps focus on cutting lumber, drilling pocket holes, and assembling the frame so everything is square and strong.
What Types of Outdoor Bars are out there?
There are many different types of outdoor bars that you can choose to build. You can opt for a wooden bar style if you want a more traditional look. These bars are typically made from cedar or redwood and can be stained or painted to match your other outdoor furniture.
If you’re looking for something a little more modern, you could try a metal bar. These bars are often made from aluminum or stainless steel and can be powder-coated to resist rusting. If you’re looking for a more unique or rustic look, you could try a wicker bar or DIY pallet bar. Wicker is a material that is often used in outdoor furniture and can give your bar a one-of-a-kind appearance.
The outdoor bars come in different sizes. It can be a small bar cart or a large stand with walls, a roof, and a fancy interior design. There are also reclined murphy bars attached to the wall and much more…
You might also be interested in outdoor plans such as, DIY outdoor arbor swing or DIY Garden Arbor with a Bench.
Time to Complete
20 hours
Total Cost
$1700
Skill Level
Beginner to Intermediate
Download Printable Plans in PDF


DIY Outdoor Bar PDF Plans
Price range: $26.97 through $34.97
Build a professional outdoor bar with this detailed DIY woodworking PDF plan. Includes step-by-step instructions, full cut list, material list, and diagrams. Perfect for DIY builders who want a strong, stylish backyard bar. Instant download after purchase.
Description
Build Your Own Outdoor Bar with This Step-by-Step Woodworking Plan
Turn your backyard into the ultimate entertaining space with this DIY Outdoor Bar woodworking plan (PDF guide). This project is designed for DIY builders, homeowners, and woodworking enthusiasts who want a professional-looking outdoor bar without hiring a contractor.
This plan walks you through the entire build from start to finish using simple, clear instructions. Even if you are an intermediate beginner, you can follow along and build a strong, functional, and visually impressive outdoor bar.
This design solves a common problem: expensive outdoor furniture and confusing build instructions. Instead of guessing, you get exact measurements, a full cut list, and a proven step-by-step system that keeps your project organized and accurate.
Whether you want a backyard bar for entertaining, grilling, or relaxing with friends, this plan gives you everything you need to build it correctly the first time.
What’s Included in This Woodworking Plan
- Complete step-by-step building instructions (easy to follow)
- Full cut list with exact lumber measurements
- Material list for the entire project
- Tools required list for efficient building
- Estimated build time for planning your project
- Estimated total project cost (budget-friendly guidance)
- Assembly diagrams and visual references
- Printable high-quality PDF format
- Designed for both beginners and experienced woodworkers
Why This Plan Is Different
This is not a basic sketch or incomplete idea. It is a fully detailed woodworking guide built for real-world construction.
- Clear measurements for every cut
- Structured step-by-step workflow
- Designed to prevent mistakes during assembly
- Includes reinforcement points for durability
- Focused on real outdoor use and stability
- Tested layout that results in a strong finished build
You do not need to guess or improvise. Everything is planned for you.
Download Information
- Instant PDF download after purchase
- No physical product will be shipped
- Works on phone, tablet, and computer
- Print at home or use digitally in your workshop
Start building immediately after purchase.
Additional information
| Additional Items | Bar Plans, Bar+Stool, Bar+Stool+Planter |
|---|
Other Woodworking Projects
Material List
- Available with the purchase of PDF plans.
Note: Lumber dimensions are listed as nominal size. See lumber sizes for actual dimensions vs nominal.
Disclosure: Some of the links on this page as well as links in “tools for this project” and “material list” sections, are affiliate links.
Dimensions
Step 1 – Cut Frame Boards for the Front Panel of the DIY Bar
Start by preparing all the lumber for the front panel. This step is important because accurate cuts will make assembly much easier later on.
Cut:
- (4) 2×4 boards at 32 3/4 inches
- (2) 2×4 boards at 56 1/4 inches
- (1) 2×4 board at 116 inches
- (1) 4×4 post at 36 1/4 inches
Drilling Pocket Holes
Once all pieces are cut, drill two pocket holes on each end of every 2×4 board.
- Use a Kreg Jig to drill the pocket holes
- Set the jig for 1 1/2″ thick material (standard for 2x4s)
- Drill clean, consistent holes to ensure tight joints
For the 4×4 post, drill pocket holes only at the top end—do not drill holes at the bottom.
Pro Tips:
- Double-check all measurements before cutting
- Use a miter saw for clean, straight cuts
- Label each board after cutting to stay organized
- If you’re new to pocket holes, check this helpful guide from Kreg Tool: https://learn.kregtool.com/learn/how-to-use-a-pocket-hole-jig/

Step 2 – Assemble Sections of the Front Panel Frame
Now that your boards are cut and pocket holes are drilled, you’ll build two identical U-shaped frame sections.
What You’ll Use:
- (2) 56 1/4″ boards
- (4) 32 3/4″ boards
- 2 1/2″ pocket hole screws
Assembly Instructions:
- Lay out two vertical boards (32 3/4″) parallel to each other
- Place one 56 1/4″ board across the top to form a “U” shape
- Secure the joints using 2 1/2″ pocket hole screws
- Repeat this process to create a second identical U-shaped frame
Important Tips:
- Use clamps to hold boards tightly in place before screwing
- Make sure corners are square (use a speed square if needed)
- Keep all edges flush so your frame stays even
Taking your time here ensures the entire bar frame will be strong and aligned properly.

Step 3 – Build the Front Panel Frame of the DIY Outdoor Bar
In this step, you’ll connect everything together to form the full front panel of your bar.
Instructions:
- Take the 116″ board and measure the center point
- Mark it clearly at 58 inches
- Attach the 4×4 post at the center mark
- Align it perfectly vertical
- Secure it using 2 1/2″ pocket hole screws through the top pocket holes
- Attach the two U-shaped frames:
- Place one frame on each side of the 4×4 post
- Make sure the pocket holes are facing the back side (this keeps the front clean)
- Align all boards so they are flush with the back edge of the 116″ board
Pro Tips:
- Clamp everything together to prevent shifting
- Check alignment before driving screws
- Use a level to ensure the 4×4 post is straight

Step 4 – Cut Siding Boards for the Front Outdoor Bar Panel
Now it is time to fill in the front panel of the bar. This step covers the frame and gives the bar its finished look.
There are several ways to do this:
- Option 1: Install 1×8 boards horizontally with a slight overlap. This creates a clean, high-end look.
- Option 2: Use a plywood siding panel. Cut it to size and attach it to the frame. This option is cheaper but does not look as detailed.
- Option 3: Install real house siding. This works well if you want the bar to match your home.
For this tutorial, use Option 1 (overlapping 1×8 boards).
Take 1×8 lumber and cut sixteen boards to 56 1/4 inches in length.
Measure each board carefully before cutting. Mark your cut line clearly. Use a miter saw or circular saw to make straight cuts. Keep all boards the same length. This is important for a clean and even installation later.

Step 5 – Attach Siding Boards to the Front Panel
Start at the bottom of the frame. Place the first 56 1/4″ board flat against the frame. Make sure it sits level and flush with the edges.
Attach the board using a nail gun with 2″ brad nails. Drive nails into each framing member behind the board. Space the nails evenly. Keep the board tight against the frame while fastening.
If you do not have a nail gun, use wood screws instead. Pre-drill pilot holes to prevent splitting. Since these 1×8 boards are not structural, brad nails are strong enough for this step.
Move to the second board. Place it above the first board. Overlap the lower board by 3/4 inch. This overlap creates a siding look and helps shed water.
Hold the board in place. Check that it is straight. Then nail it to the frame the same way as before.
Continue working upward. Install each board with the same 3/4 inch overlap. Keep all overlaps consistent. Make sure each board is level before attaching it.
When you reach the top, the last board may be too tall. Measure the remaining space. Mark the board to fit. Trim it using a table saw or circular saw. Then attach it in place.
Repeat this entire process on the other side of the front panel. Make sure both sides match in spacing and alignment.

Step 6 – Build the Left Side Panel Frame of the DIY Outdoor Bar
The left side panel is built the same way as the front panel, but the dimensions are different.
Take 2×4 lumber and cut the following pieces:
- (4) boards at 32 3/4 inches
- (2) boards at 65 inches
Make sure all cuts are straight and accurate. Keep the board lengths consistent.
Drill two pocket holes on each end of every 2×4 board. Set your jig for standard 2×4 thickness. Drill clean and even holes. These holes will be used to join the frame together.
Assemble the Frame
Lay out the boards based on the correct dimensions and layout. Follow your reference image carefully. Position the vertical and horizontal boards to form the side frame. Clamp the boards in place before fastening. Attach the boards using pocket hole screws. Keep all edges flush and corners square.
Important Measurement
There is a 14 1/2 inch spacing between specific boards in this frame. This measurement is critical. This section will support both the lower shelf and upper shelf of the bar. If this spacing is off, the shelves will not fit correctly. Measure carefully before attaching. Double-check the spacing. Then secure the boards in place.

Step 7 – Build the Right Side Panel Frame
The right side panel is built the same way as the left panel, but with different dimensions.
Take 2×4 lumber and cut:
- (3) boards at 32 3/4 inches
- (2) boards at 41 inches
Make clean and straight cuts. Keep all board lengths accurate.
Drill two pocket holes on each end of every 2×4 board. Set your jig correctly for 2×4 material. Make sure all holes are clean and centered.
Assemble the Frame
Lay out the boards based on the correct design. Follow your reference image. Position the boards to form the right side frame. Clamp everything in place before fastening. Attach the boards using pocket hole screws. Keep all edges flush. Make sure the frame stays square.
Important Measurement
Maintain the 14 1/2 inch spacing in the correct section of the frame. This measurement is critical. It supports the lower and upper shelves of the bar. Measure carefully before attaching. Double-check the spacing. Then secure all boards in place.

Step 8 – Cut and Attach the Siding Boards for the Side Panels
Now, cover the left and right side frames with siding boards. This step is the same process used for the front panel.
Take 1×8 lumber and cut:
- (8) boards at 41 inches
- (8) boards at 65 inches
Measure each board carefully. Mark your cut lines clearly. Use a miter saw or circular saw to make straight cuts. Keep all boards the same length.
Start at the bottom of each side panel. Place the first board flat against the frame. Make sure it is level and flush. Attach the board using a nail gun with 2″ brad nails. Nail into each framing member. Space nails evenly. Place the next board above it. Overlap the lower board by 3/4 inch. Hold it in place and nail it to the frame.
Continue working upward. Keep the 3/4 inch overlap consistent on every board. Check that each board is straight before attaching. When you reach the top, measure the remaining space. If the last board is too tall, trim it to fit using a table saw or circular saw.
Complete Both Panels
Repeat this process for both the left side panel (65″ boards) and the right side panel (41″ boards). Make sure both panels have consistent spacing, straight lines, and clean alignment.

Step 9 – Cut Front Posts and Attach Them to the Front Panel
Now build and attach the main support posts for the bar. These posts will hold the roof.
If you plan to set the posts in the ground, cut them longer. In this tutorial, the posts sit on a concrete patio, so standard height is used.
Take 4×6 lumber and cut:
- (2) posts at 84 inches
Take a 4×4 board and cut:
- (1) piece at 120 inches (this will be the roof support beam)
Make sure all cuts are straight and clean.
Drill pocket holes on both ends of the 4×4 board. These holes will be used later when attaching the roof structure. Keep the holes centered and even.
Attach the Posts to the Front Panel
Place the front panel face down on a flat surface. Position one 4×6 post on each side of the panel. Align them with the outer edges. Make sure the bottom of each post is flush with the bottom of the front panel.
Attach the panel to the posts using 2 1/2″ pocket hole screws. Drive screws through the frame into the posts. Keep everything tight and aligned.
Install the Top 4×4 Beam
Place the 120″ 4×4 board across the top of both posts. Center the board so it extends evenly on both sides. You should have about 3 1/2 inches of space on each side of the 4×6 posts. Check alignment before fastening.
To attach the beam, you have two options:
- Drive 4 1/2″ screws down through the top of the 4×4 into the posts
- Or drill pocket holes in the 4×6 posts and use pocket hole screws
Make sure the beam is secure and level before moving on.

Step 10 – Attach Side Panels to the Front of the DIY Outdoor Bar
This step connects the side panels to the front frame and forms the main structure of the bar.
Stand the Front Frame Upright
Get help from another person. Lift the front panel with the posts and stand it upright. Place it on a flat surface. Make sure it is stable before attaching anything.
Take the left and right side panels. Position them against the front posts. Line up each side panel with the corresponding post. Hold the panel in place.
Attach the panels to the posts using screws or pocket hole screws. Drive fasteners through the frame into the posts. Keep everything tight.
Check Alignment
Make sure the top board of each side panel is flush with the front of the post. This is important for proper alignment and for the next steps. Double-check your measurements. Measure across the sides. The total width should be 127 inches. Adjust if needed before fully tightening all screws.
Make sure both side panels are straight and square. Check that all joints are tight.
At this point, the main frame of your outdoor bar should be standing and secure.

Step 11 – Build the Shelves for the Inside of the Bar
Now it is time to build the inside shelves for the bar. You will build two separate frames. One will be the lower shelf. One will be the upper shelf.
Lower Shelf Frame
Take 2×4 lumber and cut:
- (2) boards at 120 inches
- (3) boards at 11 1/2 inches
Upper Shelf Frame
Take 2×4 lumber and cut:
- (2) boards at 120 inches
- (3) boards at 18 3/4 inches
Drill two pocket holes on each end of every 2×4 board. Make sure all pocket holes are drilled clean and evenly spaced. These holes will be used to connect the frame together with screws.
Assemble the Shelf Frames
Start by laying out the 120″ boards on a flat surface. These will be the long sides of each shelf frame. Place the shorter boards between them to form a rectangle. Use the 11 1/2″ boards for the lower shelf frame. Use the 18 3/4″ boards for the upper shelf frame.
Align all pieces before fastening. Make sure everything is square. Attach the boards using 2 1/2″ pocket hole screws. Drive screws through the pocket holes into the connecting boards until tight.
Important Notes
Keep the frame square while assembling. Check alignment before fully tightening screws. Build both shelf frames using the same process. When finished, you should have two strong rectangular shelf frames ready for installation inside the bar.

Step 12 – Insert and Secure Both Shelves to the Outdoor Bar
The lower shelf height can vary depending on what you plan to store. For this project, position the lower shelf 11″ above the ground. Use a combination of pocket hole screws and standard wood screws to attach it securely to the frame. Make sure the shelf is level before fastening it in place.
Next, install the upper shelf. Place it 33 1/2″ above the ground. Secure it using both wood screws and pocket hole screws. Check that it is level and firmly attached on all sides.
To prevent the shelves from sagging under heavy weight, especially in the center, add a middle support post. Cut one 2×4 to 32″ in length. Position it vertically in the middle of the structure. It should sit under the upper shelf and in front of the lower shelf. Secure it tightly to the frame.

Step 13 – Place and Attach Shelf Boards to the Frame
Cut five pieces of 1×8 lumber to 120″ in length. These will form the shelf surfaces.
Place two boards on the lower shelf frame. Then place three boards on the upper shelf frame. Space them evenly for full coverage and a clean look.
Once positioned, secure all boards to the shelf frames using wood screws or brad nails. Make sure each board is firmly attached and does not shift.

Step 14 – Build the Back Wall of the DIY Outdoor Bar
Start by building a support frame for the back wall. This frame will hold the siding and will later be attached to the rear posts of the bar.
Cut four pieces of 2×4 lumber to 77″ in length. Then cut four additional pieces to 56 1/4″ in length. Drill pocket holes on both ends of all 2×4 pieces, as shown in the reference image. Add extra pocket holes along the longer boards to help prevent the frame from shifting or moving over time.
If you plan to mount anything heavy on the back wall, such as a TV, add extra supports or backing inside the frame now. The siding boards alone will not be strong enough for heavy loads.
Once the frames are assembled, attach them to the back posts of the bar as shown in the design. You will build and install two identical frames to complete the back wall structure.

Step 15 – Fasten the Siding Boards to the Back Wall Frame
Choose your siding material for the back wall. Similar to Step 4, multiple options are possible. For this project, use 1×8 boards that overlap each other.
Cut thirty-six pieces of 1×8 boards to 56 1/4″ in length.
Flip both back wall frames so the pocket holes face downward. Start at the bottom of the frame and place the first siding board in position. Secure it using wood screws.
Use screws instead of brad nails for the back wall. This makes the wall stronger and more durable. It also allows for future additions like shelves or a chalkboard menu.
Unlike Step 5, where the overlap was 3/4″, the siding boards on the back wall should overlap by 1″. Maintain this overlap consistently for each board.
Continue installing the remaining boards one by one, working upward until the entire frame is covered.
Repeat the same process for the second frame until both back wall sections are fully sided.

Step 16 – Assemble the Back Wall Panel
Cut two back posts from 4×6 lumber to 84″ in length. These will go on the far left and far right sides of the back wall.
Next, take 4×4 lumber and cut one piece to 84″ for the middle back post. Also cut one piece to 120″ for the back roof truss. Drill pocket holes on both ends of the 120″ 4×4 truss. These pocket holes will be used later to connect the roof boards in the next step.
Position the 4×4 middle post between the two back wall panels. Then place the 4×6 posts on the far left and far right sides of the panels. Attach both panels to the posts using 2 1/2″ pocket hole screws. Make sure the back edges of both panels are flush with the back side of the posts.
Now install the 120″ 4×4 roof truss on top of the back wall panels. This is done the same way as the front truss in Step 9. Center the truss across the top. It should sit 2″ onto each 4×6 post. This will create a 3 1/2″ gap on the posts, as shown in the reference image.

Step 17 – Connect Back Wall to the DIY Bar
Now attach the back wall assembly to the rest of the outdoor bar frame.
First, take 4×4 lumber and cut two pieces to 96″ in length for the roof trusses and one piece to 84″ in length for the door post.
Attach the 84″ 4×4 door post to the right-side panel using 2 1/2″ pocket hole screws. Then carefully lift the back wall into position and attach it to the left-side panel using pocket hole screws. Make sure the entire wall is level before fully securing it.
Next, place the two 96″ 4×4 roof truss boards into the 3 1/2″ gap on top of the 4×6 posts. Secure them from the top using 4 1/2″ wood screws. Also, secure them from the sides using 2 1/2″ pocket hole screws.
Make sure the front and back truss measurements match. Also, check that both sides are evenly spaced. This will confirm that the entire structure is square and properly aligned.

Step 18 – Cut and Attach Table Top Support Boards
Before building the outdoor bar top, install support boards on both sides of the bar.
Cut 2×4 lumber into two pieces. One piece should be 79 3/4″ long and the other 55 3/4″ long. Using a miter saw, cut a 45-degree angle on one end of each board, as shown in the reference image. The angled end will face the front of the bar.
Attach the longer board to the left side of the bar using 2 1/2″ wood screws. Attach the shorter board to the right side.
Both support boards must extend 9 1/4″ past the front 4×6 posts. Also, ensure both boards are installed at the same height as the top panel board for a level surface.
Step 19 – Assemble the Outdoor Bar Table Frame
The outdoor bar table wraps around three sides, so it is easiest to build it in separate sections.
Start with the left section of the table frame. Cut all 2×4 pieces according to the measurements shown in the reference image. Drill pocket holes in the appropriate ends and assemble the frame as shown. Make sure all joints are tight and the frame is square before securing it fully.
Next, repeat the same process for the right side of the table. Cut the 2×4 pieces to match the dimensions in the picture, drill pocket holes, and assemble the second frame. Double-check that both frames match in size and shape.

Step 20 – Connect Table Frames to the DIY Bar
Place the left table frame against the left side panel of the bar. Then place the right table frame against the right side panel.
Adjust both frames so the total distance from the far left end to the far right end of the table frame measures 144″. Confirm this measurement at both the front and the back. Both sides must match exactly 144″ for proper alignment.
Once the frames are centered and aligned, inspect the connection points. Identify where additional pocket holes can be added for extra strength. Add these pocket holes where needed to reinforce the structure.
Secure the table frames to the outdoor bar using screws through the pocket holes. After fastening, check the spacing again. You should have an 8 1/2″ gap between the 4×6 posts and the outer edge of the table frame.

Step 21 – Finish Building the Front of the Table Frame
After both table frames are attached, cut four additional 2×4 boards to 15 1/2″ in length.
Attach one board on each side where the front post meets the table frame. Then attach another board at the outer edge of each table frame. This means each side will have two short support pieces installed.
Next, cut one 2×4 board to 144″ in length. Install this board across the entire front of the bar, connecting the left table frame to the right table frame. Secure it firmly so the front structure is fully tied together and stable.

Step 22 – Complete the Back Table Frame
Finish the back section of the table frame by cutting one 2×4 board to 107″ in length. Then cut six additional 2×4 pieces to 15 1/2″ in length.
Attach these boards to the back table frame as shown in the reference image. Make sure each piece is positioned correctly before fastening.
You may need to drill extra pocket holes in different areas of the frame. Add additional screws where needed to improve strength and reduce movement. The goal is to make the back frame as solid and rigid as possible.
Step 23 – Attach the Front Table Top Boards
With the frame fully built, you can now install the tabletop.
Cut two pieces of 1×10 lumber to 144″ in length.
Take the first board and place it along the front edge of the table frame. Align it carefully and secure it using wood screws. Make sure it runs straight across the full length of the bar.
For the second 144″ board, you will need to cut notches for the 4×6 posts. Place the board behind the posts and line it up with the front board. Use a pencil to mark the exact locations where the posts intersect the board.
Use a skill saw to carefully cut out the marked notches. After cutting, slide the board into place between the posts. Align it with the front board and secure it to the frame using wood screws.

Step 24 – Finish Attaching the Remaining Table Top Boards
Repeat the same process to install the remaining tabletop boards on the sides of the outdoor bar.
Cut and fit each 1×10 board according to the measurements shown in the cut list and reference image. Mark and cut notches where needed around posts, just like in Step 23.
Once each board is properly fitted, secure it tightly with wood screws. Continue until all remaining sections of the tabletop are fully installed and the surface is complete.

Step 25 – Cut Lumber for the Roof Trusses
It is now time to build the roof. The roof has a 30-degree slope, so most cuts will use 30-degree and 60-degree angles.
Start with 2×4 lumber. Cut ten pieces to 88″ in length. Each piece must have a 60-degree miter cut on one end. After cutting, each board also needs a small notch. This notch helps lock the trusses in place and prevents them from sliding apart. Follow the measurements in the reference image for the exact notch size and placement.
Next, take 2×6 lumber. Cut five pieces to 26″ in length. Each of these pieces must have a 30-degree miter cut on both ends. After cutting, drill pocket holes as shown in the reference image. These will be used to assemble the trusses.

Step 26 – Assemble the Roof Trusses
Assemble each roof truss using the cut 2×4 and 2×6 pieces.
Align the parts carefully so all angles match. Use 2 1/2″ pocket hole screws to fasten the joints together. Make sure each truss is tight, square, and consistent in shape.
When finished, you should have a total of five complete roof trusses.

Step 27 – Install the Roof Trusses
Start by placing the first truss at the front edge of the 4×4 horizontal support boards. The 4×4 beam must fit into the notch you cut in Step 25. Once it is seated correctly, secure it by driving pocket hole screws above the notch.
Continue installing the remaining trusses, spacing each one 24″ apart. Maintain consistent spacing across the roof. The last truss will have a slightly smaller gap than 24″. Leave a 3/4″ space at the back to allow room for the plywood.
After all trusses are installed, measure the distance between them. Cut five sets of support boards, one set for each truss bay, based on these measurements.
Drill pocket holes on both ends of each support board. Install them between the trusses as shown in the reference image. These boards lock the trusses in place and prevent side-to-side movement or swaying.

Step 28 – Install Decor Truss Supports
Before installing the plywood roof, add decorative truss supports for extra structure and appearance.
Take 2×4 lumber and cut two pieces to 27 5/8″ in length. Then cut four additional boards to 29 5/8″ in length. Each of these six boards must have a 60-degree miter cut on one end.
After cutting, drill two pocket holes on each end of all boards.
Now install these two support sets over the 4×4 roof beam. Position them as shown in the reference image. Make sure all pocket holes are facing toward the back of the bar before fastening. Secure them firmly so they are stable and aligned.

Step 29 – Attach Plywood to the Roof Trusses
Now install the plywood roof decking over the trusses.
Start with a full 4′×8′ sheet of plywood. Place it on the lower section of the roof trusses and align it properly. Once positioned, secure it with wood screws.
Next, measure and cut additional plywood pieces to fit the remaining roof sections. Install each piece and fasten them securely to the trusses using wood screws. Make sure all seams are tight and the plywood is firmly attached.
After the top surface is complete, move to the back side of the roof trusses. Cut plywood pieces based on the measurements shown in the reference image. Fit these panels into the 3/4″ gap created in Step 27. Carefully slide them into place and secure them with wood screws to complete the roof enclosure.

Step 30 – Install Fascia Board and Roof Shingles
Start by installing the fascia boards. Take 1×8 lumber and cut two pieces to 88″ in length. Each board must have a 30-degree miter cut on one end, matching the angle of the roof slope.
Attach these fascia boards to the front truss. Make sure they are aligned evenly and fully secured so they cover the exposed roof edge cleanly.
Next, install roofing paper over the plywood. Begin at the bottom edge of the roof and work your way upward. Overlap each layer as you go to ensure proper water protection.
After the roofing paper is installed, attach roof shingles on top. Start from the bottom row and continue upward, following standard shingle overlap patterns. Secure each shingle firmly so the roof is fully covered and sealed.
Once the roof is complete, you can paint the outdoor bar in any color you prefer.
At this stage, you can also customize the bar further. Possible upgrades include adding a bar entrance door, installing shelves on the back wall for storage, adding supports for a TV, or installing hanging lights or plants.
Your DIY outdoor bar is now complete.


Reviews
There are no reviews yet.