
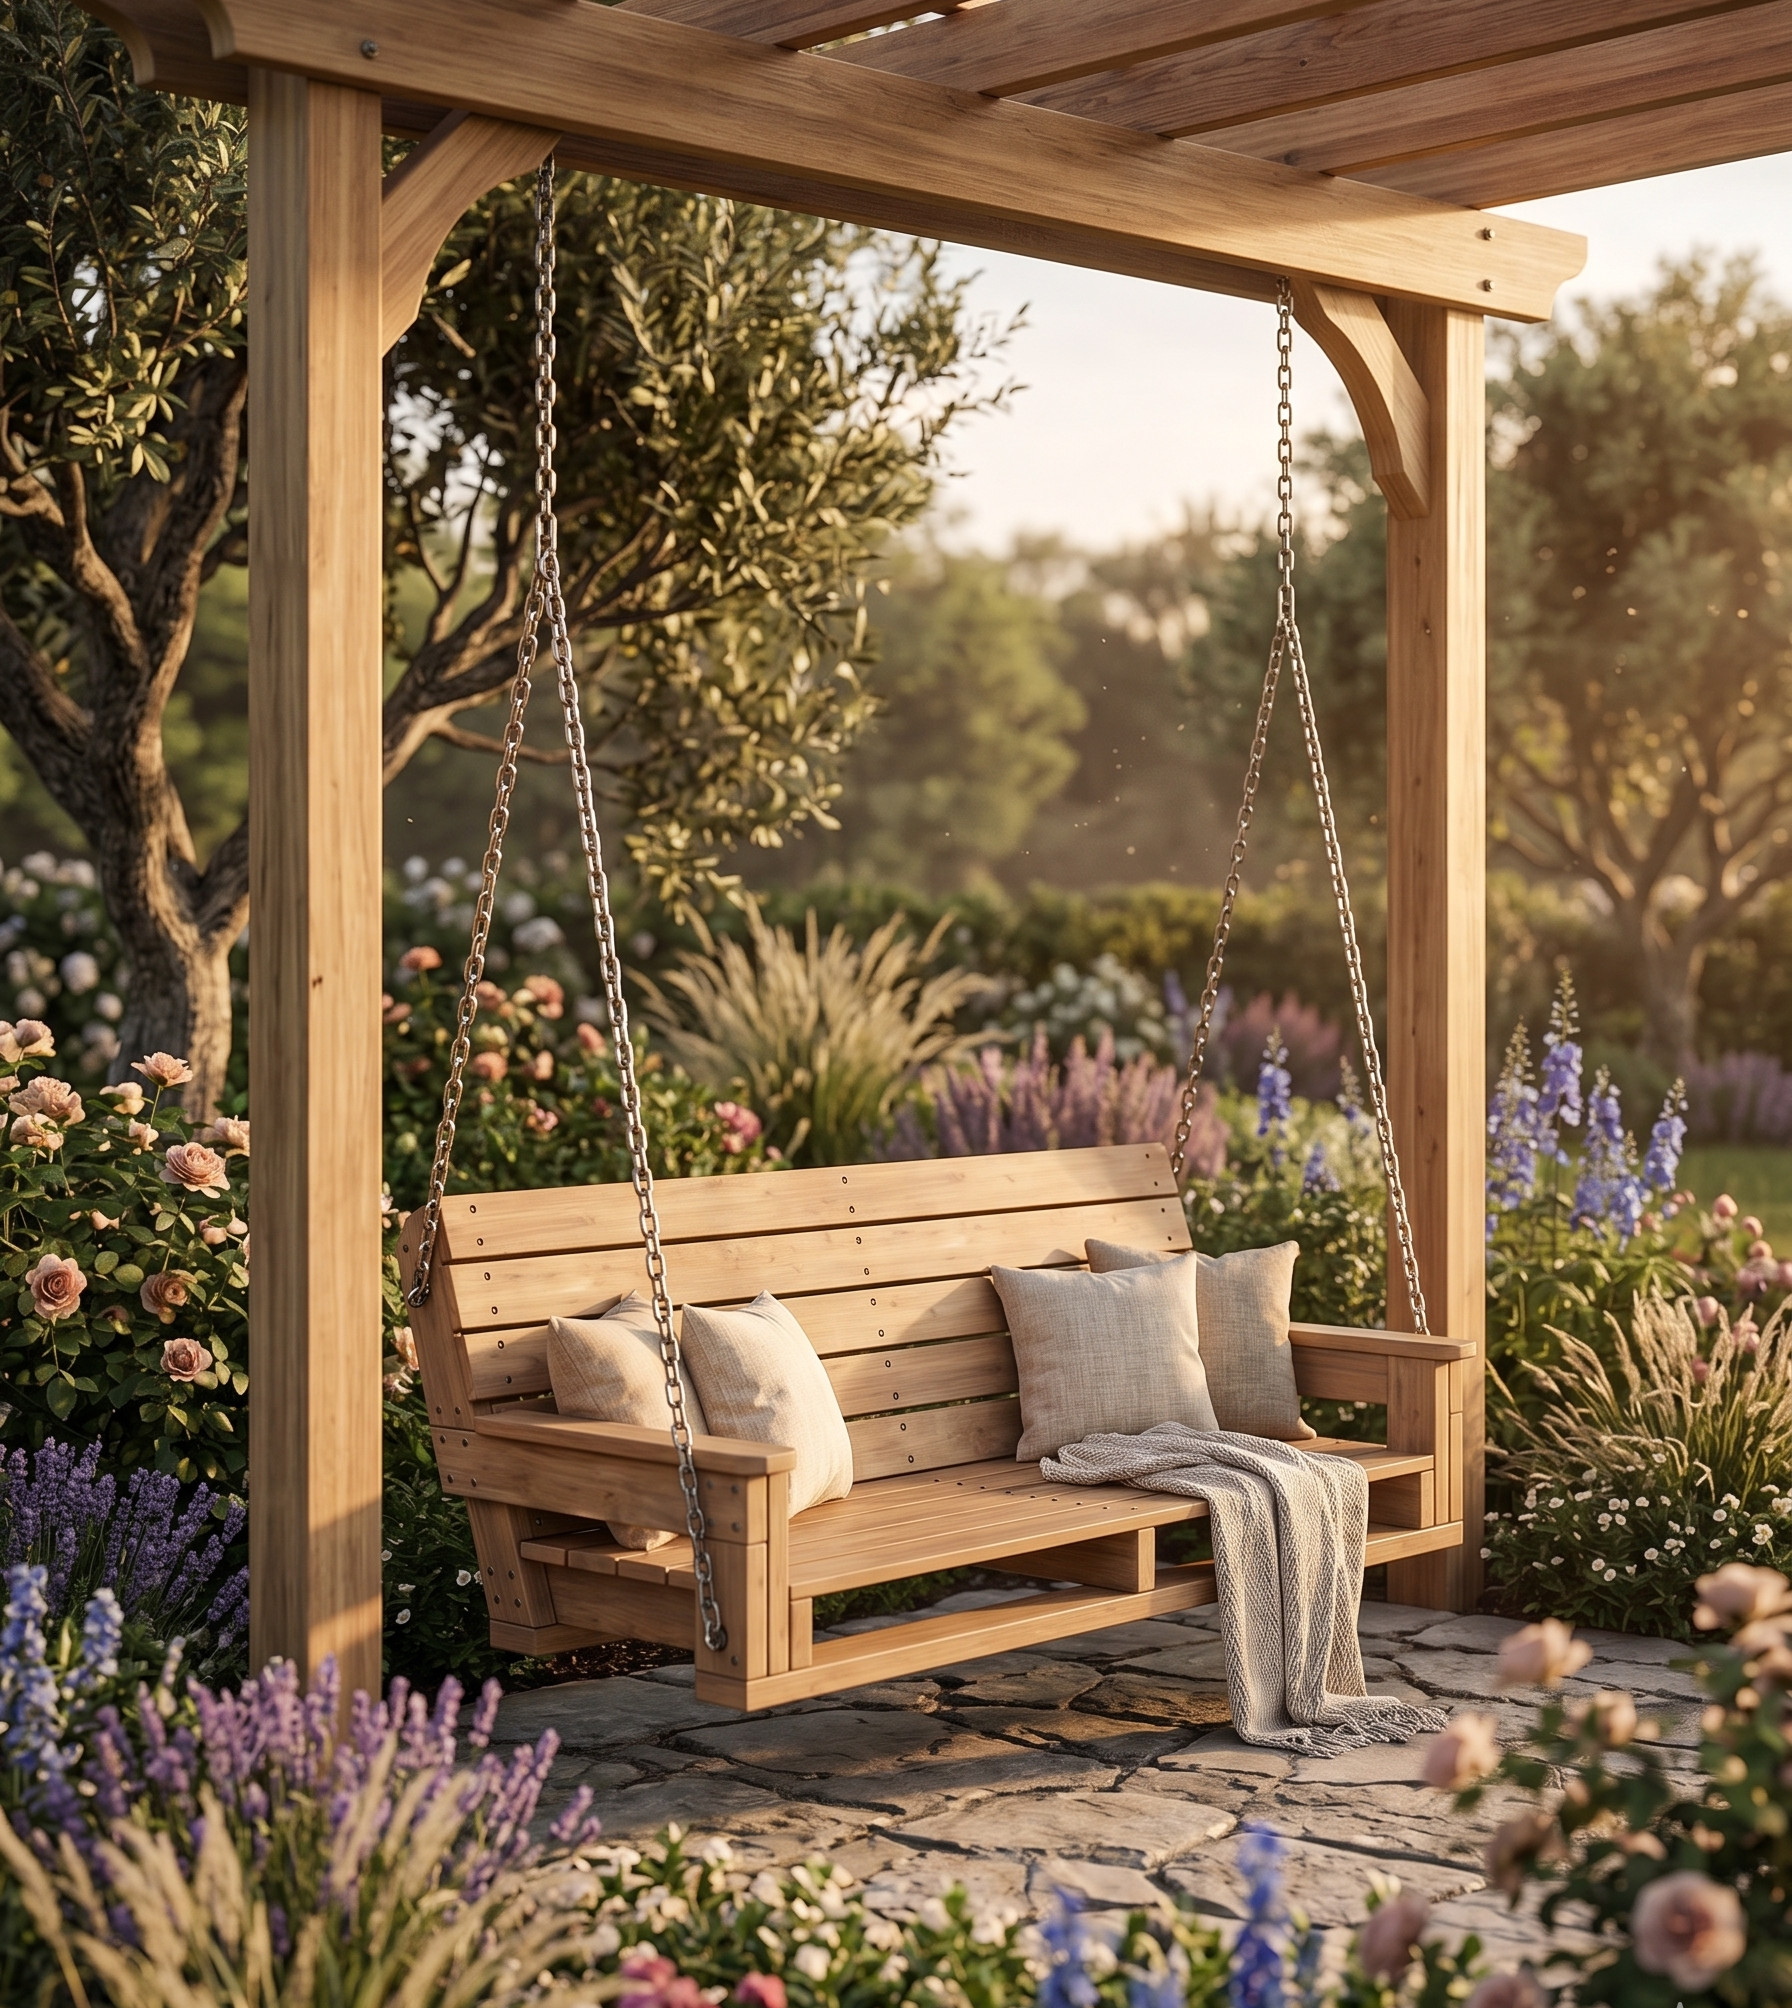
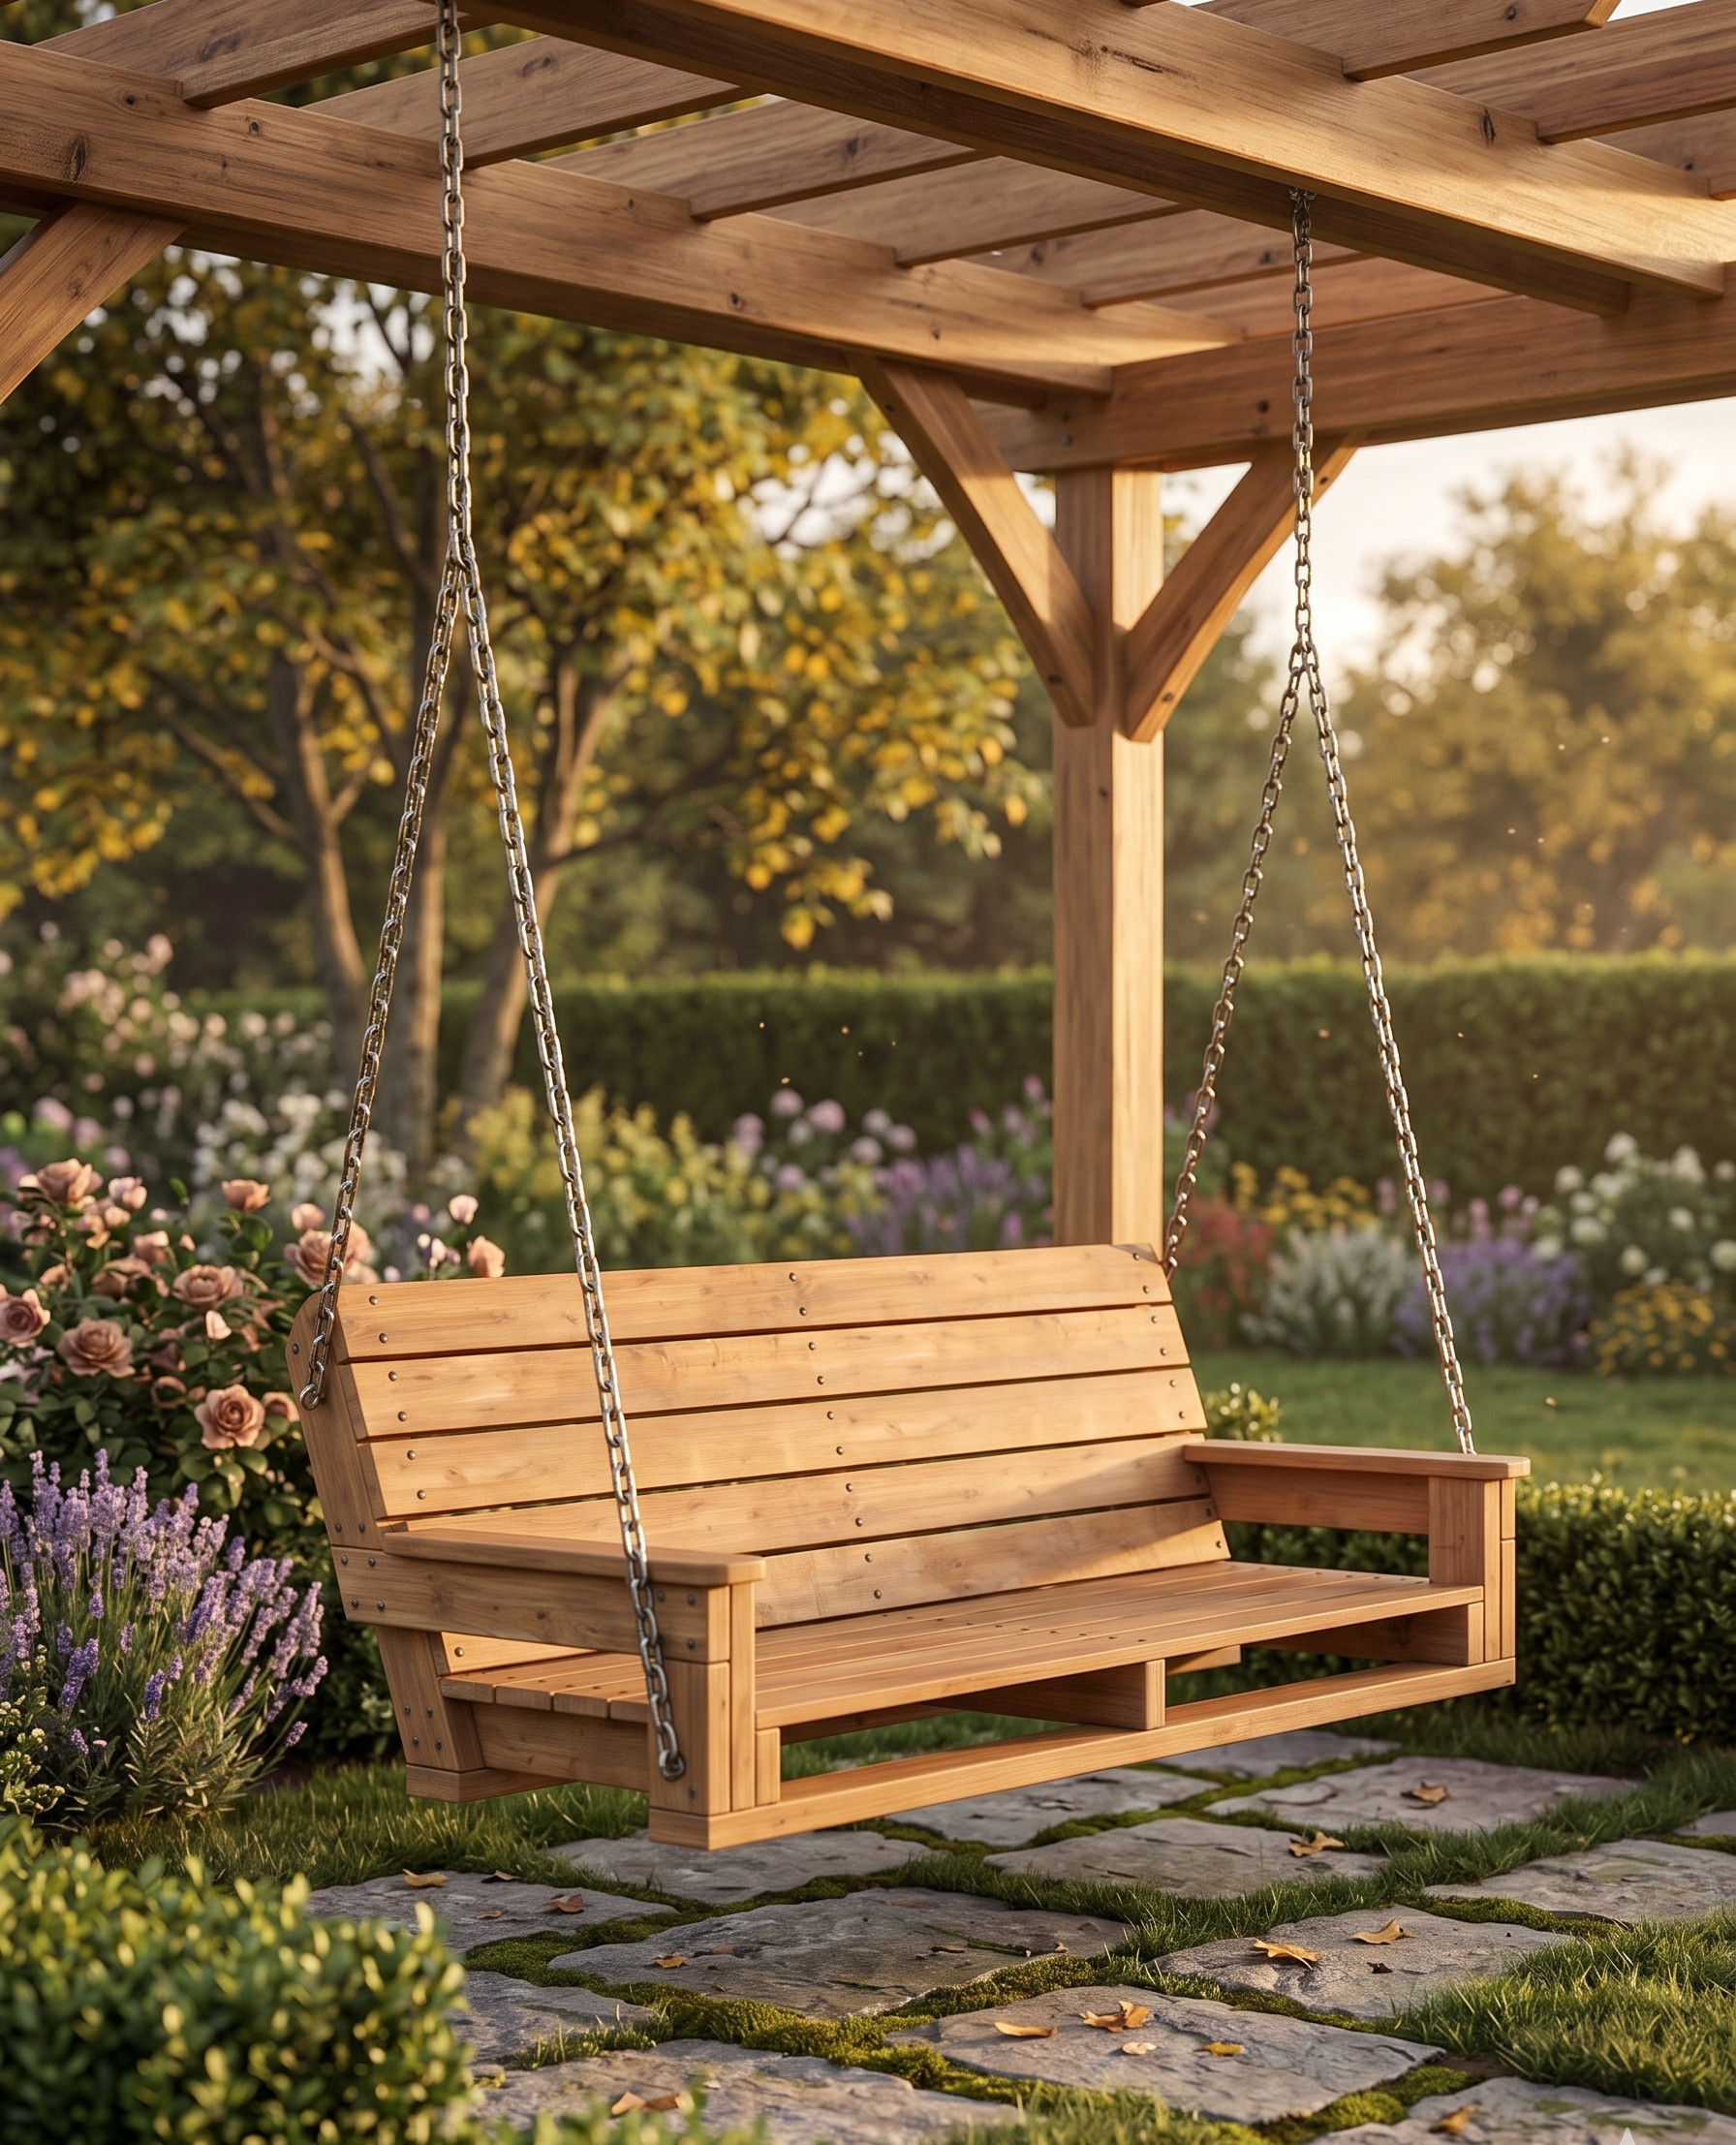
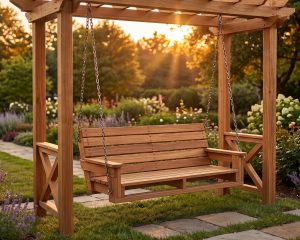
If you’re looking for a relaxing and stylish outdoor project, building a DIY swing bench for your pergola is one of the best woodworking projects you can take on. A wooden hanging bench creates the perfect place to sit, relax, read a book, or enjoy time with family in your backyard.
This step-by-step guide will show you exactly how to build a strong, comfortable, and beautiful DIY swing bench using simple lumber and basic woodworking tools. Whether you’re adding this bench to a pergola, covered patio, porch, or garden structure, this project is beginner-friendly and gives your outdoor space a high-end custom look without the expensive price tag.
This swing bench is designed to be sturdy, comfortable, and attractive while still being simple enough for most DIY woodworkers to build in a weekend.
What You’ll Build
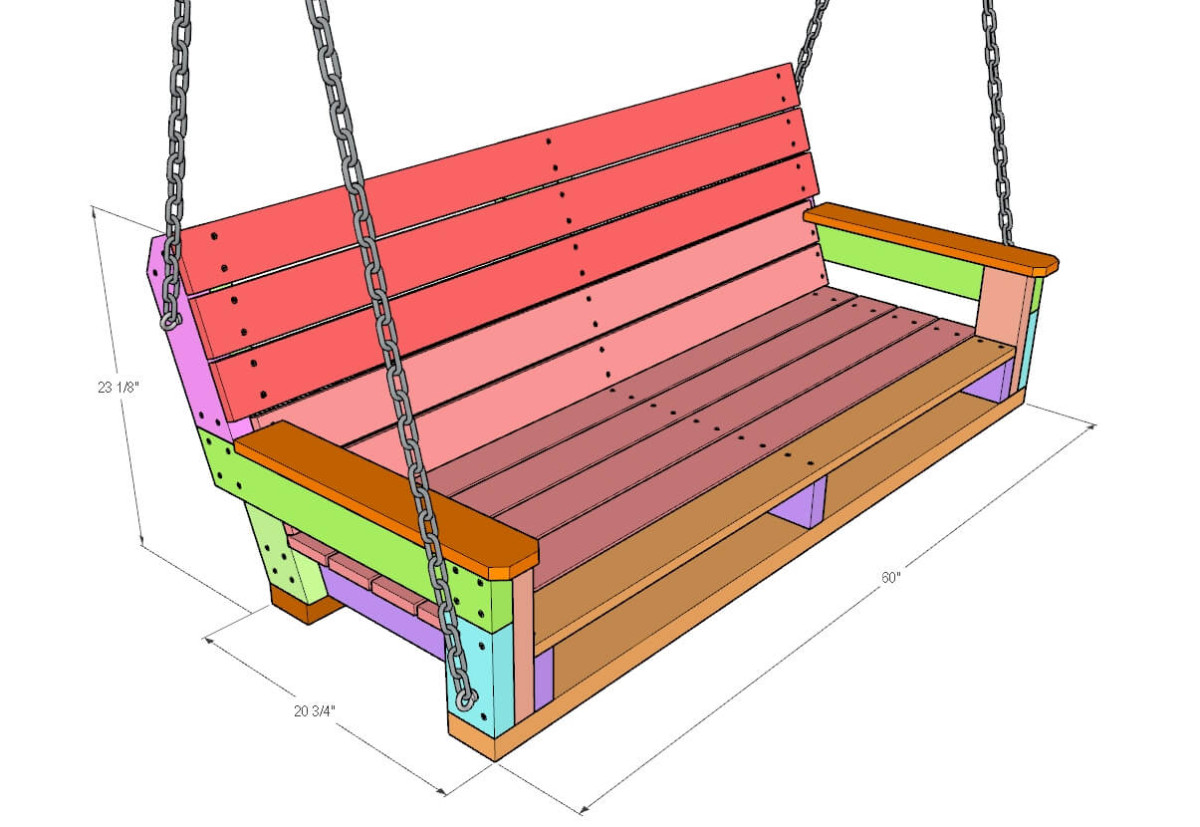
You’ll be building a 60-inch long wooden swing bench designed to hang from a pergola using heavy-duty chains and screw eyes. The bench includes:
- Strong base frame
- Comfortable angled backrest
- Armrests on both sides
- Slatted seat and back support
- Hanging hardware for safe suspension
This design creates a classic porch swing look that works beautifully in almost any backyard.

Why This Project Is Worth Building
A DIY pergola swing bench offers several great benefits:
- Adds beauty and value to your backyard
- Creates a relaxing outdoor seating area
- Costs far less than buying a pre-made swing
- Customizable to fit your space
- Stronger and better quality than many store-bought options
Now let’s start building.
Time to Complete
6-10 hours
Total Cost
$160
Skill Level
Beginner to Intermediate
Download Printable Plans in PDF


DIY Swing Bench for Pergola Plans PDF
$14.97
Build a strong and stylish DIY swing bench for pergola with this step-by-step woodworking PDF plan. Includes cut list, materials, tools, and easy instructions. Perfect for beginners and intermediate woodworkers.
Description
Build a beautiful and sturdy DIY swing bench for pergola with this detailed woodworking plan PDF. This digital build guide is designed for DIY woodworkers who want to create a professional-quality hanging swing bench without paying expensive retail prices.
This plan shows you exactly how to build a 60-inch wooden swing bench that fits perfectly under a pergola, porch, or outdoor patio. It is ideal for beginners and intermediate woodworkers who want a clear, step-by-step system they can follow without confusion.
If you want a relaxing outdoor seating area that looks custom-built and lasts for years, this plan gives you everything you need.
This project solves a common problem. Most store-bought swing benches are either overpriced, weak, or not the right size. With this plan, you build a strong, durable, and fully customizable swing bench using standard lumber and basic tools.
What’s Included in This DIY Woodworking Plan
- Step-by-step building instructions (easy to follow)
- Full cut list with exact measurements
- Complete material list
- Tools required list
- Estimated build time
- Estimated total project cost
- Assembly guidance with clear structure
- Printable PDF format for workshop use
- Beginner-friendly layout with clear progression
Step-by-Step Build Overview
This DIY swing bench for pergola plan guides you through the entire build process:
Step 1: Cut front and back base rails for the main frame
Step 2: Cut angled seat rails for comfort and structure
Step 3: Build back support boards for the angled backrest
Step 4: Assemble seat and back support structure
Step 5: Attach base rails to complete the main frame
Step 6: Build armrest components with accurate angles
Step 7: Assemble and mirror armrest supports
Step 8: Attach armrests and install back hanging supports
Step 9: Install filler board for a clean backrest finish
Step 10: Install seat and back slats with proper spacing
Step 11: Add top armrest boards for comfort and style
Step 12: Sand and apply protective outdoor finish
Step 13: Install chains and hang the swing bench safely
Each step follows a logical order so you never feel lost during the build.
Why This Plan Is Different
This is not a basic sketch or rough idea. This is a complete woodworking plans PDF designed for real builders.
You get:
- Clear measurements for every cut
- A strong structural design built for safety
- A comfortable seating angle for long-term use
- A clean, modern pergola-style swing bench
- Beginner-friendly instructions with pro-level results
This plan removes guesswork. You simply follow each step and build with confidence.
Instant Digital Download
- Instant PDF download after purchase
- No physical product will be shipped
- Access on phone, tablet, or computer
- Print it for use in your workshop
Start building immediately after purchase.
Other Woodworking Projects
-
DIY Playhouse for Kids
$26.97 Add to cart -
DIY Swing Bench for Pergola Plans PDF
$14.97 Add to cart -
DIY Outdoor Bar PDF Plans
Price range: $26.97 through $34.97 Select options This product has multiple variants. The options may be chosen on the product page -
Queen Size Loft Bed with Desk PDF
$18.97 Add to cart
Tools for this project
Material List
- Available with the purchase of PDF plans.
Note: Lumber dimensions are listed as nominal size. See lumber sizes for actual dimensions vs nominal.
Disclosure: Some of the links on this page as well as links in “tools for this project” and “material list” sections are affiliate links.
Dimensions

Step 1 – Cut the Front and Back Base Rail Boards for the DIY Swing Bench
Start by cutting the two longest boards that form the main base of the swing bench. These boards will support the entire seat frame, so accurate measurements are important.
Use 2×4 lumber for this step.
Cut one front base rail to 60 inches long.
Then cut one back base rail to 57 inches long.
The front rail is longer because it extends past the side seat supports. This extra length will later provide space for attaching the armrest legs.
The back rail is slightly shorter because it sits flush with the back support structure.
This tutorial is designed for a 60-inch-long swing bench, which is a comfortable size for most pergolas and outdoor spaces. If you want your bench to be longer or shorter, you can adjust these measurements to fit your needs.
For example, if you want a wider bench for extra seating, simply increase the length of both base rails. Just make sure the front rail remains longer than the back rail so the armrest supports will fit correctly later in the build.
Before cutting, use a tape measure and pencil to mark each board clearly. Double-check your measurements to avoid mistakes and wasted material. Use a miter saw or circular saw to make clean, straight cuts.

Step 2 – Cut the Seat Rail Boards
Cut the seat rail boards that will connect the front and back base rails of the swing bench. These boards also help create the angled backrest, making the bench more comfortable to sit in.
Use 2×4 lumber for this step.
Cut three seat rail boards to 22 inches in length.
On the back end of each board, make a 20-degree miter cut. This angled cut is important because it creates the proper slope for the backrest. It allows the back of the bench to lean slightly backward instead of sitting straight up.
Make sure all three boards are cut to the exact same size and angle. This will help keep the bench frame level and ensure all parts fit together correctly during assembly.
Use a miter saw for clean and accurate cuts. Measure each board carefully, mark the cut lines with a pencil, and double-check the angle before cutting.
These seat rails provide support for both the seat and the backrest, so accuracy is important for strength and comfort.
If you plan to build a longer bench, you may need to add extra seat rail boards for better stability and durability. Additional support helps prevent sagging and makes the bench stronger when holding more weight.
Keep in mind that adding more seat rails will also make the swing bench heavier, so be sure your pergola or support structure can safely handle the extra load.

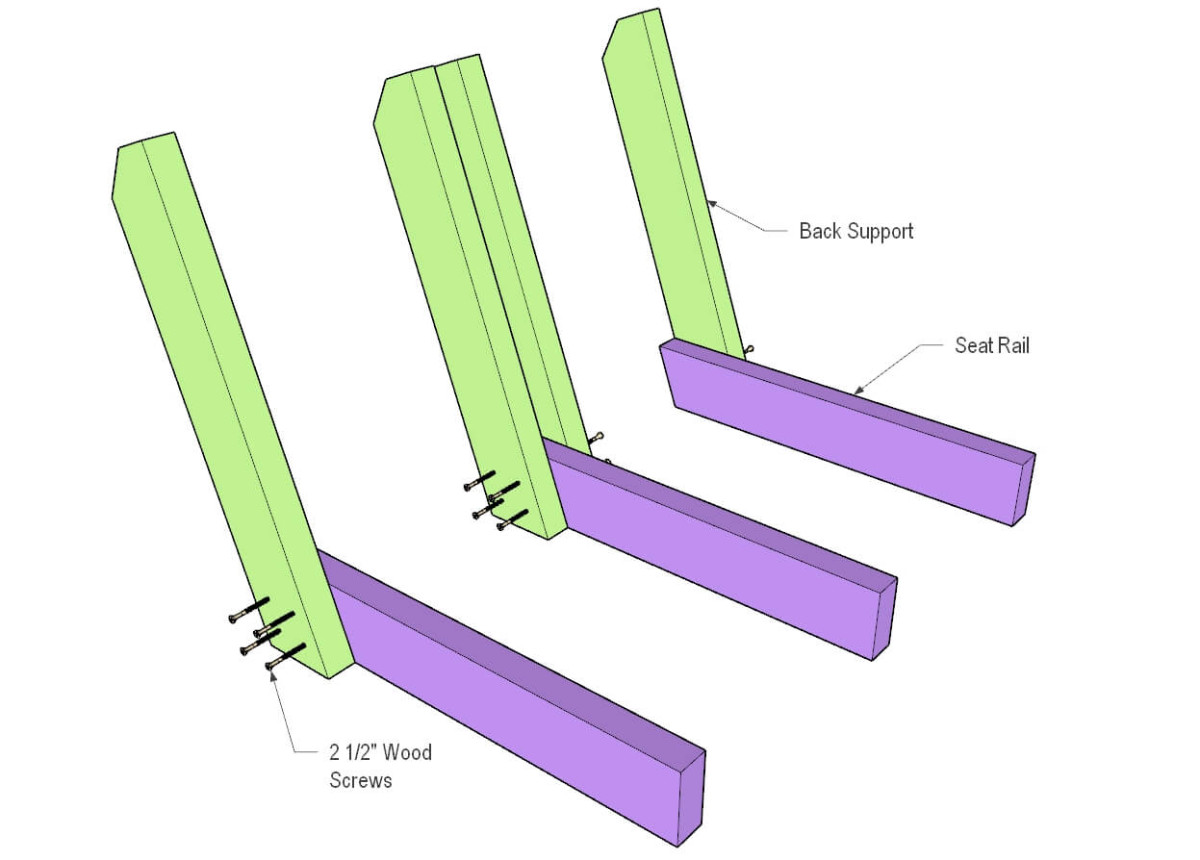
Step 3 – Make the Back Support Boards
Next, cut the back support boards that will form the angled backrest of the swing bench. These boards help support the back slats and create a comfortable leaning position when sitting.
Use 2×4 lumber for this step.
Cut four back support boards to 23 inches in length.
Since the backrest is designed to lean backward slightly, each board needs a 20-degree miter cut on the bottom end. This angled cut allows the back supports to sit correctly against the seat frame and creates the proper backrest angle.
Make sure all four boards are cut to the same length and angle so the back of the bench stays even and balanced.
For the best results, use a miter saw with an adjustable guide or laser guide. This helps make clean, accurate cuts and keeps all pieces consistent.
After cutting the bottom angle, trim one top corner of each board at a 45-degree angle. This small cut improves the appearance of the bench and removes sharp corners that could be uncomfortable or unsafe.
These back support boards will be highly visible in the finished project, so take your time and make each cut clean and precise. Properly cut supports will make the entire swing bench stronger, safer, and better looking.

Step 4 – Attach the Back Supports to the Seat Rails
Now begin assembling the seat rails and back support boards that were cut in the previous steps. This section creates the main support structure for the seat and backrest of the swing bench.
Start by taking one seat rail and attaching it to one back support board using 2 1/2-inch wood screws.
Position the bottom of the seat rail against the angled bottom end of the back support so the pieces sit flush together. Make sure the 20-degree angle is facing the correct direction to create the slanted backrest.
If your 2×4 lumber is very dry, pre-drill pilot holes before driving in the screws. This helps prevent the wood from splitting and makes the assembly stronger and cleaner.
The center bench support should have double back supports for extra strength. This middle section carries the most weight, so using two back support boards helps improve durability and support.
The left and right bench supports should each have only one back support board.
Before securing everything permanently, place all the assembled support sections next to each other or stack them carefully to compare the angles. This helps make sure all pieces line up correctly and that the backrest angle stays consistent across the entire bench.
Once you confirm that everything is aligned properly, drive the screws in fully and complete the assembly. Accurate placement here is important because these support sections will hold the seat frame and determine how comfortable the finished swing bench will be.

Step 5 – Attach the Base Rails to the Bench Support
Now that the bench support assemblies are complete, you can attach them to the front and back base rails. This step forms the main frame of the swing bench.
Start with the back base rail.
Position the middle bench support exactly in the center of the back rail. Make sure it is aligned evenly so the weight of the bench is distributed properly.
Once centered, secure it from underneath using 2 1/2-inch wood screws.
Next, attach the left and right bench supports in the same way. Space them evenly and ensure they match the layout shown in the reference image.
Check that the back base rail sits flush with the rear edges of all bench support pieces. This creates a clean, straight back edge and ensures proper alignment for the backrest slats later.
After the back rail is installed, move on to the front base rail.
Attach the front rail using wood screws driven from underneath the frame.
Make sure the front rail is positioned correctly. It should extend 3 inches past both ends of the seat rails. This extra space is intentional and will later be used to attach the armrest legs.
Before tightening all screws, double-check that the frame is square and all supports are aligned correctly.
Once everything is in position, drive the screws in fully and securely. The frame will carry significant weight, so all fasteners should be tight and well seated in the wood.


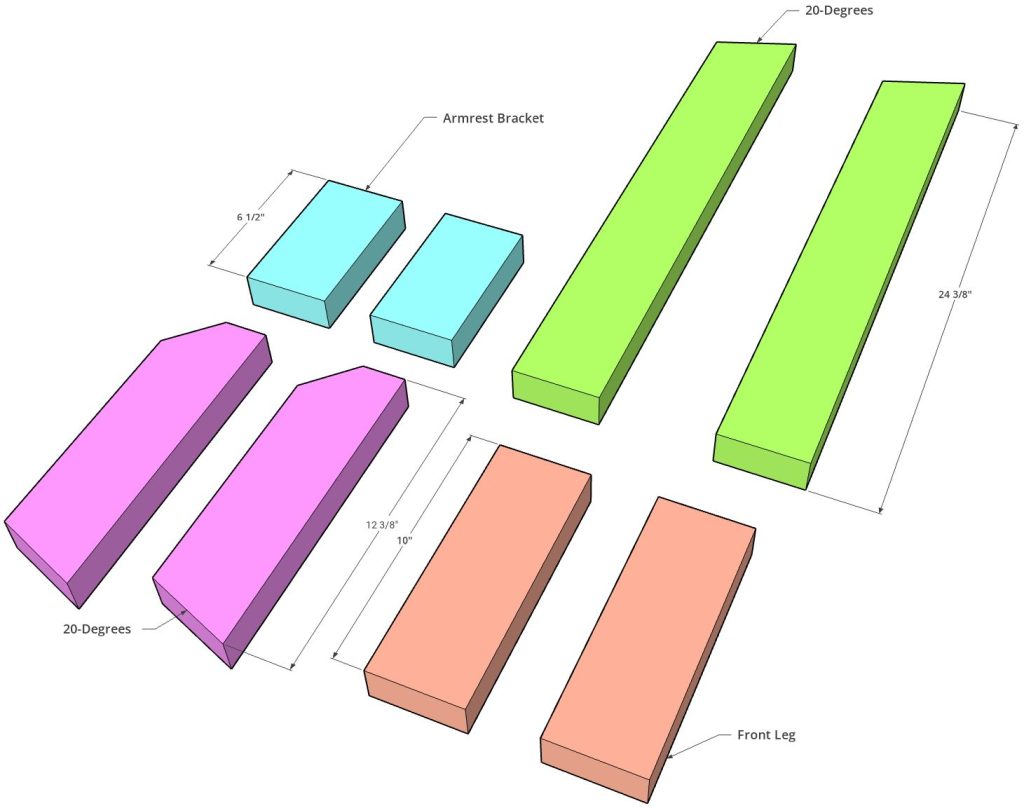
Step 6 – Cut Armrest Boards for the DIY Swing Bench
Now cut all the boards needed to build the armrests. These parts will create the sides of the swing bench and provide both comfort and structure.
Use 2×4 lumber for all cuts in this step.
First, cut two pieces to 10 inches long. These will be the front armrest legs.
Next, cut two more pieces to 6 1/2 inches long. These will be used for the arm bracket connection.
The armrest design follows a similar layout to the bench support structure from Step 5, so the angles and connections will match well.
Now cut the angled support pieces:
Take two pieces of 2×4 lumber and cut them to 24 3/8 inches long. Add a 20-degree miter cut on the back end of each board.
Then cut two additional back support pieces to 12 3/8 inches long. On these boards, make a 20-degree miter cut on the bottom end.
After that, trim one top corner of each of the 12 3/8-inch pieces at a 45-degree angle. This helps the pieces fit together more cleanly and removes sharp edges.
Make sure all cuts are accurate and consistent. These pieces will be visible on the finished bench, so clean cuts are important for both strength and appearance.
Once all parts are cut, lay them out in order and check the fit before assembly. This step prepares the armrest structure so it can be assembled smoothly in the next stage.
Step 7 – Assemble the Armrest Support
Now assemble the armrest supports using the pieces you cut in the previous step. This will form both the left and right armrests of the swing bench.
Start by attaching the 10-inch piece and the 6 1/2-inch piece together. Align them exactly as shown in the reference picture. These two parts must fit tightly and squarely because they form the front structure of the armrest.
Make sure the alignment is precise. These assemblies will be mirror images of each other. One set will become the left armrest, and the other will become the right armrest. Any small difference in alignment will be noticeable on the finished bench.
Next, attach the 24 3/8-inch angled piece to the front armrest legs. Position it so it sits flush against both the 10-inch and 6 1/2-inch pieces.
Check that all edges are even and properly aligned before securing the joints. This is important for keeping both armrests symmetrical and level.
Once all three pieces are attached securely, repeat the same process for the second armrest assembly.
When finished, you should have two identical armrest supports that match in size, angle, and structure. These will later be attached to the main bench frame.

Step 8 – Connect Armrest Support to the DIY Swing Bench
Now attach the armrests to the main swing bench frame. This step locks the armrests into place and adds extra structural support for the hanging system.
Start by positioning each armrest on the side of the bench frame.
Attach the armrest to the bench using 2 1/2-inch wood screws. Make sure each screw is driven in fully so the connection is tight and secure. The armrests should feel solid with no movement once fastened.
Repeat this process for both the left and right sides.
After the armrests are installed, cut additional back support boards. These will be mounted on both sides of the swing bench, directly above the armrests.
Attach these back support boards securely to the frame. These pieces are very important because they will later hold the screw eyes that support the chains for the swing bench.
Make sure these back supports are aligned straight and firmly attached. They need to handle the full weight of the bench and anyone sitting on it once it is hung.
Once installed, these supports will serve as the main anchor points for the hanging hardware in a later step.

Step 9 – Cut and Install the Filler Board in the Back
The middle section of the backrest needs a filler board to improve the overall appearance of the bench. This board fills the open space between the back supports and creates a more finished and professional look.
Start by measuring the opening in the center back support area.
Measure from the bottom of the back support to the top. Take an accurate measurement so the filler board fits tightly without gaps.
Next, transfer those measurements to a 2×4 board.
Cut the filler board to match the exact length needed. Make sure to follow the same angles as the original back support pieces so the board fits correctly within the angled frame.
Double-check both sides before cutting. The angles must match the existing back supports for a clean fit.
Once the board is cut, position it in the center back support opening. It should sit snugly between the existing frame pieces.
Secure it in place using wood screws, making sure the board is flush with the surrounding structure.
The purpose of this filler board is mainly visual. It improves the look of the back of the bench by filling in the empty space, while still maintaining the strength and function of the overall frame.

Step 10 – Cut and Install the Bench Slats
Now install the seat and back slats that will form the sitting surface of the swing bench. These slats give the bench its final shape and comfort.
Use 1×4 lumber for this step.
First, cut three boards to 60 inches long. These will be used for the main sections of the bench.
Next, cut six boards to 57 inches long. These will fill in the remaining seat and back areas.
Finally, cut one front slat board to 53 inches long. This piece goes at the front edge of the seat.
Before installing, lay all slats in position to confirm fit and spacing.
Attach each slat to the seat and back frame using 1 1/2-inch wood screws. Follow the layout shown in the reference image to ensure correct placement.
When installing, keep a consistent 1/4-inch gap between each board. This spacing is important for both appearance and function. It allows for:
- Wood expansion and contraction
- Water drainage
- A more even, professional look
Use a spacer block or measuring guide to keep all gaps consistent while fastening.
Drive each screw in tightly so the slats are secure and do not loosen over time. Make sure every board is firmly attached to the frame to ensure the bench is strong, stable, and safe to use.

Step 11 – Attach the Armrest Boards
Now install the final pieces that complete the armrests of the swing bench. These boards provide a smooth resting surface for your arms and finish the overall look of the bench.
Use 1×4 lumber for this step.
Take one 1×4 board and cut it into two equal pieces. Each piece should be 21 inches long.
These will become the top armrest boards for both sides of the bench.
Before attaching them, improve the appearance by trimming the front corners of each board at a 45-degree angle. This removes sharp edges and gives the armrests a cleaner, more finished look.
Once both armrest boards are cut and trimmed, position them on top of the armrest frames.
Make sure they are centered and aligned evenly on both the left and right sides.
Secure each board using 1 1/2-inch wood screws. Drive the screws in firmly so the boards do not shift or loosen over time.
Double-check that both armrests match in length, angle, and placement. This step completes the armrest structure and gives the swing bench a smooth and comfortable finish.

Step 12 – Sand and Apply Polyurethane
Now finish the swing bench by sanding and applying a protective coating. This step improves the look of the wood and helps protect it from moisture and outdoor weather.
Start sanding the entire bench using a random orbital sander.
Begin with 80-grit sandpaper. Sand the surface in smooth, circular motions. Apply even pressure across all areas, especially on edges and corners. This removes rough spots and levels the surface.
Once the entire bench has been sanded with 80-grit, switch to 120-grit sandpaper. Repeat the same process to smooth out the wood further and remove scratches from the previous grit.
Finish sanding with 220-grit sandpaper. This creates a smooth surface that is ready for finishing.
After sanding is complete, clean the bench thoroughly. Remove all dust, sawdust, and debris. Also make sure there are no oils, wax, or residue left on the wood surface. A clean surface is important for proper adhesion of the finish.
Next, apply polyurethane.
Pour a small amount directly onto the wood or into a container. Use a foam brush to spread it evenly across the entire bench. Apply a thin, even coat over all surfaces, including the seat, backrest, and armrests.
Allow the first coat to dry completely before applying a second coat if needed. Follow the drying time instructions on the product you are using.
Once the final coat is applied, let the bench dry for at least 24 hours before using it. This ensures the finish is fully cured and durable for outdoor use.
Step 13 – Connect the Chain to the Swing Bench
Now it’s time to hang the swing bench. This step requires careful installation because it directly affects safety and comfort.
You will need four 2 1/2-inch screw eyes for this step.
Start by installing the screw eyes on the bench.
On each side of the bench, screw one eye bolt into the top of the back support. Then screw another eye bolt into the armrest bracket on the same side.
Make sure each screw eye is turned in tightly and fully seated. The eye should sit flush against the wood with no looseness.
Repeat this process for both sides of the bench until all four screw eyes are installed.
Next, attach the chain.
Use quick links to connect the chain to each screw eye. Secure each connection firmly so there is no movement or slipping.
When hanging the bench, adjust the chain length so the seat leans slightly backward. This angle improves comfort and helps keep the user from sliding forward while sitting.
Before final use, carefully check the strength of the structure you are hanging the bench from. The pergola or support beam must be strong enough to hold both the weight of the bench and the people sitting on it.
If you are unsure about the load capacity, consult a professional before use.
Once everything is secure, your DIY swing bench is complete.
You now have a strong, comfortable, and custom-built pergola swing bench ready to enjoy.

Final Result
Once installed, your DIY swing bench is ready to enjoy. It’s perfect for relaxing evenings, reading, or spending time outdoors with family and friends.
Conclusion
Building a DIY swing bench for your pergola is a rewarding project that combines comfort, function, and style. You save money, gain woodworking skills, and end up with a custom piece that fits your space perfectly.
This project is simple enough for beginners but detailed enough to produce professional results. With careful measurements, proper assembly, and a good finish, your swing bench will last for years.
Now it’s your turn—grab your tools and start building!

Reviews
There are no reviews yet.