
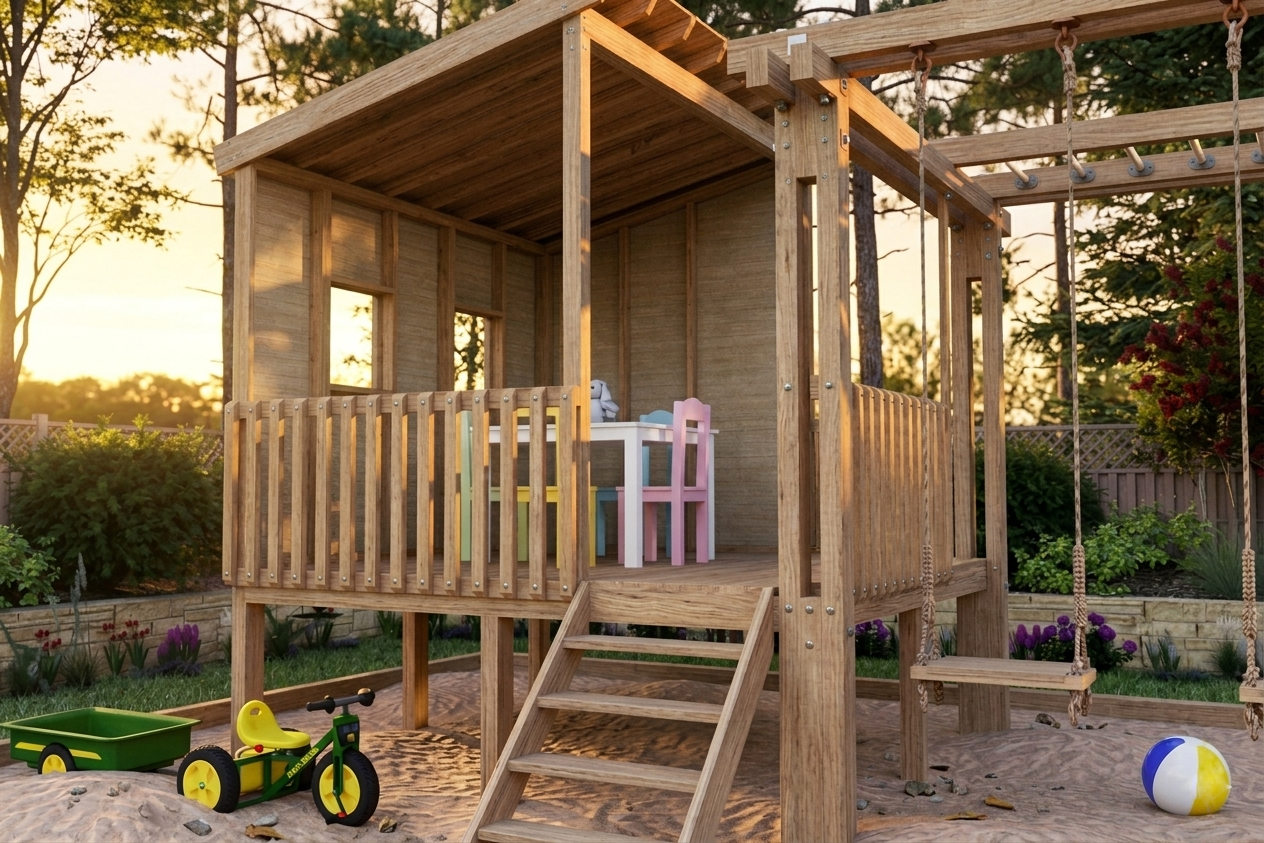
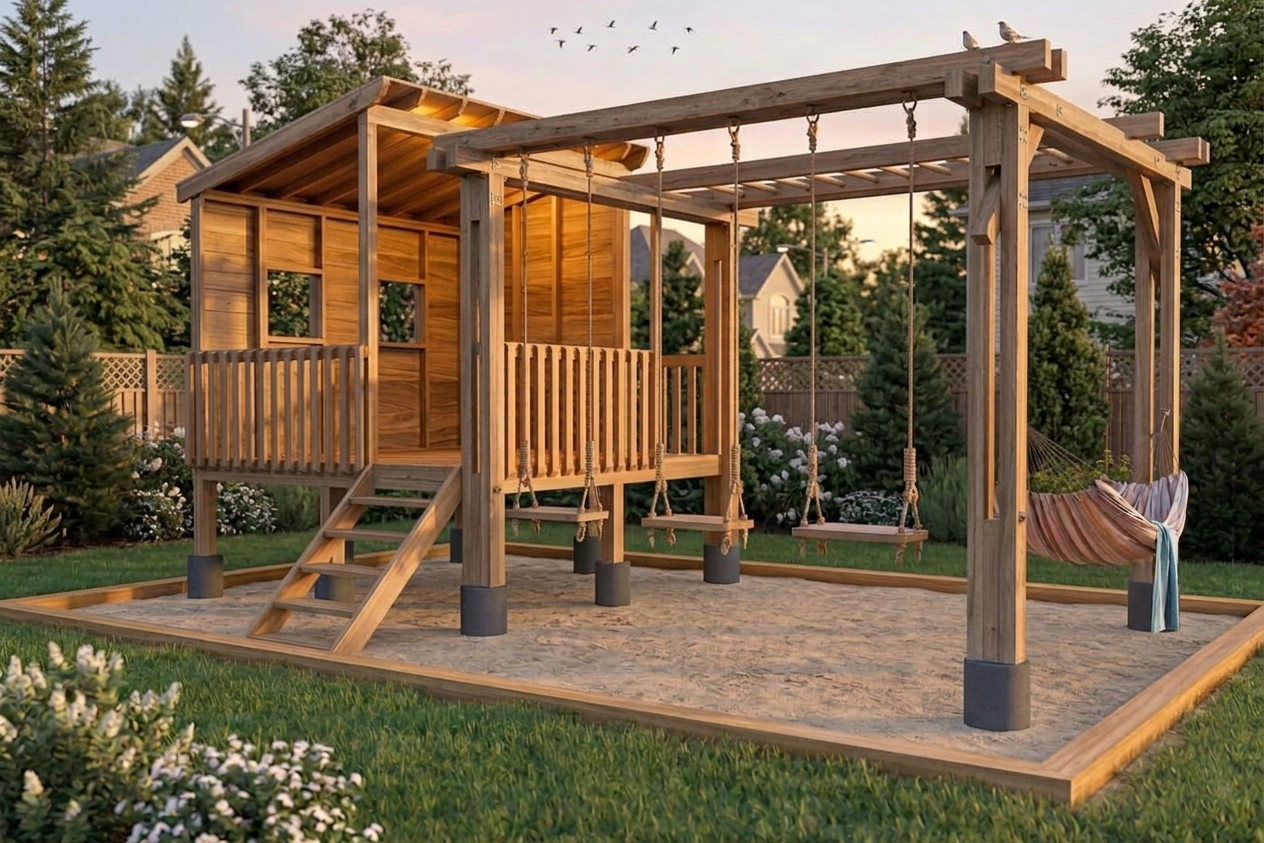
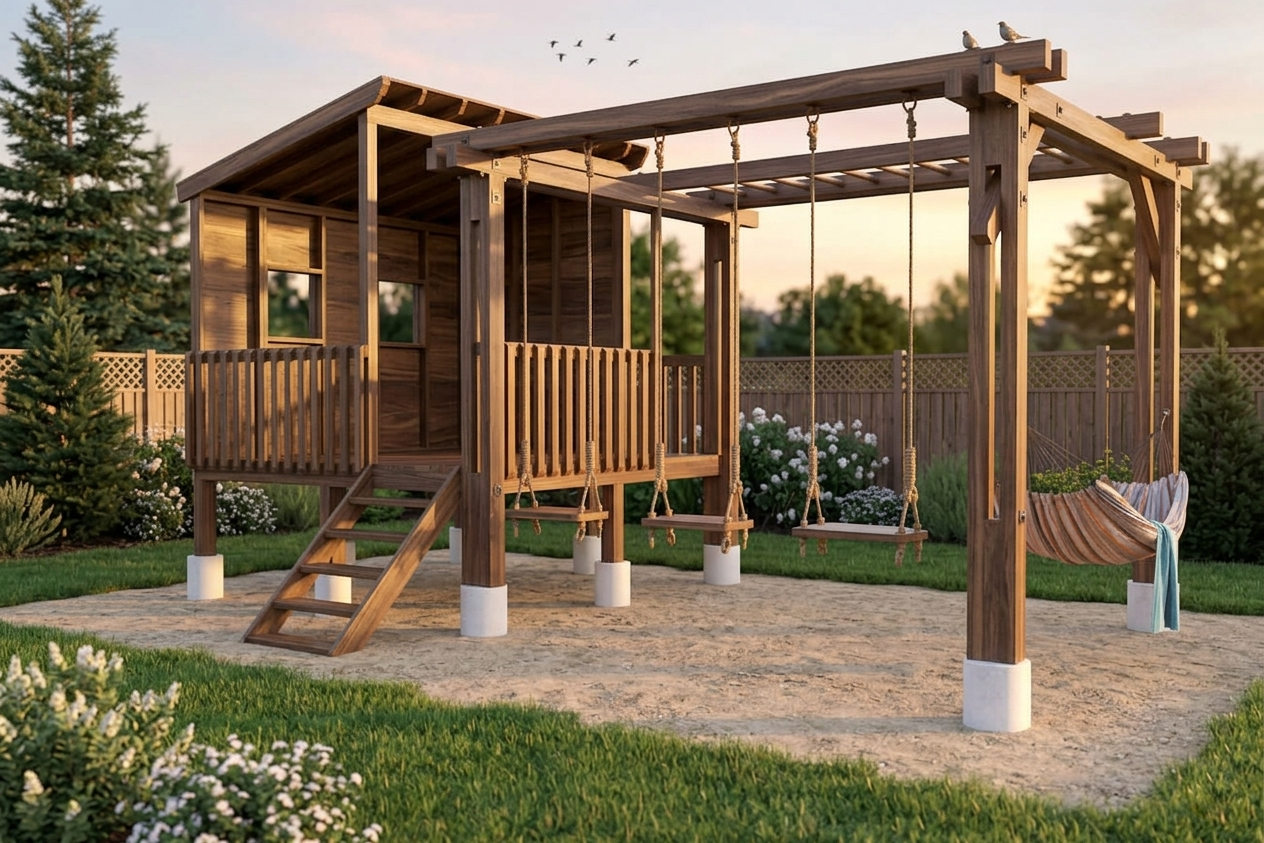
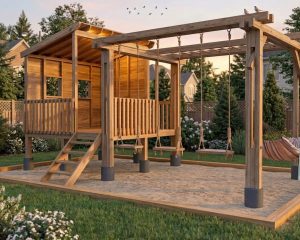
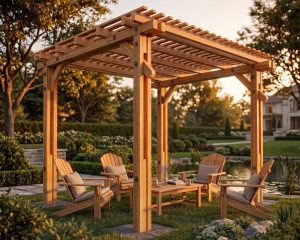
Building a DIY playhouse for kids is one of the best backyard projects you can take on. It creates a fun outdoor space where children can play, use their imagination, and enjoy fresh air every day. This project combines a raised playhouse, deck, fence panels, stairs, swings, and optional monkey bars—all in one structure.
If you’ve been searching for how to build a DIY playhouse for kids, backyard wooden playhouse plans, or a raised kids playhouse with swings, this guide will walk you through the full process in simple steps.
This playhouse is strong, durable, and designed to last for years. It also adds value and charm to your backyard while giving your kids their own special place to play.
Even if you are not an expert woodworker, this project is very manageable if you take it one step at a time.
What are the Benefits of Building Your Own DIY Playhouse?
Building a DIY playhouse for kids can have several benefits, including:
- Cost savings: Building a playhouse yourself can be more cost-effective than buying a pre-made playhouse. You can use recycled materials or buy cheaper materials to save money.
- Customization: Building a playhouse yourself gives you the flexibility to customize it to your liking and your child’s preferences. You can choose the design, size, and features of the playhouse that will best suit your child’s needs and interests.
- Creativity and bonding: Building a playhouse with your child can be a fun and creative activity that can promote bonding and communication between you and your child. It can also teach them valuable skills such as measuring, cutting, and assembling.
- Quality control: When you build a playhouse yourself, you have complete control over the quality of the materials and construction. You can ensure that the playhouse is built to your specifications and is safe for your child to play in.
- Sense of accomplishment: Completing a DIY project can give you a sense of accomplishment and pride. Seeing your child enjoy playing in something that you’ve built together can be a rewarding experience.
Overall, building a DIY playhouse for kids can be a fun, cost-effective, and rewarding project that can provide your child with a safe and enjoyable place to play.
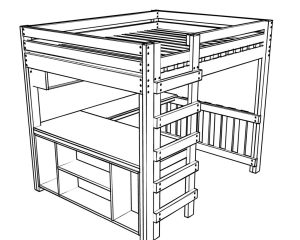
What You’ll Build
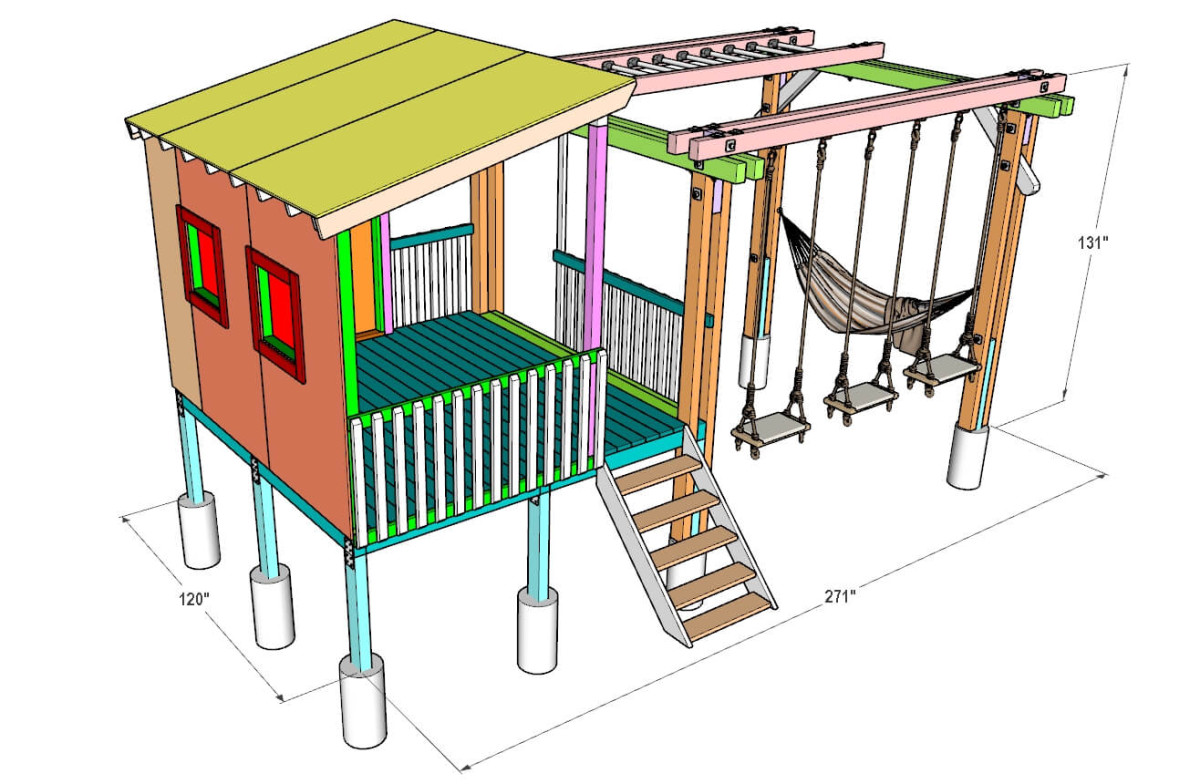
This project is a raised wooden DIY playhouse with:
- Elevated deck platform
- Framed walls and windows
- Sloped roof with shingles
- Fence panels for safety
- Wooden stairs
- Swing set attachment
- Optional monkey bars
It works like a mini backyard playground and playhouse combined into one structure.
Time to Complete
4 to 7 Day
Total Cost
$2200
Skill Level
Intermediate to Advanced
Download Printable Plans in PDF

DIY Playhouse for Kids
$26.97
DIY Kids Playhouse Plans PDF with step-by-step instructions to build a raised backyard playhouse with deck, stairs, fence, swings, and optional monkey bars. Instant digital download.
Description
Build a strong, safe, and fun backyard play space with these DIY Kids Playhouse Plans PDF. This detailed woodworking guide shows you exactly how to build a raised wooden playhouse with a deck, stairs, fence panels, swings, and optional monkey bars.
This project is designed for builders who want a real, long-lasting outdoor structure. It is not a simple weekend craft. Instead, it follows proper construction methods used in real framing and deck building. As a result, you get a sturdy playhouse that can handle years of use.
The plans walk you through every stage of the build. First, you prepare the ground and set precise pier locations. Then you build a strong post foundation using concrete and pressure-treated lumber. After that, you construct the full frame, install joists, and build a solid deck platform.
Next, you assemble the walls, roof structure, and siding. The guide also includes detailed instructions for stairs, fence panels, and finishing trim. Finally, you can add swings and optional monkey bars to turn the playhouse into a full backyard playground.
Each step includes clear measurements, cut sizes, and assembly guidance. The design uses common lumber sizes like 2×4, 2×6, 4×4, and 4×6, so materials are easy to find at any local hardware store.
This plan is perfect for DIY builders, woodworkers, and parents who want to create a custom outdoor play area. You do not need advanced skills, but basic knowledge of tools like a saw, drill, and level is recommended.
Because this is a digital PDF download, you can start your project immediately after purchase. No shipping required.
If you want a strong, safe, and visually impressive backyard playhouse that your kids will love, this plan gives you everything you need.
Other Woodworking Projects
Tools for this project
Material List
- Available with the purchase of PDF plans.
Note: Lumber dimensions are listed as nominal sizes. Please refer to standard lumber sizing charts for actual vs. nominal dimensions.
Disclosure: Some of the links on this page, including those in the “Tools for This Project” and “Material List” sections, are affiliate links.
Dimensions

Step 1 – Level the Ground and Mark the Pier Locations
Start by clearing the entire area where the playhouse will be built. Remove all bushes, grass, weeds, roots, rocks, and any other vegetation. Make sure the ground is clean and free of anything that could interfere with the foundation.
Next, level the ground as much as possible. Remove any high spots and fill in any low areas so the surface is flat and even. A level foundation is very important because uneven ground can cause the entire playhouse structure to become crooked or unstable later.
Using the dimensions provided in the plans, roughly mark the center point of each pier location on the ground. These marks will show where the support posts for the playhouse will be installed.
Choose one corner of the project as your main reference point, also called the home base. Pull all measurements from this single corner only. Do not measure from different corners or different points, because small errors can quickly add up and cause the entire layout to be out of square.
After the rough pier locations are marked, build batter boards around the outside of the project area. Batter boards are temporary wooden supports used to hold string lines in place. They help create a much more accurate foundation layout before digging begins.
Once the batter boards are installed, stretch string lines between them and adjust the strings to match the exact dimensions shown in the playhouse plans. Take your time during this step and double-check all measurements.
The string lines will create a perfect outline of the foundation. They also help ensure that the layout is square, straight, and level before you dig the pier holes. This step is extremely important because accurate string lines will make the rest of the project much easier.
For more details on how to properly set up batter boards and string lines, you can read this helpful guide from InspectAPedia: https://inspectapedia.com/decks/Batter-Board-Layout.php

Step 2 – Dig Holes for the Piers
Now dig the holes for the concrete piers that will support the playhouse foundation. If your ground is already flat and properly leveled, each hole should be 14 inches round and 24 inches deep.
Use the pier locations marked in Step 1 as your guide. Dig each hole carefully and keep the sides as straight as possible. Try to make the bottom of each hole flat so the concrete form tube sits evenly.
Next, take 12-inch round concrete form tubes and cut six pieces to 24 inches in length. These tubes will hold the concrete and help create strong, uniform piers.
If your yard has a slope, some holes may need to be deeper than 24 inches. In that case, some concrete form tubes may also need to be taller than others. The most important part is not that every tube is the same height, but that the top of all tubes ends at the same final elevation.
Place one concrete form tube into each hole. The top of each tube should sit about 2 inches above ground level. This helps protect the wood structure from ground moisture and keeps water from sitting around the base.
Check each tube carefully before moving forward. Make sure every form tube is straight, level, and properly positioned. Also, confirm that the top of all six tubes lines up evenly at the same height.
Taking extra time here will help create a strong, level foundation for the rest of the playhouse.

Step 3 – Insert Posts and Pour Concrete into the Form Tubes
Before mixing concrete, make sure all of your materials, tools, and measurements are ready. Concrete begins to harden quickly after mixing, so you will only have a limited amount of time to work. Once it starts to set, it becomes very difficult to adjust the posts or change the shape of the concrete.
Take 4×6 pressure-treated lumber and cut six posts to 48 inches in length. These posts will be the main vertical supports for the playhouse foundation.
Place one post inside each concrete form tube. Position the post so that the top extends 24 inches above the top of the concrete tube. This height is important because it creates the correct support level for the beams and upper structure.
On the top of each post, draw an X from corner to corner. This marks the exact center of the post and helps you line everything up correctly with the measurements shown in the plans.
Next, secure each post using temporary cross braces. Attach the braces firmly so the posts cannot shift while the concrete is being poured. If the posts move during this step, the entire foundation layout can become uneven.
Carefully check that the center of each post matches the dimensions provided in the plans. Also, make sure all posts are straight, plumb, and positioned correctly. Use a level to confirm that the top of every post is at the same elevation.
Once everything is aligned and all measurements are accurate, mix the concrete according to the manufacturer’s instructions. Pour the concrete into each form tube until it is completely filled around the post.
Allow the concrete to fully cure before removing the temporary cross braces. Do not rush this step. After the concrete has hardened, remove the braces and inspect the posts one final time before moving on to the next step.


Step 4 – Cut and Install the Legs
Next, take 4×6 lumber and cut eight leg pieces to exactly 10 feet in length. Even if you purchased boards that are labeled as 10 feet long, always measure each one before installing. Lumber is often slightly longer than the listed size, so you may need to trim the ends to get the exact length.
Having all eight legs cut to the same size is very important. If one leg is even slightly longer or shorter, it can affect the balance and stability of the entire playhouse structure.
Once the legs are cut, place two legs at the top of each pier post, with one leg on each side of the 4×6 center post.
Make sure the legs are positioned correctly according to the plans before drilling. Hold them firmly in place and check that both sides are even and properly aligned.
Next, drill a 1/2-inch hole all the way through both legs and the center post. The hole needs to be straight so the bolt can pass through easily.
Insert a 12-inch-long bolt through the drilled hole to secure the legs to the post. Install washers on both sides of the bolt before tightening the nut. The washers help distribute pressure and prevent the bolt from damaging the wood.
Tighten the nut securely, but do not overtighten to the point where the wood begins to crush.
Using bolts and nuts instead of screws is much stronger for this type of structural connection. Over time, outdoor wood expands and shrinks as the weather changes. Bolts can be tightened later if the wood loosens, while screws may allow movement. This helps prevent the playhouse from becoming loose or wobbly in the future.


Step 5 – Join the Top of the Legs
Start by cutting the connecting blocks. Take 4×6 lumber and cut four pieces to 23 inches in length. These pieces will lock the top of the leg pairs together and add strength to the frame.
Place one 23-inch block between each pair of legs. Position it so it sits 11 inches above the top of the leg, as shown in the plans. Make sure the height is consistent on all sections so the frame stays even and aligned.
Check that each block fits tightly between the legs before drilling. Proper fit is important so the structure stays stable and does not shift later.
Next, drill a hole through both legs and the 23-inch block, just like in the previous step. Make sure the hole goes straight through all three pieces so the bolt can pass through easily.
Insert the bolt through the hole and tighten the nut securely. Once tightened, the connection should feel solid and locked in place.
Repeat this process for all sections until the top of all legs are properly joined.

Step 6 – Cut and Attach the 12-Foot Horizontal Beams
Start by cutting the main horizontal beams. Take 4×6 lumber and cut four pieces to 144 inches (12 feet) in length. These beams will form the main horizontal support for the structure.
Once cut, lift each beam into position and place it on top of the legs. Make sure each beam sits evenly across the tops of the supports.
Carefully center each beam between the legs. Measure both sides to confirm that the beam is positioned correctly and not shifted to one side. Proper centering is important for balance and structural strength.
After positioning the beams, align them with the 23-inch connecting blocks installed in the previous step.
Drill through the beam and into the 23-inch block. Then insert a bolt through the hole and secure it with a nut.
Tighten the connection firmly so the beam is locked in place.
Repeat this process for all four 12-foot beams until all are securely installed and properly aligned.

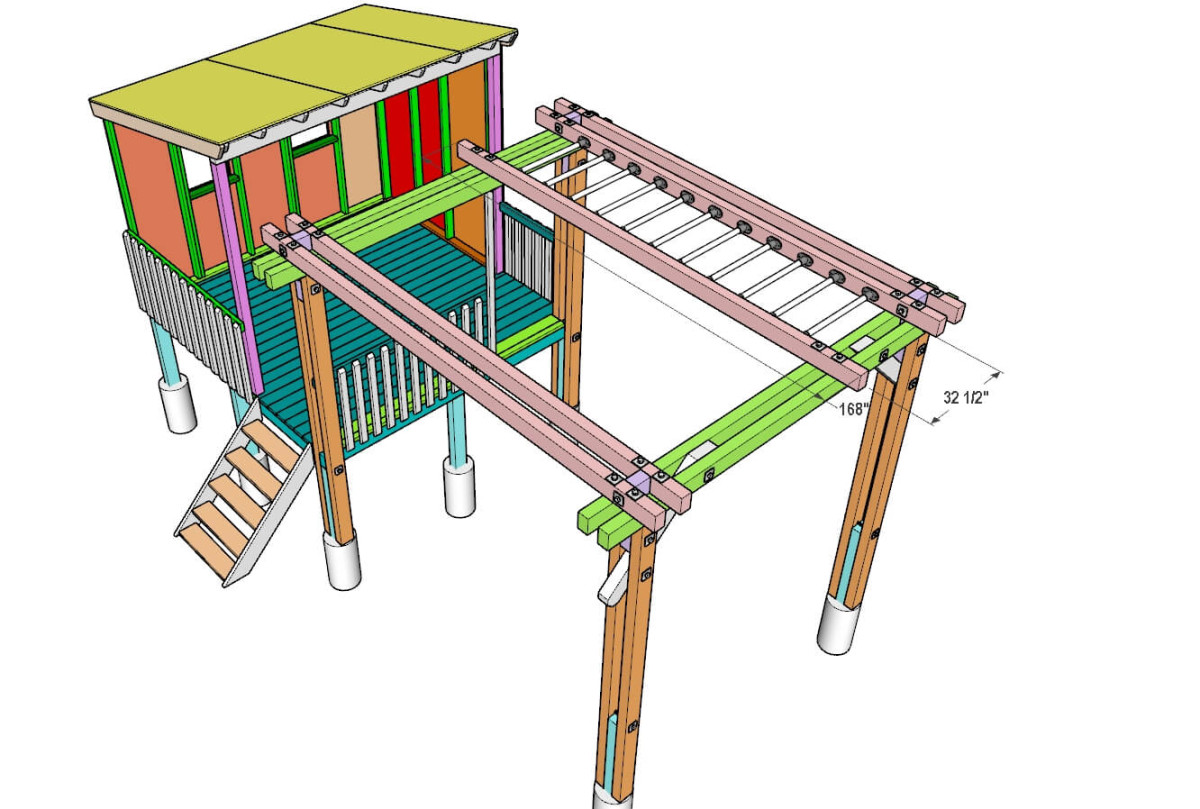
Step 7 – Cut and Attach 14-Foot Horizontal Beams
Start by cutting the next set of beams. Using 4×6 lumber, cut four pieces to 168 inches (14 feet) in length. These will sit on top of the beams installed in the previous step.
Carefully lift each 14-foot beam into place and set it directly on top of the lower 12-foot beams, as shown in the plans. Make sure each beam is properly aligned before securing it.
Center each beam between the legs. Measure both sides to confirm equal spacing. This step is important to keep the structure balanced and square.
Once the beams are positioned correctly, drill 1/2-inch holes from the top. Drill straight down through both the upper 14-foot beam and the lower 12-foot beam at the same time.
Insert bolts through the drilled holes. Add washers and tighten each connection with a nut.
Make sure each beam pair is tightly secured so the upper and lower beams act as one solid structure.
Repeat this process for all four beam locations until everything is fully fastened and aligned.

Step 8 – Install Diagonal Brace
Start by cutting the diagonal braces. Take 4×6 lumber and cut two pieces to 49 1/2 inches in length. Cut a 45-degree miter on one end of each piece. On the opposite end, chamfer the corners as shown in the plans.
Next, position the brace. Slide each diagonal brace between the lower beams and the legs. Fit it tightly into place so it sits securely within the frame.
Make sure the top of the brace is flush with the top of the lower beams. This alignment is important for proper support and strength.
Once the brace is positioned at a 45-degree angle, check the fit and alignment carefully. Adjust if needed so it sits tight and even on both ends.
After everything is aligned, drill the bolt holes through the brace and into the connecting members.
Insert bolts through the holes and secure them with washers and nuts. Tighten everything firmly so the brace locks the structure in place.
Repeat the same process for the second brace.


Step 9 – Cut and Install DIY Playhouse Deck Beams
Take the 10-foot-long 4×6 deck beams and position them on top of the posts, as shown in the plans. Carefully lift each beam into place and make sure it sits evenly across the posts.
Check the alignment before fastening anything. Each beam should be centered and properly supported by the posts underneath.
Once the beams are in the correct position, secure them to the posts using 8×4 metal strap plates or truss mending plates.
Attach the metal plates tightly so the beams are firmly locked to the posts. This connection helps prevent movement and adds strength to the deck frame.
Repeat this process for all deck beams until each one is securely installed and properly fastened to the posts.

Step 10 – Attach the Joist Boards to the Beams
Start by cutting the joists. Take 2×6 lumber and cut two boards to 53 inches long. Then cut fourteen boards to 56 1/2 inches long. Make sure all cuts are accurate so the floor framing fits correctly.
Next, prepare to install the joists using Simpson Strong-Tie face mount joist hangers. These metal hangers provide strong support and keep each joist securely attached to the beams.
Begin with the two shorter joists. Install each one so it connects from the deck beam on one side to the leg on the other side. These help frame the outer edges of the structure.
The front joists must be installed 1 1/2 inches back from the front edge of the playhouse. This spacing is important because a fascia board will be added later in Step 16.
Now install the remaining joists. Space them evenly about 16 inches apart across the frame. Keep the spacing consistent to ensure proper floor support.
At the back of the structure, install the back joists 1 1/2 inches from the rear edge of the playhouse, matching the spacing used at the front.
Once all joists are installed, double-check that they are level, evenly spaced, and securely fastened in the joist hangers.


Step 11 – Install the Deck Boards
Take 10-foot-long 2×6 deck boards and begin installing them across the joists. Place each board perpendicular to the joists so they span the full deck surface.
Secure each deck board using exterior wood screws. Drive the screws through the boards and into every joist they cross. Make sure each board is tightly fastened so there is no movement or bouncing.
As you continue installing boards, keep the spacing even. Maintain consistent gaps between boards for drainage and wood expansion.
When you reach the support legs, you will need to trim some deck boards to fit around them. Measure carefully, mark your cut lines, and use a saw to make clean cuts so the boards fit snugly around the legs.
Continue installing all deck boards until the entire floor surface is covered. Double-check that all boards are securely screwed down and the deck surface is solid and even.

Step 12 – Build the Walls for the DIY Playhouse
Now it’s time to build the walls of the playhouse. Start with the side wall first.
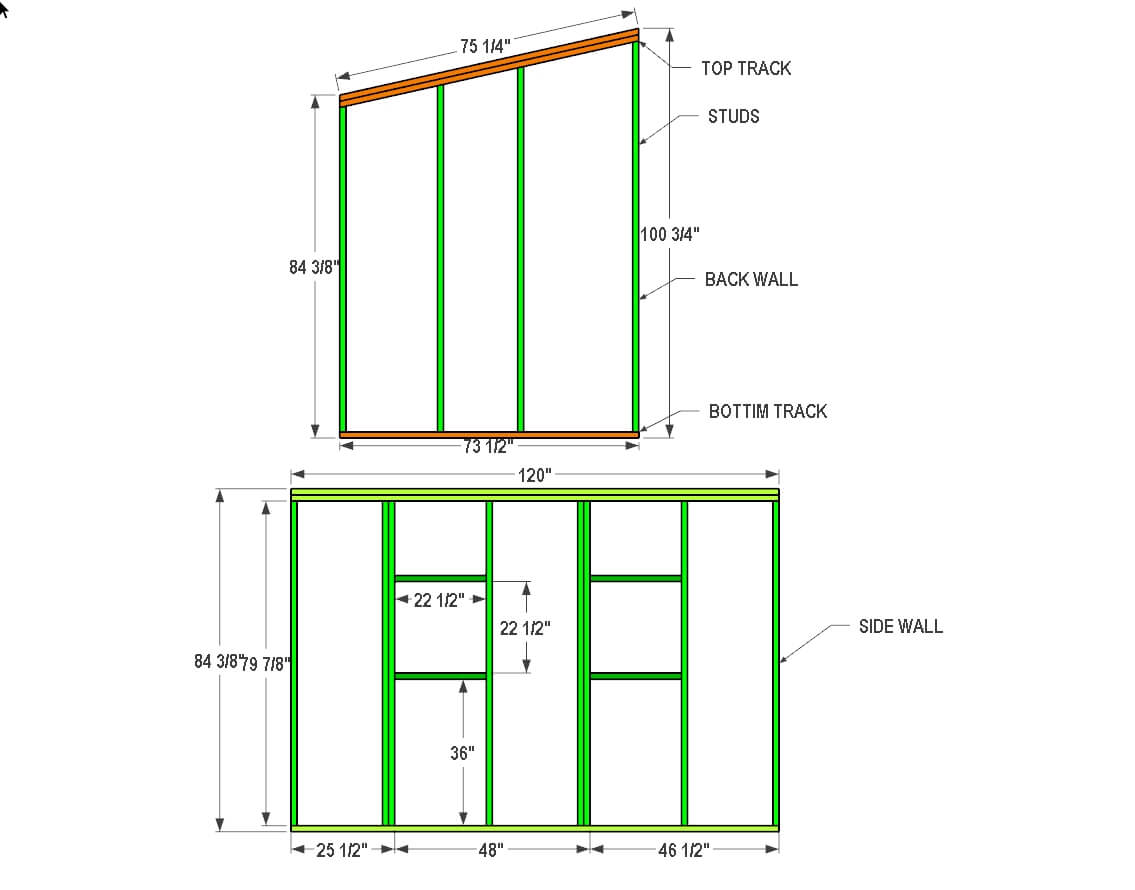
For the side wall, cut and prepare the framing materials. Use one 2×4 board that is 10 feet long for the bottom plate (track). Then use two 2×4 boards for the top plate. Next, cut eight 2×4 studs to 79 7/8 inches in length. These will form the vertical structure of the wall.
For the window opening, cut four 2×4 pieces to 22 1/2 inches long. These will frame the window section.
Assemble the side wall on a flat surface. Attach the studs between the top and bottom plates according to the plan layout. Make sure everything is square and securely fastened.
Once the side wall is complete, move on to the back wall. The back wall is built similarly, but the top plate must be installed at a 12.6-degree angle to match the roof slope. Follow the exact dimensions shown in the plans so the roof will fit correctly later.
After both walls are fully assembled, lift them into position on the deck. Set them upright and align them with the floor framing.
Secure each wall to the deck boards using wood screws or nails. Make sure each wall is straight, plumb, and firmly attached before moving on to the next step.


Step 13 – Install Roof Beam for the Playhouse
Start by cutting the support posts. Take 4×4 lumber and cut two pieces to 96 inches in length. These posts will hold and support the main roof beam.
Next, cut the roof beam. Use 4×6 lumber and cut one piece to 120 inches in length. This beam will span across the top of the playhouse and carry the roof load.
Begin installation by attaching the back 4×4 post. Secure it to the back wall and the deck using wood screws. Make sure it is straight and firmly anchored.
Then install the front 4×4 post. Position it so the distance from the wall to the post is the same as the back post. Measure carefully to ensure both posts are perfectly aligned and parallel.
Once both posts are in place, lift the 4×6 roof beam and set it on top of the 4×4 posts.
Secure the roof beam using metal straps or truss mending plates, the same method used in Step 8. Fasten the hardware tightly so the beam is locked securely to the posts.
Double-check that everything is level, aligned, and firmly attached before moving on to the next step.

Step 14 – Cut and Install the Roof Trusses
For the roof trusses, use 2×4 lumber for the main structure. You will also attach 2×6 fascia boards at both the front and back of the roof trusses to finish and strengthen the roof edges.
Start by cutting nine 2×4 boards to 96 inches in length. These will be your roof truss rafters.
Next, cut the notches in each board using the measurements shown in the plans. These notches must match the roof slope, which is approximately 12.6 degrees. The angle must be consistent so the trusses sit correctly on both the wall and the roof beam.
A helpful method is to place one truss on the roof beam and top wall plate first. Mark the notch locations directly from the structure. Then use this first truss as a template to mark and cut the remaining pieces. This helps ensure all trusses match.
When installing the trusses, the lower notch will sit on the top plate of the side wall. The upper notch will sit on the roof beam. Make sure each truss fits tightly in both locations.
Install the first truss flush with the side wall and aligned with the roof beam. Once it is positioned correctly, attach a 2×6 fascia board to the front edge of the truss, as shown in the plans.
Continue installing the remaining trusses, spacing them about 16 inches apart. Keep spacing consistent across the entire roof frame.
Make sure to plan ahead for the roof plywood installation. Each truss must align so that plywood edges land on solid framing. If needed, adjust spacing or add extra trusses to properly support the plywood sheets.
Once all front trusses are installed, attach the back fascia board in the same way as the front. Secure it firmly to the ends of the trusses to complete the roof frame.


Step 15 – Attach Roof Plywood and Siding
Start by choosing the siding material for the exterior walls. You can use different types of siding depending on your budget and preference.
The simplest and most cost-effective option is 4’×8’ siding panels. These can be cut down to match the wall dimensions. Another option is vinyl siding boards, which are installed one piece at a time for a more finished look.
If you are using siding panels, follow the cut list provided in the plans to cut each section to the correct size before installation.
Attach the siding panels directly to the wall framing. Make sure each panel is straight, aligned, and securely fastened before moving to the next section.
Once all siding is installed, move on to the windows. Cut and install 1×4 trim boards around each window opening. This will clean up the edges and give the playhouse a finished appearance.
Next, install the roof decking. Use 3/4-inch plywood sheets and place them on top of the roof trusses.
Secure the plywood using wood screws or nails. Fasten each sheet into the roof framing so it is fully supported and does not move.
After the plywood is installed, cover the entire roof with roofing paper (felt). Overlap each layer to prevent water from getting underneath.
Finally, install asphalt shingles over the roofing paper. Start from the bottom edge and work your way up to the top, overlapping each row properly to ensure water runs off the roof correctly.

Step 16 – Measure and Cut Boards for Fence Panel
This playhouse includes three fence panels: one on the front, one on the side, and one on the back.
Before building the fence, prepare the fascia boards. Cut two 2×6 boards to 56 1/2 inches in length and two 2×6 boards to 53 inches in length. Attach these fascia boards to the front and back joists of the playhouse, as shown in the plans.
These fascia boards will provide a solid mounting point for the fence panels and the stairs.
Build the Front Fence Panel
Start with the front fence panel. Use 2×4 lumber and cut two rail pieces to 80 1/2 inches in length. These will be the top and bottom rails.
Next, use 2×3 lumber to cut 14 picket boards. Each picket should be 37 inches long. Trim both ends of each picket at a 45-degree angle, as shown in the plans.
Lay out the rails and begin attaching the pickets to them. Space each picket evenly with a 3 1/2-inch gap between boards. Keep spacing consistent for a clean and uniform look.
Once the panel is fully assembled, lift it into place and attach it to the front of the playhouse using wood screws. Make sure it is straight and securely fastened.
Build the Side and Back Fence Panels
The side and back fence panels are slightly different. Each of these panels uses only one top rail.
The bottom of the pickets will attach directly to the deck beam and the fascia board.
Follow the same method used for the front panel when spacing and attaching the pickets. Maintain a 3 1/2-inch gap between each picket for consistency.
Once assembled, install the side and back fence panels in their correct locations, as shown in the plans.
Secure all panels tightly to ensure they are stable and properly aligned before moving to the next step.


Step 17 – Build the Stairs for the DIY Playhouse
Start by cutting the stair stringers. Take 2×8 lumber and cut two pieces to 60 3/4 inches in length. Cut both ends of each board at a 45-degree miter angle, as shown in the plans.
Next, cut the stair treads. Use 2×8 lumber and cut five pieces to 32 inches in length. These will form the steps of the stairs.
Lay out the two stringers in position and begin assembling the steps. Attach each 32-inch step board evenly between the stringers. Make sure each step is level, properly spaced, and securely fastened.
Double-check that the staircase is square and stable before installation.
Once the stairs are fully assembled, move them into position at the front of the playhouse. Align the top of the stairs with the front fascia board.
Secure the stairs to the front fascia board using 2 1/2-inch wood screws. Drive the screws tightly to ensure the stairs are firmly attached and do not shift.
After installation, check that the stairs are stable, level, and safe to use.

Step 18 – Install Monkey Bars (Optional)
This step is optional. If you do not want monkey bars, you can skip it.
Start by marking the exact locations and spacing for the monkey bars on the upper beam that was installed earlier. Measure carefully so the spacing is even and aligned across the beam.
Once marked, install the monkey bars at each location. Secure them using bolts or screws, depending on the type of monkey bar system you are using. Make sure each connection is tight and stable.
Next, take another 4×6 beam that is 14 feet long and position it on top of the lower beams. Place it directly against the installed monkey bars so it lines up properly.
Secure the monkey bar system to this beam so everything is connected together.
Finally, drill a 1/2-inch hole through both the upper and lower beams. Insert bolts through the holes and tighten with nuts to lock the monkey bar beam in place.
Once finished, check all connections to ensure everything is tight, aligned, and secure before use.

Step 19 – Attach the Swings to the Beam
Start by spacing out the swings evenly along the upper beam. Measure the distance between each swing so they are equal and properly balanced.
Once you are satisfied with the layout, attach each swing to the beam using the appropriate swing hardware. Make sure you are using heavy-duty, outdoor-rated swing hangers or brackets designed to support weight and movement.
Secure each connection tightly to the upper beam. Double-check that all bolts, hooks, or brackets are fully tightened and locked in place.
After all swings are installed, test each one carefully for stability before allowing use.
Once everything is secure, your DIY Playhouse for Kids is complete.
Conclusion
Building a DIY playhouse for kids is a big project, but it is one of the most rewarding woodworking builds you can complete.
You end up with:
- a raised wooden playhouse
- a safe outdoor deck
- stairs and fence panels
- swings
- optional monkey bars
- years of backyard fun for your family
This project creates memories that last much longer than the build itself.
Take your time, measure carefully, and focus on safety during every step.
The final result is a beautiful custom backyard playhouse your kids will love.


Reviews
There are no reviews yet.