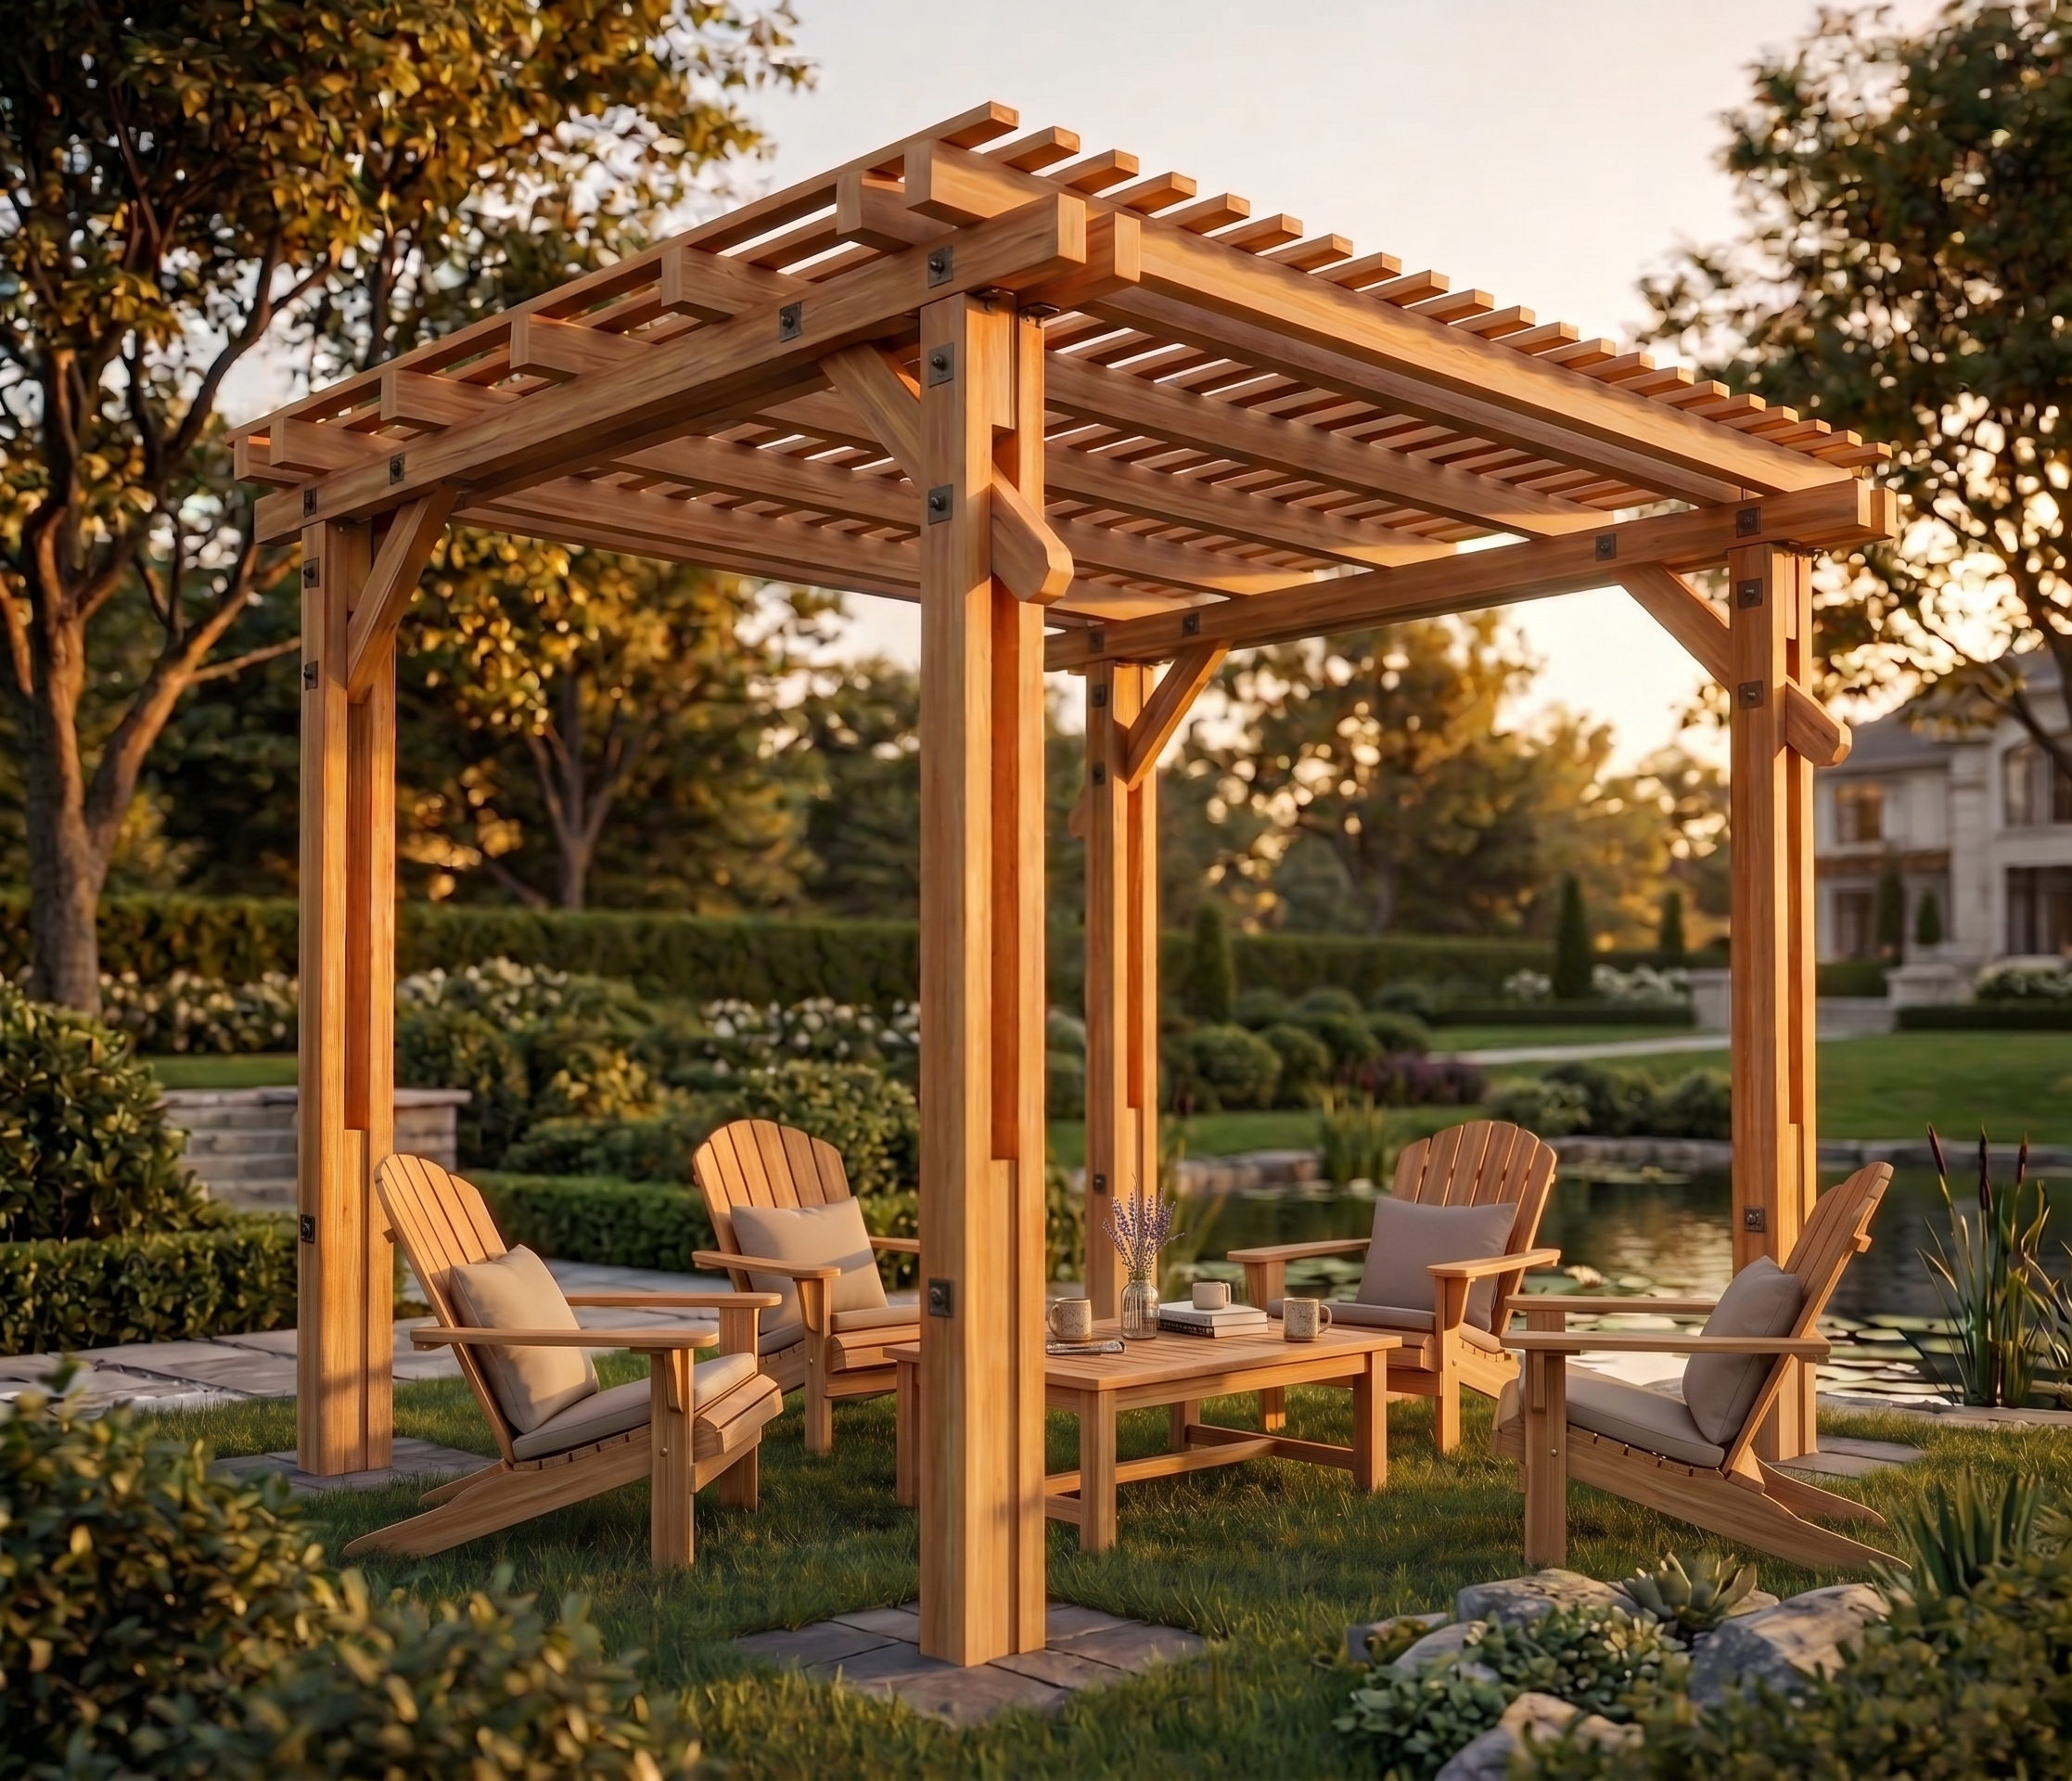
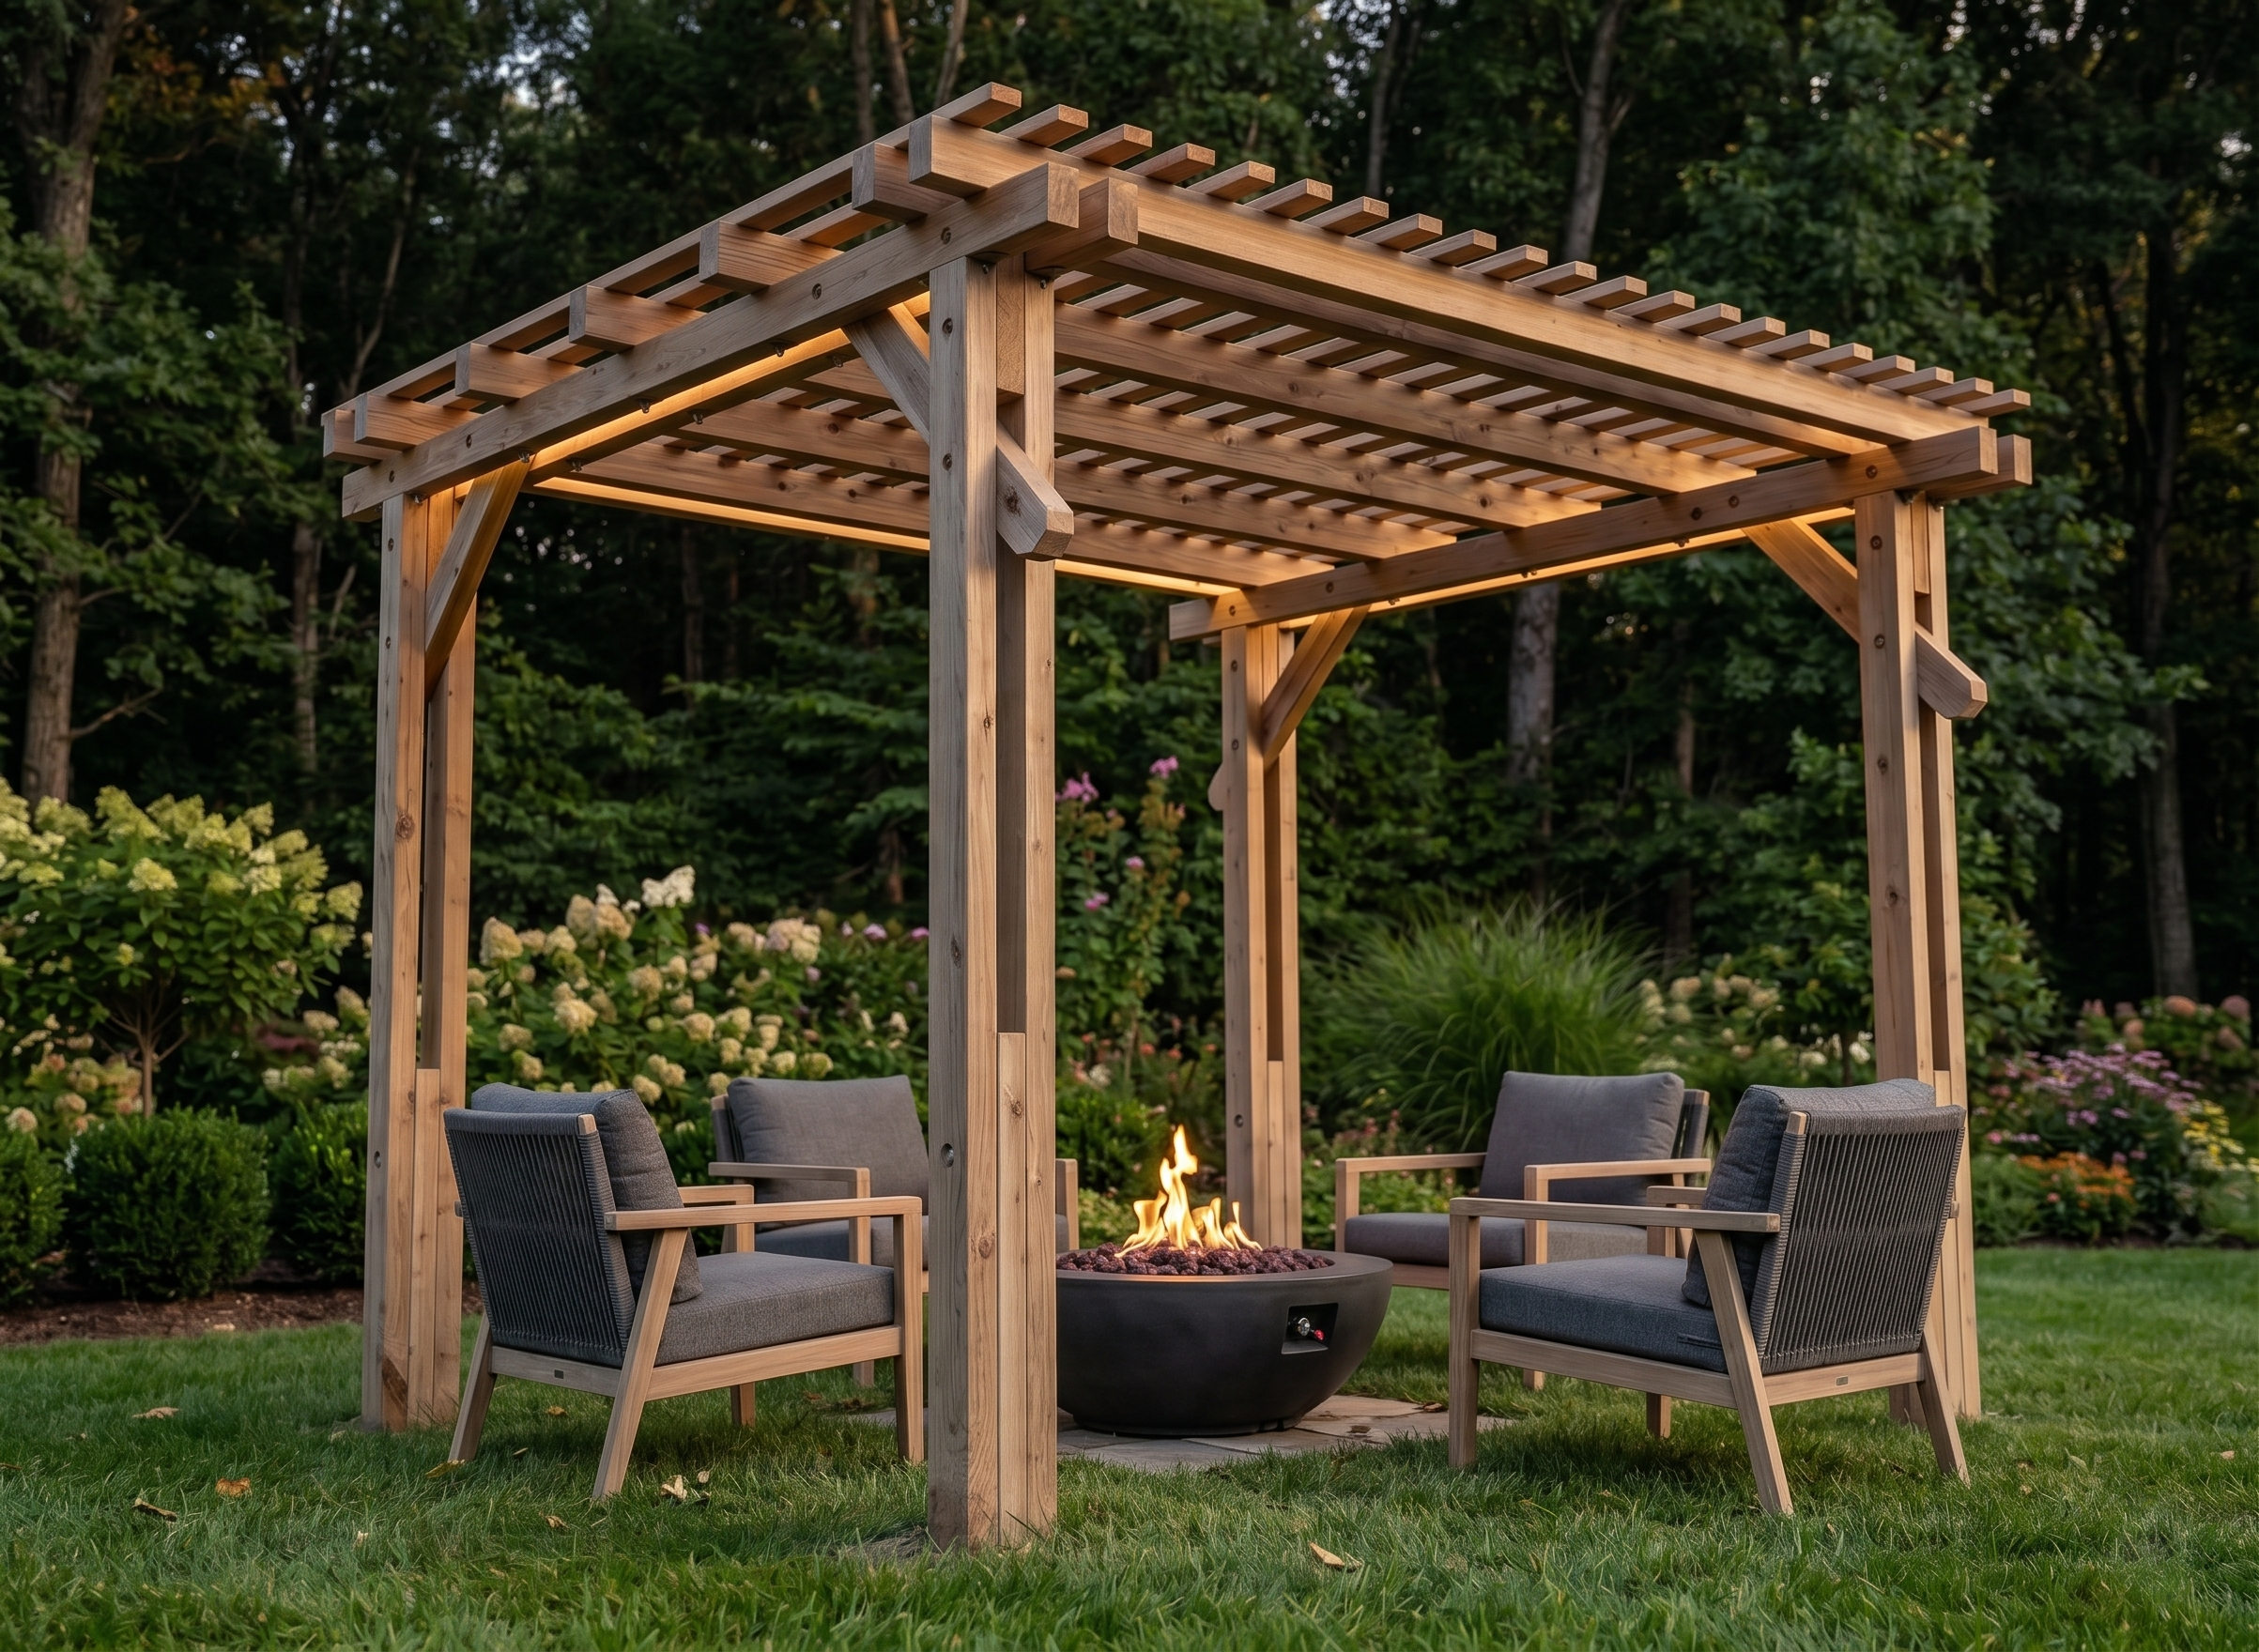
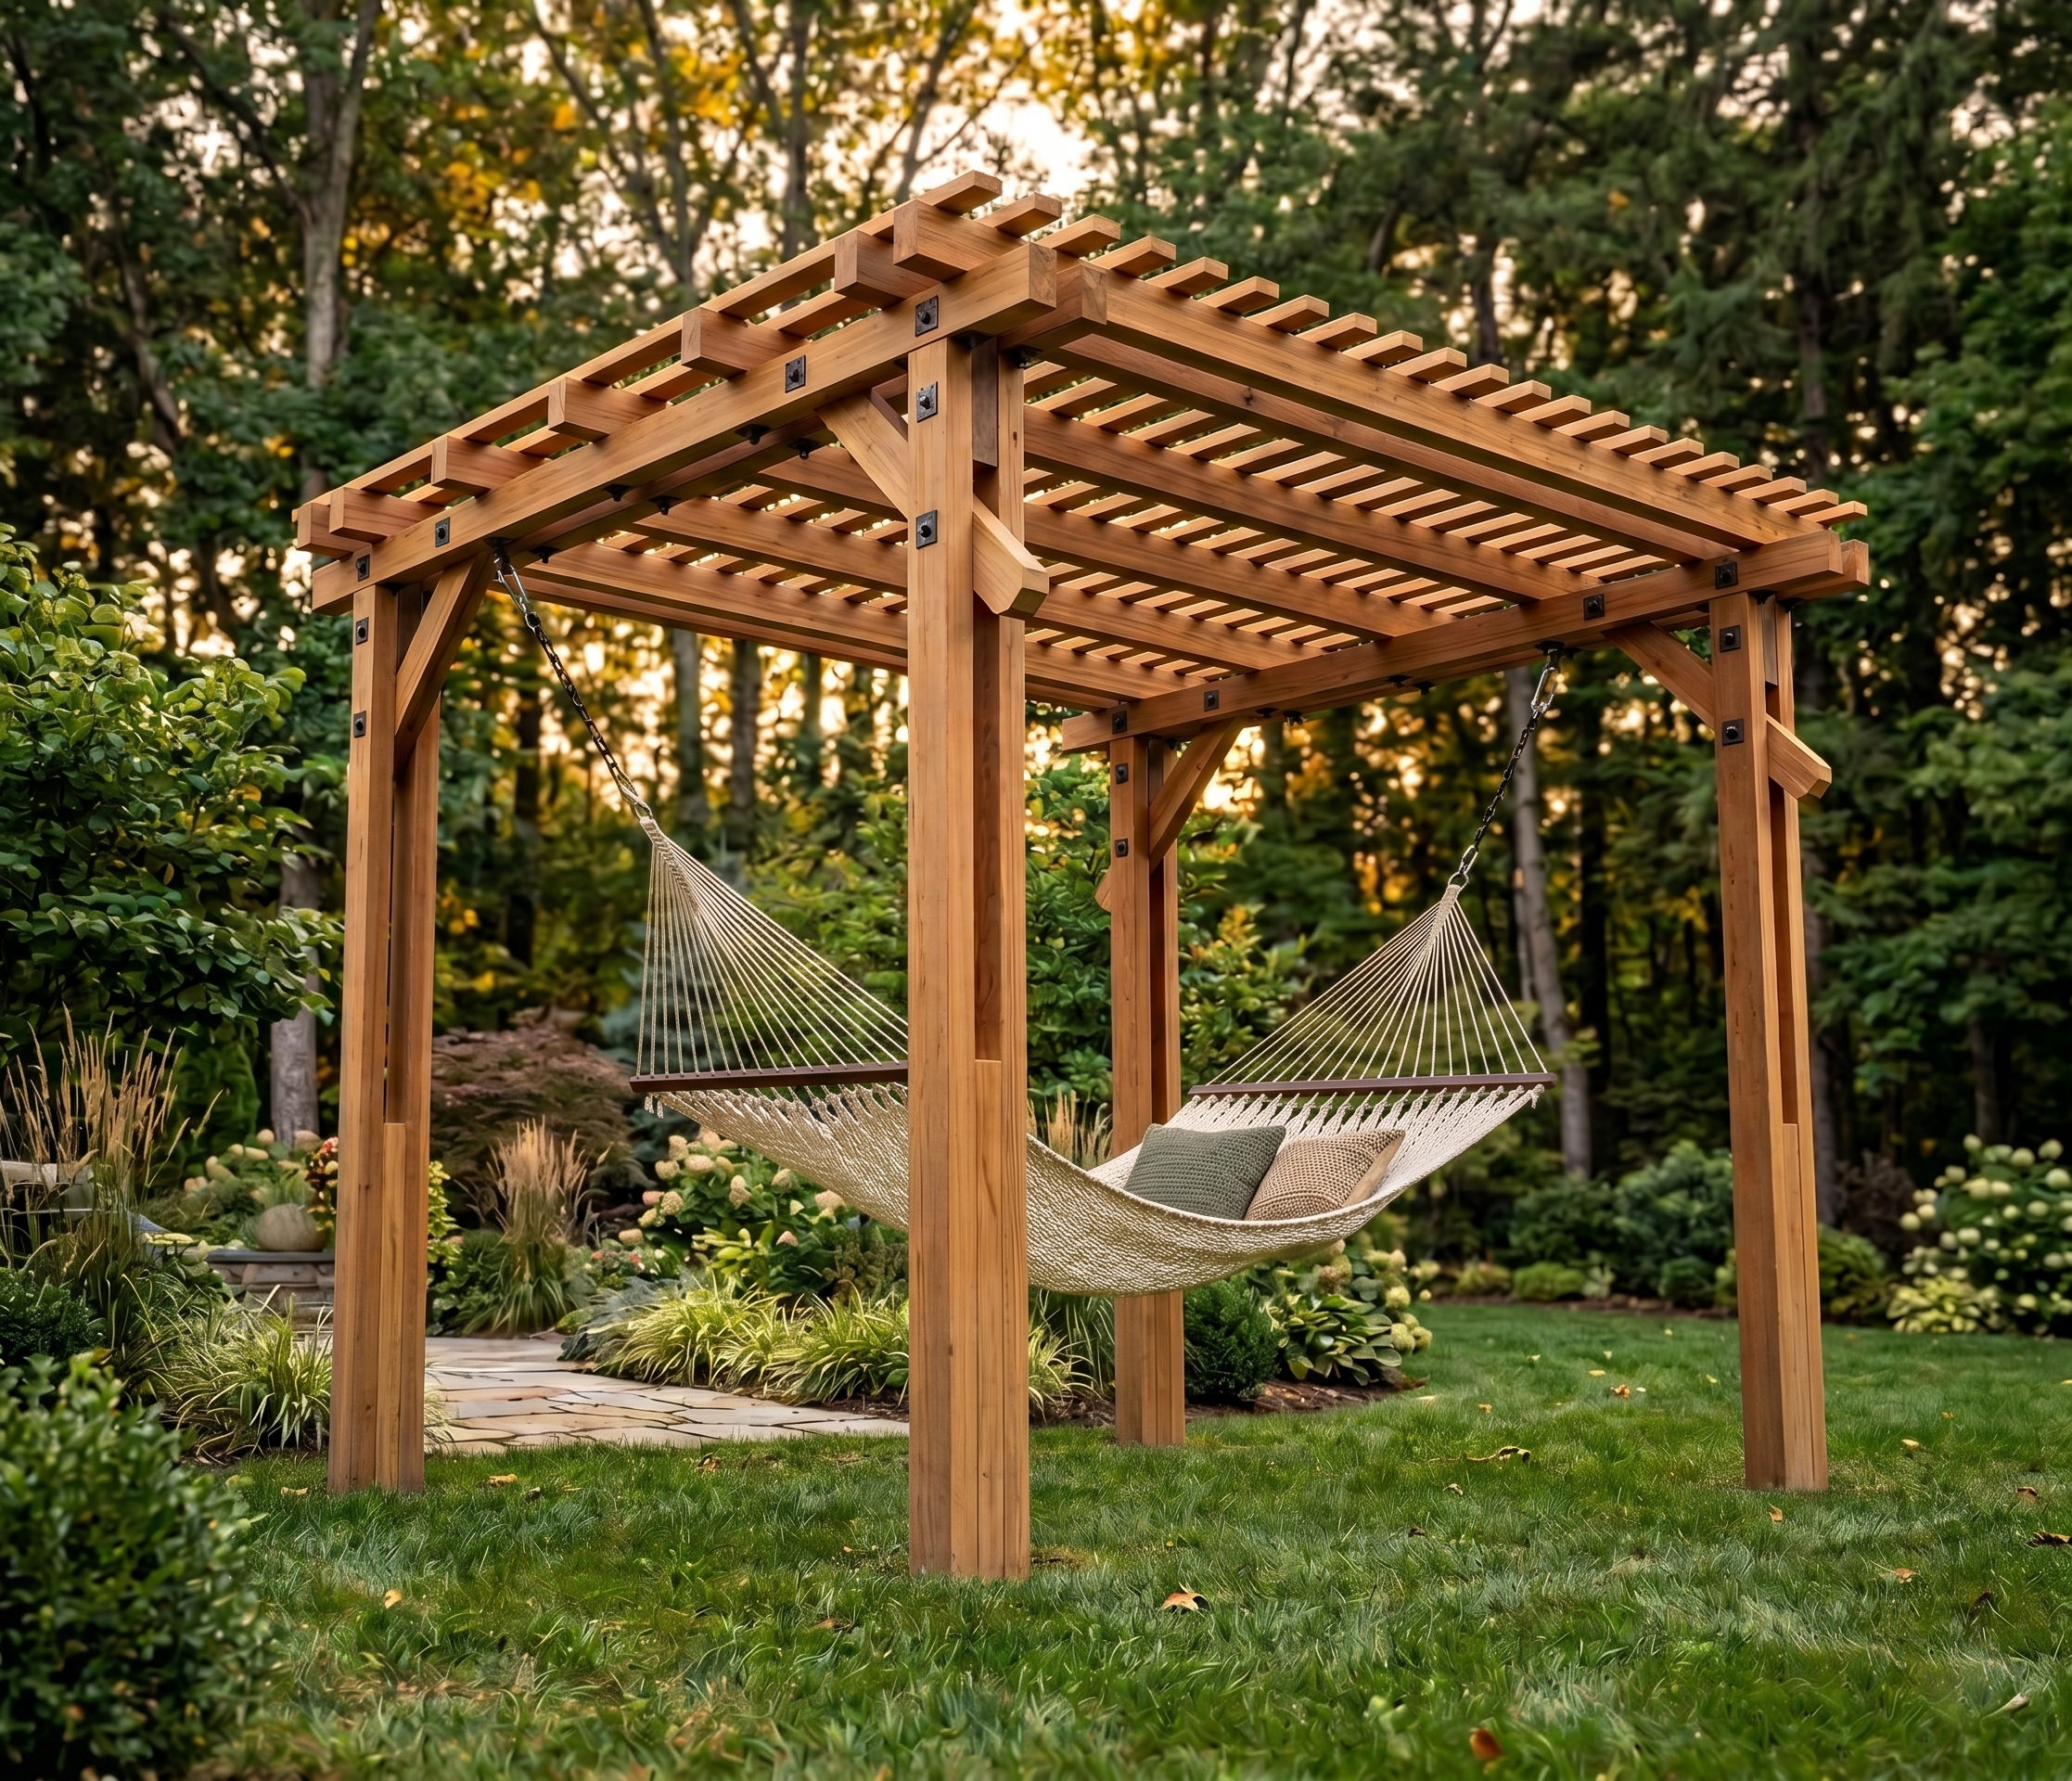
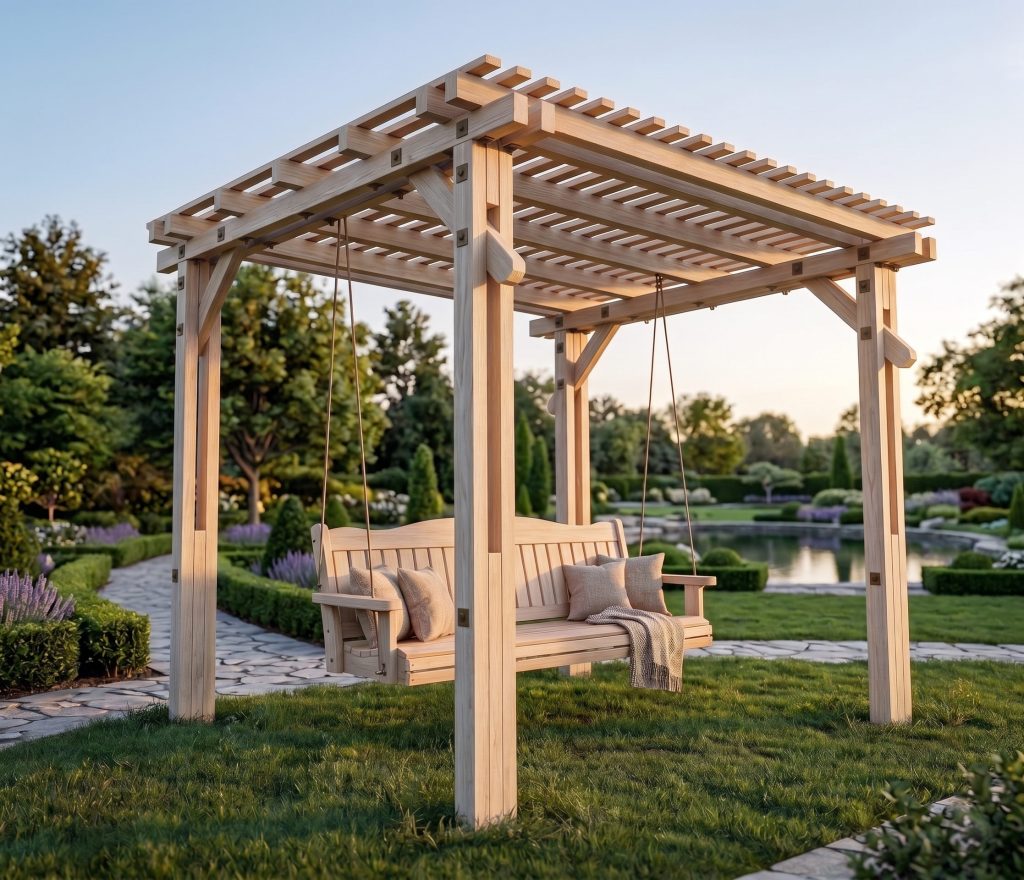
In this guide, you will learn how to build a 14×12 DIY pergola using strong 4×6 pressure-treated lumber. This pergola creates a beautiful outdoor structure that adds shade, style, and value to your backyard. It is perfect for covering a patio, outdoor dining area, hot tub space, or garden seating area.
A pergola is one of the most popular outdoor woodworking projects because it is both functional and visually impressive. It provides partial shade while still keeping your outdoor space open and airy. Once finished, your pergola will instantly upgrade your backyard and create a relaxing space for family gatherings, BBQs, or quiet evenings outside.
This project is designed to be beginner-friendly to intermediate skill level, but it does require careful measuring, leveling, and working with concrete. If you follow the steps closely, you can build a strong, long-lasting structure that will last for many years.
Benefits of Building Your Own DIY Pergola
1. Cost Savings: Building your own DIY pergola can save you a lot of money compared to hiring someone else to build it for you.
2. Customization: Building your own DIY pergola allows you to customize the size, shape, and details to fit your exact needs and preferences.
3. Increase Home Value: Installing a pergola can increase the value of your home, as it provides an attractive outdoor living space.
4. Endless Possibilities: With a DIY pergola, you can create endless possibilities with its design and features- from hanging planters to adding lighting or fans for cooling on hot summer days.
5. DIY Satisfaction: Nothing quite compares to the satisfaction of completing a project yourself and admiring your hard work! Building your own DIY pergola is a great way to get creative and show off your skills. Plus, you can be proud that you did it all yourself.
Time to Complete
2-3 days
Total Cost
$850
Skill Level
Beginner to intermediate
Download Printable Plans in PDF

DIY 14×12 Pergola Plans PDF
$18.97
Build your own backyard pergola with this DIGITAL PDF woodworking plan download. Includes step-by-step instructions, detailed cut list, measurements, material list, tools required, and assembly diagrams to help you build a sturdy 14×12 DIY pergola with confidence. Perfect for beginner to intermediate woodworkers looking for printable pergola plans with accurate dimensions and easy-to-follow guidance. Instant PDF download after purchase. No physical product shipped.
Description
Build a Beautiful 14×12 DIY Pergola for Your Backyard
Create a stylish and functional outdoor space with these detailed DIY 14×12 pergola woodworking plans. Whether you want to add shade to your patio, upgrade your backyard entertaining area, or build a modern outdoor structure for relaxing and gatherings, these printable PDF plans help simplify the entire building process.
Instead of relying only on free tutorials or guessing measurements, this downloadable pergola plan provides organized step-by-step instructions, accurate dimensions, material guidance, and detailed diagrams to help you build with confidence.
These woodworking plans are designed to make the project easier, more efficient, and more beginner-friendly while still providing the detail experienced DIY builders expect.
Who These Pergola Plans Are For
These DIY pergola plans are ideal for:
- Beginner to intermediate woodworkers
- DIY homeowners
- Backyard renovation projects
- Patio and outdoor living upgrades
- Weekend woodworking projects
- Anyone searching for easy-to-follow pergola plans with measurements
- Builders who want printable woodworking plans with cut lists
What’s Included in the PDF Download
Your digital woodworking plan includes:
- Step-by-step building instructions
- Detailed cut list with measurements
- Complete material shopping list
- Recommended tools list
- Assembly diagrams and illustrations
- Project dimensions and layout guidance
- Printable PDF format
- Instant digital download after purchase
The plans are organized in an easy-to-follow format so you can work through the project efficiently from start to finish.
Project Details
Project Type
DIY Outdoor Pergola
Approximate Size
14×12 Pergola
Difficulty Level
Beginner to Intermediate
Estimated Build Time
2–4 days depending on experience level
Estimated Project Cost
Approximately $500–$1,500 depending on lumber prices and material choices
Recommended Tools
- Circular saw or miter saw
- Drill and driver
- Tape measure
- Speed square
- Level
- Clamps
- Post hole digger
- Socket wrench set
Why Choose These Woodworking Plans
Building a pergola is much easier when you have clear woodworking plans to follow. These detailed PDF plans help reduce mistakes, improve accuracy, and save time during construction.
Benefits include:
- Accurate measurements and organized layouts
- Easier material planning before you start
- Clear step-by-step guidance
- Printable instructions you can use on-site
- Better organization than relying on scattered online tutorials
- Helps simplify complex outdoor woodworking projects
- Ideal for DIY backyard upgrades
These plans are designed to help you feel more confident throughout the build process while creating a professional-looking finished pergola.
Digital Download Information
Please note:
- This is a DIGITAL PRODUCT only
- No physical item will be shipped
- Instant PDF download available after purchase
- Compatible with desktop, tablet, and mobile devices
- Printable for workshop or jobsite use
You’ll receive the woodworking plan PDF immediately after checkout so you can start planning your build right away.
Start Building Your DIY Pergola Today
If you’re ready to build a durable and attractive backyard pergola, these step-by-step woodworking plans provide the guidance and structure needed to complete the project with confidence.
Download your DIY pergola plans PDF today and start building a beautiful outdoor space for relaxing, entertaining, and enjoying your backyard.
Other Woodworking Projects


Tools for this project
Material List
- Available with the purchase of PDF plans
Note: Lumber dimensions are listed as nominal size. See lumber sizes for actual dimensions vs nominal.
Disclosure: Some of the links on this page as well as links in “tools for this project” and “material list” sections are affiliate links.
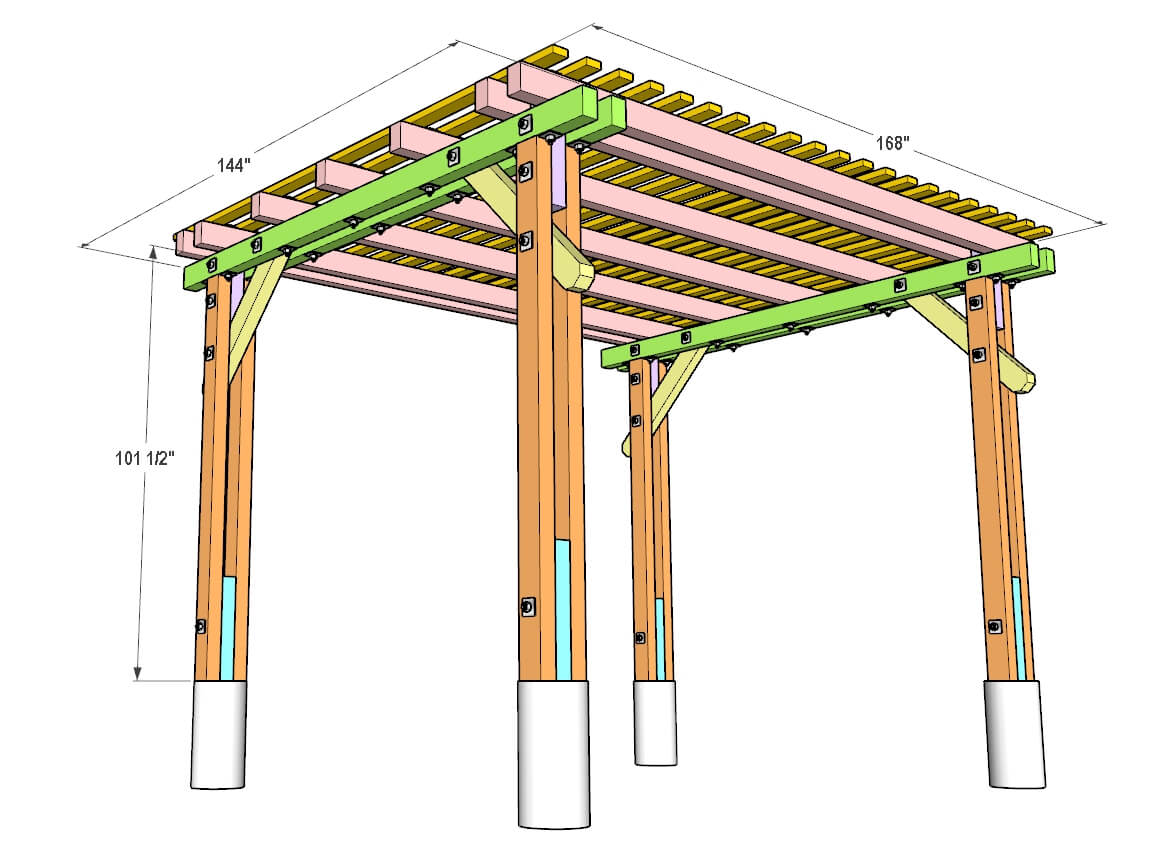
Dimensions

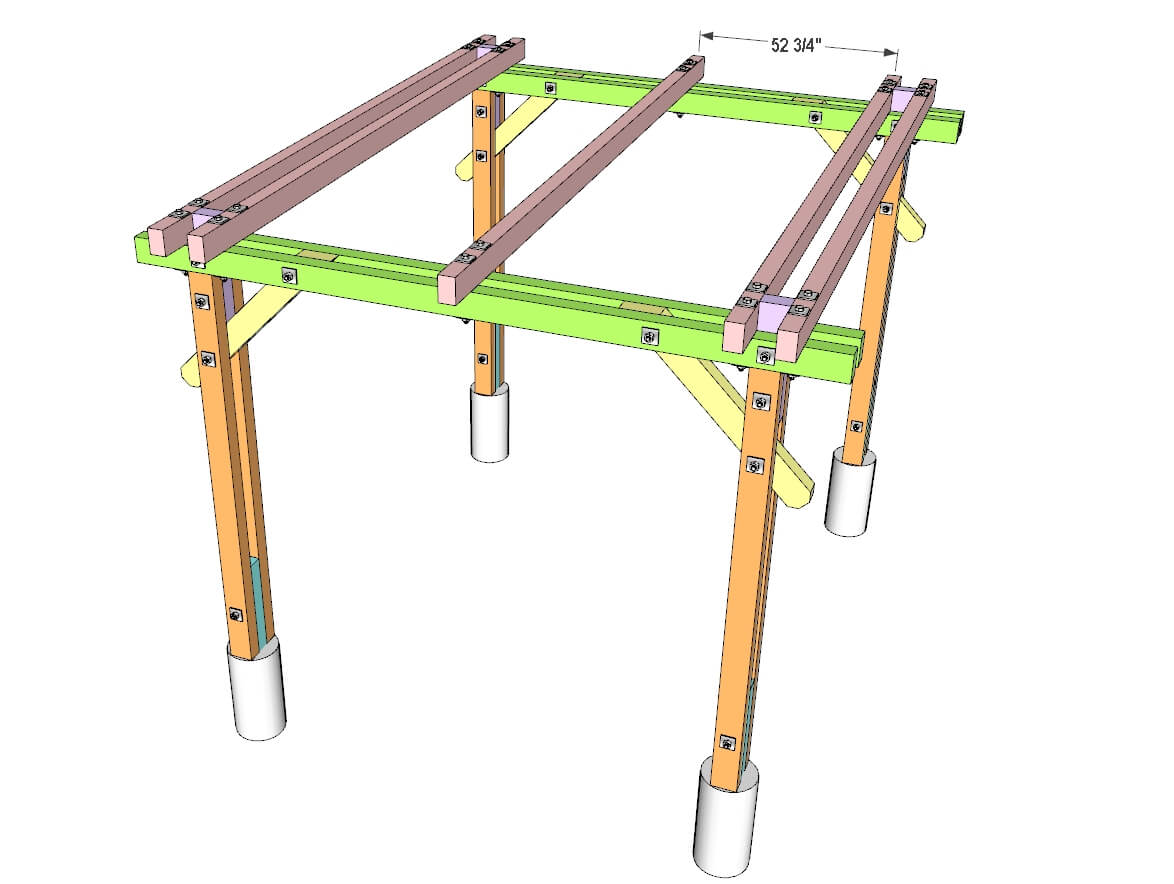
Step 1 – Level the Ground and Mark the Pier Locations
Start by clearing the entire area where the playhouse will be built. Remove all bushes, grass, weeds, roots, rocks, and any other vegetation. Make sure the ground is clean and free of anything that could interfere with the foundation.
Next, level the ground as much as possible. Remove any high spots and fill in any low areas so the surface is flat and even. A level foundation is very important because uneven ground can cause the entire playhouse structure to become crooked or unstable later.
Using the dimensions provided in the plans, roughly mark the center point of each pier location on the ground. These marks will show where the support posts for the playhouse will be installed.
Choose one corner of the project as your main reference point, also called the home base. Pull all measurements from this single corner only. Do not measure from different corners or different points, because small errors can quickly add up and cause the entire layout to be out of square.
After the rough pier locations are marked, build batter boards around the outside of the project area. Batter boards are temporary wooden supports used to hold string lines in place. They help create a much more accurate foundation layout before digging begins.
Once the batter boards are installed, stretch string lines between them and adjust the strings to match the exact dimensions shown in the playhouse plans. Take your time during this step and double-check all measurements.
The string lines will create a perfect outline of the foundation. They also help ensure that the layout is square, straight, and level before you dig the pier holes. This step is extremely important because accurate string lines will make the rest of the project much easier.
For more details on how to properly set up batter boards and string lines, you can read this helpful guide from InspectAPedia: https://inspectapedia.com/decks/Batter-Board-Layout.php

Step 2 – Dig Holes for the Piers
Now it is time to dig the foundation holes.
Dig 14-inch diameter holes that are approximately 24 inches deep. If your ground is sloped, some holes may need to be deeper to keep all post tops level.
Place 12-inch concrete form tubes into each hole. Cut each tube to about 24 inches in height if needed.
The top of each tube should sit about 1 inch above ground level. This helps prevent soil and water from entering the concrete base.
Check carefully that:
- All tubes are level
- All tube tops are at the same height
- The layout still matches your string lines
Take your time here. A mistake in foundation leveling will affect the entire structure.

Step 3 – Insert Posts and Pour Concrete into the Form Tubes
This step requires preparation because concrete sets quickly.
Cut six pieces of 4×6 pressure-treated posts to 48 inches long. These will be your vertical support posts.
Place each post into the center of the concrete tube. The top of the post should extend about 24 inches above the tube.
Before pouring concrete:
- Draw an “X” on top of each post to mark the center
- Use temporary wood braces to hold each post straight
- Double-check alignment with your string lines
Make sure:
- All posts are plumb (perfectly vertical)
- All post tops are at the same height
- The layout matches your pergola footprint
Now mix and pour concrete into each tube. Fill slowly and ensure no air pockets remain.
Allow concrete to cure fully (usually 24–48 hours, depending on product).
Once dry, remove temporary braces but keep checking alignment.


Step 4 – Cut and Install the Legs of the Pergola
Cut eight 4×6 beams to 8 feet in length.
Even if boards are labeled as 8 feet, always measure and trim if needed for accuracy.
Place two beams on opposite sides of each post to form the lower support frame.
Drill a 1/2-inch hole through both the beams and the post.
Insert 12-inch carriage bolts with washers on both sides and tighten securely.
Using bolts instead of screws is important because:
They provide stronger structural support and allow tightening over time.
They reduce wobbling as wood shrinks.


Step 5 – Join the Top of the Legs
Cut four 4×6 beams to 23 inches long.
These pieces will connect the top portion of the leg frames.
Install them between the vertical supports so they sit about 11 inches above the top of the legs.
Drill and secure each connection using bolts and washers.
This step helps lock the structure together and prevents movement in high winds.

Step 6 – Cut and Attach the 12-Foot Horizontal Beams
Cut four 4×6 beams to 144 inches (12 feet).
Lift and place them across the top of the pergola frame.
Make sure they are:
- Centered properly
- Sitting flush on both sides
Secure them using bolts through the support joints below.
This forms the first layer of your pergola roof frame.

Step 7 – Cut and Attach 14-Foot Horizontal Beams
Now cut four 4×6 beams to 168 inches (14 feet).
Place these beams on top of the previous layer.
Align them carefully so they match the structure below.
Drill downward through both layers and secure with bolts and washers.
This creates a strong double-layer frame that supports the roof slats.

Step 8 – Install Diagonal Braces
Cut four 4×6 braces at 49 1/2 inches, with a 45-degree angle cut on one end.
These braces are critical for stability and prevent side-to-side movement.
Install them between the legs and the lower beams.
Make sure:
- The top of the brace is flush with the beam
- The angle sits tightly against both surfaces
Drill and secure with bolts.


Step 9 – Install Additional Upper Beams
Cut three more 4×6 beams at 14 feet (168 inches).
Install one beam in the center of the pergola.
Then evenly space the remaining two beams between the outer and center beams.
This creates a strong and visually balanced roof structure.
Secure everything with bolts.


Step 10 – Attach the Top Slats
Cut 21 pieces of 2×4 lumber at 139 inches.
Start by placing the first two slats at each end of the pergola roof.
Then evenly space the remaining slats approximately 8 inches apart.
Attach each slat using exterior wood screws or nails.
These slats provide shade while still allowing sunlight and airflow.

Conclusion: Enjoy Your New DIY Pergola
You have now completed a strong and beautiful 14×12 DIY pergola. This structure not only improves your outdoor living space but also adds long-term value to your property.
With proper care, your pergola will last for many years. You can customize it further by adding:
- Outdoor lights
- Hanging plants
- Curtains for shade
- Climbing vines
This is a project that transforms a simple backyard into a comfortable outdoor living space you can enjoy year-round.
Reviews
There are no reviews yet.