Building a DIY Loft Bed with a Desk is a great way to save space in a small room. By raising the bed up off the floor, you can free up valuable floor space that can be used for other DIY furniture or storage. Adding a desk to the mix allows you to create a functional and stylish bedroom that is perfect for both sleeping and studying.
Having a loft bed with a desk can offer many advantages. First, it can provide you with a place to study or work on projects. This can be especially beneficial if you live in a small space and do not have a dedicated desk area.
Second, a loft bed with a desk can give you extra storage space for books, papers, or other materials. This can help to keep your room more organized and tidy.
Finally, a loft bed with a desk can be a great place to set up a computer, laptop, or other electronics. This can provide you with a quiet, private space to work or play games. Ultimately, deciding whether to include a desk underneath your loft bed is up to you. However, if you are looking for a way to optimize your space and make your room more functional, having a desk under your loft bed may be the perfect solution.
Are Queen-Sized Loft Beds Good for Adults
Yes, loft beds can be a good choice for adults and kids. However, it is important to ensure that the bed is sturdy, that it can support the weight, and that there is enough headroom to avoid injury. If you have some woodworking skills and decide to build a loft bed project, you have the option to make it as tall as you want to give you more headroom.
You also might be interested in a DIY Bunk Bed and DIY Toddler Bed.
Time to Complete
8 hours
Total Cost
$500
Skill Level
Intermediate
Download Printable Plans in PDF


DIY Queen Size Loft Bed with Desk Plans
$18.97
Digital PDF download — Step-by-step woodworking plans to build a queen-size loft bed with a built-in desk. Includes cut list with measurements, material list, tools list, 3D illustrations, and assembly diagrams. Instant download. No physical product shipped. Perfect for beginner-to-intermediate DIYers looking to save space and build a functional bedroom furniture piece for around $500.
Description
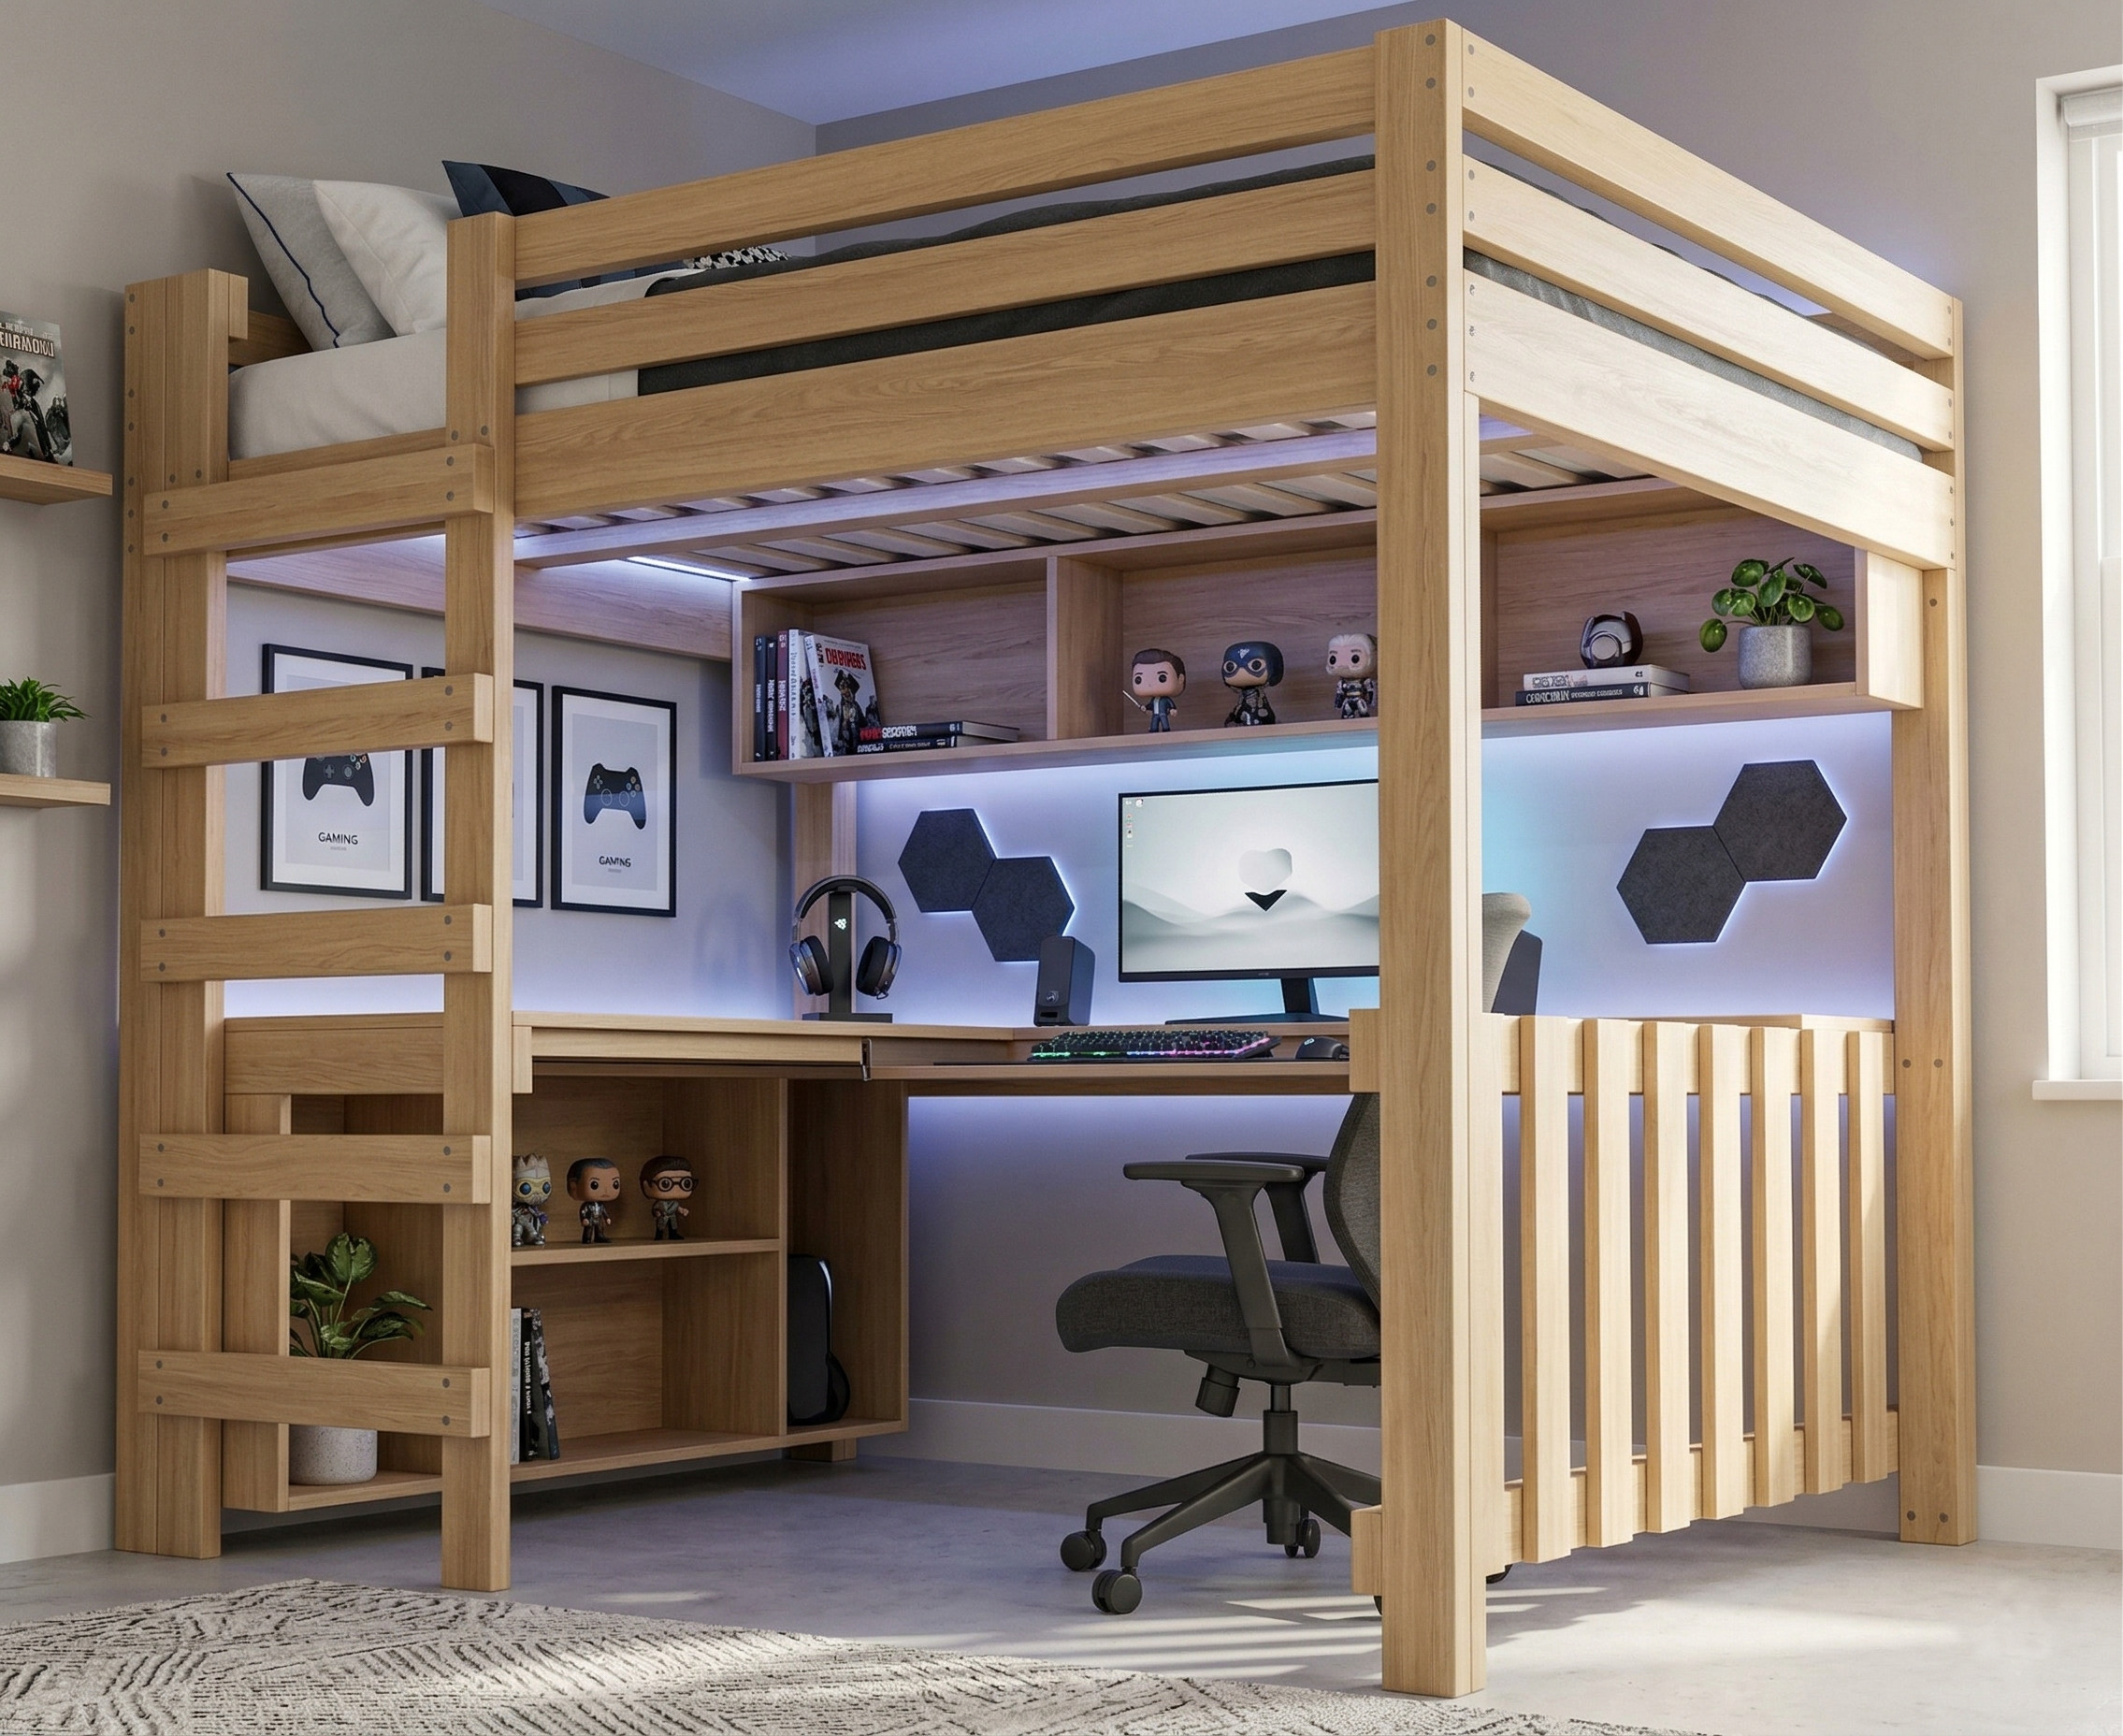
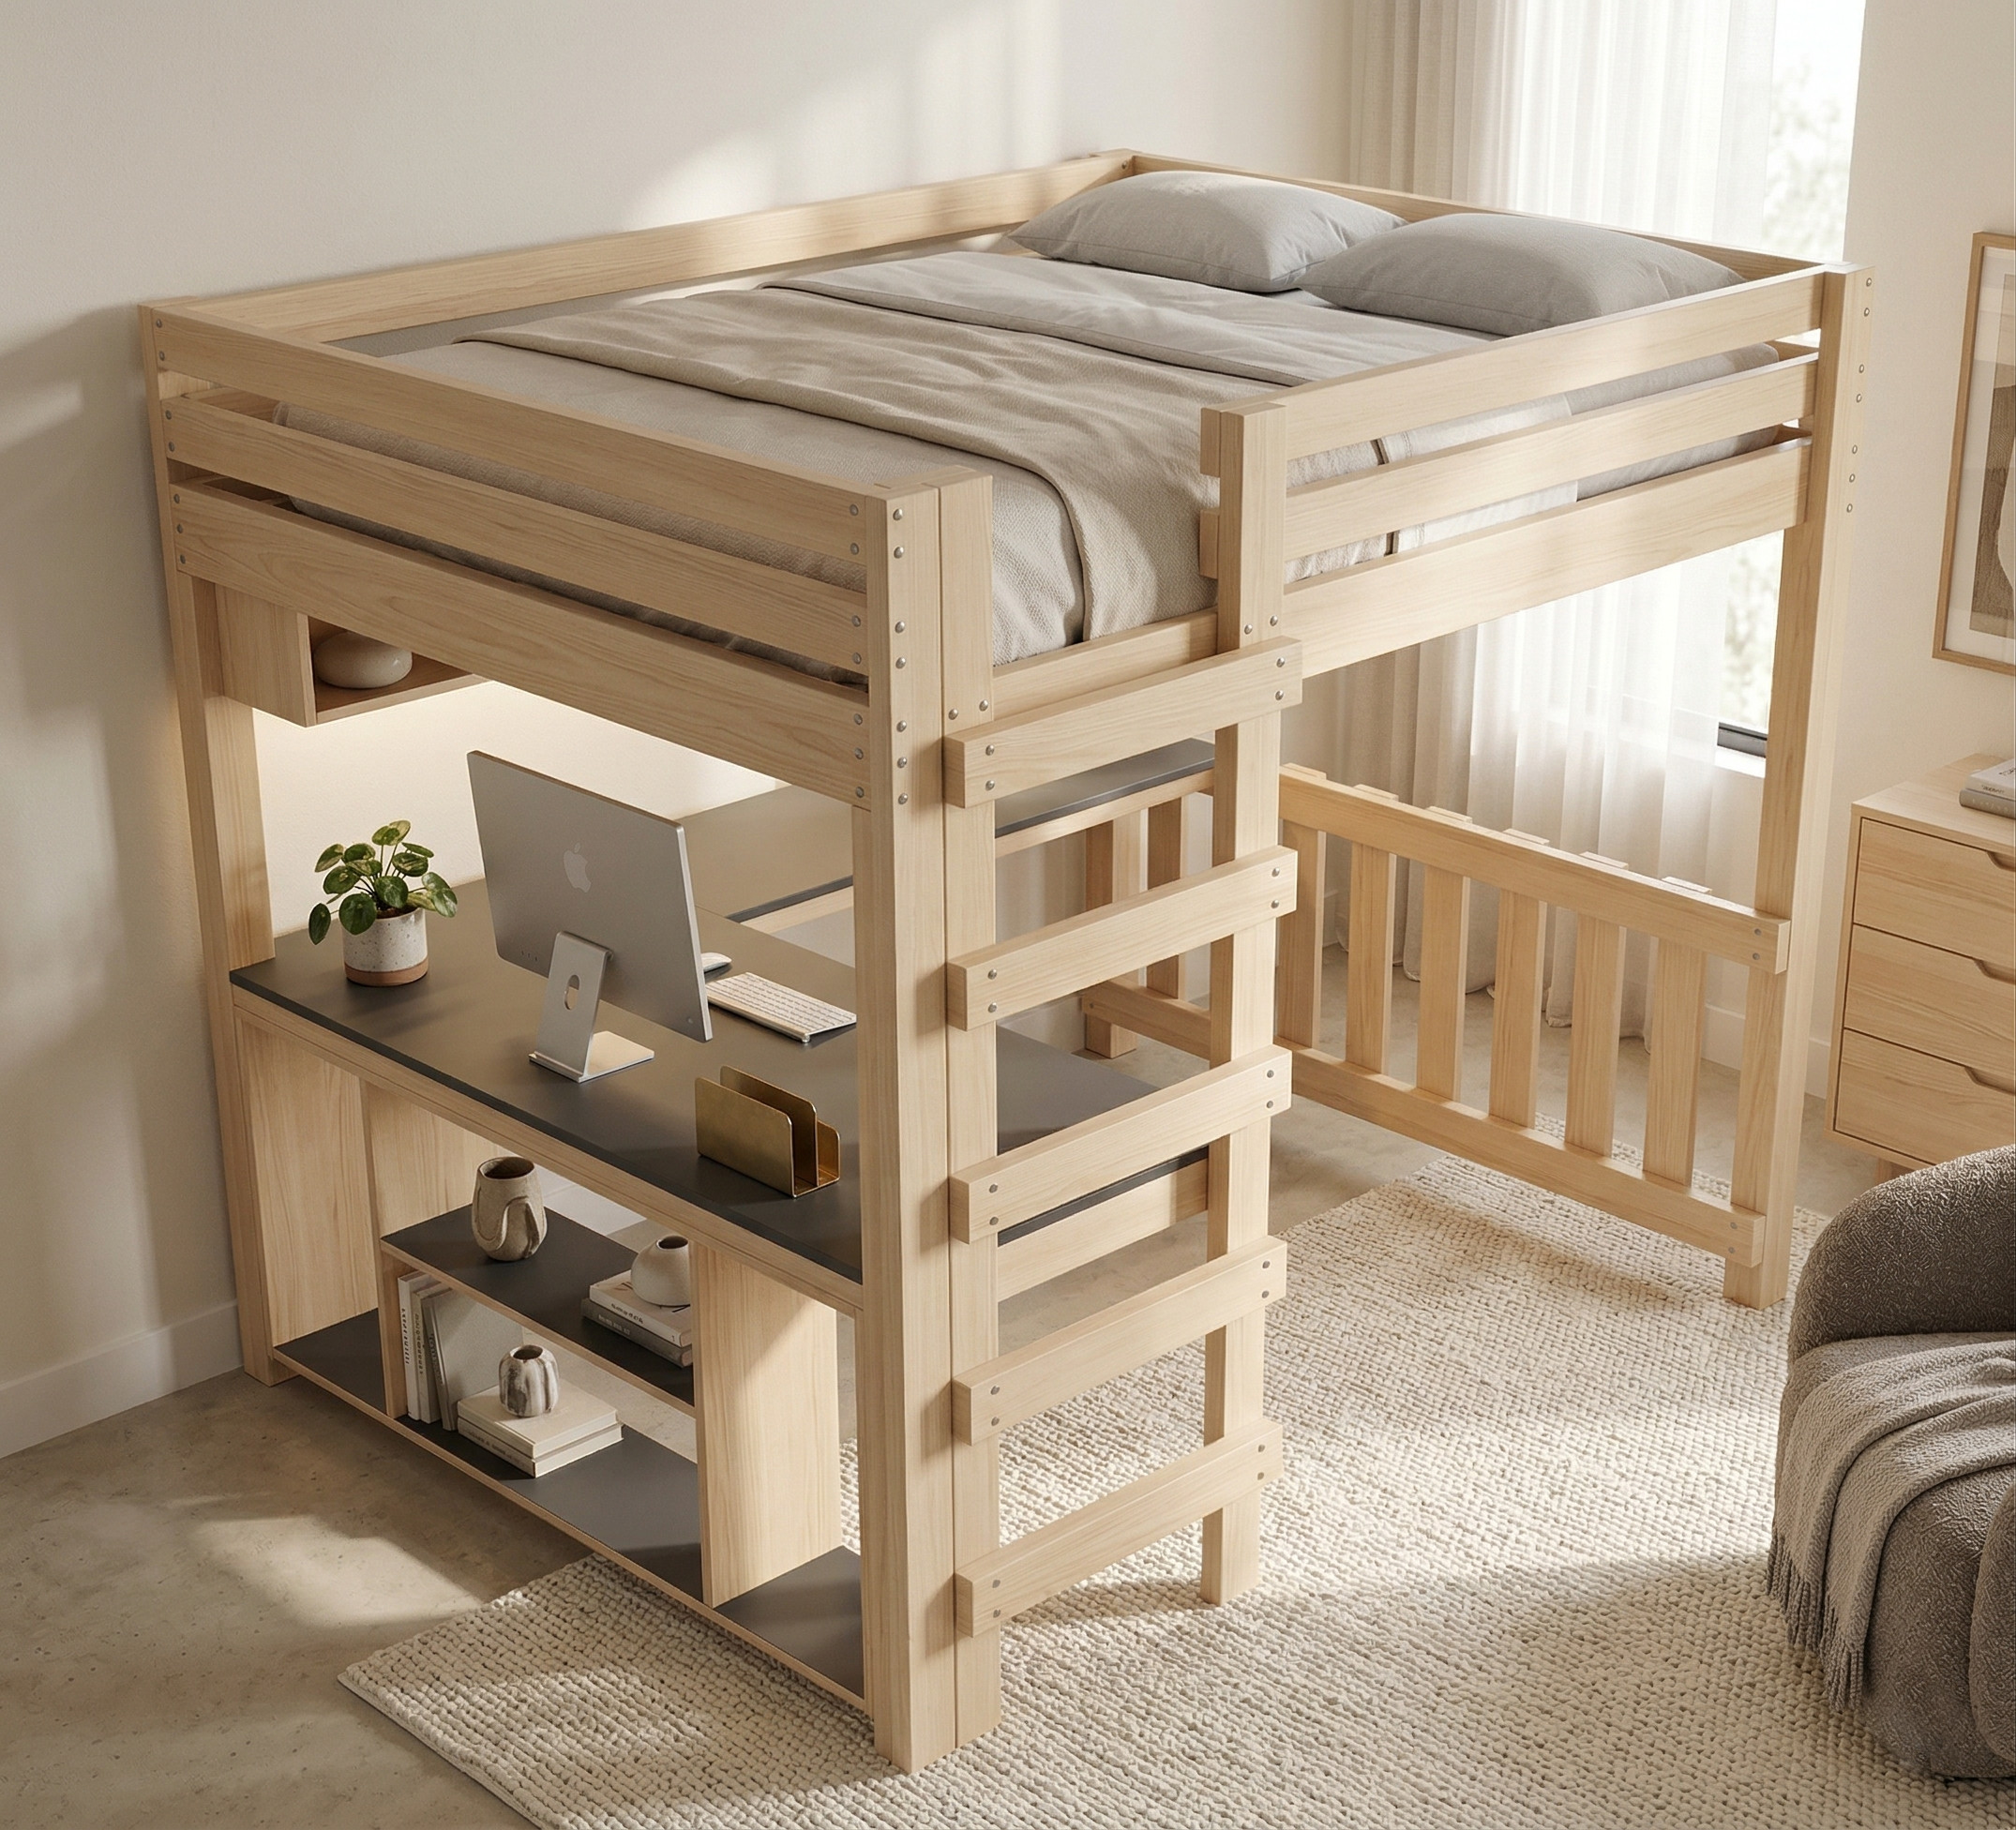
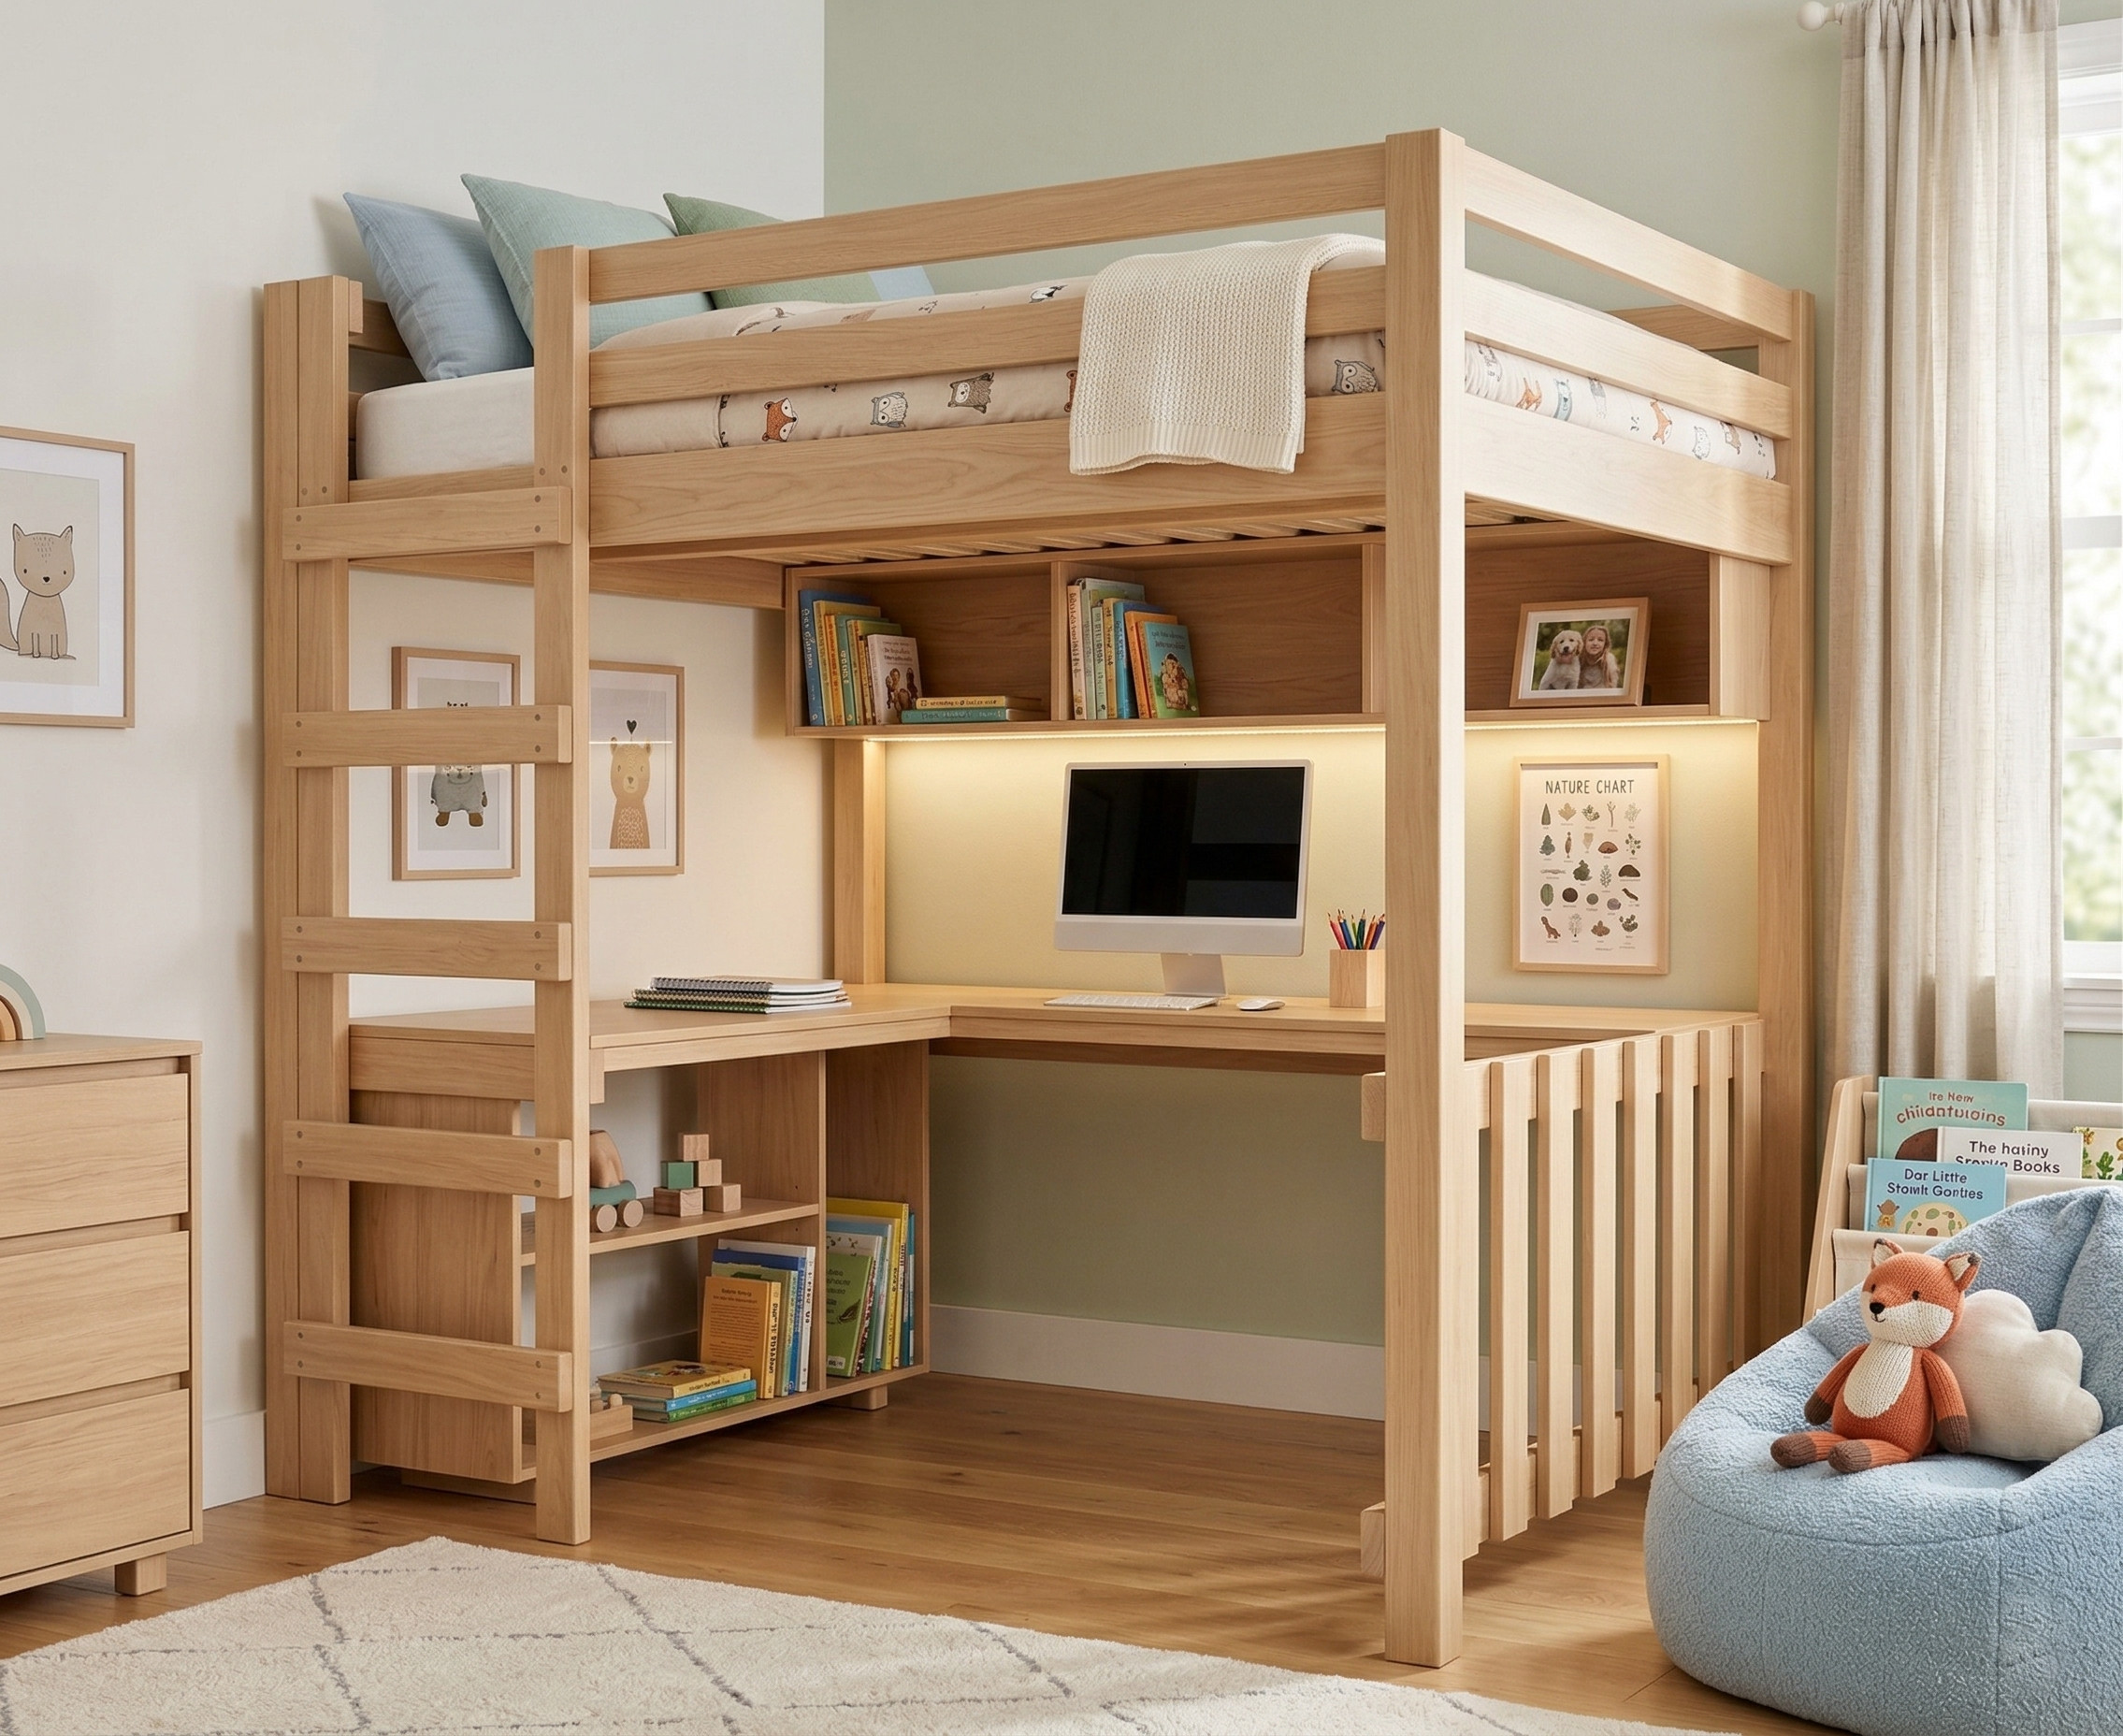
If you’re working with a small bedroom and need to make every square foot count, a queen-size loft bed with a built-in desk is one of the smartest furniture projects you can build. Raising the bed off the floor frees up valuable space below — giving you a dedicated desk area, a lower storage shelf, and a cleaner, more functional room layout.
These detailed woodworking plans walk you through how to build a sturdy, good-looking queen loft bed complete with an integrated desk, a lower storage shelf with interior dividers, an upper shelf with multiple compartments, and a decorative side panel — all from standard dimensional lumber and plywood you can pick up at any hardware store.
Whether you’re building for a teenager’s room, a college apartment, a guest room, or your own space, this project delivers a custom piece of furniture that would cost far more to buy ready-made.
Who These Plans Are For
These plans are designed for beginner-to-intermediate woodworkers and DIY homeowners who want clear, reliable guidance from start to finish. You don’t need to be an expert — just comfortable with basic power tools and ready to follow step-by-step instructions.
These plans are a great fit for:
- DIY homeowners building functional bedroom furniture from scratch
- Parents creating a practical sleep-and-study space for kids or teenagers
- Small-space dwellers who need a combined sleeping and work area in one footprint
- Adults who want a custom loft bed solution sized for a queen mattress
- Intermediate woodworkers looking for a satisfying, skill-building weekend project
What’s Included in the PDF
When you purchase, you’ll receive an instant downloadable PDF that goes well beyond what’s shown in the free blog post preview. The full plans include:
- ✅ Step-by-step building instructions — 13 detailed steps covering every phase of the build
- ✅ Full cut list with exact measurements — imperial dimensions for every board and plywood piece
- ✅ Complete material list — everything you need to buy before you start cutting
- ✅ Tools required list — no surprises once you’re at the hardware store
- ✅ 3D illustrations and assembly diagrams — see exactly how every component fits together
- ✅ Estimated build time — approximately 8 hours
- ✅ Estimated total project cost — approximately $500
- ✅ Difficulty level rating — Intermediate
- ✅ Printable PDF format — print at home or at a copy shop on standard letter-size paper
- ✅ Instant download after purchase — no waiting, no shipping
- ✅ Works on desktop, tablet, and mobile — view on any device
Note: Measurements are imperial (inches). SketchUp or CAD files are not included.
Project Details at a Glance
| Detail | Info |
|---|---|
| Project Type | Queen Size Loft Bed with Built-In Desk |
| Skill Level | Intermediate |
| Estimated Build Time | ~8 Hours |
| Estimated Material Cost | ~$500 |
| Bed Size | Queen |
| Desk Height | 29¼” from floor to desk surface |
| Primary Materials | 2×4 lumber, 1×4 lumber, ¾” plywood |
| Joinery Method | Pocket hole screws (Kreg Jig) |
| Measurements | Imperial (inches) |
| Format | Printable PDF — Instant Download |
What You’ll Build — Step by Step
The PDF plans guide you through every phase of this project in a logical, easy-to-follow sequence:
- Cutting 2×4 frame boards for the desk at the correct length
- Attaching the desk frame to the loft bed legs at 29¼” height using pocket hole screws
- Cutting and assembling the decorative right-side panel using 2×4 rails and 1×4 picket boards
- Nailing picket boards to the side panel for a clean, finished look
- Cutting and installing the remaining desk frame boards
- Building the lower shelf frame from ¾” plywood
- Cutting and inserting interior vertical dividers and a horizontal center shelf
- Installing the lower storage shelf under the desk frame
- Cutting all components for the upper shelf unit
- Assembling the upper shelf with backboard, top, bottom, ends, and center dividers
- Attaching the upper shelf to the loft bed structure
- Cutting both tabletop pieces to size, including notching corners around the bed posts
- Securing the tabletop to the finished frame — and you’re done
The plans use pocket hole joinery throughout (Kreg Jig), which makes for strong, clean connections that are well within reach for woodworkers who are still building their skills.
Recommended Tools
You’ll want these tools on hand before you begin:
- Tape Measure
- Drill
- Miter Saw
- Table Saw
- Nail Gun (brad nailer)
- Kreg Jig (pocket hole jig)
- Skill Saw (for notching the tabletop corners)
Why These Plans Make the Build Easier
Free tutorials and YouTube videos can get you started, but they rarely give you everything you need in one place. That’s where a complete, well-organized PDF plan makes a real difference.
With these plans, you get:
- Accurate measurements so you cut correctly the first time and minimize wasted material
- A complete cut list so you know exactly how much lumber and plywood to purchase
- 3D illustrations so there’s no guessing about how pieces connect or which direction they face
- A logical build sequence across 13 clear steps so you’re never standing in the shop wondering what comes next
- Printable format so you can work from paper without constantly checking your phone
- A defined tools list so you can make sure you have everything on hand before you start
Building with a solid plan is one of the easiest ways to avoid costly mistakes and wasted trips to the hardware store.
How Much Can You Save?
A store-bought loft bed with a desk of this size can run anywhere from $1,000 to $1,500 or more — and you’re still stuck with whatever design and dimensions the manufacturer chose. Building it yourself with these plans means you get a custom-built, queen-size piece for around $500 in materials, built to the exact size and style you want. That’s real savings, and a result you’ll be proud of.
Digital Download — What to Expect
This is a digital product only. Nothing physical is shipped.
Here’s how it works after purchase:
- Complete your purchase through secure checkout
- Receive an instant download link — delivered immediately to your email
- Download your PDF right away — no waiting required
- Open on your computer, tablet, or phone, or print it out for the shop
- Build at your own pace with the full plan in hand
The PDF is formatted for easy printing on standard letter-size paper and is fully readable on any screen.
Frequently Asked Questions
Is this a physical product? No. This is a digital PDF download. No physical item is shipped to you.
What’s the desk height? The desk surface sits at 29¼” from the floor — a standard desk height comfortable for adults and older teens.
What materials do I need? The full material list is included in the PDF. Primary materials are 2×4 lumber, 1×4 lumber, and ¾” plywood — all available at any home improvement store.
Is this suitable for adults? Yes. The plans are designed for a queen-size mattress and are appropriate for adults, teenagers, and anyone who needs a sturdy loft bed with a workspace underneath.
What if I already have the loft bed built? These plans cover the desk, shelving, and panel additions only. A separate plan for the queen-size loft bed structure itself is available on TheDIYPlan.com.
Are measurements in metric? No — all measurements are imperial (inches).
If you’re ready to maximize a small bedroom and build something you’ll actually be proud of, the PDF plans are ready to download the moment you check out.
Other Woodworking Projects


Material List
- Available with the purchase of PDF plans.
Note: Lumber dimensions are listed as nominal size. See lumber sizes for actual dimensions vs nominal.
Disclosure: Some of the links on this page as well as links in “tools for this project” and “material list” sections are affiliate links.
Dimensions

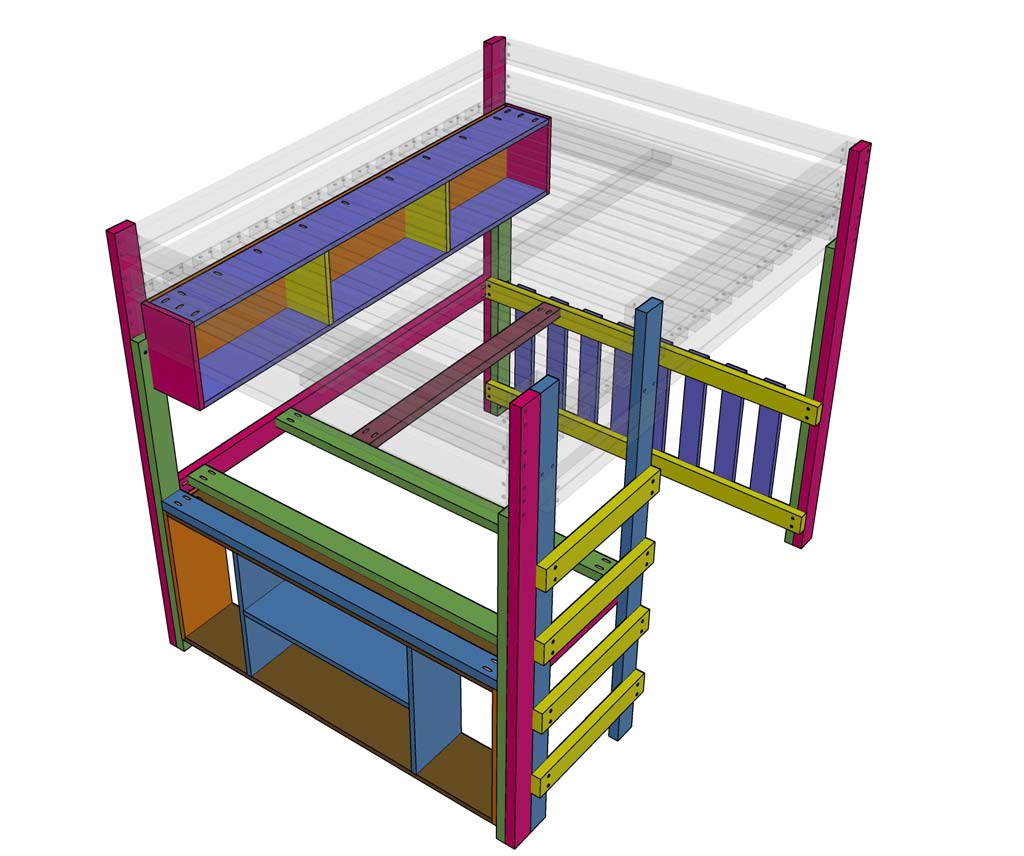
Step 1 – Cut Frame Boards for the Tabletop
Once you finish assembling the loft bed (separate set of plans for the loft bed), next, you need to build a frame out of 2x4s for the desk. This will keep the table top nice and sturdy and prevent the shelves from sagging.
When building the frame, it’s very important to use straight 2×4 boards. I recommend spending a little bit more time selecting straight boards at your hardware store than trying to fix them later.
You will need to use the Kreg Jig tool to attach the desk frame to the loft bed. Kreg Jig is a very useful tool in woodworking. It’s easy to use, and it makes wood joints very strong.
Take a 2×4 board and cut one piece to 76 1/2″ in length and another piece to 60 1/2″ in length. Then drill two pocket holes on both ends of the board using Kreg Jig. Make sure to use correct Kreg Jig settings when drilling pocket holes in 2x4s.

Step 2 – Attach Frame Boards to the Queen Loft Bed
To attach the frame, first mark all four legs with a pencil to know exactly where to attach the boards. Measure and mark 29 1/4″ from the ground up to the top of the desk frame. (The 3D illustration has the top of the loft bed dimmed for easier visibility).
Attach the back frame board to the rear legs using 2 1/2″ pocket hole screws. Try to position the boards so the pocket holes will be less visible. For example, if the loft bed is standing against the wall, maybe you could flip the boards and have the pocket holes facing the wall. When I use pocket holes, I always think about the best place to position the holes.
Next, attach the left side frame board using 2 1/2″ pocket hole screws. Make sure the top of the board is aligned with the 29 1/4″ mark.

Step 3 – Cut Pieces for the Right Panel of the DIY Loft Bed
Take 2×4 and cut two rail pieces to 65″ in length. Then take 1×4 and cut 8 picket pieces to 25 1/4″ in length.
This panel will need to be installed on the right side of the loft bed. First, attach the top rail board with 2 1/2″ wood screws at 29 1/4 measuring from the ground to match the rest of the frame boards. Then attach the bottom rail board to 7 1/2″ from the ground.

Step 4 – Nail the Picket Boards to the Panel
Since these picket boards do not support any weight and are for decoration only, you could use a nail gun with 1 1/4″ brad nails to attach them. Measure 4″ from the leg and nail the first picket board. Then nail the rest of the pickets 3 1/2″ apart.

Step 5 – Cut and Install the Rest of the Frame Boards
Take 2×4 and cut one piece to 25″ in length, two pieces to 62″ and one piece to 50″ in length. Then drill pocket holes on each end of the 50″ and 62″ boards.
First, attach the shortest piece (25″) to the backside of the ladder. This board must be at the same elevation as the rest of the frame boards (29 1/4″).
Next, attach the rest of the frame boards using the dimensions provided in the picture.

Step 6 – Build the Lower Shelf Frame for the DIY Loft Bed
Take 3/4″ plywood and, using a table saw, cut two pieces to 9″ x 59″ and two pieces to 9″ x 25 1/4″. Then drill three pocket holes on each end of the longer pieces. See picture. Make sure to change the settings on your Kreg Jig for 3/4″ wood thickness.
Now attach these boards together with wood glue and 1 1/4″ pocket hole screws. Make sure to clamp the boards before driving in the screws to prevent the pieces from shifting and misaligning.

Step 7 – Insert and Attach the Inside Shelf Boards
Using 3/4″ plywood, cut two pieces to 9″ x 23 3/4″. These two boards are going to be vertical dividers inside the shelf. Next, cut one piece to 9″ x 31″ for the horizontal center shelf.
Attach the vertical pieces with 1 5/8″ wood screws from the top and bottom. See picture. Then take the horizontal piece and drill three pocket holes on each end. Now attach this board to the vertical dividers. Make sure to flip the board, so that pocket holes are on the bottom. You could install this shelf board at any elevation you want.

Step 8 – Install the Lower Shelf Under the Frame
Slide in the shelf on the left side of the loft bed under the 2×4 frame boards. Then take 1 5/8 wood screws and attach the shelf to the frame. Drive in the screws under the top shelf piece. You could also use a nail gun to nail a few brad nails on the sides of the shelf to prevent it from swaying.
Step 9 – Cut Boards for the Upper Shelf for the Loft Bed
The upper shelf is also made from 3/4″ plywood and connected together with pocket hole screws.
Cut one backboard to 12″ x 79″, two 9″ x 79″ pieces for the top and bottom, two 9″ x 13 1/2″ pieces for the ends, and two 8 1/4″ x 12″ pieces for the middle dividers.
Now drill the pocket holes on the longer boards as shown in the picture.

Step 10 – Assemble the Upper Shelf
Place the backboard on your workbench, then attach the bottom and top pieces using wood glue and 1 1/4″ pocket hole screws. Then attach the end pieces. Once you slide in the middle dividers, drive in the 1 5/8″ screws from the top and bottom of the shelf.

Step 11 – Attach the Upper Shelf to the Loft Bed
Slide the upper shelf under the mattress support board and attach it with 1 5/8″ wood screws. You could also drive in some screws through the backboard into the rear legs of the loft bed.
Step 12 – Cut the Tabletop Pieces for the Desk
The last two pieces that need to be cut are the tabletop boards. Using a table saw, cut one piece to 28 1/2″ x 65″, then cut the other piece to 17 1/2″ x 51 1/2″.
The larger piece will need to have two corners notched around the post. See the picture for exact measurements. You could use a skill saw to cut these notches or any kind of hand saw.

Step 13 – Secure the Tabletop to the Frame
Once the tabletop pieces are cut, slide them onto the frame and drive in the screws. Finally, you are done with the DIY queen-size loft bed with a desk.


Frequently Asked Questions
Bunk beds are usually built with one bed stacked on top of the other. Loft beds are built as a single bed that is raised on supports high enough to allow the use of the floor area below for various purposes.
Reviews
There are no reviews yet.