
It’s always nice to have extra storage space to keep household items more organized. There is one little place that typically is not being utilized, which is behind the closet door. So I’ve built a DIY Back of Door Shelf Organizer for our pantry closet. This gives us more space to store additional items.
This is a very simple project that took me an hour to do and it could be customized to any door size you want. Our pantry door is smaller than a typical 36”x80” door, so the plans I created were designed for a 20” wide door. If you’re making a shelf for a different size door, you just have to leave about 1 ½” clearance from the front to make sure the door closes without hitting the door jamb.
I used 1×4 boards for the entire project and installed the shelves far apart to fit 8” tall water bottles. A lot of times we buy a full case of water bottles and each case has 24 bottles. So this DIY back of door shelf fits 24 bottles perfectly.
This pantry shelf project could also be customized to store different herbs and spices. Usually, herbs and spices come in smaller containers and in this case, instead of using 1×4, you could use 1×2 boards. Also, the horizontal shelf boards could be much closer together.
You also might be interested in a DIY Offsetting Shelf I build earlier this year.

Time to Complete
1 hour
Total Cost
$15
Skill Level
Beginner
Back of Door Shelf PDF
$0.00
This PDF download includes Cut Diagrams, a List of Supplies, and 3D illustrations with detailed steps to build the project. Measurements are in imperial and not metric. Does NOT include SketchUp/CAD files.
Other Woodworking Projects

Tools for this project
Material List
- 1x4x8′ (x2)
- 1 1/4″ Brad Nails
- 1 1/4″ Pocket hole screws
- Wood Glue
Note: Lumber dimensions are listed as nominal size. See lumber sizes for actual dimensions vs nominal.
Disclosure: Some of the links on this page as well as links in “tools for this project” and “material list” sections are affiliate links.
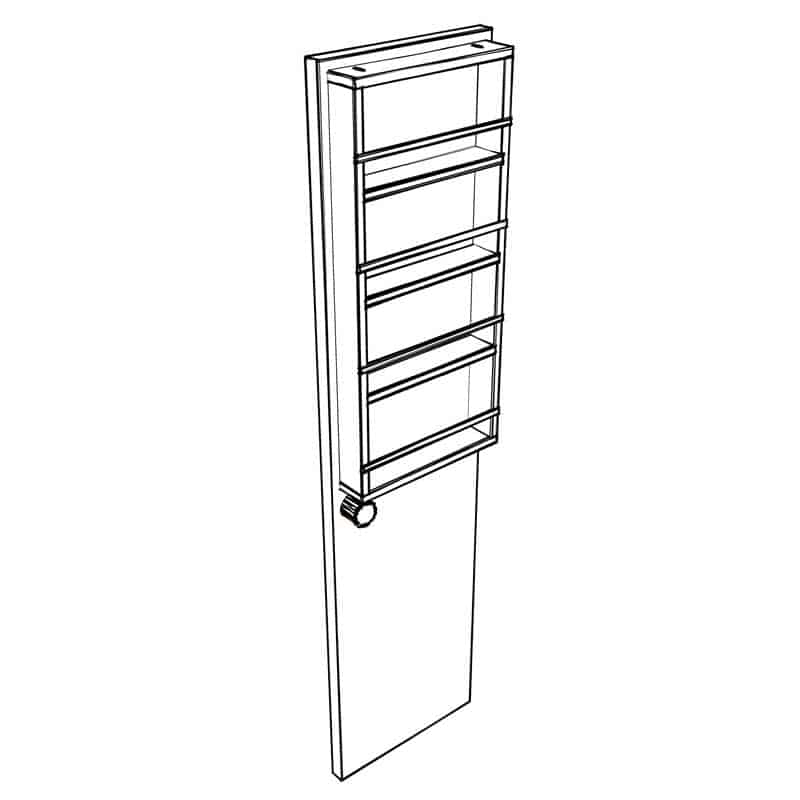
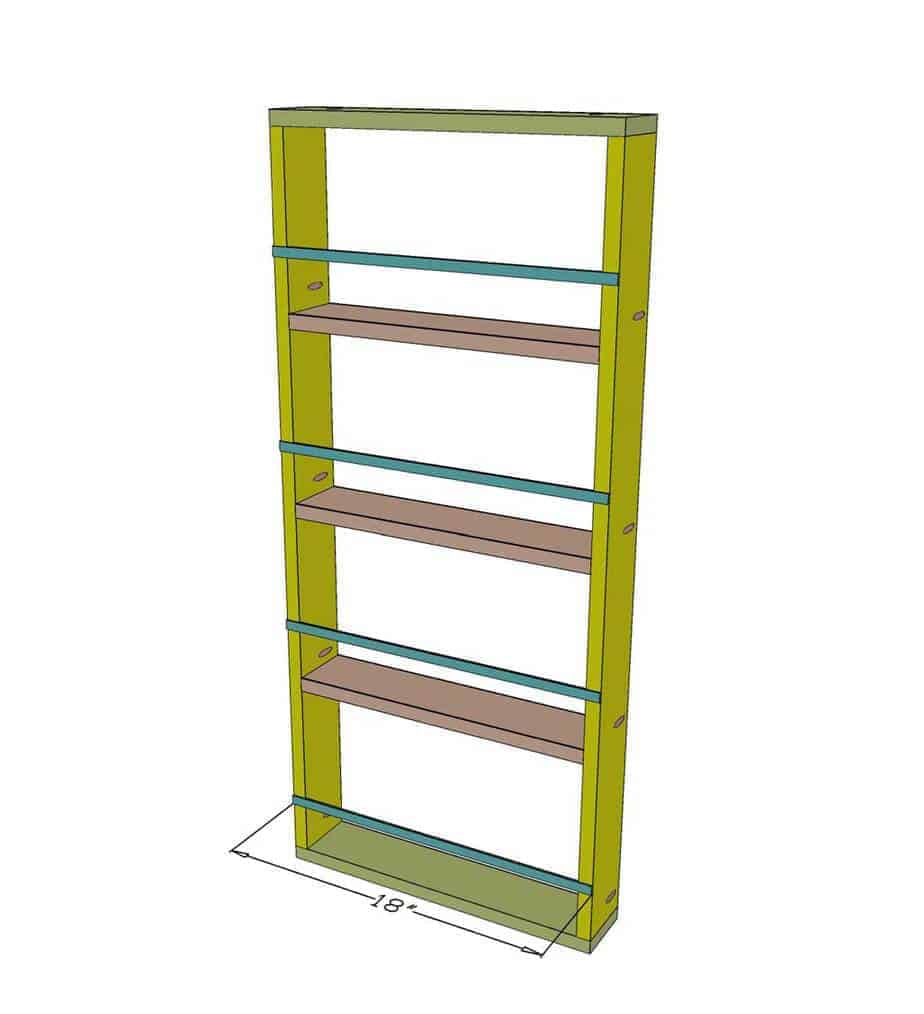
Dimensions

Cut List

Step 1 – Cut Frame Boards for the Shelf Organizer
First, take 1×4 board and cut two 39″ pieces and two 18″ pieces.


Step 2 – Drill Pocket Holes on the Frame Boards
Using Kreg Jig, drill two pocket holes on the 18″ boards and four pocket holes on the 39″ boards. You want to drill these holes so that they are not easily visible when the shelf is installed. So, follow pocket holes dimensions that are provided in the picture. These are placed right above the horizontal shelf boards and will be behind the items that sit on the shelf. Next, using random orbital sander sand all the boards before assembling.


Step 3 – Attach Back of Door Frame Together
Attach the frame together with wood glue and 1 1/4″ brad nails. Make sure the frame is squared. Use a corner of your workbench to align the frame to make sure it’s squared.


Step 4 – Cut and Attach Back of Door Shelf Boards
Now cut three 16 1/2″ boards and attach them 9 7/8″ apart. Attach these boards using wood glue and 1 1/4″ brad nails.


Step 5 – Cut and Attach 1/2″ Wide Strips
Using 1/4″ plywood, cut four 1/2″ wide strips that are 18″ long. Attach these plywood pieces 2 3/4″ above the horizontal shelf board with a nail gun.

Step 6 – Attach the Shelf Frame to the Back of the Door
Now attach the shelf to the door using 1 1/4″ pocket hole screws and paint it to match the door color. You’re done with this DIY back of door shelf organizer!


Was your door a hollow door? If so, how did you get those small screws to hold the shelves?
Hi Paul, Yes the door is hollow inside but the outside of the door still has a 1/4″ plywood. I used Kreg Jig 1 1/4″ pocket hole screws and it holds pretty good.
Always use a small EZ wall anchors. I like the metal ones and I put a small bead of adhesive glue on the thread as well. That will insure it will never come loose or come out. Hope that helps